
04linux架构-nginx实现动静分离的负载均衡
在工作中,我们可能希望不同的服务器处理不同的事物,比如静态文件我们希望使用nginx和aoache处理、动态文件我们希望apache和tomcat来处理、图片文件我们希望是有squid来处理。那么这种情况下我们就可以使用nginx来实现动静分离的负载均衡
nginx的upstream模块支持的负载均衡模式有五种方式:
1)、轮询(默认)
每个请求按时间顺序逐一分配到不同的后端服务器,如果后端服务器 down 掉,能自动剔除。
2)、weight
指定轮询几率,weight 和访问比率成正比,用于后端服务器性能不均的情况。
3)、ip_hash
每个请求按访问 ip 的 hash 结果分配,这样每个访客固定访问一个后端服务器,可以解决 session 的问题。
4)、fair(第三方)
按后端服务器的响应时间来分配请求,响应时间短的优先分配。
5)、url_hash(第三方) url哈西
按访问url的hash结果来分配请求,使同样的url定向到同一个后端服务器,后端服务器为缓存时比较有效
实例一、使用nginx实现负载均衡和动静分离
准备三台主机,一台为nginx做为分发器,另外两台做为后端的web服务器(在实际工作环境中可以添加更多的 不同功能的服务器)
源码编译安装nginx
1、安装相关的编译工具和相关依赖
[root@LVS2 ~]# yum -y install gcc gcc-c++ autoconf automake
[root@LVS2 ~]# yum -y install zlib zlib-devel openssl openssl-devel pcre pcre-devel
zlib:nginx提供gzip模块,需要zlib库支持
openssl:nginx提供ssl功能
pcre:支持地址重写rewrite功能
[root@LVS2 src]# tar -zxvf nginx-1.16.1.tar.gz
[root@LVS2 src]# cd nginx-1.16.1
[root@LVS2 nginx-1.16.1]# ./configure --prefix=/usr/local/nginx --with-http_dav_module --with-http_stub_status_module --with-http_addition_module --with-http_sub_module --with-http_flv_module --with-http_mp4_module
参数:
--with-http_dav_module 启用ngx_http_dav_module支持(增加PUT,DELETE,MKCOL:创建集合,COPY和MOVE方法)默认情况下为关闭,需编译开启
--with-http_stub_status_module 启用ngx_http_stub_status_module支持(获取nginx自上次启动以来的工作状态)
--with-http_addition_module 启用ngx_http_addition_module支持(作为一个输出过滤器,支持不完全缓冲,分部分响应请求)
--with-http_sub_module 启用ngx_http_sub_module支持(允许用一些其他文本替换nginx响应中的一些文本)
--with-http_flv_module 启用ngx_http_flv_module支持(提供寻求内存使用基于时间的偏移量文件)
--with-http_mp4_module 启用对mp4文件支持(提供寻求内存使用基于时间的偏移量文件)
[root@LVS2 nginx-1.16.1]# make && make install
[root@LVS2 nginx-1.16.1]# useradd -s /sbin/nologin naginx
nginx主要目录结构:
[root@LVS2 /]# ls /server/nginx-1.16.1/
conf html logs sbin
conf #配置文件
html #网站根目录
logs #日志
sbin #nginx启动脚本
主配置文件:
[root@LVS2 /]# ls /server/nginx-1.16.1/conf/nginx.conf
启动nginx:
[root@LVS2 /]# /server/nginx-1.16.1/sbin/nginx
[root@LVS2 /]# netstat -antup | grep :80
tcp 0 0 0.0.0.0:80 0.0.0.0:* LISTEN 5281/httpd
[root@LVS2 /]# netstat -antup | grep :80
开机启动:
[root@LVS2 nginx-1.16.1]# echo '/server/nginx-1.16.1/sbin/nginx & ' >> /etc/rc.local
nginx服务日常操作:
测试配置文件语法:
[root@xuegod63 nginx-1.8.0]# /server/nginx-1.8.0/sbin/nginx -t
nginx: the configuration file /server/nginx-1.8.0/conf/nginx.conf syntax is ok
nginx: configuration file /server/nginx-1.8.0/conf/nginx.conf test is successful
重新加载配置文件
[root@xuegod63 nginx-1.8.0]# /server/nginx-1.8.0/sbin/nginx -s reload
关闭nginx
[root@xuegod63 /]# /server/nginx-1.8.0/sbin/nginx -s stop
[root@xuegod63 /]# /server/nginx-1.8.0/sbin/nginx -s start #没有start参数
nginx: invalid option: "-s start"
配置nginx成为分发器,实现动静分离
[root@xuegod63 conf]# cd /server/nginx-1.8.0/conf #配置文件目录
[root@xuegod63 conf]# cp nginx.conf nginx.conf.back #备份一下配置文件
[root@xuegod63 conf]# vim nginx.conf
[root@xuegod63 nginx-1.8.0]# vim /server/nginx-1.8.0/conf/nginx.conf #指定启动nginx用户
改:# user nobody;
为:user nginx nginx;
改:
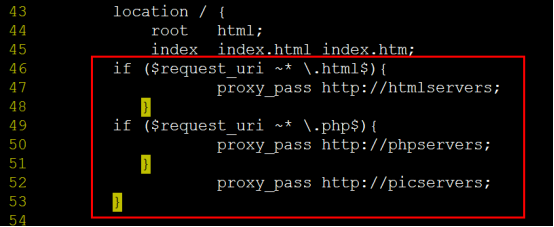
43 location / {
44 root html;
45 index index.html index.htm; #在location / { 。。。} 中添加以下内容 #定义分发策略
location / {
root html;
index index.html index.htm;
if ($request_uri ~* \.html$){
proxy_pass http://htmlservers;
}
if ($request_uri ~* \.php$){
proxy_pass http://phpservers;
}
proxy_pass http://picservers;
}
如图:
把以下内容注释掉,否则php文件直接在nginx服务器上解析了,不再解析给后端服务器:
# location ~ \.php$ {
73 # root html;
74 # fastcgi_pass 127.0.0.1:9000;
75 # fastcgi_index index.php;
76 # fastcgi_param SCRIPT_FILENAME /server/nginx-1.8.0/html$fastcgi_script_name;
77 # include fastcgi_params;
78 # }
如图:

#定义负载均衡设备的 Ip
#定义负载均衡设备的 Ip
在配置文件nginx.conf的最后一行}前,添加以下内容:
upstream htmlservers { #定义负载均衡服务器组名称
server 192.168.204.142:80;
server 192.168.204.143:80;
}
upstream phpservers{
server 192.168.204.142:80;
server 192.168.204.143:80;
}
upstream picservers {
server 192.168.204.142:80;
server 192.168.204.143:80;
}
#后期工作中,根据工作中的需要,配置成具体业务的IP地址
如图:

保存退出。
重新加载nginx服务器配置文件:
[root@xuegod63 conf]# /server/nginx-1.8.0/sbin/nginx -t
nginx: the configuration file /server/nginx-1.8.0/conf/nginx.conf syntax is ok
nginx: configuration file /server/nginx-1.8.0/conf/nginx.conf test is successful
[root@xuegod63 conf]# /server/nginx-1.8.0/sbin/nginx -s reload
定义后端服务器web1
[root@RS-WEB1 ~]# yum install httpd php -y
[root@RS-WEB1 ~]# echo 192.168.204.142 > /var/www/html/index.html
[root@RS-WEB1 ~]# vim /var/www/html/test.php
192.168.204.142-php
<?php
phpinfo();
?>
定义后端服务器web2
[root@RS-WEB2 ~]# yum install httpd php -y
[root@RS-WEB2 ~]# echo 192.168.204.143 > /var/www/html/index.html
[root@RS-WEB2 ~]# vim /var/www/html/test.php
192.168.204.143-php
<?php
phpinfo();
?>
然后客户端访问192.168.204.141 看是否负载均衡成功,生成环境中可以通过定义不同的服务做不同的事情
测试性能:
扩展: 文件打开数过多
[root@test html]# ab -n 1000 -c 1000 http://192.168.1.62/index.html #运行正常
[root@test html]# ab -n 2000 -c 2000 http://192.168.1.62/index.html #报错
This is ApacheBench, Version 2.3 <$Revision: 655654 $>
Copyright 1996 Adam Twiss, Zeus Technology Ltd, http://www.zeustech.net/
Licensed to The Apache Software Foundation, http://www.apache.org/
Benchmarking 192.168.1.62 (be patient)
socket: Too many open files (24) # 测试时,一次打开的socket文件太多。
#ulimit -a #查看
#ulimit -n
1024
系统默认一个进程最多同时允许打开1024的文件
解决:
#ulimit -n 10240 #报错的解决方法
Nginx负载的5种策略设置方法:
1、轮询(默认)
每个请求按时间顺序逐一分配到不同的后端服务器,如果后端服务器down掉,能自动剔除。
upstream backserver {
server 192.168.1.62;
server 192.168.1.64;
}
2、指定权重
指定轮询几率,weight和访问比率成正比,用于后端服务器性能不均的情况。
upstream backserver {
server 192.168.1.62 weight=1;
server 192.168.1.64 weight=2;
}
3、IP绑定 ip_hash
每个请求按访问ip的hash结果分配,这样每个访客固定访问一个后端服务器,可以解决session的问题。
upstream backserver {
ip_hash;
server 192.168.1.62:80;
server 192.168.1.64:80;
}
4、fair(第三方)
按后端服务器的响应时间来分配请求,响应时间短的优先分配。
upstream backserver {
server server1;
server server2;
fair;
}
5、url_hash(第三方)
按访问url的hash结果来分配请求,使每个url定向到同一个后端服务器,后端服务器为缓存时比较有效。
upstream backserver {
server squid1:3128;
server squid2:3128;
hash $request_uri;
hash_method crc32;
}
总结,扩展:
如有tomcat ,apache,squid 配置为如下:
[root@xuegod63 conf]# vim nginx.conf # 在最后添加以下内容。 定义服务器组
upstream tomcat_servers {
server 192.168.1.2:8080;
server 192.168.1.1:8080;
server 192.168.1.11:8080;
}
upstream apache_servers {
server 192.168.1.5:80;
server 192.168.1.177:80;
server 192.168.1.15:80;
}
upstream squid_servers {
server 192.168.1.26:3128;
server 192.168.1.55:3128;
server 192.168.1.18:3128;
}

 浙公网安备 33010602011771号