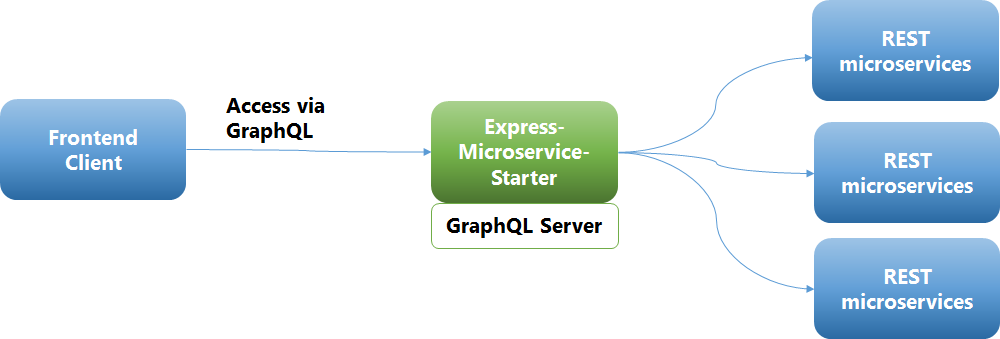
一种不错的 BFF Microservice GraphQL/REST API 层的开发方式

云原生(Cloud Native)Node JS Express Reactive 微服务模板 (REST/GraphQL) 这个项目提供了完整的基于 Node JS / Typescript 的微服务模板,包括生产部署、监控、调试、日志记录、安全、CI/CD 所需的所有功能。还添加了基于响应性扩展的示例,以演示如何将其用于构建微服务 API 边缘服务(edge-service)、前端的后端(BFF)或将其用作构建任何类型微服务的基础。
项目地址:nxplorerjs-microservice-starter
设计原则
- 使用同类最佳的模块来创建可用于生产的微服务框架
- 基于 12-factor app 原则
- 没有定制代码或包装器,因此任何开发人员都可以修改/替换任何模块或实现
- 可作为参考的实现的设计模式
- 模块化,可替换和即插即用代码
- 为业务 API 和微服务平台开发提供入门
- DevOps 准备了代码质量,单元和集成测试,自动部署。
功能/特性
Node JS,Express,Typescript, 依赖注入(Dependency Injection base)- 基于
Backpack(webpack) - 构建 , 开发 , 打包 - 启用
Swagger- Express swagger 中间件 / Swagger UI 集成 - GraphQL 基于
Apollo Server 2.0,带有JWT安全性、数据加载器(data loader)和REST数据源示例 - 通过
graphql-import支持GraphQL SDL - 开发期间
GraphQL mock resolvers(可选) -graphql-tools - 基于 GraphQL 的客户端包装 API -
graphql-request - REST APIs - 使用
Inversify Controller - 外部化配置 -
DotEnv(设置,特定于 Env 的 API URL) - 测试 -
Jest,SuperTest,GraphQL Tester。 自动化单元和集成测试的基础设施 - 代码覆盖率 -
Istanbul - 代码质量 -
tslint - 容器支持 -
Docker,Kubernetes集群 - 基于
Helm Chart的部署支持 Prometheus集成- API 响应日志记录,Express Server 日志记录,UUID 传播 -
Pino - Reactive Extensions 支持 -
RxJS6 - CORS, JSONObject 限制 , Helmet , CSRF - Express 安全
- 基于 IOC / 依赖注入 / Express 注释的 API -
Inversify - 文档 -
TypeDocs - API 异常处理实用程序
- 标准 HTTP Code 以获取更清蒸的 code
- 示例 API,模式以供参考
Sonar Qube集成Hystrix熔断器支持 (使用 Brakes)- 基于 JWT 的 API 安全性 -
jsonwebtoken,express-jwt - 现在使用超级快速的
pino日志程序来满足所有的日志记录需求 - 内置额外的性能时间记录
查看 REST API /examples/{id}
{
  "pid": 3984,
  "hostname": "LP-507B9DA1D355",
  "level": 30,
  "time": 1515813665734,
  "0": {
    "socket": 5.656709999995655,
    "lookup": 186.8375229999947,
    "connect": 389.5646870000055,
    "response": 594.8022639999981,
    "end": 599.1270230000082
  },
  "v": 1
}
REST APIs
- 可以使用以下 URL 下载 API 规范
http://localhost:3000/api-docs/Api.yaml
http://localhost:3000/api-docs/
- examples - API 中的按 ID 示例搜索的基本示例 (
/examples/:id) - shop - 如何使用 Reactive Extensions 进行 API 编排(
FlatMap)的示例 (/shop/priceByOptionId/:id) - starwars - 如何使用 Reactive Extensions 进行 API 编排的示例(
ForkJoin)(/starwars/people/:id) - hystrix - 如何对 API 使用熔断模式的示例 (
/hystrix) - scraper - 如何使用 scrape-it 从网站上抓取数据的示例 (
/scraper) - 使用 swagger UI 以获得示例 API 的完整列表
- metrics - 为所有 API 添加了基于 Prometheus 的指标 (
/metrics) - API 部分 JSON 响应支持
curl http://localhost:3000/api/v1/starwars/people/1
- Response
    {
        name: "Luke Skywalker",
        height: "172",
        mass: "77",
        hair_color: "blond",
        skin_color: "fair",
        eye_color: "blue",
        birth_year: "19BBY",
        gender: "male",
        homeworld: {
        name: "Tatooine",
        rotation_period: "23",
        orbital_period: "304",
        diameter: "10465",
        climate: "arid",
        gravity: "1 standard",
        terrain: "desert",
        surface_water: "1",
        population: "200000",
        residents: [
        "http://swapi.co/api/people/1/",
        "http://swapi.co/api/people/2/",
        "http://swapi.co/api/people/4/",
        "http://swapi.co/api/people/6/",
        "http://swapi.co/api/people/7/",
        "http://swapi.co/api/people/8/",
        "http://swapi.co/api/people/9/",
        "http://swapi.co/api/people/11/",
        "http://swapi.co/api/people/43/",
        "http://swapi.co/api/people/62/"
        ],
        films: [
        "http://swapi.co/api/films/5/",
        "http://swapi.co/api/films/4/",
        "http://swapi.co/api/films/6/",
        "http://swapi.co/api/films/3/",
        "http://swapi.co/api/films/1/"
        ],
        created: "2014-12-09T13:50:49.641000Z",
        edited: "2014-12-21T20:48:04.175778Z",
        url: "http://swapi.co/api/planets/1/"
        },
        films: [
        "http://swapi.co/api/films/2/",
        "http://swapi.co/api/films/6/",
        "http://swapi.co/api/films/3/",
        "http://swapi.co/api/films/1/",
        "http://swapi.co/api/films/7/"
        ],
        species: [
        "http://swapi.co/api/species/1/"
        ],
        vehicles: [
        "http://swapi.co/api/vehicles/14/",
        "http://swapi.co/api/vehicles/30/"
        ],
        starships: [
        "http://swapi.co/api/starships/12/",
        "http://swapi.co/api/starships/22/"
        ],
        created: "2014-12-09T13:50:51.644000Z",
        edited: "2014-12-20T21:17:56.891000Z",
        url: "http://swapi.co/api/people/1/"
        }
curl http://localhost:3000/api/v1/starwars/people/1?data(name,gender,homeworld(gravity,population))
- Response
    {
      "data": {
        "name": "Luke Skywalker",
        "gender": "male",
        "homeworld": {
          "gravity": "1 standard",
          "population": "200000"
        }
      }
    }
GraphQL
- 已基于 apollo framework 和参考实现添加了
GraphQL支持(包括来自swapi.co的starwars api)
-
从
http://localhost:3000/playground访问 graphql playground -
从
http://localhost:3000/graphiql访问 graphiql tool -
GraphQL API 跟踪(可配置)
-
用于缓存和批处理的数据加载器(Dataloader)
-
添加了多个启用 Dataloader 示例
- RxJS API 调用 - peopleWithPlanets(id :
) - Starwars APIs - people(id:
) , planet(id: ) , starship(id: ) - peopleList(keys: [number])
- RxJS API 调用 - peopleWithPlanets(id :
-
查询列表(请参阅 schema 详细信息以获取完整列表)
- quoteOfTheDay: String
- random: Float
- examples: [ExampleType] <-- JWT身份验证
- example(id: Int): ExampleType
- blog(id: Int) (Paginated query)
- rollThreeDice: [Int]
- peopleWithPlanet(id: Int): PeopleWithPlanetType (Uses RxJS to combine results from 2 APIs)
- peopleDS(id: Int): PersonType (Based on REST DataSource)
- people(id: Int): PersonType (Based on data loader)
- planet(id: Int): PlanetType
- starship(id: Int): StarshipType
- peopleList(keys: [Int]): [PersonType]
- movie: MovieType
- 示例查询执行

-
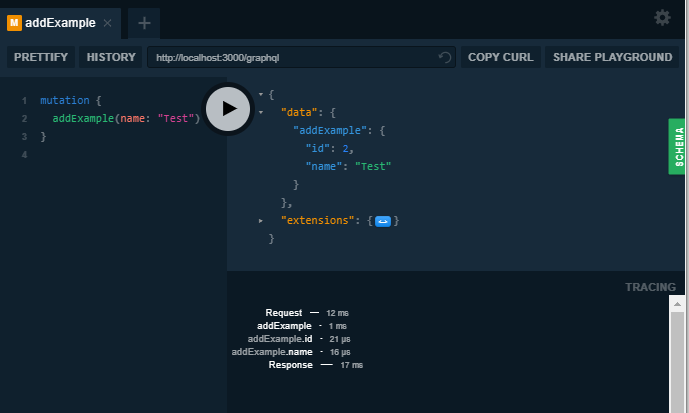
Mutations
- addExample(name: String!): ExampleType
- addComment(comment: CommentInput!): Comment
- login(email: String!,password: String!): UserType
- 示例 Mutation 执行
-
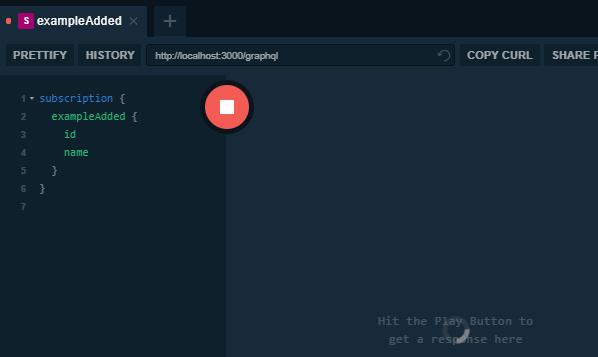
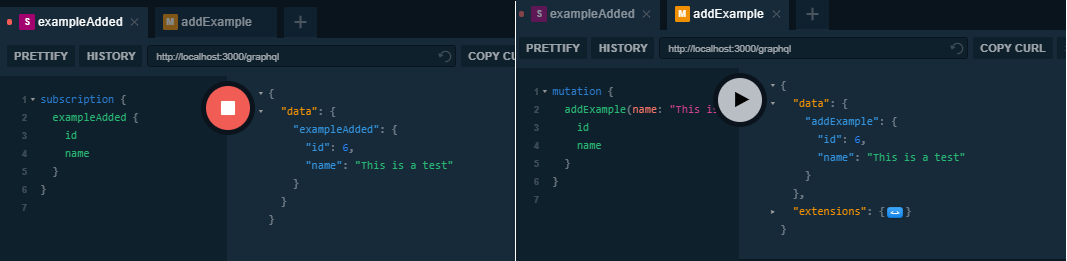
Subscriptions
- exampleAdded (将检查是否通过 mutation 添加了新元素)
- commentAdded (每当通过 mutation 添加新 comment 时都会检查)
- 示例 Subscription 执行
- VSCode 调试启动配置(添加了预配置的调试启动器)
- 在开发过程中添加了用于遥测的 Node 仪表板视图
- 增加了 NodeJS 集群模式(负载均衡 worker)
- 启动服务器时,它会根据 CPU 数量添加 worker
Master cluster setting up 4 workers...
Worker 2828 is online
Worker 2816 is online
Worker 13956 is online
Worker 3756 is online
up and running in development @: LP-507B9DA1D355 on port: 3000
up and running in development @: LP-507B9DA1D355 on port: 3000
up and running in development @: LP-507B9DA1D355 on port: 3000
up and running in development @: LP-507B9DA1D355 on port: 3000
Graphql 客户端 API
-
当我们构建基于 GraphQL 的服务器时,可能需要从其他下游基于 GraphQL 的 API 服务器获取数据。
-
作为一个示例,
graphqlcool/graphql-request模块用于演示这一点,使用graphqlcool演示 graphQL apihttps://api.graph.cool/simple/v1/movies。 -
API 规范
query {
  movie {
    releaseDate
    slug
    actors {
      name
    }
  }
}
- API 输出
{
  "data": {
    "movie": {
      "releaseDate": "2010-08-28T20:00:00.000Z",
      "slug": "inception",
      "actors": [
        {
          "name": "Leonardo DiCaprio"
        },
        {
          "name": "Ellen Page"
        },
        {
          "name": "Tom Hardy"
        },
        {
          "name": "Joseph Gordon-Levitt"
        },
        {
          "name": "Marion Cotillard"
        }
      ]
    }
  }
}
先决条件
安装 npm 和 nodeJS
npm version >= 3.x
node version >= 6.x
安装它
npm install
设置 外部环境
- 编辑 .{PROFILE}.env 文件 —— 其中的概要文件(PROFILE)可以是测试(test)、开发(development)、生产(production)
| 变量 | 描述 | 默认值 |
|---|---|---|
| PORT | 服务器端口 | 3000 |
| LOG_LEVEL | 日志级别 (info,debug,error) | info |
| SESSION_SECRET | 用于签名 cookie 的字符串 | |
| API_TIME_OUT | 默认API超时(以毫秒为单位) | 10000 |
| TEST_TIME_OUT | 默认测试超时(以毫秒为单位) | 10000 |
| JWT_AUTH | 启用/禁用基于 JWT 的 API 安全 | true |
| RSA_PRIVATE_KEY_FILE | RSA 私钥路径示例 | |
| RSA_PUBLIC_KEY_FILE | RSA 公钥路径示例 | |
| TOKEN_EXPIRY_TIME | JWT 令牌到期(从 /login 生成) | 1 hour (1h) |
| STREAM_HYSTRIX | 启用/禁用 Hystrix streaming 服务器 (true 或 false) | false |
| CORS | 在服务器上启用/禁用 CORS (true 或 false)。仅在生产版本中可用 | false |
| CLUSTER_MODE | 在服务器上启用/禁用 Node Clustering (true 或 false) | false |
| SWAGGER_API_DOCS_ROOT | 服务您的 Swagger API 文件,以便它们可与 Swagger UI,PostMan 等前端工具一起使用。 | /api-docs/ |
| GRAPHQL_SUBSCRIPTIONS | 启用/禁用 GraphQL subscriptions (true 或 false) | true |
| GRAPHQL_PLAYGROUND | 启用/禁用 GraphQL Playground (true 或 false) | true |
| GRAPHQL_TRACING | 启用/禁用 GraphQL tracing (true 或 false) | true |
| GRAPHQL_MOCK | 启用/禁用 GraphQL Mock,对于未实现的接口(true 或 false) | true |
| API_MOCK | 启用/禁用 REST API Mock,对于未实现的路由(true 或 false) | true |
运行它
运行在 开发 模式
npm run dev
运行在 生产 模式
npm run compile
npm start
运行在 VS Code 调试 模式
npm run compile
Press F5
运行带有代码覆盖率的测试
运行单元测试
- 单元测试与要测试的模块或类位于同一目录中
- 所有单元测试都需要有一个扩展名
\*.spec.ts
npm run test
运行集成测试
- 集成测试与要测试的模块或类位于同一目录中
- 所有集成测试都需要有一个扩展名 *.itest.ts
- 首先构建集成测试。这将在构建中设置集成测试环境
npm run itest:build
- 运行 node 服务器并对其进行集成测试
- 这等待服务器启动,运行测试,然后在完成时终止所有进程
npm itest:run
尝试一下
- 将您的浏览器指向 http://localhost:3000.
- 直接或通过 swagger 调用示例 REST 端点
http://localhost:3000/swagger - 使用端点调用 Prometheus 指标
curl http://localhost:3000/metrics - 访问针对 graphQL 的浏览器内置 IDE
http://localhost:3000/graphiql - 访问 graphQL playground app
http://localhost:3000/playground/ - 访问健康检查 api
curl http://localhost:3000/healthcheck
文件结构
├───public                      * nxplorer server 的登录页面
├───screenshots                 * 示例截图
└───server                      * 服务器配置和 API
|   ├───api                     * 服务器上定义的 REST API
|   │   ├───controllers         * 使用 RxJS,Inversify 的 API controller
|   │   │   ├───examples        * Examples controller
|   │   │   ├───hystrix-demo    * Hystrix demo controller
|   │   │   ├───security        * JWT login API controller
|   │   │   ├───shop            * 带有产品,价格,库存的示例商店 API
|   │   │   └───starwars        * SWAPI controller
|   │   ├───interfaces          * Service 接口
|   │   ├───models              * API 数据模型
|   │   └───services            * Service API 实现
|   ├───common                  * Server 启动和配置
|   │   ├───config              * Server 配置
|   │   ├───constants           * Inversify 和其他通用标识符常量
|   │   ├───interfaces          * 公共 service 接口
|   │   ├───middleware          * 自定义中间件
|   │   ├───models              * 公共 API 数据模型
|   │   ├───services            * 公共 service 实现
|   │   └───swagger             * Swagger API 规范 (YAML)
|   |   └───env.ts              * DotENV 配置
|   |   └───server.ts           * Express Server 启动和配置
|   └───graphql                 * 服务器上定义的 GraphQL API
|   |   ├───dataloader          * GraphQL 数据加载器功能
|   |   ├───errors              * GraphQL 错误处理程序
|   |   ├───schema              * GraphQL Schema 类型
|   |   ├───mocks               * GraphQL Mock Resolvers
|   |   └───resolvers           * GraphQL resolvers
|   |   └───setupSchema.ts      * GraphQL schema 配置
|   └───index.ts                * 主 Server 入口点
├───helm                        * Helm chart 部署脚本
│   ├───charts                  *
│   └───templates               *
└───backpack.config.js          * Backpack 配置
└───package.json                * npm 依赖
└───build.js                    * ShellJS 实用程序构建脚本
└───deploy-k8s.sh               * Kubernetes 部署脚本
└───Dockerfile                  * Docker 构建文件
└───docker-compose.yml          * Docker 构建和运行文件
└───build-docker.bat|sh         * Docker 构建文件
└───itest.config.json           * Jest 集成测试配置
└───unit.config.json            * Jest 单元测试配置
└───tsconfig.json               * typescript 配置
└───tslint.json                 * tslint 配置
└───.{profile}.env              * 基于配置文件的外部环境文件 (development 开发,test 测试, production 生产)
└───sonar-properties.json       * sonarscanner|SonarQube 配置
└───jwtRS256.key|.key.pub       * 服务器使用的 JWT 私钥和公钥示例
日志与 UUID
-
添加了 UUID 传播的示例实现。这取决于在请求对象中设置的 cookie 'UUID'。LogService 将把 uuid 添加到它生成的所有日志中。
-
例如,如果 'UUID' 设置为
xxxx-dddd-ssss-wwww-ssss,那么调用/shop/productsAPI 将生成
{
  "pid": 13492,
  "hostname": "LP-507B9DA1D355",
  "level": 30,
  "time": 1515859200496,
  "uuid": "xxxx-dddd-ssss-wwww-ssss",
  "fullUrl": "http://localhost:3000/api/v1/shop/products",
  "statusCode": 200,
  "responseTime": "1.187",
  "v": 1
}
GraphQL Mocks
- 作为 TDD 的一部分,我们可能需要模拟 graphql 响应,直到我们能够实现解析器为止
- 该基础结构设置为仅为当前未实现的解析器添加模拟。因此,一旦实现可用,实际的解析器就会接手。 同样,如果解析器执行失败,那么这将落在模拟响应上。 此功能只能在开发期间使用,因此已添加检查以禁用“生产”版本中的此功能。
- 为了支持
- 设置环境变量 GRAPHQL_MOCK 为 true
- 在 mocks/index.ts 文件定义 mock 解析器(resolver)
- 作为示例,有查询添加了 examplesMock, peopleMock
- 示例输出如下

RestAPI Mocks
- 在
.<Profile>.env文件中启用API_MOCK=true。注意:为了安全起见,即使API_MOCK设置为true,也无法在生产模式下使用 - 针对自动产生 mock,
swagger-express-middleware模块提供了开箱即用的支持 - 步骤
- 在 Api.yaml 文件 定义 API swagger 规范
- 如果 express 路由中没有可用的实现,那么中间件将为这些 api 创建模拟
- 访问
nXplorer(/swagger) 提供的swagger ui,并引用标记为Mock API和带有前缀/mock的 API。该示例有两个主要实体 ——cars和drivers。您可以搜索、执行 CRUD 操作以及上传和下载图像。
构建 Docker 镜像
./build-docker.sh
k8s 部署
- 基于 Helm chart 的部署
./deploy-k8s.sh
- 一个示例的输出
release "nxplorerjs-microservice" deleted
NAME:   nxplorerjs-microservice
LAST DEPLOYED: Fri Sep 22 22:10:58 2017
NAMESPACE: default
STATUS: DEPLOYED

RESOURCES:
==> v1/ConfigMap
NAME                          DATA  AGE
nxplorerjs-microservice-starter  5     1s

==> v1/Service
NAME                          CLUSTER-IP  EXTERNAL-IP  PORT(S)       AGE
nxplorerjs-microservice-starter  10.0.0.196  <nodes>      80:30316/TCP  1s

==> v1beta1/Deployment
NAME                          DESIRED  CURRENT  UP-TO-DATE  AVAILABLE  AGE
nxplorerjs-microservice-starter  1        1        1           0          1s


注意:
1. 通过运行以下命令获取应用程序 URL:
  export NODE_PORT=$(kubectl get --namespace default -o jsonpath="{.spec.ports[0].nodePort}" services nxplorerjs-microservice-nxplorerjs-microservice-starter)
  export NODE_IP=$(kubectl get nodes --namespace default -o jsonpath="{.items[0].status.addresses[0].address}")
  echo http://$NODE_IP:$NODE_PORT

Express 微服务被部署到  http://192.168.99.100:30316/
使用 node 仪表板视图(仅针对开发环境)
- 去使用 node 仪表板视图
npm run compile
npm run dash
- 这将启动带有附加的 node 仪表板的应用程序,该仪表板提供有关内存,cpu 和日志的详细信息
安全
- 已使用示例 JWT 私钥和公钥实现了基于 JWT 的安全性
- REST API 和 GraphQL 都添加了示例实现。
- 验证中间件代码可以在这里查看
JWT Security GraphQL
- 基于
JWT的安全性的演示实现已启用一个查询“示例”。 下面是测试的步骤。 - 如果启用了
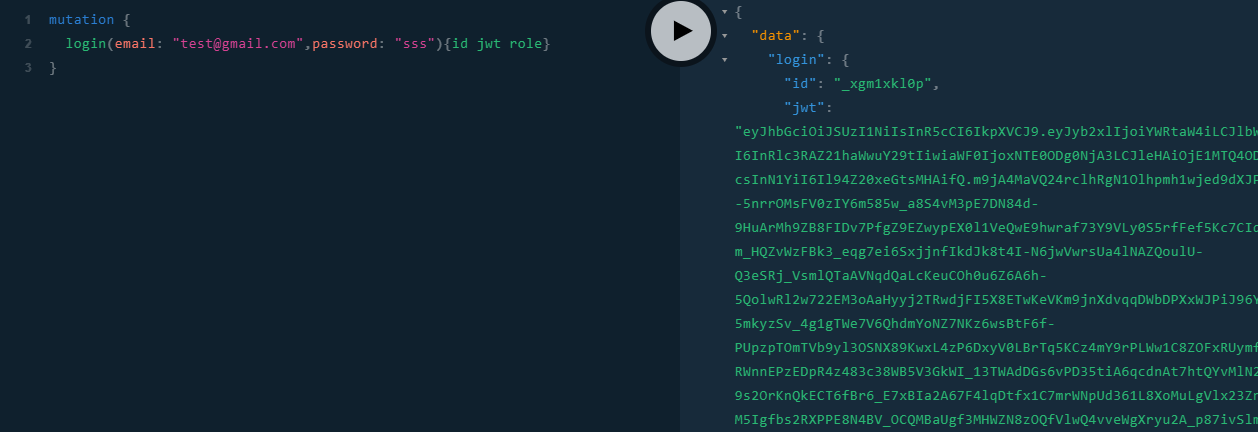
JWT安全性(环境变量JWT_AUTH为true),我们需要使用登录突变API来获取示例JWT令牌(当前设置为1小时到期) - Step 1 - 使用登录 mutation(突变)来获取有效用户的 jwt 令牌。出于演示目的,可以提供任何电子邮件和密码字符串。该角色是可选的。如果未提供,则默认为角色 “USER”
mutation {
  login(email: "tsukhu@nxplorer.com",
  password:"admin",role:"ADMIN") {
    id
    role
    email
    jwt
  }
}
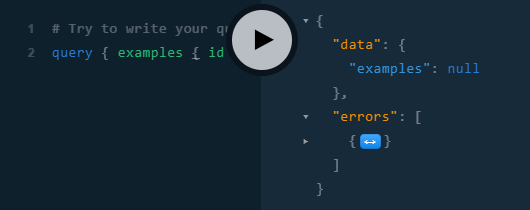
- Step 2 - 验证“示例”是否无需身份验证即可工作。 它将给出一个错误(注意:错误处理需要改进,但是这里我们只看这个概念)
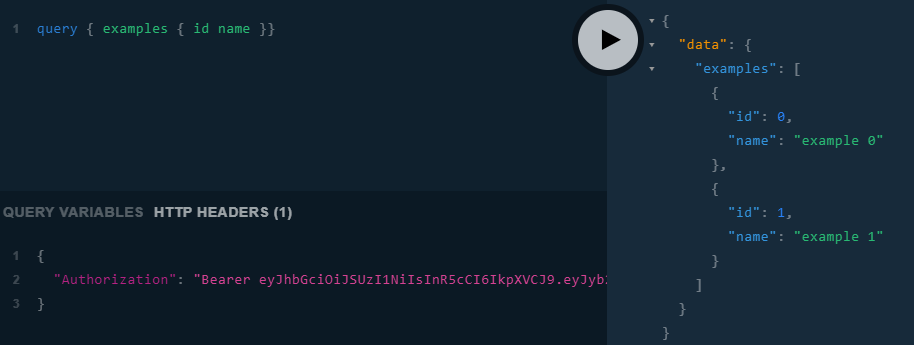
- Step 3 - 在执行 “examples” 查询之前,使用
Bearer token设置授权头。
{
  "Authorization": "Bearer xxx.xxx.xxx"
}
JWT Security REST APIs
- 如果启用了 JWT 安全性,那么我们需要使用
/loginAPI 获取示例 JWT 令牌(当前设置为1小时到期)
curl -X POST "http://localhost:3000/api/v1/login" -H "accept: application/json" -H "Content-Type: application/json" -d "{ \"email\": \"test@gmail.com\", \"password\": \"pwd\", \"role\": \"admin\"}"
- 示例输出。注意,JWT token 是属性 idToken 的值
{
  "idToken":
    "eyJhbGciOiJSUzI1NiIsInR5cCI6IkpXVCJ9.eyJyb2xlIjoiYWRtaW4iLCJpYXQiOjE1MTQ4NjQ3ODMsImV4cCI6MTUxNDg2ODM4Mywic3ViIjoidGVzdEBnbWFpbC5jb20ifQ.hAEa6AL1Kxxxxxxx",
  "expiresIn": "1h"
}
api/v1/examplesAPI,一个有效的 JWT 令牌必须在 “Authorization” header 中,在所有查询中传递。注意,这只是一个示例。您也可以类似地轻松启用添加端点。- 请查看 examples controller
@controller('/examples', authMiddleware(<User>{ role: 'admin'})) - 函数 authMiddleware 负责验证在 header 中传递的 JWT token。
- 它可以扩展为也支持基于角色的访问,并为此提供了支持。
- 注意:作为演示示例,这里提供了公钥和私钥。理想情况下,在真实场景中从外部维护这些JWKS (JSON Web Key Set)端点
- 请查看 examples controller
- “Authorization” header 中必须使用以下语法:
Bearer xxxxxx.yyyyyyy.zzzzzz - 使用 swagger ui 测试
- 点击 “Authorize” 按钮,设置上面提到的 Bearer token
- 现在所有
/examples相关的api都可以工作了
RBAC 测试
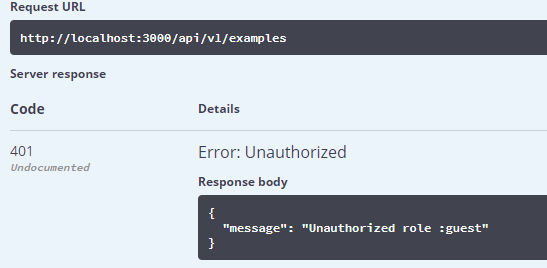
- 如果启用了 JWT 安全性,并且我们使用
/loginAPI 获取示例JWT token,但其角色为 “guest” 而不是 “admin”
curl -X POST "http://localhost:3000/api/v1/login" -H "accept: application/json" -H "Content-Type: application/json" -d "{ \"email\": \"test@gmail.com\", \"password\": \"pwd\", \"role\": \"guest\"}"
- 在 “Authorization” header 中设置 Bearer token,用于后续调用任何
/examples api,将导致基于角色的授权失败
GraphQL Directives
- 这项工作正在进行中。
- 当前添加了一个使用
@date指令的示例(如graphql-tools文档中所述) - Query (
{ today(format: "mmm-dd-yy") }) - 这里的格式基于@date scheme Directive,该格式接受解析器的输出并格式化日期,然后再将其发送给客户端。 - Query (
{ examplesWithAuth { id name } }- 这是对 JWT GraphQL APIs 部分中提到的示例查询的一种变体。此处的区别在于,我们使用@auth指令根据角色来处理身份验证,而不是对解析程序中的实现进行硬编码。这是更清蒸的方法,并且与解析器分离。 - 查询 schema
examplesWithAuth: [ExampleType] @auth(requires: ADMIN)使用@auth指令,该指令将拦截具有适当角色的经过身份验证的用户的调用检查。(注意:您需要在之前运行loginmutation,然后使用 Authorization token 设置 HTTP header)

CSRF Security
- 在生产模式中启用了 CSRF 安全性
- 所有 POST API 都需要读取浏览器中设置的 cookie “XSRF-TOKEN”,然后使用以下任一
key将其传递到响应头中- req.headers['csrf-token'] - CSRF-Token HTTP 请求头。
- req.headers['xsrf-token'] - XSRF-Token HTTP 请求头。
- req.headers['x-csrf-token'] - X-CSRF-Token HTTP 请求头。
- req.headers['x-xsrf-token'] - X-XSRF-Token HTTP 请求头。
Compression
- 默认情况下,压缩是在服务器上启用的,并且基于压缩模块
- 配置详细信息位于 compression.ts 文件中
- 如果需要在不压缩的情况下获取响应,请在请求头中传递
x-no-compression键
Hystrix 熔断器支持
- 熔断器支持已添加到项目中,并使用 hystrix 兼容模块 brakes
- Hystrix 默认禁用流支持。
- 通过在 .env 文件中将 STREAM_HYSTRIX 属性设置为 “STREAM_HYSTRIX=true” 来启用它
- 为了方便起见,提供了 Hystrix 服务器的 Docker 版本,并在 docker-compose.yml 文件中进行了设置
在 Docker 上执行的步骤
npm run compile
docker-compose build
docker-compose up
- 在 Docker 上设置 3000 和 8080 的端口转发

- Access the Hystrix dashboard at localhost:8080/hystrix and set the stream location to
localhost:3001/hystrix.stream - 访问
localhost:8080/hystrix上的 Hystrix 仪表板,并将流位置设置为localhost:3001/hystrix.stream - 在
/api/v1/hystrix下执行示例,并在仪表板上查看 hystrix stream 结果

与 SonarQube 集成(保证持续的代码质量)
假设您已经安装了 SonarQube 5.5.6 (LTS)
- 使用 Sonar Typescript 插件和 Generic Test Coverage 插件设置 SonarQube
- 全局安装 sonar-scanner (
npm install --global sonar-scanner) - 更新属性
sonar.host.url的sonar-project.properties文件以指向您的 SonarQube 服务器。默认情况下,这假设 SonarQube 服务器使用默认端口在本地运行 - 运行单元测试
npm run test
- 测试结果以 sonar 兼容格式收集在结果文件夹中
- 将结果推送到 SonarQube
npm run sonar-scanner
- 如果使用 SonarQube 6.x。它支持通用测试数据
修改 package.json 以设置适当的 sonarQube 版本
jestSonar": {
    "reportPath": "reports",
    "reportFile": "test-reporter.xml",
    "indent": 4,
    "sonar56x": true
}
注意:对于 Sonar 6.x,将 sonar56x 设置为 “false”,这将生成使用 sonar 6 schema 的测试报告。
负载测试
- loadtest 是用于负载测试的出色工具
- 使用步骤
- 将其安装为全局 npm 模块
npm install -g loadtest
- 启动 nxplorerjs-microservice
npm run start
- 针对生产版本运行负载测试。以下是一个示例
loadtest http://localhost:3000/api/v1/examples/1 -t 20 -c 20

 浙公网安备 33010602011771号