

查询性能优化
一、单体项目测压
1、云服务器准备一台,阿里云服务器(对于学习用,可以选择按量付费模式)
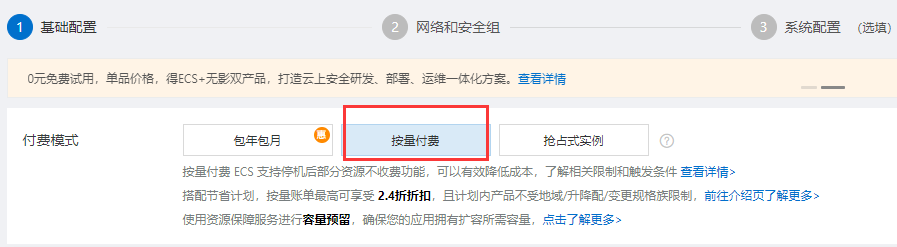
可有效降低学习成本,不使用的时候停止服务器即可,不收取费用,需要使用的时候开启即可
我的配置

2、在服务器安装相关环境(JDK、MYSQL)
模式为传统单体项目。所有都放在一个服务器中。
3、秒杀项目准备(项目资源可留言)
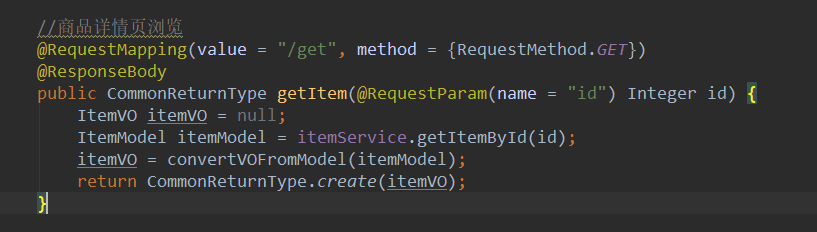
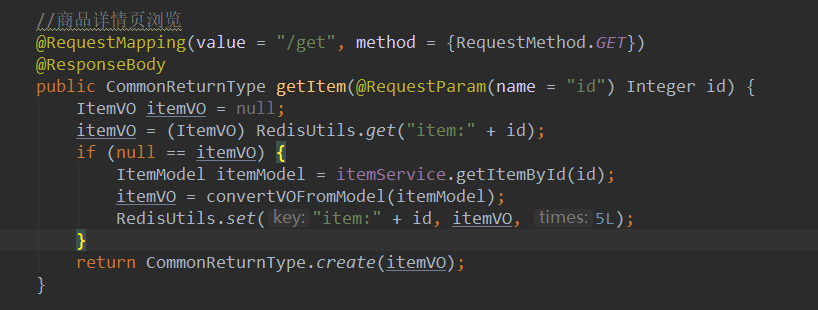
商品详情页接口展示,之后将主要使用该接口测压、优化。
4、所有环境都准备好后,打包部署(阿里云服务器需配置具体的安全组规则,开放端口,不然无法对外访问)
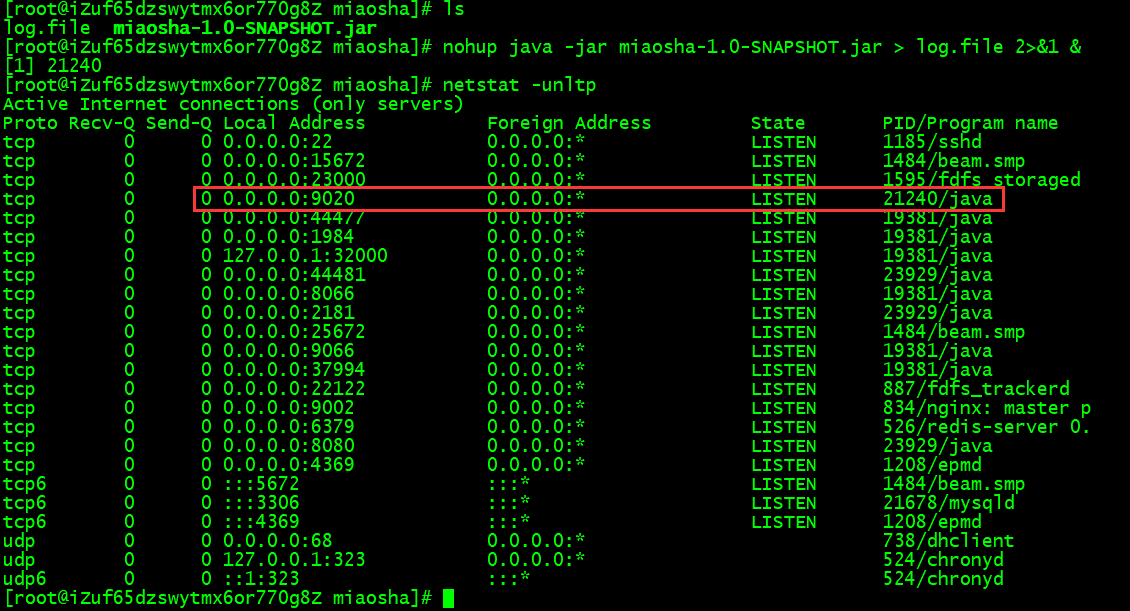
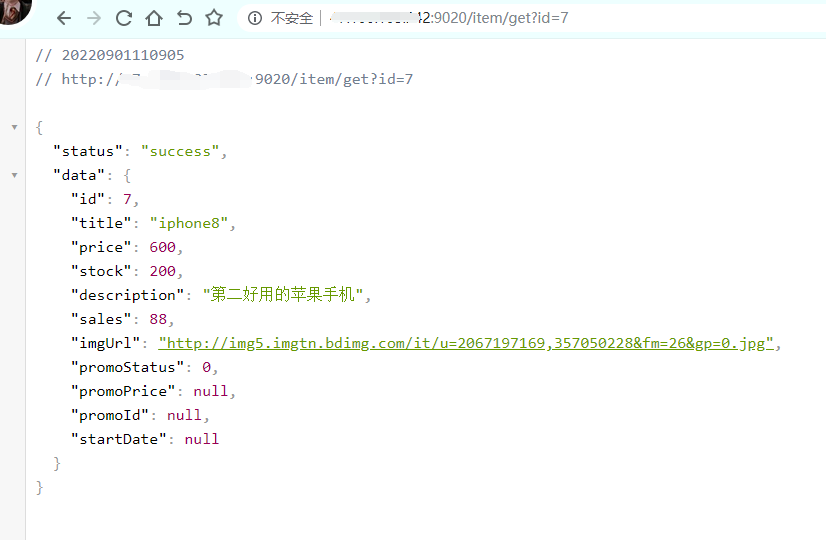
5、接口访问成功。
6、使用 JMeter 测压
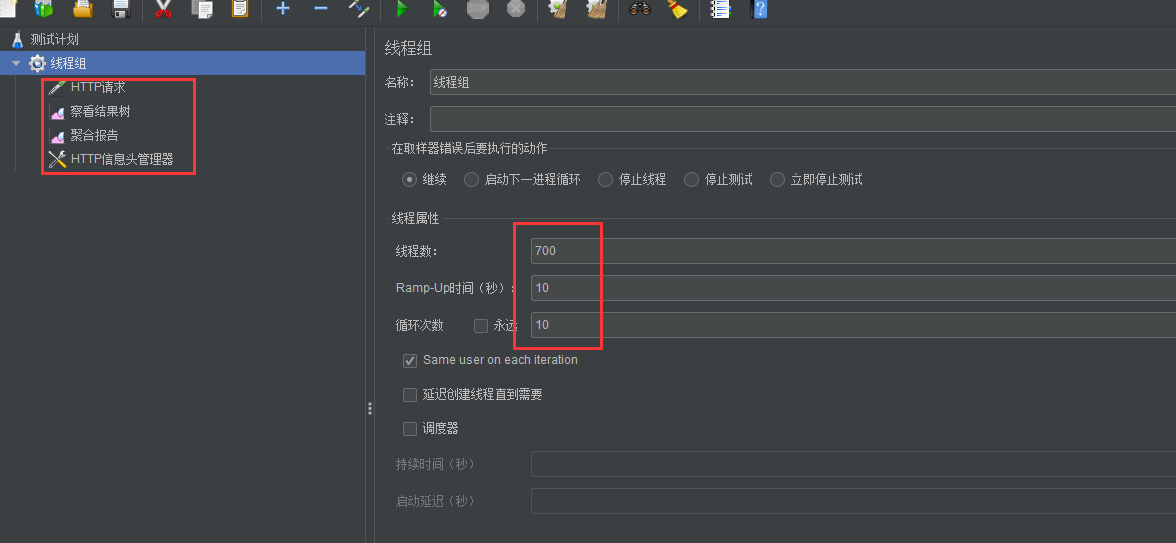

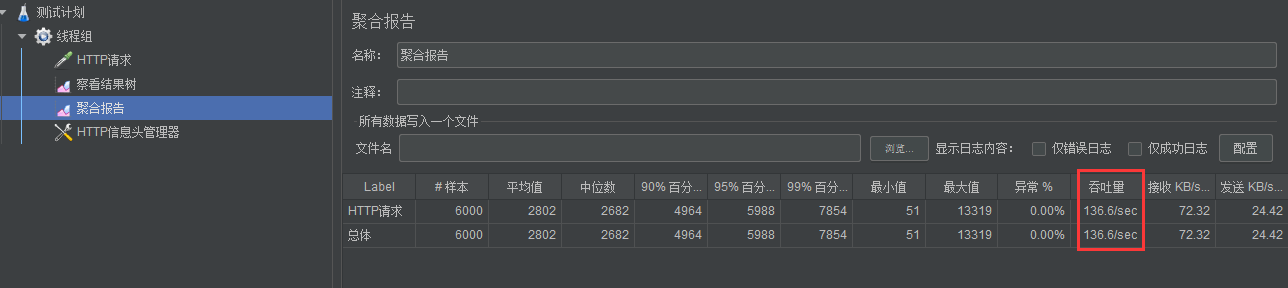
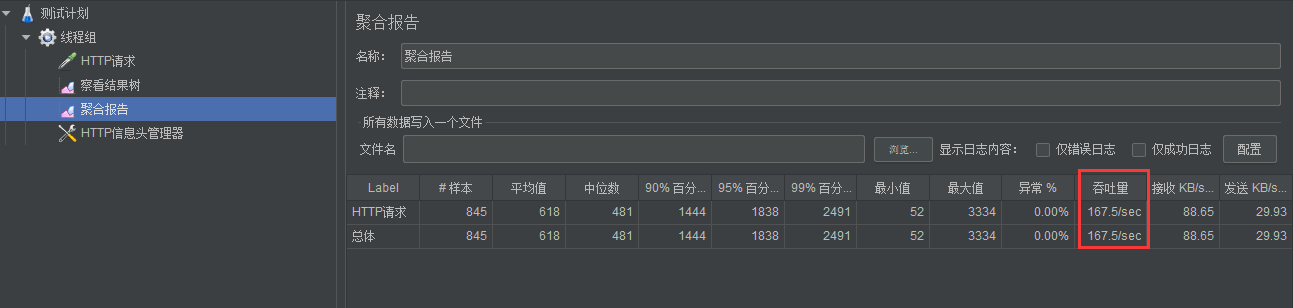
1、线程数量:700,循环次数:10。数据可进行相关调整。通过多次测压吞吐量平均值在 130/s 左右。
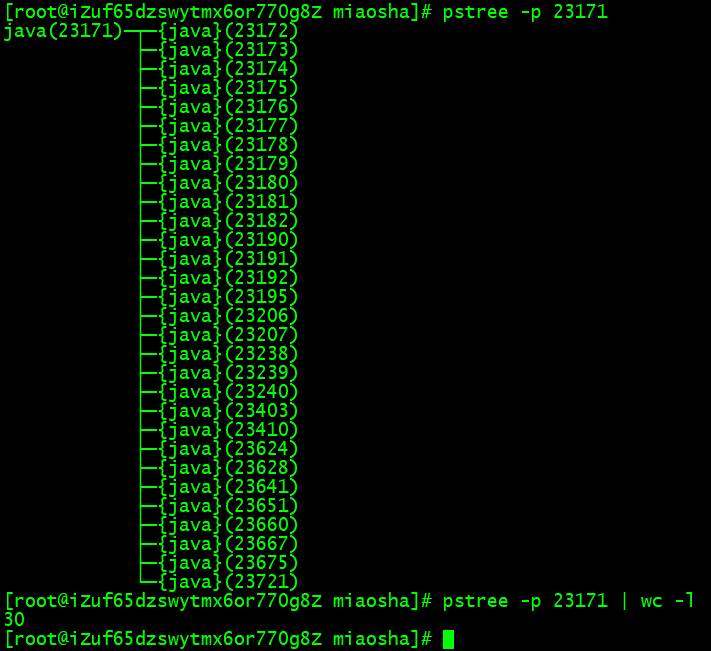
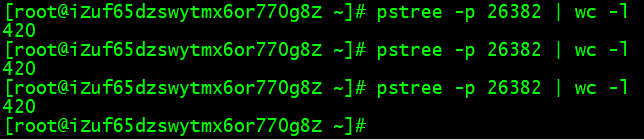
2、使用 pstree -p 端口号,查看线程数量
在没有测压情况下的数量:30(tomcat最小核心线程 10 + 其他线程)
3、使用 top -H 查看
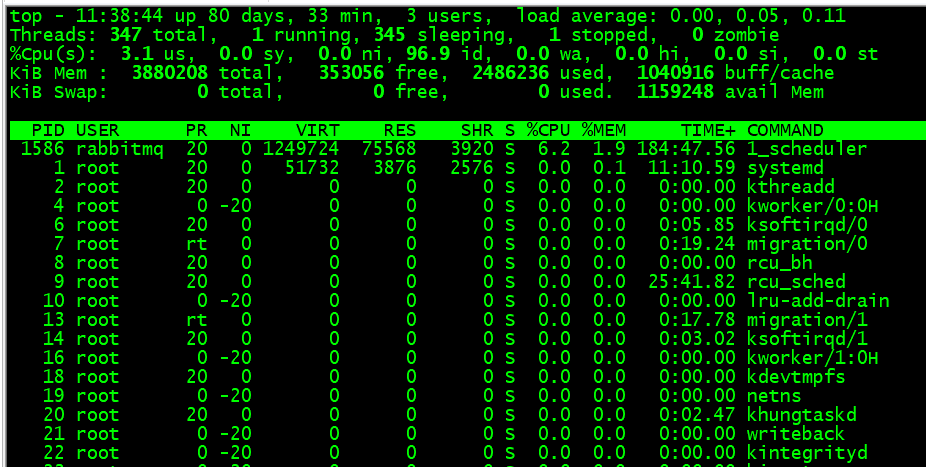
cpu us:用户空间的cpu使用情况(用户层代码)
cpu sy:内核空间的cpu使用情况(系统调用)
load average:1,5,15分钟load平均值,跟着核数系数,0代表通常,1代表打满,1+代表等待阻塞i)
memory:free空闲内存,used使用内存
7、配置 springboot tomcat 配置
· 1、查看 springboot 相关 tomcat 配置
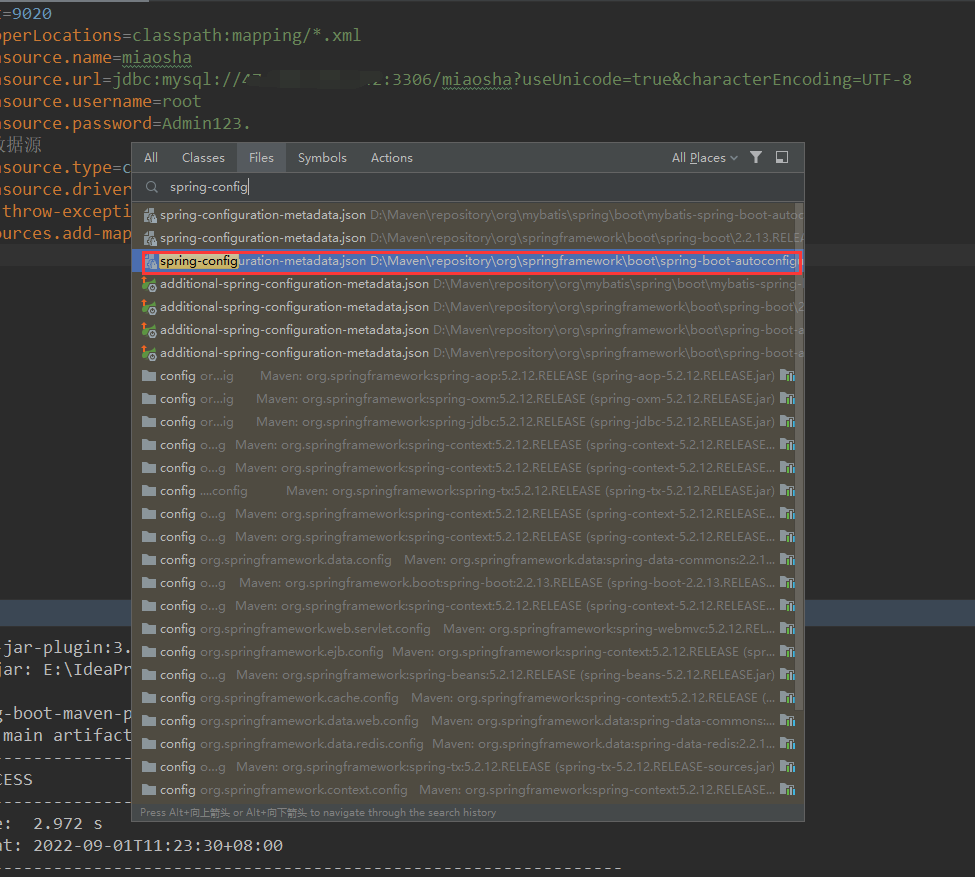
搜索 service.tomcat
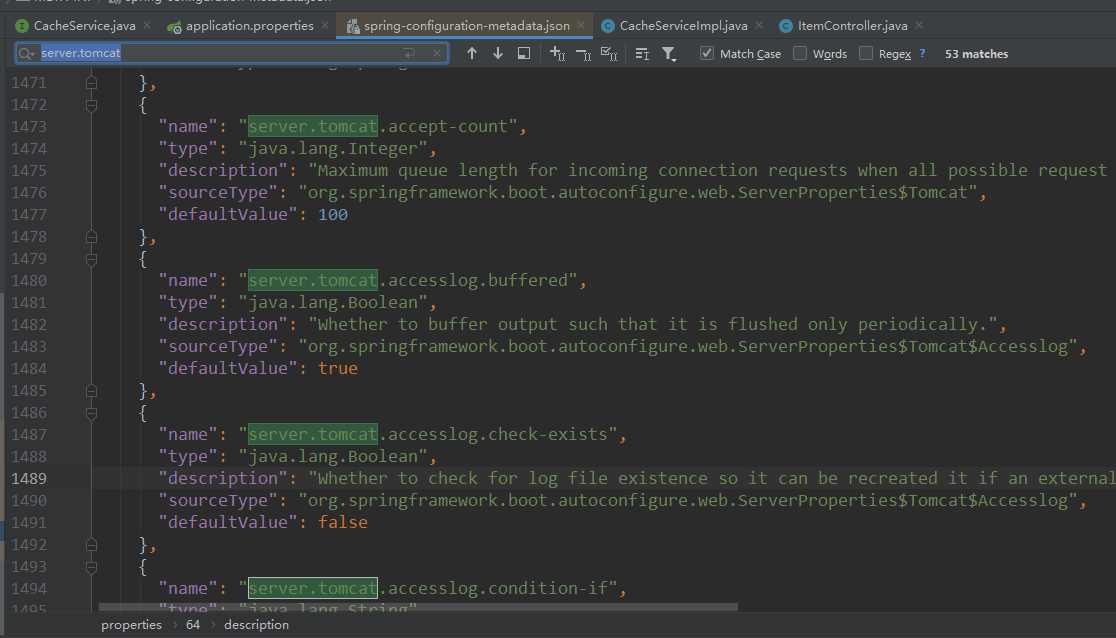
springboot内置 tomcat 所有相关 默认配置都在这里。
accept-count:默认队列数量 100,

accesslog.enabled:是否开启 tomcat 日志

max-threads:最大线程数量

min-spare-threads:最小核心线程
2、springboot 中添加相关 tomcat 配置:
# 默认队列
server.tomcat.accept-count=1000
# (几核 * 2) *100 最大线程
server.tomcat.max-threads=400
# 最小核心线程
server.tomcat.min-spare-threads=100
# 开启 tomcat 日志
server.tomcat.accesslog.enabled=true
# 日志路径
server.tomcat.accesslog.directory=/home/miaosha/tomcat
# 日志格式 %h ip地址,%l ,%u ,%t 处理时长, "%r" 请求url, %s 返回状态码, %b 请求 response大小, %D 处理请求时长
server.tomcat.accesslog.pattern=%h %l %u %t "%r" %s %b %D
3、配置 tomcat Keepalived 相关配置
/**
 * @description 当 Spring 容器内没有 TomcatEnbeddedServerFactory 这个 Bean 时,会把此 bean 加载进 Spring 中
 * @author: hq
 * @create: 2022-08-30 23:16
 **/
@Component
public class WebServerConfig implements WebServerFactoryCustomizer<ConfigurableWebServerFactory> {
    @Override
    public void customize(ConfigurableWebServerFactory factory) {
        // 使用对应工厂类提供的接口,定制化 Tomcat connector
        ((TomcatServletWebServerFactory)factory).addConnectorCustomizers(new TomcatConnectorCustomizer() {
            @Override
            public void customize(Connector connector) {
                Http11NioProtocol protocol = (Http11NioProtocol) connector.getProtocolHandler();
                // 定制化 KeepalivedTimeOut,设置 30s 内没有请求则服务端自动断开 Keepalived 连接
                protocol.setKeepAliveTimeout(30000);
                // 当客户端发送超过 1w 个请求则自动断开 Keepalived 连接
                protocol.setMaxKeepAliveRequests(10000);
//                protocol.setMaxConnections(); 最大 soket 连接数
            }
        });
    }
}
4、重新打包部署测压

启动过后会在设置 Tomcat 日志的目录生成文件夹

在未测压情况下,默认线程数量:120
压力测试时,最大线程数量为420。与未设置 tomcat.max-threads 提升了不少。
吞吐量也提升至 160/s。
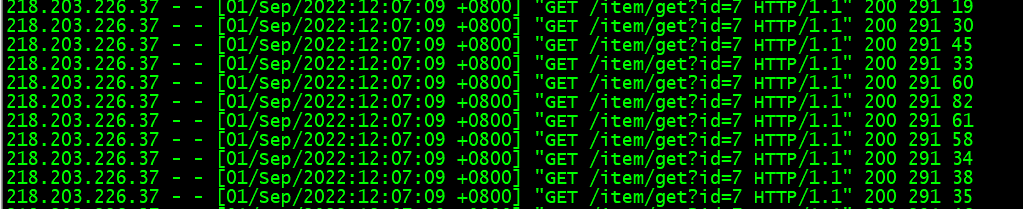
查看 tomcat 日志
二、负载均衡、分布式会话
1、准备 3 台服务器(新增)

一台作为 Nginx、两台 Java。环境分别安装好。地区为成都。
开始那台机器地区为上海,之后将作为 Redis、Mysql 服务使用。
2、向两台Java1、Java2 部署程序(两台数据访问Mysql均连接上海区域服务器)
3、配置Nginx
#user  nobody; CPU数量 * 2
worker_processes  4;

#error_log  logs/error.log;
#error_log  logs/error.log  notice;
#error_log  logs/error.log  info;

pid        /usr/local/nginx/logs/nginx.pid;


events {
    worker_connections  1024;
}


http {
    include       mime.types;
    default_type  application/octet-stream;

    #log_format  main  '$remote_addr - $remote_user [$time_local] "$request" '
    #                  '$status $body_bytes_sent "$http_referer" '
    #                  '"$http_user_agent" "$http_x_forwarded_for"';

    #access_log  logs/access.log  main;

    sendfile        on;
    #tcp_nopush     on;

    #keepalive_timeout  0;
    keepalive_timeout  65;

    #gzip  on;

    upstream tomcatServerPool{
        server 172.29.26.12:9020 weight=10;
        server 172.18.160.168:9020 weight=10;
    }

    server {
        listen       80;
        server_name  localhost;

        location / {
           # root   html;
           # index  index.html index.htm;
           proxy_pass http://tomcatServerPool;
       #用户IP
       proxy_set_header X-Real-IP $remote_addr;
        }

        error_page   500 502 503 504  /50x.html;
        location = /50x.html {
            root   html;
        }

     }

}
4、首先测试单机
修改IP地址

在测压的过程中,吞吐量 66/s 左右,与我们使用上海区域服务器慢了将近一般,这是因为受地区影响,后面新建的3台服务器都是成都区域,java程序数据访问上海区域,受传输距离影响所以速度就变慢了。所以看得出,跨区域太远会影响响应速度。
5、双机,nginx负载均衡测试压力
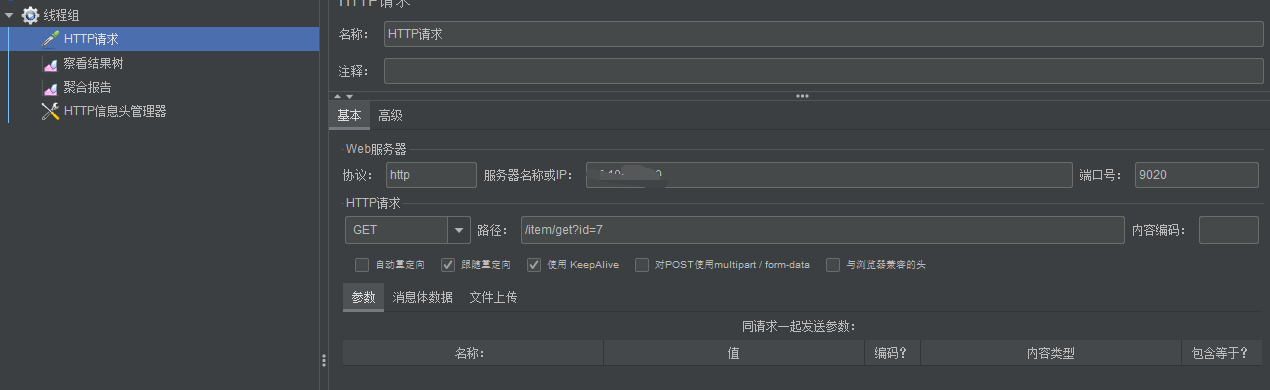
JMeter 修改IP地址为 nginx 服务器IP,端口还改为 80,线程组不变

可以看到 通过 负载均衡,已将吞吐量提升了一倍多。由 66/s 提升至 143/s 。
三、缓存
1、Redis 缓存
spring.redis.database=1
spring.redis.port=6379
spring.redis.host=********
spring.redis.password=********
spring.redis.jedis.pool.max-active=1000
spring.redis.jedis.pool.max-wait=-1ms
spring.redis.jedis.pool.max-idle=16
spring.redis.jedis.pool.min-idle=8
1、修改代码
2、部署压力测试(后面都是双机测试)
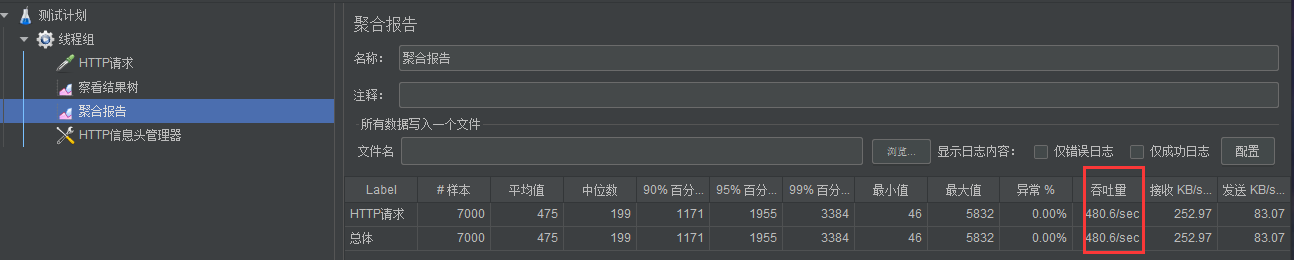
通过 Redis 缓存介入,吞吐量翻了几倍。
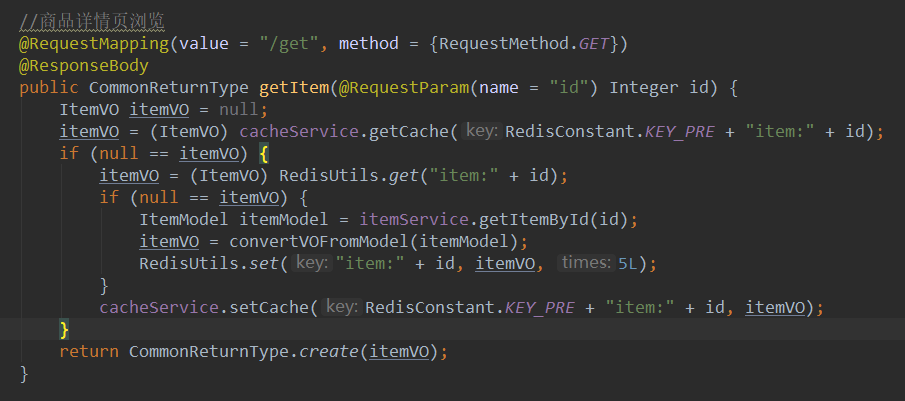
2、Guava 本地缓存
1、这个时候考虑加入本地缓存,在每台服务器上缓存热点数据,像直接使用 HashMap、ConcurrentHashMap格式的类型还不满足自动失效清除功能,我们可以使用 guava 提供的数据类型 Cache<String, Object>;
但是在修改方面,可以使用 MQ 消息广播,通知每台服务器进行操作,代码复杂度提高了。
2、编写代码
    <dependency>
      <groupId>com.google.guava</groupId>
      <artifactId>guava</artifactId>
      <version>18.0</version>
    </dependency>
/**
 * @description
 * @author: hq
 * @create: 2022-08-31 16:21
 **/
@Service
public class CacheServiceImpl implements CacheService {

    private Cache<String, Object> cache = null;

    @PostConstruct
    public void init() {
        cache = CacheBuilder.newBuilder()
                // 设置缓存容器初始容量
                .initialCapacity(16)
                // 设置缓存中最大可以存储 100 个 key,超过100个后按照 LRU 策略移除缓存项
                .maximumSize(100)
                // 设置写缓存多少秒过期
                .expireAfterWrite(30, TimeUnit.SECONDS)
                .build();
    }


    @Override
    public void setCache(String key, Object obj) {
        cache.put(key, obj);
    }

    @Override
    public Object getCache(String key) {
        return cache.getIfPresent(key);
    }
}
3、部署服务
4、压力测试
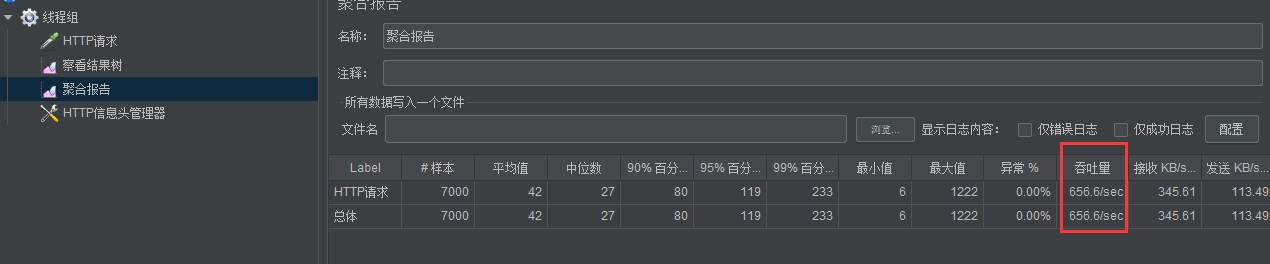
吞吐量已经提升至 650/s。
3、Nginx 缓存(反向代理废弃版)
1、在整个服务调用运行过程中,nginx 是用户第一道关卡。那么可以在用户调用的时候,先查找 nginx 缓存。
2、配置反向代理缓存
#user  nobody;
worker_processes  4;

#error_log  logs/error.log;
#error_log  logs/error.log  notice;
#error_log  logs/error.log  info;

pid        /usr/local/nginx/logs/nginx.pid;


events {
    worker_connections  1024;
}


http {
    include       mime.types;
    default_type  application/octet-stream;

    #log_format  main  '$remote_addr - $remote_user [$time_local] "$request" '
    #                  '$status $body_bytes_sent "$http_referer" '
    #                  '"$http_user_agent" "$http_x_forwarded_for"';

    #access_log  logs/access.log  main;

    sendfile        on;
    #tcp_nopush     on;

    #keepalive_timeout  0;
    keepalive_timeout  65;

    #gzip  on;

    upstream tomcatServerPool{
        server 172.29.26.12:9020 weight=10;
        server 172.18.160.168:9020 weight=10;
    keepalive 30;
    }

    # proxy_cache_path 设置缓存目录
    # levels 表示是两级目录,1和2表示用1位和2位16进制来命名目录名称。在此例中,第一级目录用1位16进制命名,如b;第二级目录用2位16进制命名
    # keys_zone 设置共享内存以及占用空间大小
    # max_size 最大缓存容量
    # inactive 缓存最长时间
    proxy_cache_path /usr/local/nginx/upstream_cache levels=1:2 keys_zone=mycache:50m max_size=1g inactive=5m;

    server {
        listen       80;
        server_name  localhost;

        #charset koi8-r;

        #access_log  logs/host.access.log  main;

        location / {
           # root   html;
           # index  index.html index.htm;
           proxy_pass http://tomcatServerPool;
       #用户IP
       proxy_set_header X-Real-IP $remote_addr;
       proxy_cache mycache;
       # 缓存状态为 200 304 的数据
        proxy_cache_valid 200 304 5m;
        }

        error_page   500 502 503 504  /50x.html;
        location = /50x.html {
            root   html;
        }

     }

}
3、重启 nginx
4、JMeter 压测

性能提升不是很大,原因是因为 nginx 是将缓存存储在磁盘上的,读取没有内存速度快。
但是它介于用户第一层关卡就返回数据,如果没有这缓存,那么也会有网络上的消耗,毕竟是上海区服务器。
4、Nginx Lua
1、lua携程机制
ngxin有对应的携程机制
携程就是线程空间在内的执行单元,叫做携程。
类似于线程一样,有自己独立的一个运行空间,它这个运行是基于用户态模拟出来的独立运行空间。本身依托于线程,并且也要像线程一样被 CPU 执行。
切换开销小
2、nginx lua 插载点
init_by_lua:系统启动时调用
init_worker_by_lua:worker 进程启动时调用
set_by_lua:nginx 变量用复杂 lua return
rewrite_by_lua:重写 url 规则
access_by_lua:权限验证阶段
content_by_lua:内容输出节点
3、安装 OpenResty (nginx 服务器)
下载地址:https://openresty.org/cn/download.html
安装为默认安装路径:https://www.runoob.com/w3cnote/openresty-intro.html

1、进入 openresty 目录
2、编写测试lua脚本(需将之间运行的 nginx 关闭)
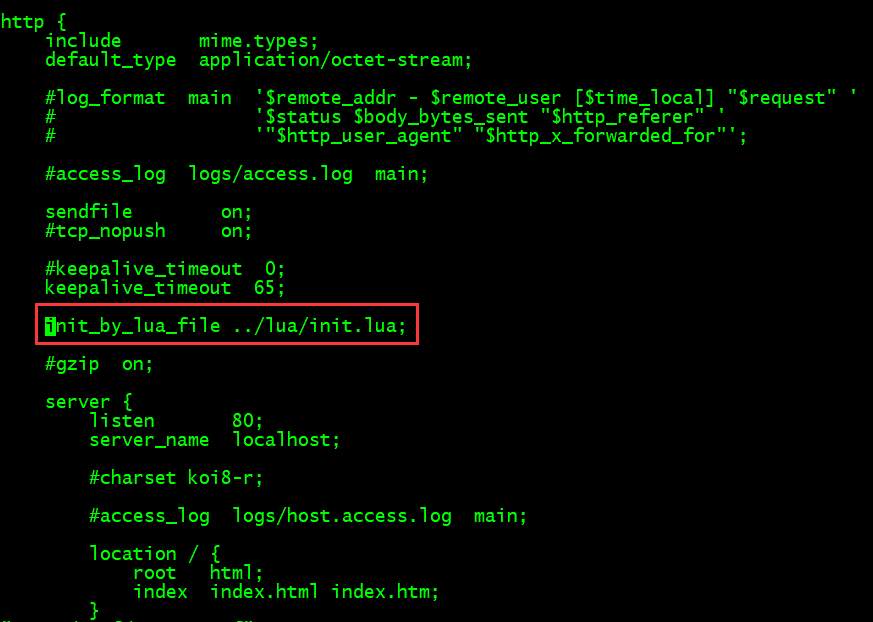
1、创建 lua 文件夹,并进入 lua 文件夹

2、vim init.lua
ngx.log(ngx.ERR,"init lua success");
#调用 nginx 日志方法,打印错误日志
3、返回上一级

4、进入nginx目录 修改配置 vim nginx/conf/nginx.conf
5、启动 nginx

打印出了刚才的那句话
6、将刚才配置干掉,只是测试使用
3、编写 Hello World html文本输出案列
1、vim lua/helloworld.lua
ngx.exec("/item/get?id=7");
2、编辑 nginx 配置


3、启动 nginx
4、测试
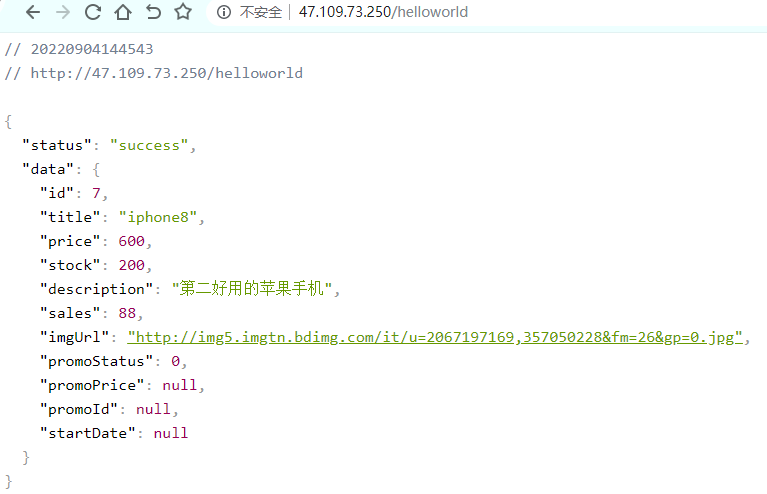
像一个代理转发,现在通过 nginx 和 lua 完成了指定某一个固定 URL 的方式。
4、Openresty 实践
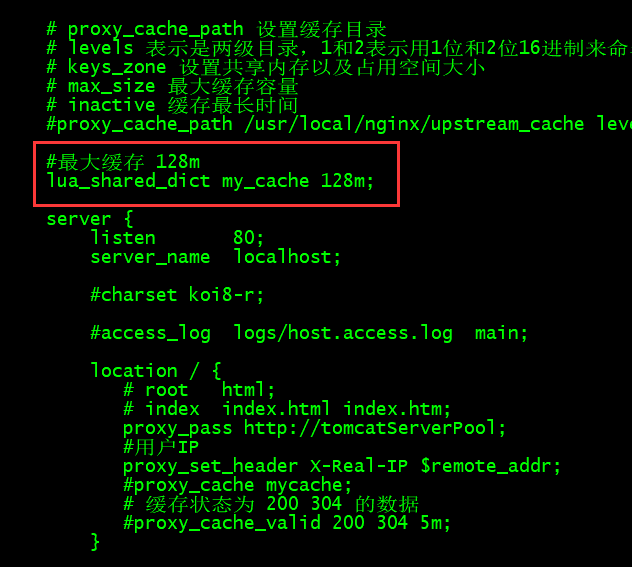
shared dic:共享内存字典,所有 worker 进程可见,lru 淘汰
1、配置 shared dic

vim nginx/conf/nginx.conf
2、编写 lua 脚本
vim lua/itemshareddict.lua
function get_from_cache(key)
        -- 声明一个变量:这个变量就是刚才 ngxin.conf 配置的 my_cache
        local cache_ngx = ngx.shared.my_cache
        local value = cache_ngx:get(key)
        return value
end

-- 参数 key,value exptime(过期时间)
function set_to_cache(key,value,exptime)
        if not exptime then
                exptime = 0
        end
        local cache_ngx = ngx.shared.my_cache
        local succ,err,forcible = cache_ngx:set(key,value,exptime)
        return succ
end

-- /item/get?id=7
local args = ngx.req.get_uri_args()
-- 取到 id 参数
local id = args["id"]
-- "item_"..id 两个..类似于 java 中 string 字符串拼接 +
local item_model = get_from_cache("item_"..id)

-- 如果缓存取不到
if item_model == nil then
        -- 发送 http 请求拿到 resp
        local resp = ngx.location.capture("/item/get?id="..id)
        -- 获取 body 内容
        item_model = resp.body
        -- 将结果添加至缓存中 1分钟
        set_to_cache("item_"..id,item_model,1*60)
end
-- 不等于 null 直接返回
ngx.say(item_model)
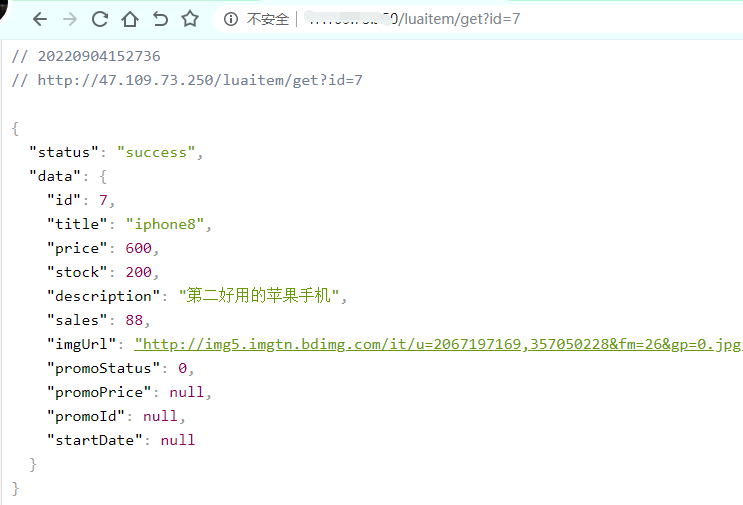
3、配置 nginx URL
location /luaitem/get {
        default_type "application/json";
        content_by_lua_file ../lua/itemshareddict.lua;
}
4、浏览器调用测试,访问成功
5、测压
5、Openresty Redis 支持
1、安装 openresty 对 redis 的支持

进入 lualib 目录

cd resty

这里面封装了常用的 redis 的操作
2、编写 itemredis.lua
-- 获取请求参数
local args = ngx.req.get_uri_args()
local id = args["id"]

-- 引入二次封装 redis
local redis = require "resty.my_redis"

local self = {
ip = "172.29.26.13",
port = "6379",
db_index = 1,
pool_max_idle_time = 30000,
pool_size = 100
}

local cache = redis.new(self)

local item_model = cache:get("miaosha:item:"..id)

if item_model == ngx.null or item_model == nil then
        local resp = ngx.location.capture("/item/get?id="..id)
        -- 正常操作是获取到数据后,是要存入 redis 中的,但是我们在程序中已经完成了这步操作了
        -- 这里就不对 redis 操作了
        item_model = resp.body
end

ngx.say(item_model)
在这里,我找了一个第三方封装好的组件
local redis_c = require "resty.redis"

local ok, new_tab = pcall(require, "table.new")
if not ok or type(new_tab) ~= "function" then
new_tab = function (narr, nrec) return {} end
end

local _M = new_tab(0, 155)
_M._VERSION = '0.01'

local commands = {
"append", "auth", "bgrewriteaof",
"bgsave", "bitcount", "bitop",
"blpop", "brpop",
"brpoplpush", "client", "config",
"dbsize",
"debug", "decr", "decrby",
"del", "discard", "dump",
"echo",
"eval", "exec", "exists",
"expire", "expireat", "flushall",
"flushdb", "get", "getbit",
"getrange", "getset", "hdel",
"hexists", "hget", "hgetall",
"hincrby", "hincrbyfloat", "hkeys",
"hlen",
"hmget", "hmset", "hscan",
"hset",
"hsetnx", "hvals", "incr",
"incrby", "incrbyfloat", "info",
"keys",
"lastsave", "lindex", "linsert",
"llen", "lpop", "lpush",
"lpushx", "lrange", "lrem",
"lset", "ltrim", "mget",
"migrate",
"monitor", "move", "mset",
"msetnx", "multi", "object",
"persist", "pexpire", "pexpireat",
"ping", "psetex", "psubscribe",
"pttl",
"publish", --[[ "punsubscribe", ]] "pubsub",
"quit",
"randomkey", "rename", "renamenx",
"restore",
"rpop", "rpoplpush", "rpush",
"rpushx", "sadd", "save",
"scan", "scard", "script",
"sdiff", "sdiffstore",
"select", "set", "setbit",
"setex", "setnx", "setrange",
"shutdown", "sinter", "sinterstore",
"sismember", "slaveof", "slowlog",
"smembers", "smove", "sort",
"spop", "srandmember", "srem",
"sscan",
"strlen", --[[ "subscribe", ]] "sunion",
"sunionstore", "sync", "time",
"ttl",
"type", --[[ "unsubscribe", ]] "unwatch",
"watch", "zadd", "zcard",
"zcount", "zincrby", "zinterstore",
"zrange", "zrangebyscore", "zrank",
"zrem", "zremrangebyrank", "zremrangebyscore",
"zrevrange", "zrevrangebyscore", "zrevrank",
"zscan",
"zscore", "zunionstore", "evalsha"
}

local mt = { __index = _M }

local function is_redis_null( res )
if type(res) == "table" then
for k,v in pairs(res) do
if v ~= ngx.null then
return false
end
end
return true
elseif res == ngx.null then
return true
elseif res == nil then
return true
end

return false
end

function _M.close_redis(self, redis)
if not redis then
return
end
--释放连接(连接池实现)
local pool_max_idle_time = self.pool_max_idle_time --最大空闲时间 毫秒
local pool_size = self.pool_size --连接池大小

local ok, err = redis:set_keepalive(pool_max_idle_time, pool_size)
if not ok then
ngx.say("set keepalive error : ", err)
end
end

-- change connect address as you need
function _M.connect_mod( self, redis )
redis:set_timeout(self.timeout)

local ok, err = redis:connect(self.ip, self.port)
if not ok then
ngx.say("connect to redis error : ", err)
return self:close_redis(redis)
end

if self.password then ----密码认证
local count, err = redis:get_reused_times()
if 0 == count then ----新建连接,需要认证密码
ok, err = redis:auth(self.password)
if not ok then
ngx.say("failed to auth: ", err)
return
end
elseif err then ----从连接池中获取连接,无需再次认证密码
ngx.say("failed to get reused times: ", err)
return
end
end

return ok,err;
end

function _M.init_pipeline( self )
self._reqs = {}
end

function _M.commit_pipeline( self )
local reqs = self._reqs

if nil == reqs or 0 == #reqs then
return {}, "no pipeline"
else
self._reqs = nil
end

local redis, err = redis_c:new()
if not redis then
return nil, err
end

local ok, err = self:connect_mod(redis)
if not ok then
return {}, err
end

redis:init_pipeline()
for _, vals in ipairs(reqs) do
local fun = redis[vals[1]]
table.remove(vals , 1)

fun(redis, unpack(vals))
end

local results, err = redis:commit_pipeline()
if not results or err then
return {}, err
end

if is_redis_null(results) then
results = {}
ngx.log(ngx.WARN, "is null")
end
-- table.remove (results , 1)

--self.set_keepalive_mod(redis)
self:close_redis(redis)

for i,value in ipairs(results) do
if is_redis_null(value) then
results[i] = nil
end
end

return results, err
end


local function do_command(self, cmd, ... )
if self._reqs then
table.insert(self._reqs, {cmd, ...})
return
end

local redis, err = redis_c:new()
if not redis then
return nil, err
end

local ok, err = self:connect_mod(redis)
if not ok or err then
return nil, err
end

redis:select(self.db_index)

local fun = redis[cmd]
local result, err = fun(redis, ...)
if not result or err then
-- ngx.log(ngx.ERR, "pipeline result:", result, " err:", err)
return nil, err
end

if is_redis_null(result) then
result = nil
end

--self.set_keepalive_mod(redis)
self:close_redis(redis)

return result, err
end

for i = 1, #commands do
local cmd = commands[i]
_M[cmd] =
function (self, ...)
return do_command(self, cmd, ...)
end
end

function _M.new(self, opts)
opts = opts or {}
local timeout = (opts.timeout and opts.timeout * 1000) or 1000
local db_index= opts.db_index or 0
local ip = opts.ip or '127.0.0.1'
local port = opts.port or 6379
local password = opts.password
local pool_max_idle_time = opts.pool_max_idle_time or 60000
local pool_size = opts.pool_size or 100

return setmetatable({
timeout = timeout,
db_index = db_index,
ip = ip,
port = port,
password = password,
pool_max_idle_time = pool_max_idle_time,
pool_size = pool_size,
_reqs = nil }, mt)
end

return _M
3、修改 nginx 配置

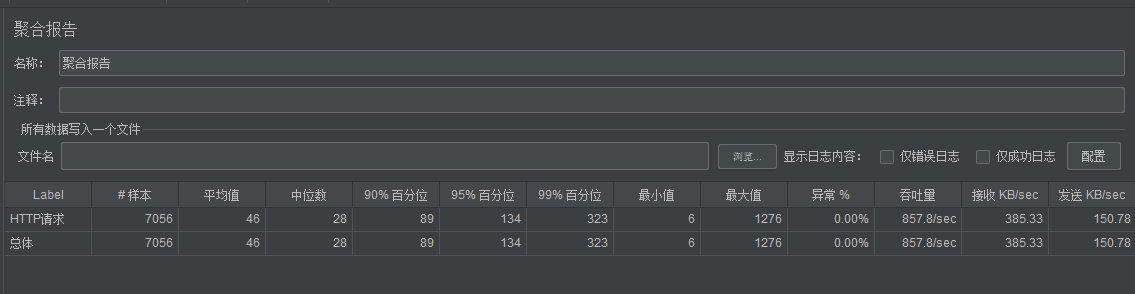
4、压力测试

这就很给力了,峰值吞吐量 1000/s 。(从单体的 70/s 到现在的 1000/s。)
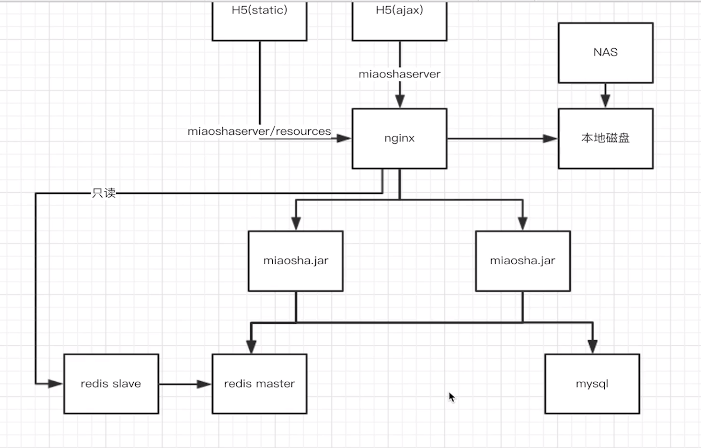
5、最后整体架构图
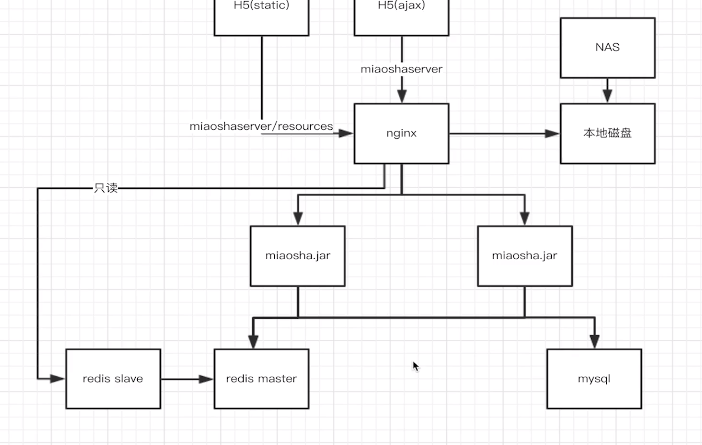
openresty 使用 redis 从节点作为缓存,减少主节点加压力,也可使用 多主多从模式。可扩展。

