Code-First Development with Entity Framework 4
.NET 4 ships with a much improved version of Entity Framework (EF) – a data access library that lives in the System.Data.Entity namespace.
When Entity Framework was first introduced with .NET 3.5 SP1, developers provided a lot of feedback on things they thought were incomplete with that first release. The SQL team did a good job of listening to this feedback, and really focused the EF that ships with .NET 4 on addressing it.
Some of the big improvements in EF4 include:
- POCO Support: You can now define entities without requiring base classes or data persistence attributes.
- Lazy Loading Support: You can now load sub-objects of a model on demand instead of loading them up front.
- N-Tier Support and Self-Tracking Entities: Handle scenarios where entities flow across tiers or stateless web calls.
- Better SQL Generation and SPROC support: EF4 executes better SQL, and includes better integration with SPROCs
- Automatic Pluralization Support: EF4 includes automatic pluralization support of tables (e.g. Categories->Category).
- Improved Testability: EF4’s object context can now be more easily faked using interfaces.
- Improved LINQ Operator Support: EF4 now offers full support for LINQ operators.
Visual Studio 2010 also includes much richer EF designer and tooling support. The EF designer in VS 2010 supports both a “database first” development style – where you construct your model layer on a design surface from an existing database. It also supports a “model first” development style – where you first define your model layer using the design surface, and can then use it to generate database schema from it.
Code-First Development with EF
In addition to supporting a designer-based development workflow, EF4 also enables a more code-centric option which we call “code first development”. Code-First Development enables a pretty sweet development workflow. It enables you to:
- Develop without ever having to open a designer or define an XML mapping file
- Define your model objects by simply writing “plain old classes” with no base classes required
- Use a “convention over configuration” approach that enables database persistence without explicitly configuring anything
- Optionally override the convention-based persistence and use a fluent code API to fully customize the persistence mapping
EF’s “code first development” support is currently enabled with a separate download that runs on top of the core EF built-into .NET 4. CTP4 of this “code-first” library shipped this week and can be downloaded here.
It works with VS 2010, and you can use it with any .NET 4 project (including both ASP.NET Web Forms and ASP.NET MVC).
Step by Step Tutorial: Building NerdDinner using a Code-First Approach
Last year I wrote an ASP.NET MVC 1.0 tutorial that was published both online and in a book. The tutorial walked through creating a simple application, called “NerdDinner”, which provides an easy way for people to organize, host and RSVP for dinners online. You can read my original ASP.NET V1 NerdDinner tutorial here. An updated version of the tutorial is also included in the new Professional ASP.NET MVC 2 book.
The NerdDinner tutorial used a “database first approach” where the database schema was defined first, and then we used a Visual Studio designer to create our LINQ to SQL / LINQ to Entities model objects that mapped to it.
Below I’m going to demonstrate how we could instead use a “code first approach” using EF4 to build the NerdDinner model layer and database schema, and construct a CRUD application using ASP.NET MVC.
We will walkthrough building this application step-by-step. A download link to a completed version of the sample is available at the end of this blog post.
Step 1: Create a New Empty ASP.NET MVC 2 Application
We’ll start by creating a new ASP.NET MVC 2 Project within Visual Studio 2010. Choose File->New Project and use the “ASP.NET MVC 2 Empty Web Application” project template to do this.
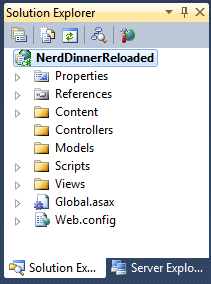
This will create an empty ASP.NET MVC 2 project that does not have any controllers, models or views within it:
We’ll next work to define our NerdDinner “model” – which refers to the objects that represent the data of our application, as well as the corresponding domain logic that integrates validation and business rules with it. The model is the "heart" of an MVC-based application, and fundamentally drives the behavior of it. We’ll create this model layer using the new EF4 “Code First” capabilities.
Step 2: Create our Model
Let’s assume we do not already have a database defined, and that we are building our new NerdDinner application completely from scratch.
We do not need to start with a database
When using a code-first development workflow, we do not need to begin our application by creating a database or specifying schema. Instead we can begin by writing standard .NET classes that define the domain model objects that are most appropriate for our application – without having to worry about intermixing data persistence logic within them.
Creating Model Classes
NerdDinner is a small application, and our data storage needs with it are pretty simple. We want to be able to define and store “Dinners” that refer to specific events that people can attend. We also want to be able to define and store “RSVP” acceptances, which are used to track a person’s interest in attending a particular Dinner.
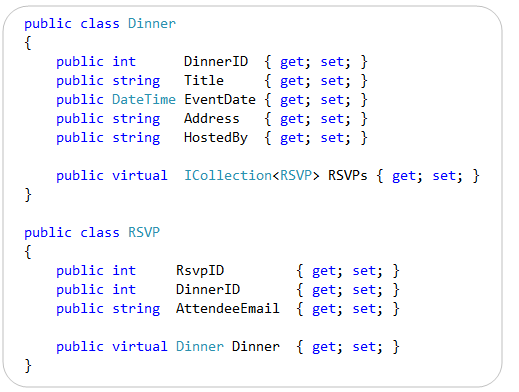
Let’s create two classes (Dinner and RSVP) to represent these concepts. We’ll do this by adding two new classes to our ASP.NET MVC project - “Dinner” and “RSVP”:
The above “Dinner” and “RSVP” model classes are “plain old CLR objects” (aka POCO). They do not need to derive from any base classes or implement any interfaces, and the properties they expose are standard .NET data-types. No data persistence attributes or data code has been added to them.
The ability to define model classes without having to tie them to a particular database, database API, or database schema implementation is really powerful – and provides us with much more data access flexibility. It allows us to focus on our application/business needs without having to worry about persistence implementation. It also gives us the flexibility to change our database schema or storage implementation in the future – without having to re-write our model objects, or the code that interacts with them.
Creating a Context Class to Handle Database Persistence
Now that we’ve defined our two POCO model classes, let’s create a class that we can use to handle the retrieval/persistence of Dinner and RSVP instances from a database.
We’ll name this class “NerdDinners”. It derives from the DbContext base class, and publishes two public properties – one that exposes our Dinner objects, and one that exposes our RSVP objects:
The DbContext and DbSet classes used above are provided as part of the EF4 Code-First library. You’ll need to add a reference to the System.Data.Entity.CTP assembly that is installed into the \Program Files\Microsoft ADO.NET Entity Framework Feature CTP4\Binaries directory to reference these classes. You’ll also want to add a “using System.Data.Entity” namespace statement at the top of your “NerdDinners” class file.
That is all the code we need to write
The above three classes contain all of the code necessary to implement a basic model and data persistence layer for our NerdDinner application. We do not need to configure any additional database schema mapping information, nor run any tools, nor edit any XML files, nor use any designers in order to start using our classes to retrieve, update, and save data into a database.
Convention Based Persistence Mapping
We do not need to write any additional code, nor create any XML files, nor use any tools in order to map our model classes to and from a database. How, you might ask, is that possible?
By default, EF code-first supports a “convention over configuration” approach that enables you to rely on common mapping conventions instead of having to explicitly configure things. You can override these conventions if you want to provide custom database mapping rules. But if you instead just use the default conventions you’ll find that the amount of code you have to write is really small, and the common 90% of scenarios “just work” the way you’d expect them to without any extra code or configuration.
In our example above, our NerdDinners context class will by default map its “Dinners” and “RSVPs” properties to “Dinners” and “RSVPs” tables within a database. Each row within the Dinners table will map to an instance of our “Dinner” class. Likewise, each row within the RSVPs table will map to an instance of our “RSVP” class. Properties within the “Dinner” and “RSVP” classes in turn map to columns within the respective “Dinners” and “RSVPs” database tables.
Other default conventions supported by EF include the ability to automatically identify primary-key and foreign keys based on common naming patterns (for example: an ID or DinnerID property on the Dinner class will be inferred as the primary key). EF also includes smart conventions for wiring-up association relationships between models. The EF team has a blog post that talks more about how the default set of conventions work here.
Code Examples of How to Use Our Model
The three classes we created earlier contain all of the code necessary to implement our model and data persistence for NerdDinner. Let’s now look at a few code examples of how we can use these classes to perform common data scenarios:
Query Using LINQ Expressions
We can write LINQ query expressions to retrieve data from a database using the following code. Below we are using a LINQ expression to retrieve all dinners that occur in the future:
We can also take advantage of relationships between Dinners and RSVPs when writing our LINQ expressions. Notice below how our “where” statement filters by dinners whose RSVP count is greater than 0:
Note that the “where” filter in the above query (where we are retrieving only those Dinners who have at least one RSVP) executes in the database server – making the query and the amount of data we retrieve very efficient.
Retrieving a Single Instance
We can use LINQ’s Single() method with a lambda query to retrieve a single instance of a Dinner using code like below:
Alternatively, we can also take advantage of a Find() method that EF “code-first” exposes that allows you to easily retrieve an instance based on its ID:
Adding a new Dinner
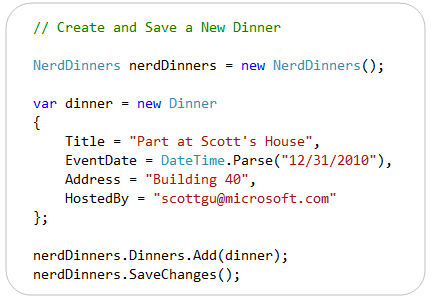
The code below demonstrates how to create and add a new Dinner to the database. All we need to do is to “new” a Dinner object, set properties on it, and then add it to the Dinners property of our NerdDinners context object. The NerdDinner context class supports a “unit of work” pattern that enables you to add multiple models to the context, and then call “SaveChanges()” on it to persist all of the changes to a database as a single atomic transaction.
Updating a Dinner
The code below demonstrates how to retrieve a Dinner, update one of its properties, and then save the changes back to the database:
Step 3: Create a ASP.NET MVC Controller that uses our Model
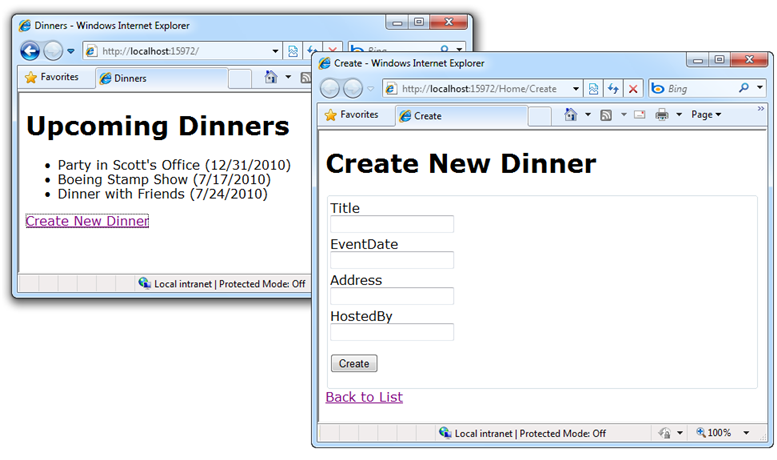
Let’s now look at a more complete scenario involving our model, where we use a controller class to implement the functionality necessary to publish a list of upcoming dinners, and enable users to add new ones:
We’ll implement this functionality by right-clicking on the “Controllers” folder and choose the “Add->Controller” menu command. We’ll name our new controller “HomeController”.
We’ll then add three “action methods” within it that work with the NerdDinners model we created earlier using EF “Code-First”:
The “Index” action method above retrieves and renders a list of upcoming dinners.
The “Create” action methods allow users to add new dinners. The first “Create” method above handles the “HTTP GET” scenario when a user visits the /Home/Create URL, and send back a “New Dinner” form to fill out. The second “Create” method handles the “HTTP POST” scenario associated with the form – and handles saving the dinner in the database. If there are any validation issues it redisplays the form back to the user with appropriate error messages.
Adding Views for our Controllers
Our next step will be to add two “View templates” to our project – one for “Index” and one for “Create”.
We’ll add the “Index” view to our project by moving our cursor within the Index action method of our controller, and then right-click and choose the “Add View” menu command. This will bring up the “Add View” dialog. We’ll specify that we want to create a strongly-typed view, and that we are passing in a IEnumerable list of “Dinner” model objects to it:
When we click “Add”, Visual Studio will create a /Views/Home/Index.aspx file. Let’s then add the following code to it – which generates a <ul> list of Dinners, and renders a hyperlink that links to our create action:
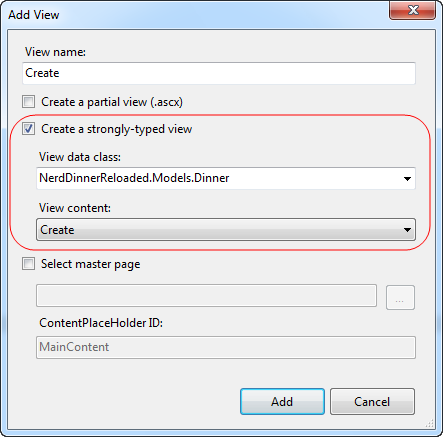
We’ll then add the “Create” view to our project by moving our cursor within the Create action method of our controller, and then right-click and choose the “Add View” menu command. Within the “Add View” dialog we’ll specify that we want to create a strongly-typed view, and that we are passing it a Dinner object. We’ll also indicate that we want to “scaffold” using a “Create” template:
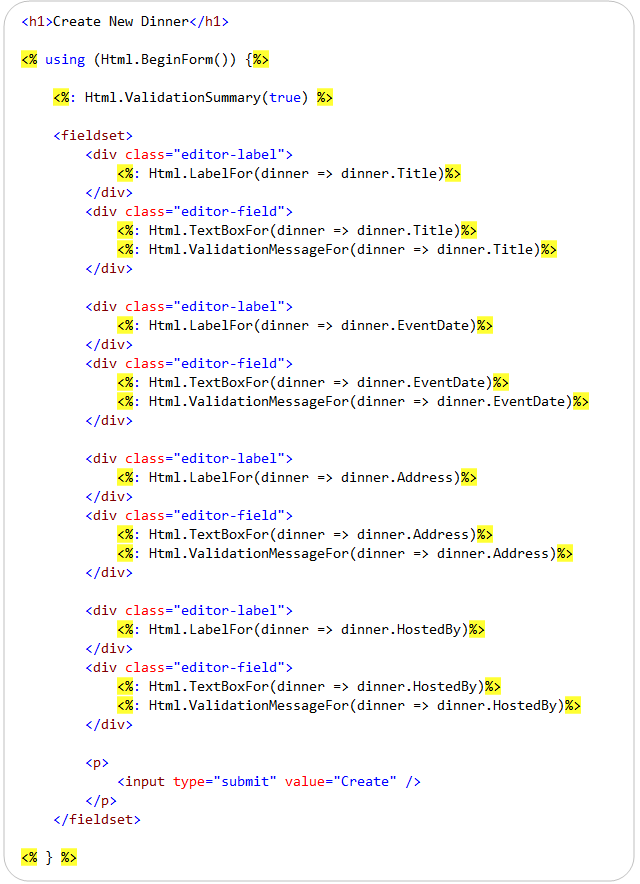
When we click “Add”, Visual Studio will create a /Views/Home/Create.aspx file with some scaffold-generated content within it that outputs an HTML <form> for a “Dinner” object. We’ll tweak it slightly and remove the input element for the DinnerID property. Our final view template content will look like this:
We have now implemented all of the code we need to write within our Controller and Views to implement the Dinner listing and Dinner creation functionality within our web application.
Step 4: The Database
We’ve written our code. Now let’s run the application.
But what about the database?
We don’t have a database yet – and haven’t needed one so far because our “code first” development workflow hasn’t required us to have one to define and use our model classes.
But we will need a database when we actually run our application and want to store our Dinner and RSVP objects. We can create the database one of two ways:
- Manually create and define the schema ourselves using a database tool (e.g. SQL Management Studio or Visual Studio)
- Automatically create and generate the schema directly from our model classes using the EF Code-First library
This second option is pretty cool and is what we are going to use for our NerdDinner application.
Configuring our Database Connection String
To begin with, we’ll setup a connection-string to point to where we want our database to live. We’ll do this by adding a “NerdDinners” connection-string entry to our application’s web.config file like so:
By default, when you create a DbContext class with EF code-first, it will look for a connection-string that matches the name of the context-class. Since we named our context class “NerdDinners”, it will by default look for and use the above “NerdDinners” database connection-string when it is instantiated within our ASP.NET application.
Taking advantage of SQL CE 4
You can use many different databases with EF code-first – including SQL Server, SQL Express and MySQL.
Two weeks ago I blogged about the work we are also doing to enable the embedded SQL CE 4 database engine to work within ASP.NET. SQL CE 4 is a lightweight file-based database that is free, simple to setup, and can be embedded within your ASP.NET applications. It supports low-cost hosting environments, and enables databases to be easily migrated to SQL Server.
SQL CE can be a useful option to use when you are in the early stages of defining (and redefining) your model layer – and want to be able to quickly create and recreate your database as you do so. We’ll use SQL CE 4 to begin with as we develop our NerdDinner application. We can later optionally change the connection-string to use SQL Express or SQL Server for production deployment – without having to modify a single line of code within our application.
The connection-string I specified above points to a NerdDinners.sdf database file, and specifies the SQL CE 4 database provider. In order for this to work you need to install SQL CE 4 – either via the Standalone SQL CE Installer or by installing WebMatrix (which includes it built-in). SQL CE 4 is a small download that only takes a few seconds to install.
Important: In the connection-string above I’m indicating that we want to create the NerdDinners.sdf file within the |DataDirectory| folder – which in an ASP.NET application is the \App_Data\ folder immediately underneath the application directory. By default the “Empty ASP.NET MVC Web Application” project template does not create this directory. You will need to explicitly create this directory within your project (right click on the project and choose the “Add->ASP.NET Folder->Add_Data” menu item).
Automatic Database Schema Creation
EF code-first supports the ability to automatically generate database schema and create databases from model classes – enabling you to avoid having to manually perform these steps.
This happens by default if your connection-string points to either a SQL CE or SQL Express database file that does not already exist on disk. You do not need to take any manual steps for this to happen.
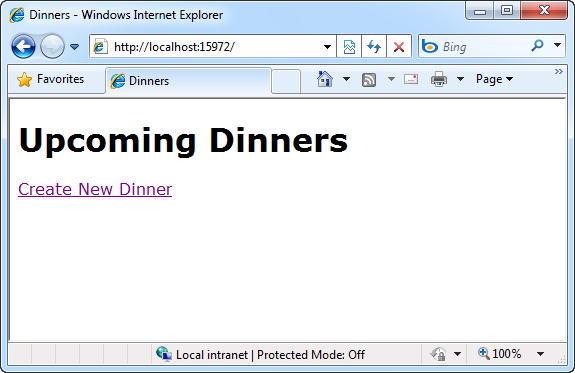
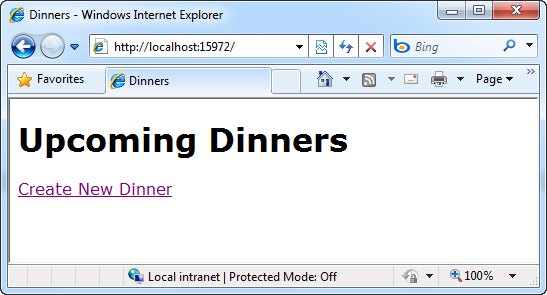
To see this in action, we can press F5 to run our NerdDinner application. This will launch a browser at the root “/” URL of our application. You should see a screen like below rendered back:
The “/” URL to our application invoked the HomeController.Index() action method – which instantiated and queried our NerdDinners context object to retrieve all upcoming Dinners from our database. Because the NerdDinners.sdf database file we pointed our connection-string to didn’t already exist, the EF code-first library automatically generated it for us. It used our NerdDinners context object to automatically infer the database schema for the database it generated.
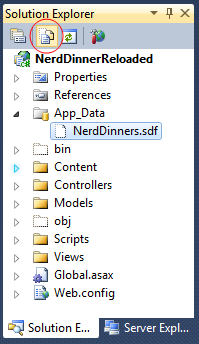
To see the SQL CE database file that was generated, click the “Show all Files” icon within the Visual Studio solution explorer, and then press the “Refresh” button and expand the App_Data folder:
We will be shipping an update to VS 2010 in the future that enables you to open up and edit SQL CE 4 databases within the “Server Explorer” tab (just like you do with SQL databases today). This will enable you to easily see (and optionally tweak) the schema and contents of the database. Until then you can optionally use the database tools within WebMatrix to examine the SQL CE 4 database file’s contents.
We did not specify any custom persistence mapping rules with our NerdDinners context – so the database that was generated followed the default EF code-first naming conventions to map the schema. If we had specified any custom mapping rules, though, the EF code-first library would have honored those and generated a database that matched them.
Just to refresh our memory – here are the two POCO model classes and the NerdDinners context class that we defined earlier:
Below are the tables that were added when we ran our application and the database was automatically created based on the above model:
The definition of the “Dinners” table looks like below. The column names and data-types map to the properties of the Dinner class we defined. The DinnerID column has also been configured to be both a primary key and an identity column:
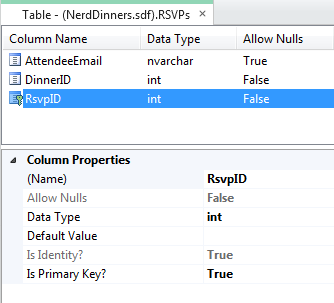
The definition of the “RSVPs” table looks like below. The column names and data-types map to the properties of the RSVP class we defined. The RsvpID column has also been configured to be both a primary key and an identity column:
A one to many primary key/foreign key relationship was also established between the Dinners and RSVPs tables. The EF code-first library inferred that this should be established because our Dinner class has an ICollection<RSVP> property named RSVPs, and the RSVP class has a Dinner property.
Populating the Database with some Dinners
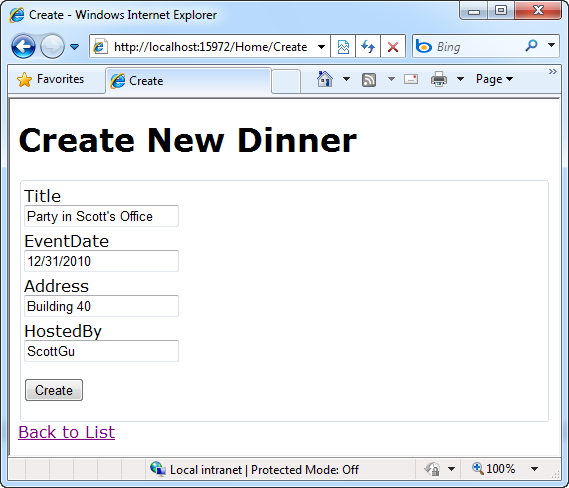
Let’s now create and add some Dinners to our database. We’ll do this by clicking the “Create New Dinner” link on our home-page to navigate to our “Create” form:
When we click the “Create” button, our new Dinner will be saved in the database. We can repeat this multiple times to register several different Dinners. Each new Dinner we create will be persisted within our database and show up in our Home listing of upcoming dinners:
Step 5: Changing our Model
We are going to continually evolve and refactor our model as our application grows. The EF code-only library includes some nice development features that make it easier to coordinate this evolution with a development database.
Adding a new Property to the Dinner Model
Let’s walkthrough making a simple change to our Dinner class. Specifically, we’ll add an additional property to our Dinner class called “Country”:
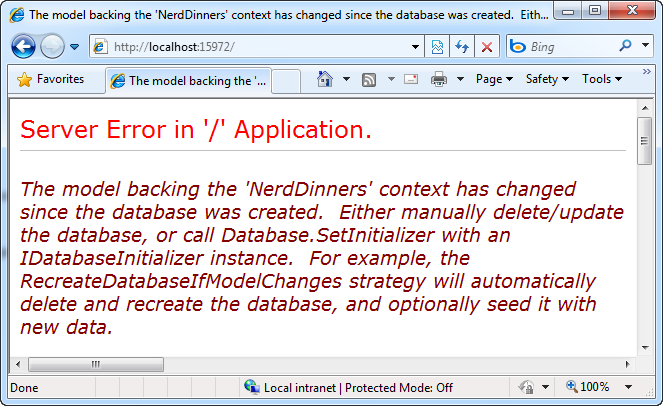
Now that we’ve made this change, let’s press F5 in Visual Studio to build and re-run the application. When we do this we’ll see the below error message:
This error message occurs because we’ve changed the structure of our Dinner class, and our model object is now no longer the same shape as the “Dinners” table we automatically created within our database.
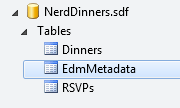
When EF automatically creates a database for you, it by default adds an “EdmMetadata” table to the database that tracks the shape of the model objects that were used to automatically create the database schema for you:
The error message above occurs when EF detects that you’ve made a change to a model object and it is now out of sync with the database it automatically created for you.
Re-synchronizing our Model Classes with the Database
There are a couple of ways we can “re-sync” our model objects and our database:
- We can manually update our database schema to match our models
- We can manually delete our database file, re-run the application, and have EF automatically re-create the database
- We can enable a feature of EF code-first that automatically updates our database for us whenever we change our models
Let’s look at how we can use this last automatic option with our NerdDinner application.
The RecreateDatabaseIfModelChanges Feature
CTP 4 of the EF Code First library includes a useful development-time feature that enables you to automatically re-create your database anytime you make modifications to your model classes. When you enable it, EF identifies when any of the model classes that were used to automatically create a database are modified, and when that happens can re-create your database to match the new model class shape – without you having to take any manual steps to do so.
This capability is especially useful when you are first developing an application, since it gives you the freedom and flexibility to quickly refactor and restructure your model code however you want - without having to do any manual work to keep your database schema in sync along the way. It works especially well with SQL CE – since it is a file-based database that can be dropped and recreated on the fly in under a second. This can enable an incredibly fluid development workflow.
The easiest way to enable this capability is to add a Database.SetInitializer() call to the Application_Start() event handler within our Global.asax class:
This tells EF to re-create our NerdDinners.sdf database to match our NerdDinners model anytime our model classes change shape. Now when we re-run our application we will no longer get that error message telling us that our model classes and database are out of sync. EF will instead automatically re-create a database for us that matches our new model class shape, and our application will run fine:
Seeding Initial Data in Automatically Created Databases
One of the things you might have noticed in the above screen-shot is that we lost our dinner data when we recreated the database. This is because the automatic “RecreateDatabaseIfModelChanges” behavior isn’t intended for production scenarios where you want to “migrate” existing data from one schema to another. Instead it is designed for development scenarios where you want the database to be quickly and automatically updated for you – without you having to take any manual steps or specify migration rules to do so.
Note: We are separately working to provide better data migration support for scenarios where you are working with production data and want to version the schema. We think of that as a different scenario than this early development-time feature that I’m describing here. The data migration capability isn’t enabled yet with this week’s CTP.
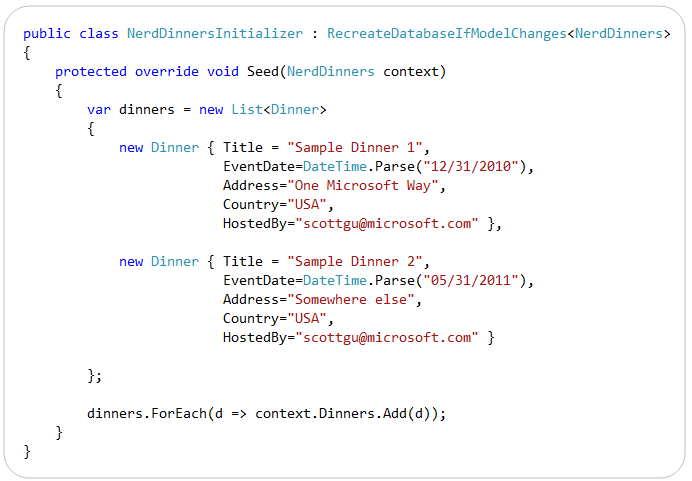
EF supports the ability for us to optionally “seed” our generated database with default/test data anytime the database is created/recreated. I find this feature really useful since it enables me to refactor a model, and then quickly run the application to try out a scenario – without having to enter in a bunch of test data manually to do so.
We can “seed” our NerdDinners database with default data by writing a “NerdDinnersIntializer” class like below. I’m using it to create two “sample dinners” and adding them to our database like so:
We can then update the Database.Initializer() call we added to our Global.asax to use this “NerdDinnersInitializer” class at startup:
And now anytime we make a change to one of our NerdDinner model classes, the database will be automatically dropped and recreated to match our models, and we’ll have two dinners already seeded in the database for testing purposes:
Easy Refactoring
The above features make it really easy to evolve and refactor your code at development time – without having to use tools or run scripts to manually keep your database in sync with your code changes.
Because our model classes, LINQ expressions, and “seed” test data are all strongly typed, we can also take advantage of refactoring tool support inside Visual Studio to quickly and automatically apply changes across our code base in a quick and easy way.
Step 6: Adding Validation Rules
We’ve built a nice, simple data-entry application.
One problem with it, though, is that we don’t currently have any type of input validation in place to ensure that fields are filled out correctly within our Create Dinner form. Let’s fix that.
Adding Validation using DataAnnotations
Validation rules in an ASP.NET MVC based application are usually best expressed within a model. This enables them to be maintained in a single place, and enforced across any number of controllers and views that might interact with them. ASP.NET MVC enables you to implement validation rules using a variety of different mechanisms, and is flexible enough to support just about any validation scheme you want to use.
ASP.NET MVC 2 includes built-in support for using .NET’s System.ComponentModel.DataAnnotations library of validation rules – which enable you to declaratively apply validation rules to model classes using validation attributes. You can learn more about this capability in a previous blog post I wrote. We’ll take advantage of this approach to enable input validation for our NerdDinner application.
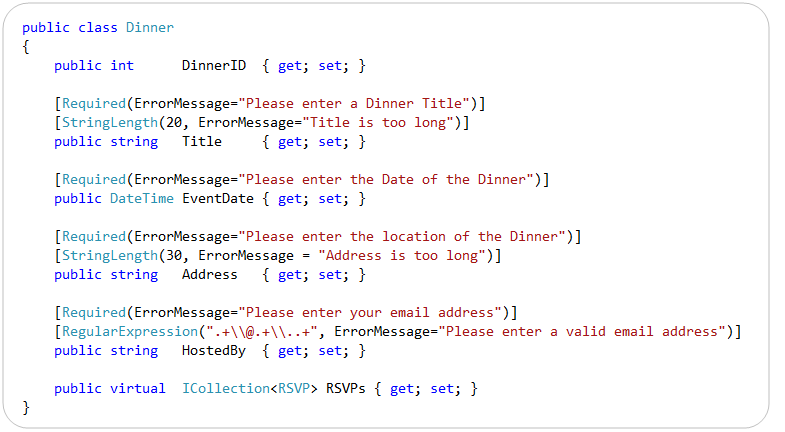
Let’s go back to the Dinner class we defined earlier and add some validation attributes to its properties (note: we need to add a “using System.ComponentModel.DataAnnotations” namespace as well):
The [Required] validation attribute indicates that a particular property must be specified. The [StringLength] validation attribute allows us to indicate a maximum length for a particular string property. The [RegularExpression] validation attribute allows us to indicate that a particular string property must match a specified regular expression in order to be valid – in this case an email address.
Each of the validation attributes supports an “ErrorMessage” property – which allows us to specify an error message that should be displayed if the validation fails. This can either be hard-coded as a string (like above) or pulled from a resource – enabling it to be easily localized.
Referencing some CSS and JavaScript files
The last step will be to go back to our Create.aspx view template and add a <link> reference to a Site.css file in our project, as well as two <script> elements that reference two JavaScript files in our project. We’ll also add one line of code to call Html.EnableClientValidation() before our <form> element is rendered:
These changes will ensure that any validation error messages that are displayed in the page are styled (to make them more visible), and that the validation rules we apply on our model will be applied both on the client and on the server.
Running the Application
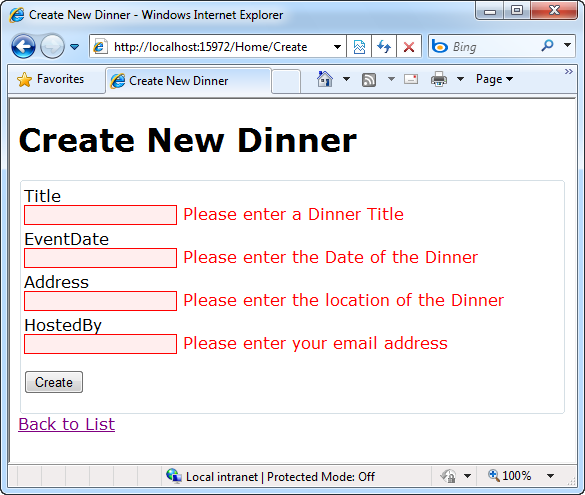
Let’s re-run the application and try to create a new Dinner. Let’s begin by pushing the “Create” button with no values filled out. We’ll find that we now see the validation error messages we applied to our model showing up in the browser:
Because we enabled client-side validation with ASP.NET MVC (that was the one line of code we wrote above), our error messages will update and change in real-time:
Notice above how our validation error message changed once our “Title” became longer than 20 characters. This is because we have a [StringLength] property on our Dinner.Title property that indicates a maximum allowed size of 20 characters. As we started entering a value within the “HostedBy” textbox, our error message likewise changed from the “[Requred]” error message (which asks you to enter your email address) to the “[RegularExpression]” error message (which is telling us we don’t have a valid email address).
These validation rules work both within the browser (via JavaScript) and on the server (enabling us to protect ourselves even if someone tries to bypass the JavaScript validation) – without us having to make any changes to our controller class. The ability to specify these rules once within our model, and have them apply everywhere, is extremely powerful – and will enable us to continue to evolve our application in a very clean way.
You can learn more about these ASP.NET MVC 2 Model Validation features and how they work here.
Download
Click here to download and run the above NerdDinnerReloaded sample we’ve built in this blog post. It requires VS 2010 (or the free Visual Web Developer 2010 Express).
Important: You must download and install SQL CE 4 on your machine for the above sample to work. You can download the EF Code-First library here. Neither of these downloads will impact your machine.
Summary
This week’s CTP4 release of the “EF Code-First” functionality provides a pretty nice code-centric way to work with data. It brings with it a lot of productivity, as well as a lot of power. In today’s tutorial I focused mostly on some of the new productivity enhancements provided with the CTP4 release. There are many more scenarios we could drill into including its Fluent API for enabling custom persistence mapping rules, its improved testability support, and other more advanced capabilities.
You can download this week’s CTP4 release of EF Code-First here. To learn even more about “EF Code-First” check out these blog posts by the ADO.NET team:
















 浙公网安备 33010602011771号