ceph---luminous版的安装

前言
ceph luminous版本新增加了很多有意思的功能,这个也是一个长期支持版本,所以这些新功能的特性还是很值得期待的,从底层的存储改造,消息方式的改变,以及一些之前未实现的功能的完成,都让ceph变得更强,这里面有很多核心模块来自中国的开发者,在这里准备用一系列的文章对这些新功能进行一个简单的介绍,也是自己的一个学习的过程
相关配置
配置ceph国内源
修改或者新建 /etc/yum.repos.d/ceph.repo文件
[ceph]
name=ceph
baseurl=http://mirrors.163.com/ceph/rpm-luminous/el7/x86_64/
gpgcheck=0
[ceph-noarch]
name=ceph-noarch
baseurl=http://mirrors.163.com/ceph/rpm-luminous/el7/noarch/
gpgcheck=0
添加完更新下缓存
yum makecache
|
默认不配置环境变量,即便是配置好了ceph.repo文件,安装的也是j版的,
配置了环境变量,配置文件其实不要也可以,
jewel版
|
luminous版
export CEPH_DEPLOY_REPO_URL=http://mirrors.163.com/ceph/rpm-luminous/el7 |
前一段时间163源上的ceph没有了,可能是误操作的,现在的163源已经恢复,上面添加的是最新的luminous版本源,本篇实践的功能是在这个版本才加入的
安装ceph相关软件包
[root@ceph-ceph-3]#yum install ceph-deploy ceph
|
检查版本
[root@ceph-3 ceph-ceph-3]# ceph -v
ceph version 12.1.0 (262617c9f16c55e863693258061c5b25dea5b086) luminous (dev)
|
检查集群健康状态
[root@ceph-3 ceph-ceph-3]# ceph -s
cluster:
id: ea64cc3d-7b7a-4676-b993-df5d71fd7f77
health: HEALTH_WARN
no active mgr
services:
mon: 3 daemons, quorum ceph-1,ceph-2,ceph-3
mgr: no daemons active
osd: 3 osds: 3 up, 3 in
data:
pools: 0 pools, 0 pgs
objects: 0 objects, 0 bytes
usage: 3164 MB used, 296 GB / 299 GB avail
pgs:
可以看到health为警告状态,提示我们mgr没有active
为mgr创建用户
ceph auth get-or-create mgr.ceph-1 mon 'allow profile mgr' osd 'allow *' mds 'allow *'
查看是否创建mgr用户成功
ceoh auth list
mgr.ceph-1
key: AQB//PZZbTAzJRAAEakxeHeehHHwbo/AiWTQFg==
caps: [mds] allow *
caps: [mon] allow profile mgr
caps: [osd] allow *
创建mgr的秘钥目录,看启动服务看log时说需要这个文件夹,那么我创建这个文件夹,这里我提前创建,将秘钥导入到里边
mkdir -p /var/lib/ceph/mgr/ceph-ceph-1/
导入秘钥:
ceph auth get-or-create mgr.ceph-1 -o /var/lib/ceph/mgr/ceph-ceph-1/keyring
也可以把这两步合成一步:
ceph auth get-or-create mgr.ceph-1 mon 'allow profile mgr' osd 'allow *' mds 'allow *' -o /var/lib/ceph/mgr/ceph-ceph-1/keyring
授权:
chown -R ceph:ceph /var/lib/ceph/mgr/ceph-ceph-1/*
启动mgr服务:
systemctl restart ceph-mgr@ceph-1
看ceph状态:
[root@ceph-1 ceph-ceph-1]# ceph -s
cluster:
id: ea64cc3d-7b7a-4676-b993-df5d71fd7f77
health: HEALTH_OK
services:
mon: 3 daemons, quorum ceph-1,ceph-2,ceph-3
mgr: ceph-1(active)
osd: 3 osds: 3 up, 3 in
data:
pools: 0 pools, 0 pgs
objects: 0 objects, 0 bytes
usage: 3164 MB used, 296 GB / 299 GB avail
pgs:
可以看出转态又原来的warring变为ok了,也可以看到mgr:ceph(active)了
dashboard
开启监控
在所有运行了 ceph-mgr 守护进程的机器上编辑ceph配置文件 /etc/ceph/ceph.conf ,以启用 dashboard。
哪条服务器上有ceph-mgr的进程,哪台服务器需要配置dashboard参数。
ps -ef|grep ceph-mgr
root 2549 2301 0 18:27 pts/1 00:00:00 tail -f /var/log/ceph/ceph-mgr.ceph-1.log
ceph 2786 1 0 18:36 ? 00:00:00 /usr/bin/ceph-mgr -f --cluster ceph --id ceph-1 --setuser ceph --setgroup ceph
root 2840 1199 0 18:39 pts/0 00:00:00 grep --color=auto ceph-mgr
在/etc/ceph/ceph.conf文件下添加:
[mgr]mgr_modules = dashboard{
"epoch": 1624,
"active_gid": 44688,
"active_name": "ceph-1",
"active_addr": "10.10.10.11:6804/8406",
"available": true,
"standbys": [],
"modules": [
"restful",
"status"
],
"available_modules": [
"dashboard",
"prometheus",
"restful",
"status",
"zabbix"
]
}
[root@ceph-2 ~]# ceph mgr dump
{
"epoch": 1627,
"active_gid": 24764,
"active_name": "ceph-1",
"active_addr": "10.10.10.11:6804/8406",
"available": true,
"standbys": [],
"modules": [
"dashboard",
"restful",
"status"
],
"available_modules": [
"dashboard",
"prometheus",
"restful",
"status",
"zabbix"
]
}
[
"dashboard",
"restful",
"status"
]
查看配置的状态和参数和怎么删除上面设置
[root@ceph-1 ceph-ceph-1]# ceph config-key dump /////查看配置的状态
{
"mgr/dashboard/server_addr": "10.10.10.11",
"mgr/dashboard/server_port": "7000"
}
[root@ceph-1 ceph-ceph-1]# ceph config-key del mgr/dashboard/server_addr ////删除配置的参数
查看端口是否设置成功
[root@ceph-1 ~]# netstat -tunlp|grep ceph-mgr|grep LISTEN
tcp 0 0 0.0.0.0:6804 0.0.0.0:* LISTEN 9128/ceph-mgr
tcp 0 0 10.10.10.11:7000 0.0.0.0:* LISTEN 9128/ceph-mgr
已经成功设置
设置完之后就重启mgr服务
systemctl restart ceph-mgr@ceph-1
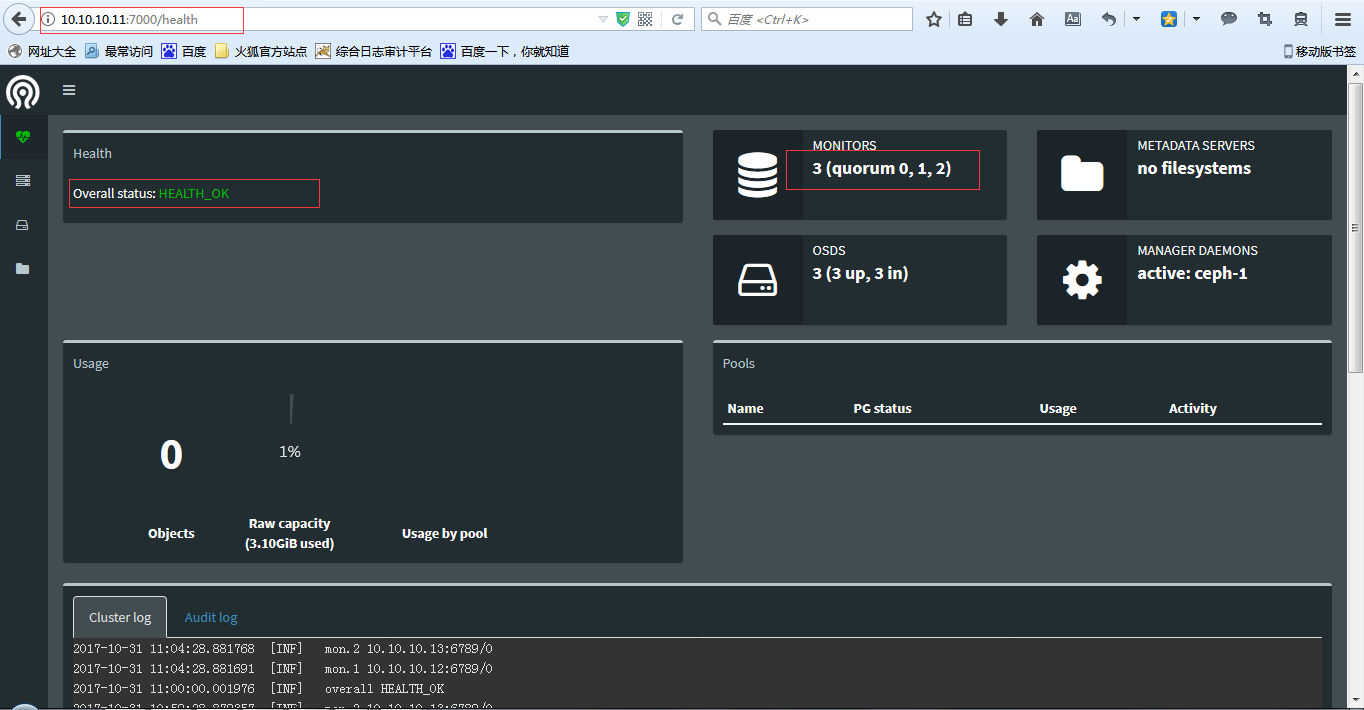
访问dashboard
打开浏览器输入:http://10.10.10.11:7000 /////具体访问地址根据自己的设定地址进行访问


