深入了解Vue组件 — 处理边界情况(上)
1.访问元素 & 组件
1.1 访问根实例
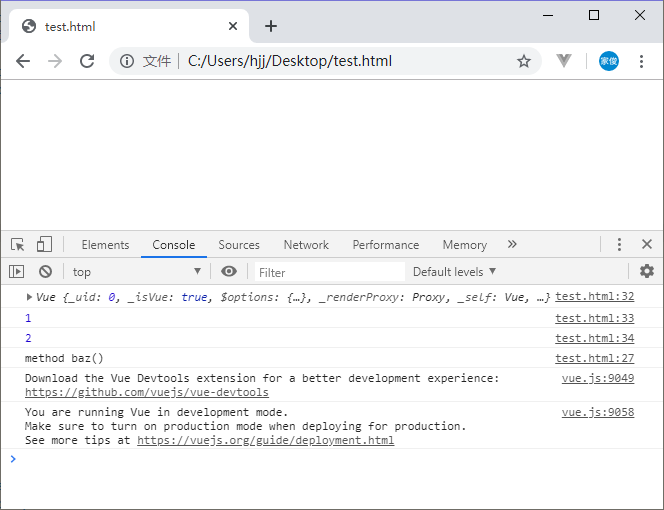
我们可以通过$root属性访问根实例。
<!DOCTYPE html>
<html>
<head>
    <meta charset="utf-8">
    <style>

    </style>
    <script src="https://cdn.jsdelivr.net/npm/vue/dist/vue.js"></script>
</head>
<body>
<div id="app">

</div>
<script>
    var vm = new Vue({
        el: '#app',
		data: {
			foo: 1
		},
		computed: {
			bar: function(){
				return 2
			}
		},
		methods: {
			baz: function(){
				console.log('method baz()');
			}
		}
    });

	console.log(vm.$root);
	console.log(vm.$root.foo);
	console.log(vm.$root.bar);
	vm.$root.baz()
</script>
</body>
</html>

1.2 访问父组件实例
我们可以通过$parent属性访问父组件的实例。
<!DOCTYPE html>
<html>
    <head>
        <meta charset="utf-8">
        <style>

        </style>
        <script src="https://cdn.staticfile.org/vue/2.4.2/vue.min.js"></script>
    </head>
    <body>
        <div id="app">
            {{ msg }}
			<my-button></my-button>
        </div>
        <script>
            new Vue({
                el: '#app',
                data: {
                    msg: '1'
                },
				mounted () {
					// 访问子组件
					console.log(this.$children[0].msg2); // 2
				},
				components: {
					'MyButton': {
						template: `<div>Hello</div>`,
						data () {
							return {
								msg2: '2'
							}
						},
						mounted () {
							// 访问父组件
							console.log(this.$parent.msg); // 1
						},
					}
				}
            });
        </script>
    </body>
</html>
1.3 访问子组件实例
<!DOCTYPE html>
<html>
    <head>
        <meta charset="utf-8">
        <style>

        </style>
        <script src="https://cdn.staticfile.org/vue/2.4.2/vue.min.js"></script>
    </head>
    <body>
        <div id="app">
			<button @click="showInput">显示</button>
            <base-input ref="usernameInput"></base-input>
        </div>
        <script>
            new Vue({
                el: '#app',
                data: {

                },
				methods: {
					showInput () {
						console.log(this.$refs.usernameInput.msg);
						this.$refs.usernameInput.show();
					}
				},
				components: {
					'BaseInput': {
                        template: `<input type="text" v-model="msg" />`,
						data () {
							return {
								msg: 'Hello'
							}
						},
                        methods: {
                            show () {
								console.log('Input ' + this.msg);
							}
                        },
					}
				}
            });
        </script>
    </body>
</html>
我们可以通过ref属性为子组件赋予一个ID引用(<base-input ref="usernameInput"></base-input>);然后父组件通过this.$refs引用ID为usernameInput的子组件(this.$refs.usernameInput)。
1.4 依赖注入
provide选项指定我们想要提供给子组件的数据/方法;在子组件我们通过inject选项接收父组件提供的数据/方法。
<!-- App.vue -->
<template>
  <div id="app">
    <HelloWorld/>
  </div>
</template>

<script>
import HelloWorld from './components/HelloWorld'

export default {
  name: 'App',
  provide () {
    return {
      foo: 'bar'
    }
  },
  components: {
    HelloWorld
  }
}
</script>

<style>
</style>
<!-- HelloWorld.vue -->
<template>
  <div>
    <h2 class="title">{{msg}}</h2>
  </div>
</template>

<script>
export default {
  inject: ['foo'],
  data () {
    return {
      msg: 'Hello Vue!'
    }
  },
  created () {
    console.log(this.foo)
  }
}
</script>

<style scoped>
  .title {
    padding: 5px;
    color: white;
    background: gray;
  }
</style>
2.程序化的事件侦听器
Vue实例的事件接口:
$on(eventName, eventHandler)$once(eventName, eventHandler)$off(eventName, eventHandler)
3.循环引用
3.1 递归组件
<!-- App.vue -->
<template>
  <div id="app">
    <Tree/>
  </div>
</template>

<script>
import Tree from './components/Tree'

export default {
  name: 'App',
  components: {
    Tree
  }
}
</script>

<style>
</style>
<!-- Tree.vue -->
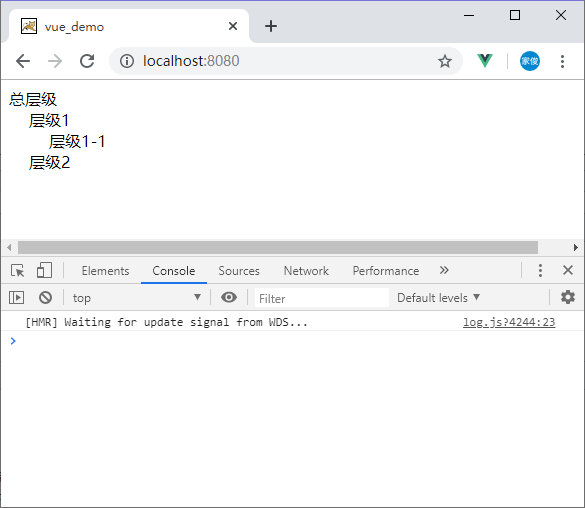
<template>
  <div>
    <tree-menu :label="tree.label" :nodes="tree.nodes" :depth="0"></tree-menu>
  </div>
</template>

<script>
import TreeMenu from './TreeMenu.vue'

export default {
  name: 'Tree',
  components: {TreeMenu},
  data () {
    return {
      tree: {
        id: '01',
        label: '总层级',
        nodes: [
          {
            id: '02',
            label: '层级1',
            nodes: [{
              label: '层级1-1'
            }]
          },
          {
            id: '03',
            label: '层级2',
            nodes: []
          }
        ]
      }
    }
  }
}
</script>

<style scoped>

</style>
<!-- TreeMenu.vue -->
<template>
  <div>
    <div :style="indent" @click="toggleChildren">{{ label }}</div>
    <div v-if="showChildren">
      <tree-menu v-for="(node, index) of nodes" :key="index" :nodes="node.nodes" :label="node.label" :depth="depth + 1"></tree-menu>
    </div>
  </div>
</template>

<script>
export default {
  name: 'TreeMenu',
  props: ['label', 'nodes', 'depth'],
  data () {
    return {
      showChildren: false
    }
  },
  methods: {
    toggleChildren () {
      this.showChildren = !this.showChildren
    }
  },
  computed: {
    indent () {
      return { transform: `translate(${this.depth * 20}px)` }
    }
  }
}
</script>

<style scoped>

</style>

下面是递归组件另一个简单的例子。
<!DOCTYPE html>
<html>
    <head>
        <meta charset="utf-8">
        <style>

        </style>
        <script src="https://cdn.staticfile.org/vue/2.4.2/vue.min.js"></script>
    </head>
    <body>
        <div id="app">
			<ul1 :index="count"></ul1>
        </div>
        <script>
            Vue.component('ul1', {
				props: ['index'],
                data: function () {
                    return {
                        count: this.index
                    }
                },
				created: function(){
					this.count++;
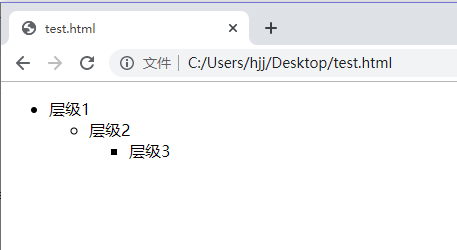
					console.log(this.count)
				},
                template: '<ul v-if="count<=3"><li>层级{{ count }}</li><ul1 :index="count"></ul1></ul>'
            });

            new Vue({
                el: '#app',
                data: {
                    count: 0
                }
            });
        </script>
    </body>
</html>

3.2 组件之间的循环引用
<!-- App.vue -->
<template>
  <div id="app">
    <ul>
      <li v-for="(folder, index) in folders" :key="index">
        <tree-folder :folder="folder"></tree-folder>
      </li>
    </ul>
  </div>
</template>

<script>
import TreeFolder from './components/TreeFolder'

export default {
  name: 'App',
  components: {
    TreeFolder
  },
  data: function () {
    return {
      folders: [
        {
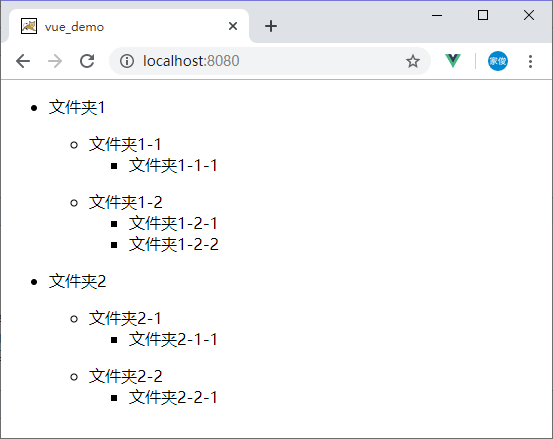
          name: '文件夹1',
          children: [{
            name: '文件夹1-1',
            children: [{ name: '文件夹1-1-1' }]
          }, {
            name: '文件夹1-2',
            children: [{
              name: '文件夹1-2-1'
            }, {
              name: '文件夹1-2-2'
            }]
          }]
        },
        {
          name: '文件夹2',
          children: [{
            name: '文件夹2-1',
            children: [{
              name: '文件夹2-1-1'
            }]
          }, {
            name: '文件夹2-2',
            children: [{
              name: '文件夹2-2-1'
            }]
          }]
        }
      ]
    }
  }
}
</script>

<style>
</style>
<!-- TreeFolder.vue -->
<template>
  <p>
    <span>{{ folder.name }}</span>
    <tree-folder-contents :children="folder.children"/>
  </p>
</template>

<script>
export default {
  name: 'TreeFolder',
  props: ['folder'],
  components: {
    TreeFolderContents: () => import('./TreeFolderContents')
  }
}
</script>

<style scoped>

</style>
<!-- TreeFolderContents.vue -->
<template>
<ul>
  <li v-for="(child, index) in children" :key="index">
    <tree-folder v-if="child.children" :folder="child"/>
    <span v-else>{{ child.name }}</span>
  </li>
</ul>
</template>

<script>
import TreeFolder from './TreeFolder'

export default {
  name: 'TreeFolderContents',
  props: ['children'],
  components: {
    TreeFolder
  }
}
</script>

<style scoped>

</style>

我们通过使用 Webpack 的异步import,解决了循环引用问题。
参考:


