

最近项目中要用到直传, 所以整理一下自己使用oss前端直传中遇到的问题
前端直传(前端保存oss账号,不安全)
let OSS = require('ali-oss')
export let client = new OSS({
  region: 'oss-cn-hangzhou',  // 填你的oss所在区域,例如oss-cn-shenzhen
  accessKeyId: 'LTAI5t6HAduxYGxxxxxxxxxxxxxx', // 填你的oss的accessKeyId
  accessKeySecret: 'wZaToZpLSqRxxxxxxxxxxxxxxxxxxk', // 填你的oss的accessSecret
  bucket: 'gyh2jlj' // 你创建的路径名称
})
其实也就是对oss对象的方法的调用:
          client.multipartUpload(filename, blobInfo.blob()).then(function (result) {
            if (result.res.requestUrls) {
              // 这里获取上传至阿里云的数据地址
              console.log('返回结果', result.res.requestUrls)
              success(result.res.requestUrls[0].split('?')[0])
            }
          }).catch(function (err) {
            console.log(err)
          })
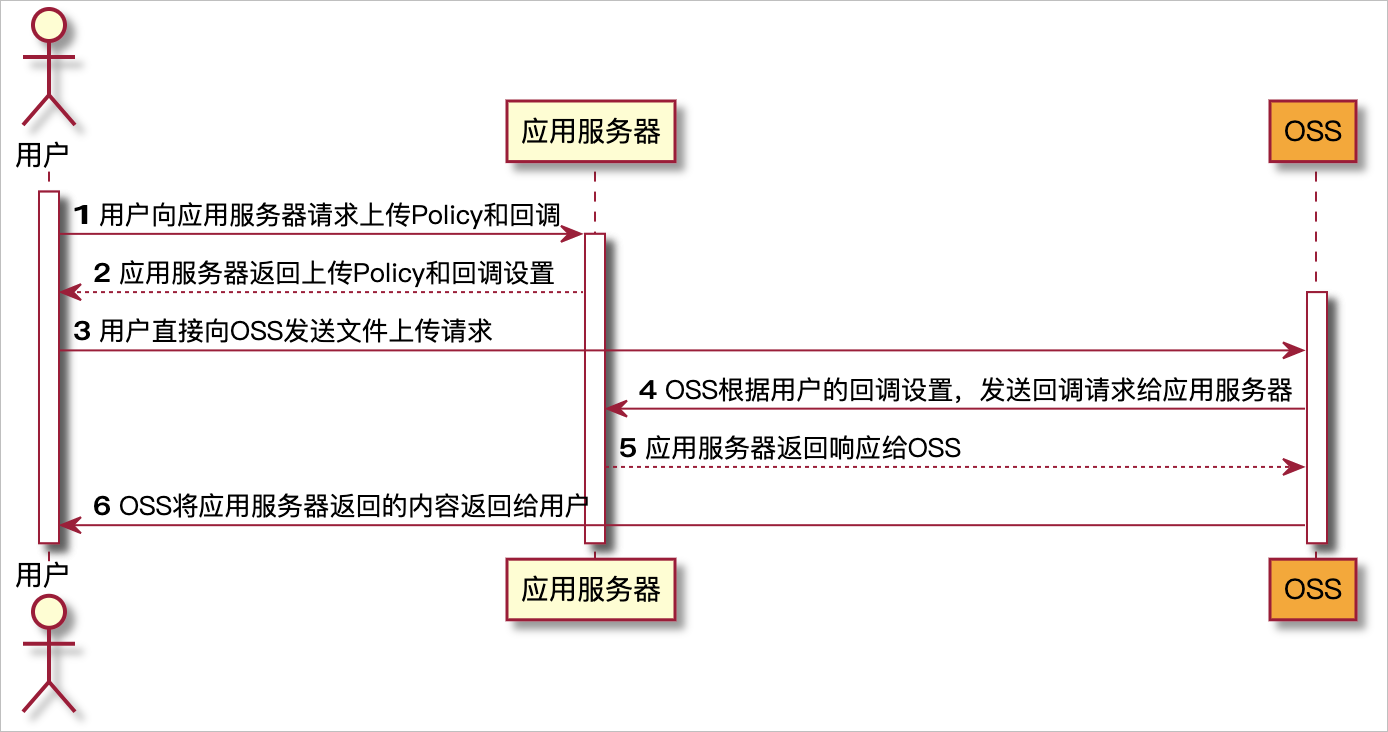
服务端签名直传
这个是从后台获取到签名,然后前端进行直传
<template>
  <div>
    <el-upload
      action="你创建的Bucket中的Bucket域名,xu"
      :data="dataObj"
      list-type="picture"
      :multiple="false" :show-file-list="showFileList"
      :file-list="fileList"
      :before-upload="beforeUpload"
      :on-remove="handleRemove"
      :on-success="handleUploadSuccess"
      :on-preview="handlePreview">
      <el-button size="small" type="primary">点击上传</el-button>
      <div slot="tip" class="el-upload__tip">只能上传jpg/png文件,且不超过10MB</div>
    </el-upload>
    <el-dialog :visible.sync="dialogVisible">
      <img width="100%" :src="fileList[0].url" alt="">
    </el-dialog>
  </div>
</template>
<script>

  export default {
    name: 'singleUpload',
    props: {
      value: String
    },
    computed: {
      imageUrl() {
        return this.value;
      },
      imageName() {
        if (this.value != null && this.value !== '') {
          return this.value.substr(this.value.lastIndexOf("/") + 1);
        } else {
          return null;
        }
      },
      fileList() {
        return [{
          name: this.imageName,
          url: this.imageUrl
        }]
      },
      showFileList: {
        get: function () {
          return this.value !== null && this.value !== ''&& this.value!==undefined;
        },
        set: function (newValue) {
        }
      }
    },
    data() {
      return {
        // 封装服务端返回的数据
        dataObj: {
          policy: '',
          signature: '',
          key: '',
          ossaccessKeyId: '',
          dir: '',
          host: '',
        },
        dialogVisible: false
      };
    },
    methods: {
      emitInput(val) {
        this.$emit('input', val)
      },
      handleRemove(file, fileList) {
        this.emitInput('');
      },
      handlePreview(file) {
        this.dialogVisible = true;
      },
      beforeUpload(file) {
        console.log(file.size);
        let _self = this;
        return new Promise((resolve, reject) => {
          // 这里使用了封装的请求方式,可以直接换成axios即可
          http({
            url: http.adornUrl("/oss/policy"),
            method: "get",
            params: http.adornParams({})
          }).then(response => {
            console.log("响应的数据",response);
            _self.dataObj.policy = response.data.policy;
            _self.dataObj.signature = response.data.signature;
            _self.dataObj.ossaccessKeyId = response.data.accessid;
            // 存放进oss的命名格式为uuid+原本文件名
            _self.dataObj.key = response.data.dir + '/' + getUUID()+'_${filename}';
            _self.dataObj.dir = response.data.dir;
            _self.dataObj.host = response.data.host;
            resolve(true)
          }).catch(err => {
            reject(false)
          })
        })
      },
      handleUploadSuccess(res, file) {
        console.log("上传成功...")
        this.showFileList = true;
        this.fileList.pop();
        this.fileList.push({name: file.name, url: this.dataObj.host + '/' + this.dataObj.key.replace("${filename}",file.name) });
        this.emitInput(this.fileList[0].url);
      }
    }
  }
</script>
<style>

</style>
需要阿里云服务器配置跨域,开启读写权限
最后是STSToken临时授权上传
参考https://segmentfault.com/a/1190000020963346
以及官网https://help.aliyun.com/document_detail/64041.html
1.       // 获取STS token
      this.credentials = await _api_stsTokenUpdata()

2.	      // 创建对象
      this.ossClient = new OSS({
        region: 'oss-cn-beijing',
        accessKeyId: this.credentials.data.accessKeyId,
        accessKeySecret: this.credentials.data.accessKeySecret,
        stsToken: this.credentials.data.securityToken,
        bucket: this.credentials.data.bucketName,
        secure: true
      })
3. this.ossClient.multipartUpload(fileName, file, {
        parallel:this.parallel,//同时上传几片
        partSize:this.partSize,//每片大小
        progress: (p, cpt, res) => {
              // 为中断点赋值。
              this.abortCheckpoint = cpt;
              console.log('abortCheckpoint',this.abortCheckpoint);
              // 获取上传进度。
              console.log(p * 100);
              this.per = Math.floor(p*100)
            },//进度条
      }).then(result => {
        // 生成文件下载地址
        const url = `http://${bucket}.${region}.aliyuncs.com/${fileName}`;
        console.log(`分片上传Multipart upload ${file.name} succeeded, url === `, url)
      }).catch(err => {
        console.log(`分片上传Multipart upload ${file.name} failed === `, err);
      });
    },


【推荐】国内首个AI IDE,深度理解中文开发场景,立即下载体验Trae
【推荐】编程新体验,更懂你的AI,立即体验豆包MarsCode编程助手
【推荐】抖音旗下AI助手豆包,你的智能百科全书,全免费不限次数
【推荐】轻量又高性能的 SSH 工具 IShell:AI 加持,快人一步
· 10年+ .NET Coder 心语 ── 封装的思维:从隐藏、稳定开始理解其本质意义
· 地球OL攻略 —— 某应届生求职总结
· 周边上新:园子的第一款马克杯温暖上架
· Open-Sora 2.0 重磅开源!
· 提示词工程——AI应用必不可少的技术