上一篇:WF从入门到精通(第十六章):声明式工作流
学习完本章,你将掌握:
1.了解工作流关联(correlation)以及在什么地方必须去使用它、它为什么是重要的
2.使用工作流关联参数(correlation parameters)
3.生成并使用相关的本地通信服务
贯穿本书你看过的应用程序普遍都是基于单一相同架构的,通过WF的支持在工作流实例中执行任务。这些都是在应用程序和它的工作流实例间进行一对一的通信。假如你和一个工作流实例进行通信,你这样做保证了无论以任何方式在应用程序和工作流之间传送数据都不会被混淆。一个应用程序对应一个工作流。
但是至少有一种情况也是有可能的,这是应用程序和工作流在同一个应用程序域(AppDomain)中执行的时候。你单独的一个应用程序会调用同一个工作流的多个副本。来回传送数据会发生什么呢?
显然,有些人需要了解工作流和哪些数据协同工作的。通常我们不能混淆并要进行匹配比较。一旦创建了工作流实例并入队执行后,如果它绑定到一个指定的数据标识符,用工作流对不同的数据标识符进行信息的处理可能存在数据完整性的问题。
其实,WF提供了一些内部簿记来帮助我们防止数据完整性的问题。在WF术语中,它被叫做关联(correlation),WF提供了非常强大的关联支持但它也很容易地使用。
宿主和工作流的本地通信
在我们进入关联的论题之前,让我们简要地回顾一下宿主和工作流的整个通信过程。在第8章“调用外部方法和工作流”中,介绍了CallExternalEvent活动并使用了一个本地通信服务来把数据从工作流发送到宿主应用程序中。在第10章“事件活动”中,使用了HandleExternalEvent活动来进行相反过程的处理:宿主也能把数据发送到工作流中。
不论数据以哪种方式进行传送,我们首先都要创建一个接口。接口中的方法注定最终会成为CallExternalEvent活动,而接口中的事件则最终会成为HandleExternalEvent活动。我们使用wca.exe工具来为我们生成这些基于我们的接口的自定义活动。(我们也可以直接使用CallExternalEvent活动和HandleExternalEvent活动,它提供出要处理的每一个接口、方法或者事件,但是在我们的工作流中创建自定义活动是我们所强烈推荐的。)
随着手头有了接口,我们然后就创建了一个本地服务并把它插入进了工作流运行时中,让它去管理我们的本地通信需求。本地服务由一个数据连接器和一个服务类组成。
当应用程序需要发送数据到工作流中时,它需要得到这个来自工作流运行时的服务,然后激发由接口提供的事件。假如你把该事件处理器(event handler)拖进了工作流中并在适当的时候调用了该事件的话,你的工作流运行时会处理这些事件。
另一方面,对本地通信服务来说,工作流却没有查询工作流运行时的必要。拖拽一个CallExternalMethod活动到你的工作流的处理路径中以后,在数据抵达的时候会自动通知宿主——这里再次假设宿主应用程序把一个接收数据事件的事件处理程序(event handler)连接到了本地通信服务上。工作流运行时保持工作流实例和本地通信服务以及宿主应用程序之间的联系。
关联
再次回味上一段内容。工作流实例不需要到处搜寻和宿主应用程序进行通信的服务。但是宿主应用程序还是需要查询本地通信服务。尽管如此,在某种程度上,由于宿主和工作流运行时之间交互的性质,处理过程也要强调宿主应用程序和工作流实例之间的一对多的关系。
宿主应用程序需要识别出它想和哪一个工作流实例进行通信,因为可能有很多个选择。但是,一个工作流实例却没有这样的选择:因为它只可能属于一个宿主应用程序。
宿主为了数据通信总是要通过查询工作流运行时来获取服务,本地通信服务正是一个你或许想去访问的服务之一。相反的过程无疑也是同样的。工作流被绑定到本地通信服务上而不用关心宿主应用程序的身份,这是架构设计上的必然结果,因为一个工作流实例只能属于一个宿主应用程序(它们之间是一对多的关系),它不可能属于一个以上的应用程序,所以不需要识别出应用程序的身份。综上所述,工作流运行时由此为工作流实例提供了本地通信服务,工作流实例可随意地调用外部方法。
那么,对于宿主来说,使用工作流实例的标识符来传送和其相关的数据流的这种方式可行吗?也就是说,假如你掌握了一个工作流实例,然后试图和工作流往返发送和接收数据,难道仅仅有了一个工作流实例的ID号还不能足够唯一地识别出工作流实例和其关联的数据吗?
是的,假如你的数据流不是单一的数据流的话。因为在你的工作流中有多个数据路径进出。为此,关联诞生了。
当你使用相关的工作流通信的时候,工作流运行时最终会为识别出我们谈到的工作流和数据所必需的大量信息创建一个存储容器。当宿主和工作流来回传送数据的时候需要咨询相关令牌(correlation token),假如相关令牌指明了两边的会话是同步的,则意味着正确的工作流实例和绑定的活动正在和正确的一批数据进行通信,能继续进行通信。但是,假如相关令牌指出一个问题,则工作流运行时就不允许继续进行数据通信并抛出一个异常。问题可能包括正使用一个不正确的工作流实例、正和错误的数据通信、调用了绑定到不同的相关令牌上的活动、或者试图在没有首先创建相关令牌的情况下发送数据。
相关令牌由CorrelationToken类维护。当你拖拽CallExternalMethod或者HandleExternalEvent活动到你的工作流中的时候,假如关联被调用,你就需要指定一个相关令牌。相关令牌通过名称进行共享,因此从数据会话的观点来看,通过为超过一个以上的相关活动指定相同名称的相关令牌,你可有效地把这些活动绑定到一起。令牌的名称只不过是一个字符串,除了进行识别外它的值没有什么意义。
为什么本书不更早介绍相关令牌呢?这是一个好问题。毕竟,我们在前面的工作中无疑已经使用过CallExternalMethod和HandleExternalEvent活动。
答案是我们选择的是不去调用关联。关联在所有的情况下并不都是必须的,直到本章你才真正创建了这样的工作流。当你的应用程序和工作流实例之间是一对一的映射的时候,关联不是必须的,你可忽略它并享受由此带来的性能上的略微改进。
即使当你的单一的宿主应用程序有多个工作流实例的时候,没有关联你也能正常工作。但是,当你使用关联的时候,WF会防止你在不经意间混淆数据,在许多情况下,这是一个非常可取的特性。
为了激活关联的使用基础,当你创建你的宿主通信接口的时候你要使用一个特定的基于WF的特性。一个好消息是处理执行宿主通信不会由此改变很多,但是在你的工作流上产生的效果却是激动人心的。
CorrelationParameter特性
假如你考虑在单一宿主应用程序的环境下可能会出现多个工作流实例的话,你可能将会发现传送数据的事件和方法也会传送某种唯一的标识符。一个订单处理系统可能要传送一个客户ID,或者一个包装系统可能要传送一个批号。这个唯一标识符的类型是确定数据唯一实例的完美候选,事实上,的确如此。
当你在你的通信接口中设计方法和事件的时候,你也要为其设计一个数据相关ID的签名。数据相关ID在所有的空间和时间情况下并不保证必须是唯一的。但是,假如它不是一个Guid,它就必定要保证在工作流实例执行期间要被唯一地使用。
也许令人惊讶的是,假如你创建了两个相关的工作流实例,它们使用了同一个参数值(即创建了两个使用了同一客户ID的工作流)在同一时间运行的话,这并不是一个错误。关联仅仅和使用了单一的关联参数值的单一的工作流实例联系起来。使用一个关联参数值创建的工作流在调用方法和事件进行数据交换时使用了不同的关联值的地方则是错误,在这些地方WF可帮助你防止产生错误。
你要在你的接口定义中包括CorrelationParameter特性来通知WF哪些方法参数要承载这个数据关联ID值(把它们放在ExternalDataExchange特性的旁边)。当数据传递的时候WF能够检查参数的内容。例如,假如你的逻辑试图混淆客户或者(包装)批号的话,WF将抛出System.Workflow.Activity.EventDeliveryFailedException。
这个异常对你很有帮助,因为它指出了你的处理逻辑部分存在明确的不匹配的数据。例如,一个客户却为其它客户买单,显而易见,这种结果是不期望发生的。假如你接收到一个异常,你就需要去检查你应用程序中不正确的逻辑处理操作。
CorrelationParameter特性在它的构造器中接收一个字符串。这个字符串代表了你的接口所使用的包含了唯一ID的参数的名称。假如你要为某一指定的方法进行对该参数进行重命名,你就可通过使用CorrelationAlias参数来为这些事件和方法进行参数的重命名。你将在本章的稍后部分读到关于这个参数的更多知识。
CorrelationInitializer特性
当数据通信开始进行的时候,WF也需要初始化相关令牌。为了方便地完成这个工作,你可在方法或事件上加入CorrelationInitializer特性来进行数据通信,这可能有多个事件或方法需要添加这个特性。在执行该方法或事件前进行相关数据的来回传送的任何企图其结果都是产生一个异常,并会在这个异常中标记该关联初始化器。
CorrelationAlias特性
当你创建相关的服务后,CorrelationParameter特性通过名称来识别出被用来传送数据相关标识符的方法参数。对于你的接口方法来说,这意味着你必须有一个方法参数使用了和相关参数名相同的名称来命名。
假如你的代理(delegate或称委托)以相关参数定义在代理中的方式创建的话,这没有任何问题。但是这对于事件来说就不适用了。
当你使用一个包含了事件参数的代理并且这些事件参数要传送相关参数的时候问题出现了。例如,设想你的相关参数被命名为customerID,然后考虑一下下面这个代理:
delegate void MyEventHandler(object sender, MyEventArgs e);
假如使用了这个委托的事件被放进你的通信接口中后,customerID参数没有在事件处理程序中出现,当你执行你的工作流的时候,WF会抛出一个异常来指出关联被错误地使用。但是,假如MyEventArgs有一个包含了客户ID的属性的话,你就能使用CorrelationAlias特性来指出它。对本例子而言,假如MyEventArgs的客户ID属性被命名为CustomerID的话,相关参数的别名(alias)就将是e.CustomerID。
一个重要的事情是要牢记住一旦你为某一单一的工作流实例初始化了一个相关数据路径的话,你就不能在该工作流实例的生命周期中改变该数据的关联ID而不会出现错误。例如,一旦你和一个用客户的ID号作为联系的工作流实例通信的话,以后你就不能使用其他客户的ID号来和同一个工作流实例进行数据通信。意思就是,就像把信息插入进一个数据表中新行的时候,假如你的处理过程涉及到创建客户的ID号,你就需要预先生成该客户的ID号。你不能让数据库为你生成它们,或者开始默认为“空”(“empty”)然后在后来使用一个新生成的ID号,因为这样你的通信过程就会在没有客户ID的情况下被初始化。提到的这些ID号如果有所不同的话,你的工作流就会抛出一个异常。
创建相关工作流
在本章中我介绍了关联的概念并只提到了三个特性。这就是所有的东西吗?
对的。但是我们的本地服务变得更加复杂,因为我们必须考虑不同的数据流。记住,本地通信服务在工作流运行时中是一个单例(singleton)服务,因此各个不同的工作流实例所请求的全部数据都必须通过这个本地通信服务。该服务不可避免地必须知悉各个工作流实例和关联参数的细节以便当宿主从一个指定的工作流请求数据的时候,该服务能返回正确的数据。
备注:你怎样架构你的本地通信服务取决于你。在本章的稍后部分我将为了展示我是怎么创建它们的,但最终没有任何规则要让你也必须像我所做的一样去创建你的服务。唯一的要求是你要能从你的服务中返回正确的相关数据。
为了让你能理解下面更大的图片,我将首先介绍你将使用的应用程序并解释它为什么使用关联。
相关工作流的典型例子是一个订单处理系统,它使用唯一的客户ID号去了解客户的订单信息。本章的示例应用程序模拟了一个货运公司可能用来跟踪其车辆的应用程序。
今天,许多长途卡车都装备了全球定位系统(GPS),它能把卡车的位置报告给运输公司。无论卡车发生了什么,你都能跟踪它并监控其对于目的地的进展状况。
这个范例模拟了这种类型的跟踪应用程序,它的用户界面如图17-1所示。图中展示了四个卡车,它们到达各个不同的终点(通过活动卡车列表显示出来)。所有卡车自身都是动态的,它们从起点移动到终点。当它们到达各自的终点时,它们会被从活动卡车的列表中移除。
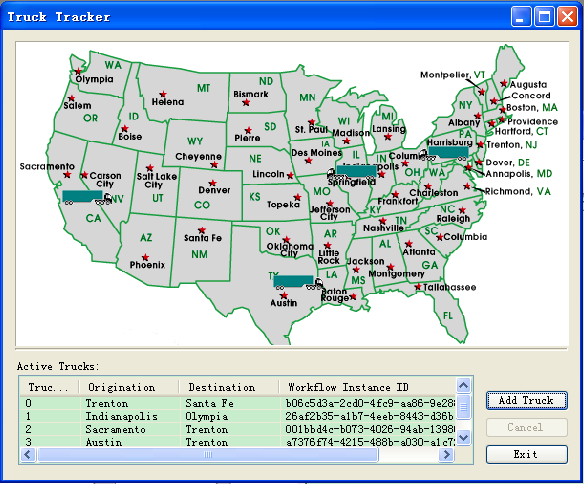
图17-1 TruckTracker应用程序用户界面
你会看到每一辆卡车都由它自己的工作流实例支持。工作流定时、异步地对卡车的地理位置进行更新。当更新进行的时候,工作流和应用程序会为计算新的坐标进行通信,然后可视化地在用户界面中对卡车的位置进行更新。当然,我们正模拟的是GPS的接受效果,所模拟卡车的移动速度远远大于实际的卡车能够达到的速度。(运行本范例4天时间后才去看卡车是否真正从加利福尼亚抵达新泽西是非常愚蠢的行为。)应用程序真正关键的地方是当和宿主应用程序进行数据通信时使用了相关的工作流实例。
卡车按照指定的路线向它们各自的终点前进,它会在地图上穿越其它城市。当你点击“Add Truck”后,通过如下图17-2所显示的对话框,你可以选择卡车的路线。卡车的路线都保存在一个XML文件中,当应用程序加载时把它们读出来。例如,此行从萨克拉门托到特伦顿,卡车将穿过凤凰城,圣菲,奥斯汀,以及塔拉哈西。
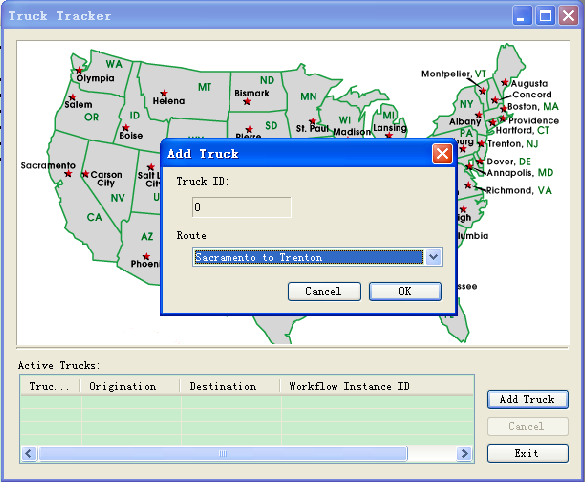
图17-2 “Add Truck”对话框
主应用程序现在已经为你完成了,剩下的任务是要完成对应的服务和工作流。我们首先将创建服务接口。
为你的应用程序添加相关通信接口
1.本范例同样为你提供了两个版本:完整版本和非完整版本。你需要下载本章源代码,打开“TruckTracker”目录中的解决方案。
2.本解决方案包含两个项目:TruckTracker(主应用程序)和TruckService。在Visual Studio的解决方案资源管理器中找到TruckService项目,打开ITruckService.cs文件准备进行编辑。
3.在接口的大括号中,添加下面这些代码:
// Workflow to host communication
[CorrelationInitializer]
void ReadyTruck(Int32 truckID, Int32 startingX, Int32 startingY);
void UpdateTruck(Int32 truckID, Int32 X, Int32 Y);
void RemoveTruck(Int32 truckID);
// Host to workflow communication
[CorrelationAlias("truckID", "e.TruckID")]
event EventHandler<CancelTruckEventArgs> CancelTruck;
[CorrelationInitializer]
[CorrelationAlias("truckID", "e.TruckID")]
event EventHandler<AddTruckEventArgs> AddTruck;
4.正好在ExternalDataExchange特性的前面(你会发现它用来对接口进行修饰),插入CorrelationParameter特性。
[CorrelationParameter("truckID")]
5.保存本文件。
回头看看你在第3步所添加的代码,它也被复制到了列表17-1中,你能看到在本章中所讨论过的每一个特性。名称为truckID的方法参数传递一个唯一的卡车标识符,它存在于该接口的所有方法中。然后,CorrelationParameter特性通知WF这个方法参数的作用是为了关联。
列表17-1 ITruckService.cs的完整代码

 ITruckService接口的完整代码
 using System;
 using System.Collections.Generic;
 using System.Text;
 using System.Workflow.ComponentModel;
 using System.Workflow.Activities;

 namespace TruckService


 {
{
 [CorrelationParameter("truckID")]
 [ExternalDataExchange]
 public interface ITruckService


 {
{
 // Workflow to host communication
 [CorrelationInitializer]
 void ReadyTruck(Int32 truckID, Int32 startingX, Int32 startingY);
 void UpdateTruck(Int32 truckID, Int32 X, Int32 Y);
 void RemoveTruck(Int32 truckID);

 // Host to workflow communication
 [CorrelationAlias("truckID", "e.TruckID")]
 event EventHandler<CancelTruckEventArgs> CancelTruck;

 [CorrelationInitializer]
 [CorrelationAlias("truckID", "e.TruckID")]
 event EventHandler<AddTruckEventArgs> AddTruck;
 }
}
 }
} AddTruck和CancelTruck两个事件使用了一个CorrelationAlias特性来把关联参数的名称由truckID重新指定为e.TruckID,因为事件参数(arguments)为这些事件携带了关联标识符。对于本范例来说使用的是e.TruckID,但是任何事件参数(argument)都能被用来携带关联参数。也就是说,你能把truckID的别名指定为任何也携带了关联值到工作流中去的参数。
在这个接口中有两种来对关联机制进行初始化的方式:工作流可以调用ReadyTruck,或者宿主应用程序调用AddTruck事件。任何一个都会开始进行相关通信(correlated communications),因为两者都使用了CorrelationInitializer特性进行修饰。在此之前调用任何其它的方法或者事件进行初始化其结果是工作流运行时产生异常。
服务项目通常都带有本地通信服务,这个范例的应用程序也并没有什么不同。因为连接器(connector)类TruckServiceDataConnector由ITruckService派生,因此现在是该完成它的时候了。
完成关联的数据连接器(correlated data connector)
1.再次回到TruckService项目,找到TruckServiceDataConnector.cs文件并打开它准备进行编辑。
2.TruckServiceDataConnector类现在是空的,但是它明显派生自ITruckService。因此,你至少要把接口中的方法和事件添加到这个类中。但是在你完成这些之前,我们先添加一些需要的代码。首先,正好在这个类的左大括号后面添加下面的字段。
protected const string KeyFormat = "{0}.Truck_{1}";
protected static Dictionary<string, string> _dataValues =
new Dictionary<string, string>();
protected static Dictionary<string, WorkflowTruckTrackingDataService>
_dataServices =
new Dictionary<string, WorkflowTruckTrackingDataService>();
private static object _syncLock = new object();
3.因为数据连接器需要与数据项保存联系并且在工作流运行时中是一个单例模式(singleton),因此我们将添加一对静态方法,它们用来对数据服务进行注册并对已经注册的数据服务进行检索。

 WorkflowTruckTrackingDataService方法和RegisterDataService方法
 public static WorkflowTruckTrackingDataService
 GetRegisteredWorkflowDataService(Guid instanceID,
 Int32 truckID)


 {
{
 string key = String.Format(KeyFormat, instanceID, truckID);

 WorkflowTruckTrackingDataService serviceInstance = null;
 if (_dataServices.ContainsKey(key))


 {
{
 // Return the appropriate data service
 serviceInstance = _dataServices[key];
 }
}

 return serviceInstance;
 }
}

 public static void
 RegisterDataService(WorkflowTruckTrackingDataService dataService)


 {
{
 string key = String.Format(KeyFormat,
 dataService.InstanceID.ToString(),
 dataService.TruckID);
 lock (_syncLock)


 {
{
 _dataServices.Add(key, dataService);
 }
}
 }
} 4.当一个新的工作流实例被启动的时候,在主应用程序中都要对数据服务进行注册(每个工作流实例对应一个数据服务),一旦数据服务被注册后,它就在数据连接器中保存关联数据。我们需要有一个去检索该数据的方式。以前,我们使用的是一个属性,但是对于我们现在来说这已经不适用了,因为我们必须传入工作流实例ID和关联值(在本例中是一个卡车的标识符)二者。为了检索该数据,在静态的注册方法(RegisterDataService方法)的下面添加如下这个方法:

 RetrieveTruckInfo方法
 public string RetrieveTruckInfo(Guid instanceID, Int32 truckID)


 {
{
 string payload = String.Empty;

 string key = String.Format(KeyFormat, instanceID, truckID);
 if (_dataValues.ContainsKey(key))


 {
{
 payload = _dataValues[key];
 }
}

 return payload;
 }
} 5.有了这最后的一个方法后,我们现在就去添加来自于ITruckService接口的方法。它们的位置紧跟在前一步骤所添加的检索数据的方法下面。

 继承自ITruckService接口的方法
 // Workflow to host communication methods
 public void ReadyTruck(Int32 truckID, Int32 startingX, Int32 startingY)


 {
{
 // Pull correlated service
 WorkflowTruckTrackingDataService service =
 GetRegisteredWorkflowDataService(
 WorkflowEnvironment.WorkflowInstanceId,
 truckID);

 // Place data in correlated store
 UpdateTruckData(service.InstanceID, truckID, startingX, startingY);

 // Raise the event to trigger host activity
 if (service != null)


 {
{
 service.RaiseTruckLeavingEvent(truckID, startingX, startingY);
 }
}
 }
}

 public void UpdateTruck(Int32 truckID, Int32 X, Int32 Y)


 {
{
 // Pull correlated service
 WorkflowTruckTrackingDataService service =
 GetRegisteredWorkflowDataService(
 WorkflowEnvironment.WorkflowInstanceId,
 truckID);

 // Update data in correlated store
 UpdateTruckData(service.InstanceID, truckID, X, Y);

 // Raise the event to trigger host activity
 if (service != null)


 {
{
 service.RaiseRouteUpdatedEvent(truckID, X, Y);
 }
}
 }
}

 public void RemoveTruck(Int32 truckID)


 {
{
 // Pull correlated service
 WorkflowTruckTrackingDataService service =
 GetRegisteredWorkflowDataService(
 WorkflowEnvironment.WorkflowInstanceId,
 truckID);

 // Remove truck from correlated store
 string key = String.Format(KeyFormat, service.InstanceID, truckID);
 if (_dataValues.ContainsKey(key))


 {
{
 // Remove it
 _dataValues.Remove(key);
 }
}

 // Raise the event to trigger host activity
 if (service != null)


 {
{
 service.RaiseTruckArrivedEvent(truckID);
 }
}
 }
} 6.在ITruckService中的方法的后面是一些事件,因此也要添加它们,它们的位置在你第5步所添加的方法的下面。

 继承自ITruckService接口的事件
 // Host to workflow events
 public event EventHandler<CancelTruckEventArgs> CancelTruck;

 public void RaiseCancelTruck(Guid instanceID, Int32 truckID)


 {
{
 if (CancelTruck != null)


 {
{
 // Fire event
 CancelTruck(null, new CancelTruckEventArgs(instanceID, truckID));
 }
}
 }
}

 public event EventHandler<AddTruckEventArgs> AddTruck;

 public void RaiseAddTruck(Guid instanceID, Int32 truckID, Int32 routeID)


 {
{
 if (AddTruck != null)


 {
{
 // Fire event
 AddTruck(null, new AddTruckEventArgs(instanceID, truckID, routeID));
 }
}
 }
} 7.回头看看在第5步中插入的方法,你会看到一个用来把关联数据插入到对应的数据字典中去的方法(UpdateTruckData)。数据本身必须被转换为XML,因此以其把下面这些代码都扩散到上面的三个方法中,那还不如添加一个UpdateTruckData方法,然后把它们都放在UpdateTruckData方法中。现在就添加该方法,把它放在你前面添加的事件的下面:

 UpdateTruckData方法
 protected Truck UpdateTruckData(Guid instanceID, Int32 truckID, Int32 X, Int32 Y)


 {
{
 string key = String.Format(KeyFormat, instanceID, truckID);
 Truck truck = null;
 if (!_dataValues.ContainsKey(key))


 {
{
 // Create new truck
 truck = new Truck();
 truck.ID = truckID;
 }
}
 else
else


 {
{
 // Pull existing truck
 string serializedTruck = _dataValues[key];
 StringReader rdr = new StringReader(serializedTruck);
 XmlSerializer serializer = new XmlSerializer(typeof(Truck));
 truck = (Truck)serializer.Deserialize(rdr);
 }
}

 // Update values
 truck.X = X;
 truck.Y = Y;

 // Serialize values
 StringBuilder sb = new StringBuilder();
 using (StringWriter wtr = new StringWriter(sb))


 {
{
 XmlSerializer serializer = new XmlSerializer(typeof(Truck));
 serializer.Serialize(wtr, truck);
 }
}

 // Ship the data back
 _dataValues[key] = sb.ToString();

 return truck;
 }
} 8.保存该文件。
列表17-2中列出了TruckServiceDataConnector类的完整代码。在强调一次,这个类的作用是保存来自各个工作流实例的关联数据。该数据被存储到一个Dictionary对象中,键值对把工作流实例标识符和卡车标识符关联起来。该数据连接器类在工作流运行时中是一个单例服务。
备注:你可能会问:为什么数据要转换为XML而不直接使用数据对象本身?这是因为,当在工作流和宿主之间来回传送数据的时候,WF并不对对象进行序列化。因此,并不会创建对象的副本(毫无疑问是为了提高性能)。对象的传递是通过引用实现的,由此工作流和宿主都在同一个对象上工作。假如你不想这样(注:指对象引用),又不想使用本范例中的方法(注:指转换为XML)的话,你就可以对对象进行序列化或者实现ICloneable来传递对象的副本。假如这种行为(注:指对象引用)并不影响你的设计,你就不需要再去做任何事情而直接(在工作流和宿主之间)来回通过引用的方式去传递你的对象。虽然如此,也要牢记你的对象将会被两个不同的线程所共享。
列表17-2 TruckServiceDataConnector.cs的完整代码

 TruckServiceDataConnector类的完整代码
 using System;
 using System.Collections.Generic;
 using System.Text;
 using System.Threading;
 using System.Workflow.Activities;
 using System.Workflow.Runtime;
 using System.Xml;
 using System.Xml.Serialization;
 using System.IO;

 namespace TruckService


 {
{
 public class TruckServiceDataConnector : ITruckService


 {
{
 protected const string KeyFormat = "{0}.Truck_{1}";
 protected static Dictionary<string, string> _dataValues = new Dictionary<string, string>();
 protected static Dictionary<string, WorkflowTruckTrackingDataService> _dataServices = new Dictionary<string, WorkflowTruckTrackingDataService>();
 private static object _syncLock = new object();

 public static WorkflowTruckTrackingDataService GetRegisteredWorkflowDataService(Guid instanceID, Int32 truckID)


 {
{
 string key = String.Format(KeyFormat, instanceID, truckID);

 WorkflowTruckTrackingDataService serviceInstance = null;
 if (_dataServices.ContainsKey(key))


 {
{
 // Return the appropriate data service
 serviceInstance = _dataServices[key];
 } // if

 return serviceInstance;
 }
}

 public static void RegisterDataService(WorkflowTruckTrackingDataService dataService)


 {
{
 string key = String.Format(KeyFormat, dataService.InstanceID.ToString(), dataService.TruckID);
 lock (_syncLock)


 {
{
 _dataServices.Add(key, dataService);
 } // lock
 }
}

 public string RetrieveTruckInfo(Guid instanceID, Int32 truckID)


 {
{
 string payload = String.Empty;

 string key = String.Format(KeyFormat, instanceID, truckID);
 if (_dataValues.ContainsKey(key))


 {
{
 payload = _dataValues[key];
 } // if

 return payload;
 }
}

 // Workflow to host communication methods
 public void ReadyTruck(Int32 truckID, Int32 startingX, Int32 startingY)


 {
{
 // Pull correlated service
 WorkflowTruckTrackingDataService service = GetRegisteredWorkflowDataService(WorkflowEnvironment.WorkflowInstanceId, truckID);

 // Place data in correlated store
 UpdateTruckData(service.InstanceID, truckID, startingX, startingY);

 // Raise the event to trigger host activity
 if (service != null)


 {
{
 service.RaiseTruckLeavingEvent(truckID, startingX, startingY);
 } // if
 }
}

 public void UpdateTruck(Int32 truckID, Int32 X, Int32 Y)


 {
{
 // Pull correlated service
 WorkflowTruckTrackingDataService service = GetRegisteredWorkflowDataService(WorkflowEnvironment.WorkflowInstanceId, truckID);

 // Update data in correlated store
 UpdateTruckData(service.InstanceID, truckID, X, Y);

 // Raise the event to trigger host activity
 if (service != null)


 {
{
 service.RaiseRouteUpdatedEvent(truckID, X, Y);
 } // if
 }
}

 public void RemoveTruck(Int32 truckID)


 {
{
 // Pull correlated service
 WorkflowTruckTrackingDataService service = GetRegisteredWorkflowDataService(WorkflowEnvironment.WorkflowInstanceId, truckID);

 // Remove truck from correlated store
 string key = String.Format(KeyFormat, service.InstanceID, truckID);
 if (_dataValues.ContainsKey(key))


 {
{
 // Remove it
 _dataValues.Remove(key);
 } // if

 // Raise the event to trigger host activity
 if (service != null)


 {
{
 service.RaiseTruckArrivedEvent(truckID);
 } // if
 }
}

 // Host to workflow events
 public event EventHandler<CancelTruckEventArgs> CancelTruck;

 public void RaiseCancelTruck(Guid instanceID, Int32 truckID)


 {
{
 if (CancelTruck != null)


 {
{
 // Fire event
 CancelTruck(null, new CancelTruckEventArgs(instanceID, truckID));
 } // if
 }
}

 public event EventHandler<AddTruckEventArgs> AddTruck;

 public void RaiseAddTruck(Guid instanceID, Int32 truckID, Int32 routeID)


 {
{
 if (AddTruck != null)


 {
{
 // Fire event
 AddTruck(null, new AddTruckEventArgs(instanceID, truckID, routeID));
 } // if
 }
}

 protected Truck UpdateTruckData(Guid instanceID, Int32 truckID, Int32 X, Int32 Y)


 {
{
 string key = String.Format(KeyFormat, instanceID, truckID);
 Truck truck = null;
 if (!_dataValues.ContainsKey(key))


 {
{
 // Create new truck
 truck = new Truck();
 truck.ID = truckID;
 } // if
 else
else


 {
{
 // Pull existing truck
 string serializedTruck = _dataValues[key];
 StringReader rdr = new StringReader(serializedTruck);
 XmlSerializer serializer = new XmlSerializer(typeof(Truck));
 truck = (Truck)serializer.Deserialize(rdr);
 } // else

 // Update values
 truck.X = X;
 truck.Y = Y;

 // Serialize values
 StringBuilder sb = new StringBuilder();
 using (StringWriter wtr = new StringWriter(sb))


 {
{
 XmlSerializer serializer = new XmlSerializer(typeof(Truck));
 serializer.Serialize(wtr, truck);
 } // using

 // Ship the data back
 _dataValues[key] = sb.ToString();

 return truck;
 }
}
 }
}
 }
} 你可以回忆一下第8章,本地通信服务也有一个服务组件,它被工作流和接口间的数据连接器使用。事实上,这个WorkflowTruckTrackingDataService服务就是用我们刚刚创建的连接器来注册的。该服务主要实现了一些基础的有用的方法去触发宿主边的一些事件,例如数据可用的事件和关联正使用的事件等,它有助于直接保持值的相关性。
完成相关数据服务(correlated data service)
1.在TruckService项目中,你会找到一个名称为WorkflowTruckTrackingDataService.cs的源文件。你需要打开它准备进行编辑。
2.第一件事是添加该服务执行它的任务时所需要的私有字段。在WorkflowTruckTrackingDataService类的左大括号的后面添加下面这些代码:
private static WorkflowRuntime _workflowRuntime = null;
private static ExternalDataExchangeService _dataExchangeService = null;
private static TruckServiceDataConnector _dataConnector = null;
private static object _syncRoot = new object();
3.在这些私有字段的下面是该服务将触发的事件。这些事件被触发的结果就是工作流实例将调用一个CallExternalMethod活动(你可在TruckServiceDataConnector类中看到它):
public event EventHandler<TruckActivityEventArgs> TruckLeaving;
public event EventHandler<TruckActivityEventArgs> RouteUpdated;
public event EventHandler<TruckActivityEventArgs> TruckArrived;
4.接下来添加两个字段以及对应的属性,你需要它们去对相关的服务实例进行识别:
private Guid _instanceID = Guid.Empty;
public Guid InstanceID
{
get { return _instanceID; }
set { _instanceID = value; }
}
private Int32 _truckID = -1;
public Int32 TruckID
{
get { return _truckID; }
set { _truckID = value; }
}
5.现在我们需要添加两个静态方法:一个是在工作流运行时中注册该服务并对它进行配置,另一个是去对已经注册的服务实例进行检索:

 CreateDataService静态方法和GetRegisteredWorkflowDataService静态方法
 public static WorkflowTruckTrackingDataService
 CreateDataService(Guid instanceID,
 WorkflowRuntime workflowRuntime,
 Int32 truckID)


 {
{
 lock (_syncRoot)


 {
{
 // If we're just starting, save a copy of the workflow.
 // runtime reference
 if (_workflowRuntime == null)


 {
{
 _workflowRuntime = workflowRuntime;
 }
}

 // If we're just starting, plug in ExternalDataExchange service.
 if (_dataExchangeService == null)


 {
{
 _dataExchangeService = new ExternalDataExchangeService();
 _workflowRuntime.AddService(_dataExchangeService);
 }
}

 // Check to see if we have already added this data
 // exchange service.
 TruckServiceDataConnector dataConnector =
 (TruckServiceDataConnector)workflowRuntime.GetService(
 typeof(TruckServiceDataConnector));
 if (dataConnector == null)


 {
{
 _dataConnector = new TruckServiceDataConnector();
 _dataExchangeService.AddService(_dataConnector);
 }
}
 else
else


 {
{
 _dataConnector = dataConnector;
 }
}

 // Pull the service instance we registered with the connection
 // object.
 return WorkflowTruckTrackingDataService.
 GetRegisteredWorkflowDataService(instanceID, truckID);
 }
}
 }
}

 public static WorkflowTruckTrackingDataService
 GetRegisteredWorkflowDataService(Guid instanceID,
 Int32 truckID)


 {
{
 lock (_syncRoot)


 {
{
 WorkflowTruckTrackingDataService workflowDataService =
 TruckServiceDataConnector.GetRegisteredWorkflowDataService(
 instanceID, truckID);
 if (workflowDataService == null)


 {
{
 workflowDataService =
 new WorkflowTruckTrackingDataService(instanceID, truckID);
 TruckServiceDataConnector.RegisterDataService(
 workflowDataService);
 }
}

 return workflowDataService;
 }
}
 }
} 6.现在添加构造器和析构器:

 类的构造器和析构器代码
 private WorkflowTruckTrackingDataService(Guid instanceID, Int32 truckID)


 {
{
 this._instanceID = instanceID;
 this._truckID = truckID;
 }
}

 ~WorkflowTruckTrackingDataService()


 {
{
 // Clean up
 _workflowRuntime = null;
 _dataExchangeService = null;
 _dataConnector = null;
 }
} 备注:你可以回忆一下第8章,构造器的作用是防止在服务和连接器类之间出现循环链接引用。而对于析构器的作用来说,只是实现IDisposable并不能完成相应的任务,因为当从工作流运行时中移除该服务的时候并不调用Dispose方法。
7.在类的构造器的下面,添加下面的读取关联数据的方法:
public string Read()
{
return _dataConnector.RetrieveTruckInfo(InstanceID, TruckID);
}
8.最后添加事件实现的代码:

 事件实现的代码
 public void RaiseTruckLeavingEvent(Int32 truckID,
 Int32 startingX,
 Int32 startingY)


 {
{
 if (_workflowRuntime == null)
 _workflowRuntime = new WorkflowRuntime();

 // Loads persisted workflow instances.
 _workflowRuntime.GetWorkflow(_instanceID);
 if (TruckLeaving != null)


 {
{
 TruckLeaving(this, new TruckActivityEventArgs(_instanceID,
 truckID,
 startingX,
 startingY));
 } // if
 }
}

 public void RaiseRouteUpdatedEvent(Int32 truckID,
 Int32 X,
 Int32 Y)


 {
{
 if (_workflowRuntime == null)
 _workflowRuntime = new WorkflowRuntime();

 // Loads persisted workflow instances.
 _workflowRuntime.GetWorkflow(_instanceID);
 if (RouteUpdated != null)


 {
{
 RouteUpdated(this, new TruckActivityEventArgs(_instanceID,
 truckID,
 X, Y));
 } // if
 }
}

 public void RaiseTruckArrivedEvent(Int32 truckID)


 {
{
 if (_workflowRuntime == null)
 _workflowRuntime = new WorkflowRuntime();

 // Loads persisted workflow instances.
 _workflowRuntime.GetWorkflow(_instanceID);
 if (TruckArrived != null)


 {
{
 TruckArrived(this, new TruckActivityEventArgs(_instanceID,
 truckID));
 } // if
 }
} 9.保存该文件并编译该TruckService项目。如果存在编译错误,请纠正任何出现的编译错误。
服务类的代码就全部完成了,列表17-3展示了该类的完整代码。TruckSercie本地通信服务可以准备使用了。我们还没有一个工作流来使用该服务。我们也需要使用可信赖的wca.exe工具来为我们创建自定义的CallExternalMethod和HandleExternalEvent活动。
列表17-3 WorkflowTruckTrackingDataService.cs的完整代码

 WorkflowTruckTrackingDataService类的完整代码
 using System;
 using System.Collections.Generic;
 using System.Text;
 using System.Workflow.Activities;
 using System.Workflow.Runtime;

 namespace TruckService


 {
{
 public class WorkflowTruckTrackingDataService


 {
{
 private static WorkflowRuntime _workflowRuntime = null;
 private static ExternalDataExchangeService _dataExchangeService = null;
 private static TruckServiceDataConnector _dataConnector = null;
 private static object _syncRoot = new object();

 public event EventHandler<TruckActivityEventArgs> TruckLeaving;
 public event EventHandler<TruckActivityEventArgs> RouteUpdated;
 public event EventHandler<TruckActivityEventArgs> TruckArrived;

 private Guid _instanceID = Guid.Empty;

 public Guid InstanceID


 {
{

 get
get  { return _instanceID; }

 set
set  { _instanceID = value; }
 }
}

 private Int32 _truckID = -1;

 public Int32 TruckID


 {
{

 get
get  { return _truckID; }

 set
set  { _truckID = value; }
 }
}

 public static WorkflowTruckTrackingDataService CreateDataService(Guid instanceID, WorkflowRuntime workflowRuntime, Int32 truckID)


 {
{
 lock (_syncRoot)


 {
{
 // If we're just starting, save a copy of the workflow runtime reference
 if (_workflowRuntime == null)


 {
{
 _workflowRuntime = workflowRuntime;
 } // if

 // If we're just starting, plug in ExternalDataExchange service
 if (_dataExchangeService == null)


 {
{
 _dataExchangeService = new ExternalDataExchangeService();
 _workflowRuntime.AddService(_dataExchangeService);
 } // if

 // Check to see if we have already added this data exchange service
 TruckServiceDataConnector dataConnector = (TruckServiceDataConnector)workflowRuntime.GetService(typeof(TruckServiceDataConnector));
 if (dataConnector == null)


 {
{
 _dataConnector = new TruckServiceDataConnector();
 _dataExchangeService.AddService(_dataConnector);
 } // if
 else
else


 {
{
 _dataConnector = dataConnector;
 } // else

 // Pull the service instance we registered with the connection object
 return WorkflowTruckTrackingDataService.GetRegisteredWorkflowDataService(instanceID, truckID);
 } // lock
 }
}

 public static WorkflowTruckTrackingDataService GetRegisteredWorkflowDataService(Guid instanceID, Int32 truckID)


 {
{
 lock (_syncRoot)


 {
{
 WorkflowTruckTrackingDataService workflowDataService = TruckServiceDataConnector.GetRegisteredWorkflowDataService(instanceID, truckID);
 if (workflowDataService == null)


 {
{
 workflowDataService = new WorkflowTruckTrackingDataService(instanceID, truckID);
 TruckServiceDataConnector.RegisterDataService(workflowDataService);
 } // if

 return workflowDataService;
 } // lock
 }
}

 private WorkflowTruckTrackingDataService(Guid instanceID, Int32 truckID)


 {
{
 this._instanceID = instanceID;
 this._truckID = truckID;
 }
}

 ~WorkflowTruckTrackingDataService()


 {
{
 // Clean up
 _workflowRuntime = null;
 _dataExchangeService = null;
 _dataConnector = null;
 }
}

 public string Read()


 {
{
 return _dataConnector.RetrieveTruckInfo(InstanceID, TruckID);
 }
}

 public void RaiseTruckLeavingEvent(Int32 truckID, Int32 startingX, Int32 startingY)


 {
{
 if (_workflowRuntime == null)
 _workflowRuntime = new WorkflowRuntime();

 _workflowRuntime.GetWorkflow(_instanceID); // loads persisted workflow instances
 if (TruckLeaving != null)


 {
{
 TruckLeaving(this, new TruckActivityEventArgs(_instanceID, truckID, startingX, startingY));
 } // if
 }
}

 public void RaiseRouteUpdatedEvent(Int32 truckID, Int32 X, Int32 Y)


 {
{
 if (_workflowRuntime == null)
 _workflowRuntime = new WorkflowRuntime();

 _workflowRuntime.GetWorkflow(_instanceID); // loads persisted workflow instances
 if (RouteUpdated != null)


 {
{
 RouteUpdated(this, new TruckActivityEventArgs(_instanceID, truckID, X, Y));
 } // if
 }
}

 public void RaiseTruckArrivedEvent(Int32 truckID)


 {
{
 if (_workflowRuntime == null)
 _workflowRuntime = new WorkflowRuntime();

 _workflowRuntime.GetWorkflow(_instanceID); // loads persisted workflow instances
 if (TruckArrived != null)


 {
{
 TruckArrived(this, new TruckActivityEventArgs(_instanceID, truckID));
 } // if
 }
}
 }
}
 }
}
创建关联数据交换的工作流
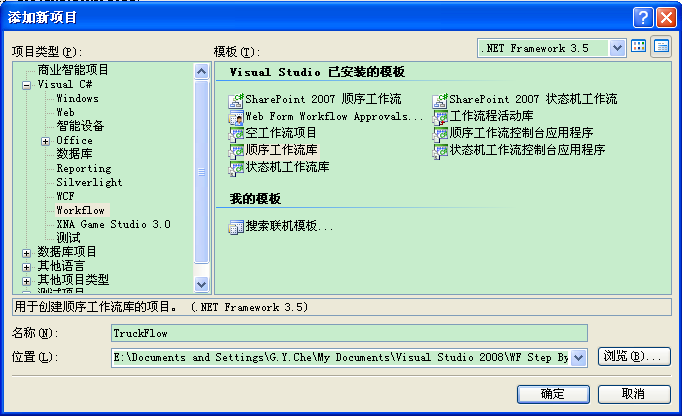
在本例中创建的这个工作流和你以前创建的工作流项目是有所不同的。在Visual Studio的解决方案资源管理器中简单地右键点击TruckTracker解决方案的名称,然后选择“添加”,选择“新建项目”。当“添加新项目”对话框打开后,如果Visual C#树状控件节点没有展开的话,就展开Visual C#树状控件节点。从模板列表中选择“顺序工作流库”。在“名称”字段中输入“TruckFlow”,最后点击“确定”。
创建了工作流项目后,我们现在就能使用wca.exe工具去生成我们需要在工作流和宿主应用程序之间进行通信所需的自定义活动,反之亦然。我们打算遵循我们在第8章“创建通信活动”中使用过的相同的方法步骤。
创建自定义数据交换活动
1.在你开始创建之前,你需要确认你没有跳过上一节的第9步“编译相关数据服务”这一过程。当wca.exe工具执行后,它需要一个已经编译好的程序集。
2.点击“开始”按钮,然后点击“运行”菜单打开“运行”对话框。
3.“运行”对话框打开后,输入“cmd”,然后点击“确定”,这将进入Windows的命令提示符。
4.更改当前目录以便你能直接访问到你先前创建的TruckService程序集。通常,你输入的命令和下面的差不多:
cd "\Chapter17\TruckTracker\TruckService\bin\Debug"
但是,你指定的目录根据你的实际情况可能会有所不同。
5.接下来通过在命令提示符中输入下面的文本来执行wca.exe工具(注意要包括双引号):
"C:\Program Files\Microsoft SDKs\Windows\v6.0A\Bin\Wca.exe" TruckService.dll /n:TruckFlow
然后按下回车键。该工具的输出结果应该和下面的相似:
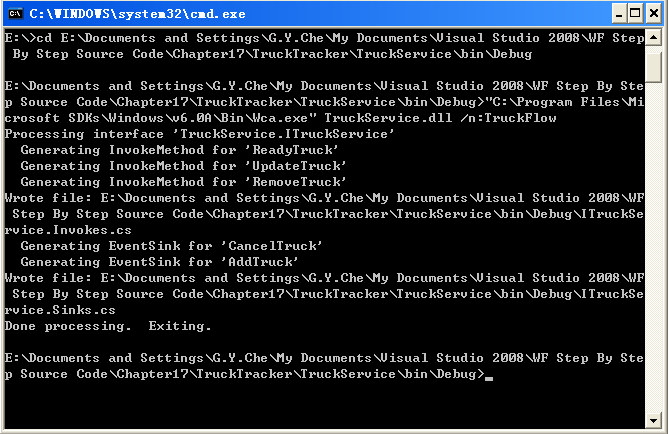
6.wca.exe工具会为你生成两个文件,你需要对它们进行重新命名并移动到工作流目录下。因此,在命令提示符中输入ren ITruckService.Invokes.cs ExternalEventActivities.cs,然后按下回车键。这个文件包含了所生成的CallExternalEvent活动。
7.因为我们刚才重命名的文件是一个工作流活动,因此我们需要把它从当前目录下移到TruckFlow目录中以便进行编译并使用。在命令提示符中输入move ExternalEventActivities.cs ..\..\..\TruckFlow并按下回车键。
8.对于外部事件活动来说,我们现在仍将使用相同的方式。在命令提示符中输入ren ITruckService.Sinks.cs ExternalEventHandlers.cs,然后按下回车键对文件进行重命名。这个文件包含了所生成的CallExternalEvent活动。
9.为了对文件进行移动,我们需要在命令提示符中输入move ExternalEventHandlers.cs ..\..\..\TruckFlow并按下回车键。
10.外部数据交换活动现在都创建好了。在这最后一步中,我们要把它们都添加到该工作流项目中。在解决方案资源管理器中右键点击TruckFlow项目,然后选择“添加”,选中“现有项”。当弹出“添加现有项”对话框后,从列表中选择这两个外部事件活动并点击“添加”。

简要地回顾一下,你创建了一个接口,它包含了工作流和应用程序将用来进行信息通信的方法和事件。该接口使用了关联特性来进行修饰,因此每一个方法和事件必须以某种方式来传送关联参数。然后你创建了你将用来在宿主和工作流之间进行信息通信的本地通信服务。最后,你运行了wca.exe工具来生成你可用在你的工作流中去执行数据通信的自定义活动。现在是该创建工作流本身的时候了。
完成相关工作流(correlated workflow)
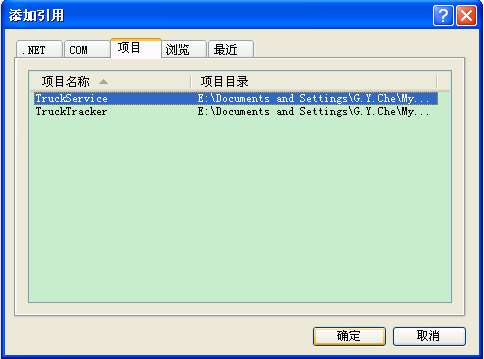
1.外部数据通信活动现在已是你工作流项目的一部分了,接下来你需要做的第一件事是添加对于通信服务项目的项目级引用。在解决方案资源管理器中右键点击TruckFlow项目,然后选择“添加引用”。在“项目”选项卡的列表中选中TruckService并点击“确定”。
2.编译该工作流项目(注意不是整个解决方案),以便把这些自定义活动加载进Visual Studio的工具箱中方便在工作流视图设计器中使用。
3.确保工作流视图设计器界面已被激活。
4.要放入你的工作流中的第一个活动是ReadyTruck活动。因此从Visual Studio的工具箱中把它拖拽进你的工作流中。

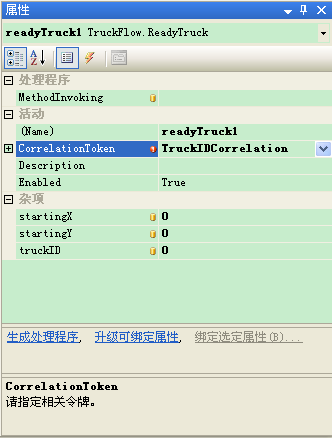
5.你需要为这个活动设置几个属性,第一个是和相关令牌(correlation token)有关的信息。在属性面板中的CorrelationToken属性中输入TruckIDCorrelation,然后按下回车键。
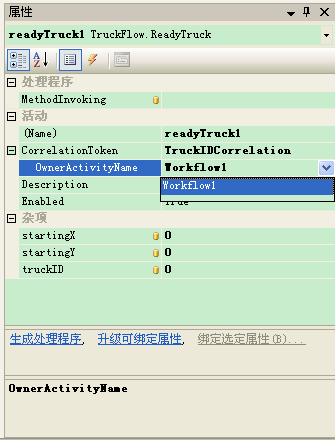
6.在属性窗口中点击“加号”(+),然后CorrelationToken属性将展开OwnerActivityName属性。点击下拉列表框的箭头,从中选中Workflow1(对于本范例应用程序来说仅有这一个选项)。
7.你需要绑定一些数据属性,首先从startingX属性开始。在属性面板中选中startingX属性,然后点击浏览(...)按钮,这将弹出“将‘startingX’属性绑定到活动的属性”对话框。选择“绑定到新成员”选项卡,在“新成员名称”字段中输入CurrentX。最后点击“确定”。
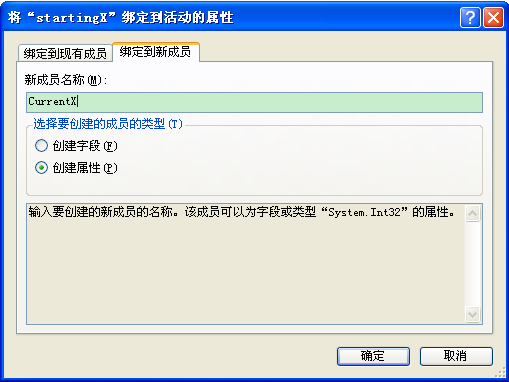
8.对于startingY属性所做的工作也一样。点击startingY属性,然后点击浏览(...)按钮,打开“将‘startingY’绑定到活动的属性”对话框。选择“绑定到新成员”选项卡,在“新成员名称”字段中输入CurrentY。最后点击“确定”。

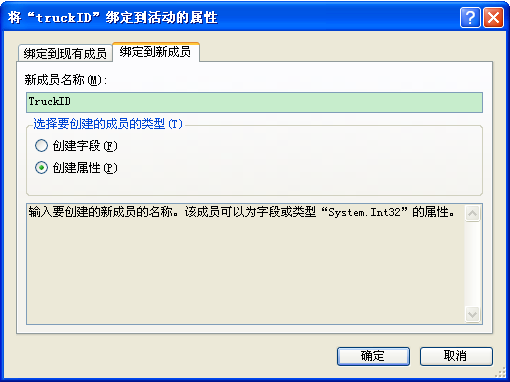
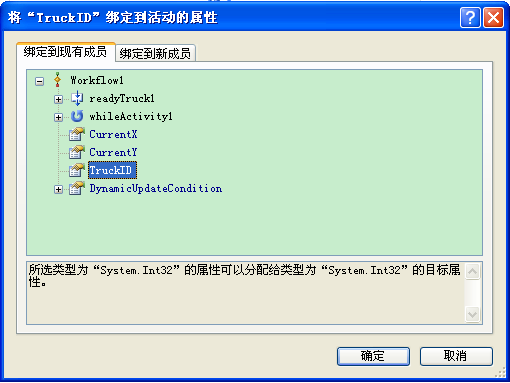
9.最后,再次在属性面板中选择truckID属性对其进行绑定。点击浏览(...)按钮打开“将‘truckID’绑定到活动的属性”对话框。选择“绑定到新成员”选项卡,在“新成员名称”字段中输入TruckID,然后点击“确定”。
10.回到工作流视图设计器,拖拽一个While活动到设计器界面上,把它放到你刚才放入的readyTruck1活动的下面。
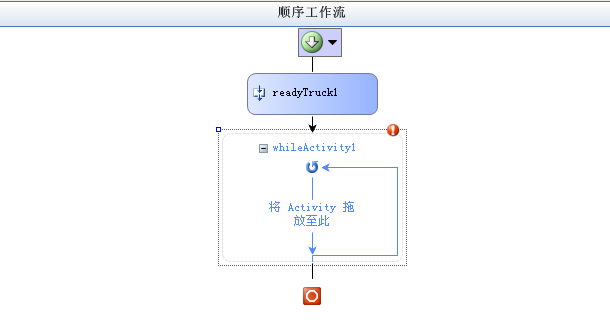
11.你需要添加一个条件表达式,因此选中Condition属性并从列表中选择“代码条件”。展开“条件”属性后面的加号(+),在第二个“条件”属性编辑框中输入TestAtDestination然后按下回车键。Visual Studio就插入了TestAtDestination方法并自动为你切换到代码视图界面下。我们需要返回到工作流视图设计器界面上来。

12.拖拽一个Listen活动到工作流视图设计器界面上,把它放到whileActivity1内部。
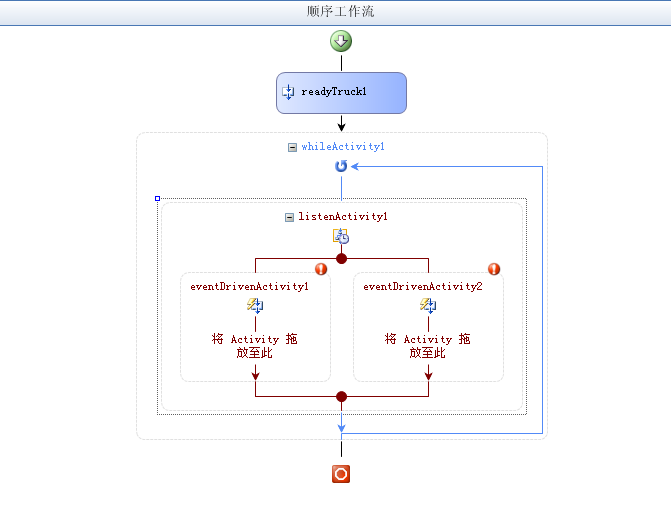
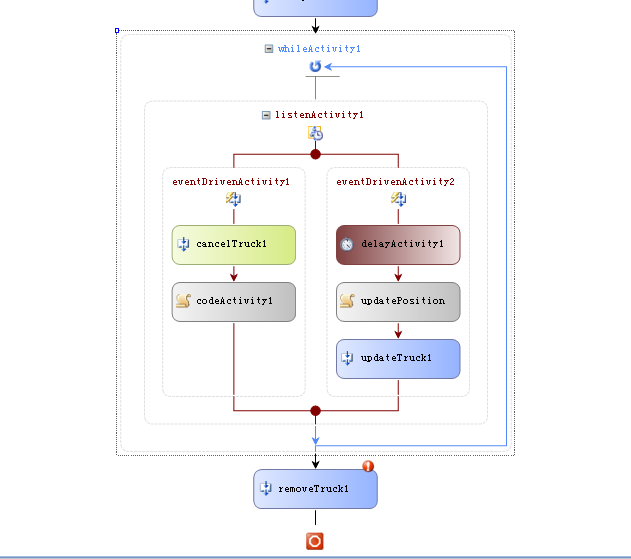
13.你刚才添加的这个Listen活动执行两个功能。其中你将在这里开始第一个功能的完成工作。从工具箱中拖拽一个CancelTruck并把它放进左边的EventDriven活动(即eventDrivenActivity1)中。
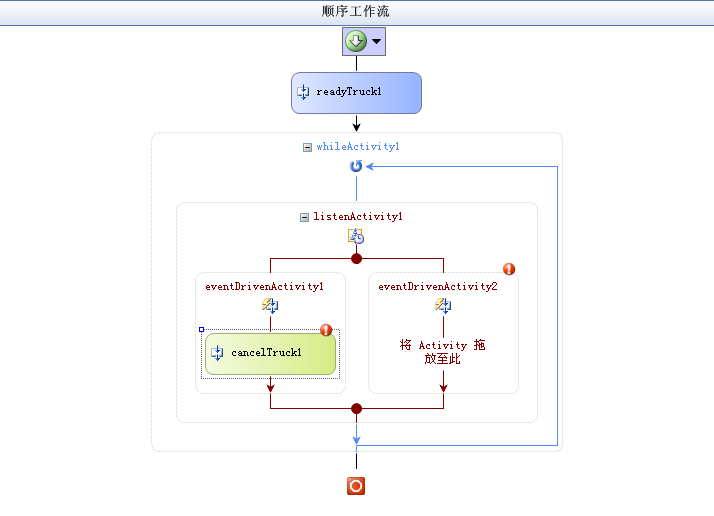
14.你需要为cancelTruck1创建相关令牌。为此,简单地点击cancelTruck1的CorrelatonToken属性的下拉箭头然后选择TruckIDCorrelation选项。假如箭头没有显示,可选中CorrelationToken属性来去激活它。

15.cancelTruck1需要有已经创建的卡车标识符,因此在truckID属性中点击浏览(...)按钮。假如浏览(...)按钮不存在的话,可再次点击该属性来激活它,就像你刚才可能在相关令牌属性上做过的一样。在“将‘truckID’绑定到活动的属性”对话框打开后,从现有属性列表中选择TruckID,然后点击“确定”。
16.为了在处理CancelTruck事件后执行一些处理过程,你需要拖拽一个Code活动到设计器界面上,把它放到你刚刚添加的cancelTruck1活动的下面。
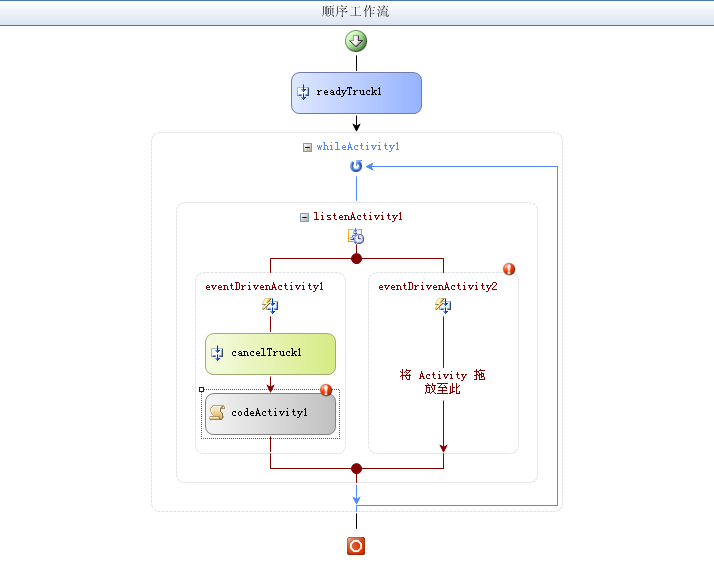
17.在codeActivity1的ExecuteCode属性中输入CancelTruck,然后按下回车键。在Visual Studio为你添加了CancelTruck方法后回到工作流视图设计器界面上来。
18.回到工作流视图设计器界面后,拖拽一个Delay活动到右边的EventDriven活动(eventDrivenActivity2)中。这就是Listen活动的第二个功能,它执行了GPS卡车定位扫描的模拟任务。

19.设置delayActivity1的TimeoutDuration为1秒。这代表了你的工作流将用来对用户界面进行更新的刷新频率。
20.拖拽一个Code活动到设计器界面上,把它放到你刚刚放入的Delay延时活动的下面。把它的名称更改为updatePosition,在它的ExecuteCode属性中输入UpdateTruckPosition并按下回车键。
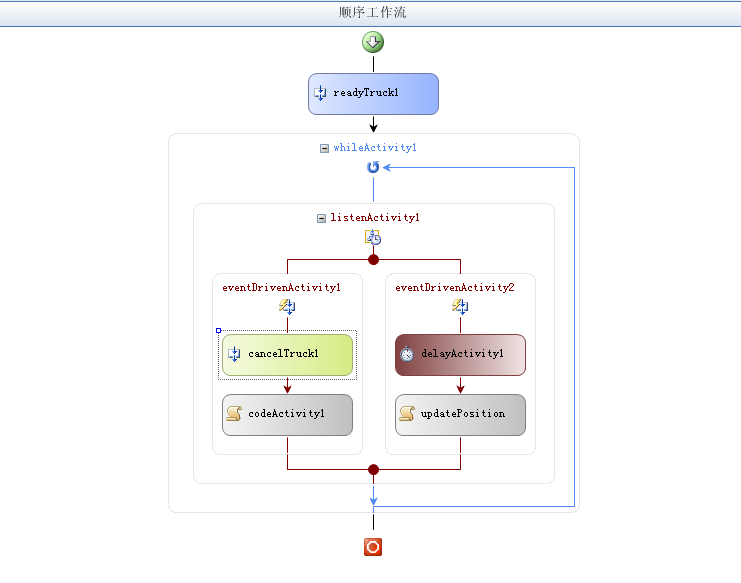
21.回到工作流视图设计器界面上来。该updatePosition Code活动执行了卡车位置测定的模拟任务,其结果就是需要把视觉处理结果传给宿主应用程序。为了把结果传给宿主应用程序,需要拖拽一个UpdateTruck活动到设计器界面上并把它放到updatePosition活动的下面。
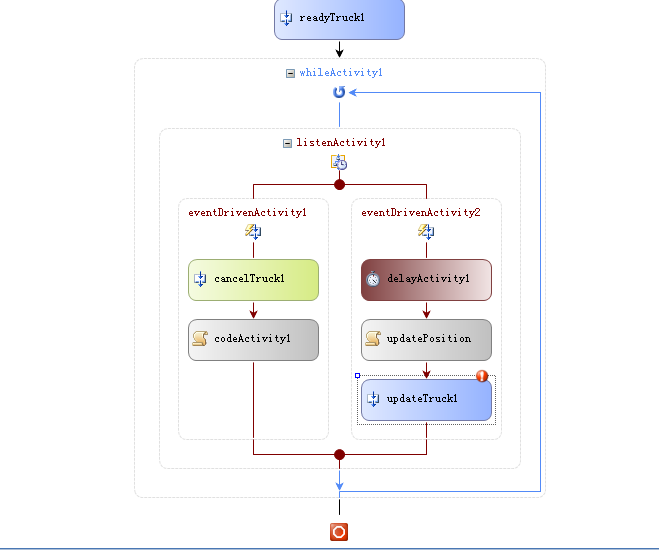
22.通过点击updateTruck1属性的下拉箭头,在其选择列表中选择CorrelationToken属性。当单击鼠标激活下拉箭头后你可能只有一个CorrelationToken属性供你选择。
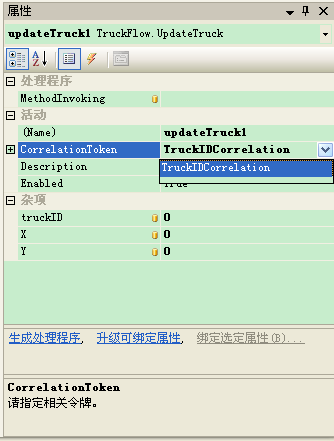
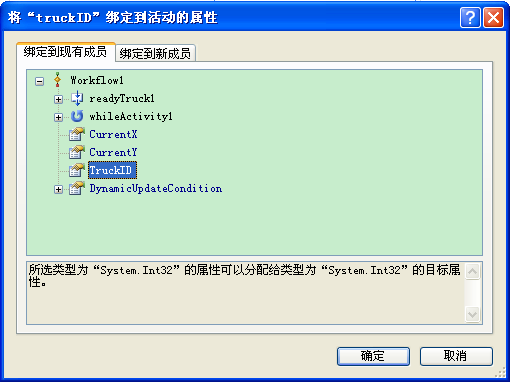
23.在激活浏览(...)按钮后点击truckID属性以便你能为updateTruck1活动指定关联的卡车标识符。点击该按钮,在“将‘truckID’绑定到活动的属性”对话框中的现有属性列表中选择TruckID,然后点击“确定”。
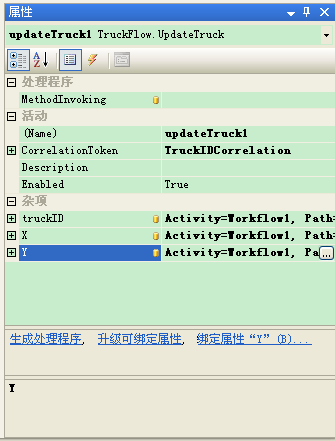
24.为了设置updateTruck1的X属性,需要再次点击浏览(...)按钮把X绑定到已存在的CurrentX属性。对于Y属性也做同样的工作,把它绑定到CurrentY属性。
25.在你取消对一辆卡车的模拟或者卡车抵达了它的终点之前,模拟过程会一直运行。前面的任何一个条件都会导致whileActivity1终止它的循环。在此时,用户界面需要把该卡车移除。因此,拖拽一个RemoveTruck活动到工作流视图设计器界面上,并把它放到whileActivity1的下面。
26.选择removeTruck1的CorrelationToken属性去激活它的下拉箭头。点击该下拉箭头将显示令牌选择列表,把该令牌设置为TruckIDCorrelation。
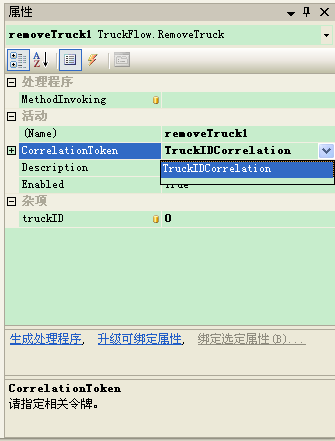
27.同样选中removeTruck1的truckID属性以便激活相似的浏览(...)按钮。点击该浏览按钮,从现有属性列表中选择TruckID,然后点击“确定”。
28.完成了这最后一个属性,工作流视图设计器上的工作你就已经完成了。现在该是添加代码的时候了。在解决方案资源管理器中选中Workflow1.cs文件,然后点击“查看代码”进入代码编辑器界面。
29.打开Workflow1.cs文件后,在该文件顶部的现有的using语句清单的下面添加如下的using语句。
using System.IO;
using System.Xml;
using System.Xml.Serialization;
30.定位到源代码中Workflow1的构造器。在构造器的下面,添加这些字段:
private bool _cancelTruck = false;
private TruckService.RouteInfo _routes = null;
private TruckService.Truck _myTruck = null;
private TruckService.Route _myRoute = null;
private TruckService.Destination _currentOrigin = null;
private TruckService.Destination _currentDestination = null;
31.在你刚刚添加的字段的下面,你需要添加工作流初始化时要用到的两个属性:

 Routes属性和TrackedTruck属性
 public string Routes


 {
{
 set
set


 {
{
 // Deserialize route information
 using (StringReader rdr = new StringReader(value))


 {
{
 XmlSerializer serializer =
 new XmlSerializer(typeof(TruckService.RouteInfo));
 _routes = (TruckService.RouteInfo)serializer.Deserialize(rdr);
 }
}
 }
}
 }
}

 public string TrackedTruck


 {
{
 set
set


 {
{
 // Deserialize truck information
 using (StringReader rdr = new StringReader(value))


 {
{
 XmlSerializer serializer =
 new XmlSerializer(typeof(TruckService.Truck));
 _myTruck = (TruckService.Truck)serializer.Deserialize(rdr);
 }
}

 // Assign the truck ID
 TruckID = _myTruck.ID;

 // Pull the route so we can retrieve the starting coordinates
 foreach (TruckService.Route route in _routes.Routes)


 {
{
 // Check this route to see if it's ours
 if (route.ID == _myTruck.RouteID)


 {
{
 // Ours, so save
 _myRoute = route;
 break;
 } // if
 }
}

 // Pull origin
 _currentOrigin = FindDestination(_myRoute.Start);

 // Pull destination or first waypoint
 if (_myRoute.Waypoints.Length > 0)


 {
{
 // Pull first waypoint
 _currentDestination =
 FindDestination(_myRoute.Waypoints[0].ID);
 }
}
 else
else


 {
{
 // No waypoints
 _currentDestination = FindDestination(_myRoute.Stop);
 }
}

 // Assign the X and Y coordinates
 CurrentX = _currentOrigin.X;
 CurrentY = _currentOrigin.Y;
 }
}
 }
} 32.TrackedTruck属性的设置器(setter)使用了一个名称为FindDestination方法。添加该方法到TrackedTruck下面:

 FindDestination方法
 private TruckService.Destination FindDestination(Int32 id)


 {
{
 // Loop through the route destinations, looking for the
 // one we want
 TruckService.Destination retVal = null;
 foreach (TruckService.Destination destination in _routes.Destinations)


 {
{
 // Check this destination
 if (destination.ID == id)


 {
{
 // Got it
 retVal = destination;
 break;
 } // if
 }
}

 return retVal;
 }
} 33.定位到TestAtDestination方法,为该方法添加如下代码:

 TestAtDestination方法的代码
 // Check for cancel
 if (_cancelTruck)


 {
{
 // Cancel immediately
 e.Result = false;
 }
}
 else
else


 {
{
 // If the truck is within 3 pixels for both X and Y, we're at the
 // destination
 e.Result = true;
 if (Math.Abs((double)_currentDestination.X - (double)CurrentX) < 3.0 &&
 Math.Abs((double)_currentDestination.Y - (double)CurrentY) < 3.0)


 {
{
 // Check for waypoints
 if (_currentDestination.ID != _myRoute.Stop)


 {
{
 // Copy former destination to origin, and then
 // look up next waypoint destination
 _currentOrigin = _currentDestination;
 TruckService.Waypoint waypoint = null;
 for (Int32 i = 0; i < _myRoute.Waypoints.Length; i++)


 {
{
 // Check to see if this is the current waypoint
 waypoint = _myRoute.Waypoints[i];
 if (waypoint.ID == _currentOrigin.ID)


 {
{
 // Found the current waypoint, so assign the next
 // waypoint to be the new destination.
 if ((i + 1) == _myRoute.Waypoints.Length)


 {
{
 // Last waypoint, head to true destination
 _currentDestination =
 FindDestination(_myRoute.Stop);
 }
}
 else
else


 {
{
 // Next waypoint
 _currentDestination =
 FindDestination(_myRoute.Waypoints[i + 1].ID);
 }
}
 break;
 }
}
 }
}
 }
}
 else
else


 {
{
 // We've arrived
 e.Result = false;
 }
}
 }
}
 }
} 34.对于CancelTruck方法,为其添加下面的代码:
// Set the cancel flag
_cancelTruck = true;
35.最后,为UpdateTruckPosition添加下面进行模拟所需的代码:
// Calculate slope for linear interpolation
// Y1 - Y2
// m = -------
// X1 - X2
//
// Solve for b: y = mx + b, so b = y - mx
double m = ((double)_currentDestination.Y - (double)_currentOrigin.Y) /
((double)_currentDestination.X - (double)_currentOrigin.X);
double b = (double)_currentDestination.Y -
(m * (double)_currentDestination.X);
// With slope and intercept, we increment x to find the new y.
Int32 multiplier = (_currentDestination.X - _currentOrigin.X) < 0 ? -1 : 1;
CurrentX += (multiplier * 2);
CurrentY = (Int32)((m * (double)CurrentX) + b);
36.保存所有打开的文件。
37.工作流现在就完成了,对你来说最后一项任务就是去执行该应用程序。TruckTracker主应用程序需要对该工作流进行引用。因此右键点击TruckTracker项目,然后选择“添加引用”。从“项目”选项卡中选择TruckFlow,然后点击“确定”
38.现在你可以对整个解决方案进行编译。纠正任何你可能遇到的编译错误。
39.按下Shift+F5执行该应用程序或者在调试模式下按下F5来运行该应用程序。通过点击“Add Truck”来添加一辆卡车、选择路线、然后点击“OK”。你可以随意添加许多的卡车。对于卡车的移除,可以在listview控件中选中它然后点击“Cancel Truck”。
该应用程序的代码和你在第8章及第10章中看到的代码大不一样。其中一个区别是在访问指定卡车的数据的时候,你需要为该车辆传入卡车标识符。在有些情况下,事件在其参数中为你提供了它。
本章源代码:里面包含本章的练习项目和完整代码
下一篇:WF从入门到精通(第十八章):在你的工作流中调用Web服务


 [CorrelationParameter(

 }
} }
}
