

[易学易懂系列|rustlang语言|零基础|快速入门|(2)|VSCODE配置]
我们今天来配置下vscode+rust。
vscode开发rust很方便。但配置有点坑,我们都认为vscode很简单,很完善。
但这里很多同学也出现不少问题。
我们在这里简单记录下win7下配置的过程,跟着我一步步来,应该就可打造你的屠龙宝刀。
首先,我们安装插件:
Rust Extension Pack
Rust Test Explorer
然后打开上一篇文章的工程:
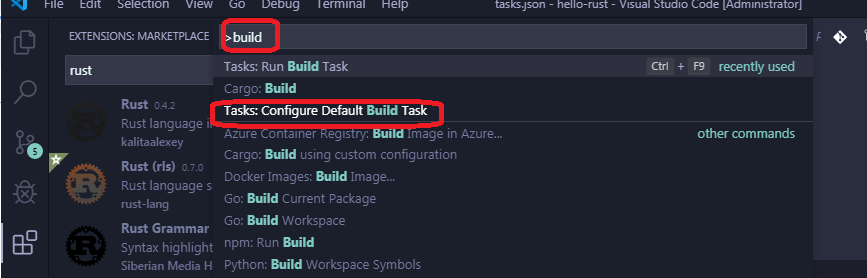
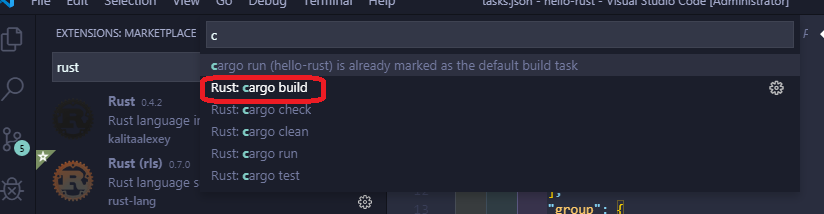
hello-rust,见:https://www.cnblogs.com/gyc567/p/11887935.html打开command palette (Ctrl-Shift-P):输入:build,然后选择:Tasks: Configure Default Build Task,再选择:Rust: cargo build
vscode会自动生成一个json文件:
// See https://go.microsoft.com/fwlink/?LinkId=733558
// for the documentation about the tasks.json format
"version": "2.0.0",
"tasks": [
{
"label": "cargo run",
"type": "shell",
"command": "cargo",
"args": [
"run"
],
"group": {
"kind": "build",
"isDefault": true
}
}
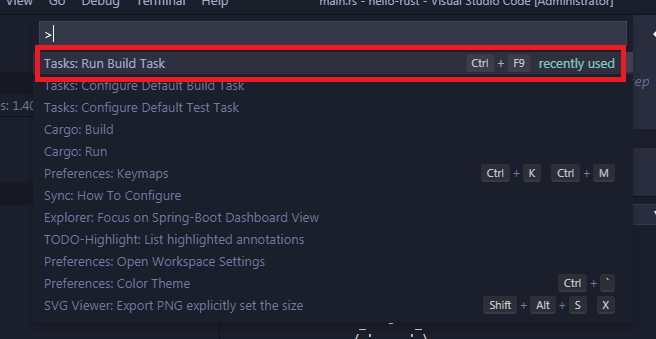
这里,我们直接按“CTRL+SHIFT+P”,选择:“Task:Run Build Task”,或者直接按快捷键“CTRL+F9”
VSCODE会自动BUILD,并在终端窗口显示打印结果:
-------------------------------------------------------
> Executing task: cargo run <
Compiling hello-rust v0.1.0 (E:\code\rustProject\hello-rust)
Finished dev [unoptimized + debuginfo] target(s) in 2.11s
Running `target\debug\hello-rust.exe`
----------------------------
| Hello fellow Rustaceans! |
----------------------------
\
\
_~^~^~_
\) / o o \ (/
'_ - _'
/ '-----' \
Terminal will be reused by tasks, press any key to close it.
--------------------------------------------------------------
下面配置测试task:
先在main函数下面增加测试代码:
#[test]
fn should_fail() {
unimplemented!();
}
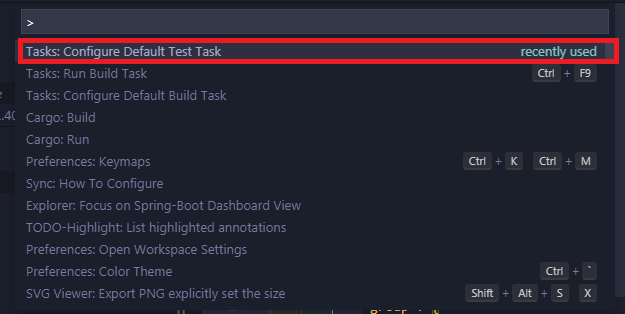
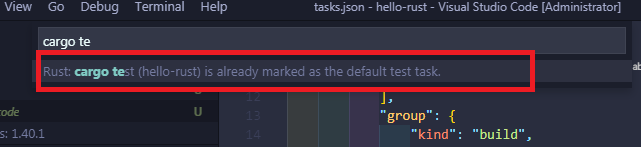
保存后,按快捷键:“CTRL+SHIFT+P”,输入:Task,选择“Tasks: Configure Default Test Task”,然后选择:“Rust: cargo test”
vscode自动生成:
{
"type": "cargo",
"subcommand": "test",
"problemMatcher": [
"$rustc"
],
"group": {
"kind": "test",
"isDefault": true
}
}
保存后,按按快捷键:“CTRL+SHIFT+P”,输入:Task:Run test Task,回车。
vscode自动运行测试用例,并打印结果:

---------------------------------------

> Executing task: cargo test <

   Compiling hello-rust v0.1.0 (E:\code\rustProject\hello-rust)
    Finished dev [unoptimized + debuginfo] target(s) in 1.77s
     Running target\debug\deps\hello_rust-bfa762df5afd173e.exe

running 1 test
test should_fail ... FAILED

failures:

---- should_fail stdout ----
thread 'should_fail' panicked at 'not yet implemented', src\main.rs:14:5
note: run with `RUST_BACKTRACE=1` environment variable to display a backtrace.


failures:
    should_fail

test result: FAILED. 0 passed; 1 failed; 0 ignored; 0 measured; 0 filtered out

error: test failed, to rerun pass '--bin hello-rust'
The terminal process terminated with exit code: 1

Terminal will be reused by tasks, press any key to close it.
-----------------------------------------------------------

下面继续配置DEBUG环境。
这里参照这个文章:https://www.forrestthewoods.com/blog/how-to-debug-rust-with-visual-studio-code/
简单来说,你按如下几步来配置就可以:
1.安装:
C/C++ extension.
Native Debug extension
2.在debug面板,新建一个新的配置,如下:
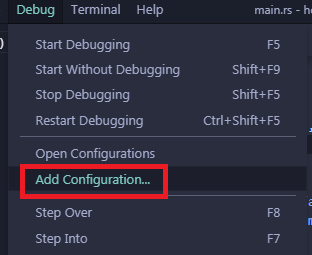
然后选择:“C++ (Windows)” environment
会自动生成launch.json代码,如下 :
{
// Use IntelliSense to learn about possible attributes.
// Hover to view descriptions of existing attributes.
// For more information, visit: https://go.microsoft.com/fwlink/?linkid=830387
"version": "0.2.0",
"configurations": [
{
"name": "(Windows) Launch",
"type": "cppvsdbg",
"request": "launch",
"program": "${workspaceFolder}/target/debug/hello-rust.exe",
"args": [],
"stopAtEntry": false,
"cwd": "${workspaceFolder}",
"environment": [],
"externalConsole": false
}
]
}
其中program的值改为你自己的exe的路径,比如我的就是:

${workspaceFolder}/target/debug/hello-rust.exe
这时,你直接按F5,你就进入debug状态,你现在可以设置断点了。
如果,你顺利走到这一步,恭喜你,你已经基本配置好rust的开发环境。
如果遇到什么问题,欢迎加入:rust新手群,在这里我可以提供一些简单的帮助,加微信:360369487,注明:博客园+rust
本人精通java高并发,DDD,微服务等技术实践,专注java,rust技术栈。 本人Eric,坐标深圳,前IBM架构师、咨询师、敏捷开发技术教练,前IBM区块链研究小组成员、十多年架构设计工作经验,《区块链核心技术与应用》作者之一, 现聚焦于:AI+Crypto。 工作微信&QQ:360369487,区块链创投与交易所资源对接,加我注明:博客园+对接,技术咨询和顾问,加我注明:博客园+顾问。想学习golang和rust的同学,也可以加我微信,备注:博客园+golang或博客园+rust,谢谢!


【推荐】国内首个AI IDE,深度理解中文开发场景,立即下载体验Trae
【推荐】编程新体验,更懂你的AI,立即体验豆包MarsCode编程助手
【推荐】抖音旗下AI助手豆包,你的智能百科全书,全免费不限次数
【推荐】轻量又高性能的 SSH 工具 IShell:AI 加持,快人一步
· 从 HTTP 原因短语缺失研究 HTTP/2 和 HTTP/3 的设计差异
· AI与.NET技术实操系列:向量存储与相似性搜索在 .NET 中的实现
· 基于Microsoft.Extensions.AI核心库实现RAG应用
· Linux系列:如何用heaptrack跟踪.NET程序的非托管内存泄露
· 开发者必知的日志记录最佳实践
· TypeScript + Deepseek 打造卜卦网站:技术与玄学的结合
· Manus的开源复刻OpenManus初探
· AI 智能体引爆开源社区「GitHub 热点速览」
· C#/.NET/.NET Core技术前沿周刊 | 第 29 期(2025年3.1-3.9)
· 从HTTP原因短语缺失研究HTTP/2和HTTP/3的设计差异