vue-cli3构建ts项目
1、构建项目
vue create xxx

上面的第一条,也就是 aaa 这一个选项在你第一次创建项目的时候是并不会出现的,只有你第一次创建完成项目后回提示你保存为默认配置模板,下次新建项目的时候就可以使用你选用的配置快速新建项目了,不需要再重新选择配置项目了。
第二条选项便是 vue cli 3 默认的项目模板,包含 babel 和 eslint。
第三条选项便是自主选择你项目所需的配置。
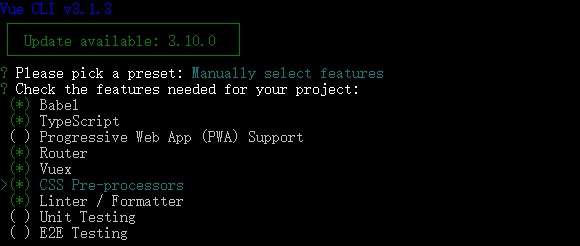
这里由于默认模板没有啥展示的必要所以我们便选择手动配置。
选择项目配置:

这里我们可以选择我们需要的配置选项,选择完成后回车进入下一步。
在选择功能后,会询问更细节的配置

TypeScript:
-
是否使用class风格的组件语法:Use class-style component syntax?
-
是否使用babel做转义:Use Babel alongside TypeScript for auto-detected polyfills?
Router:
1.是否使用history模式:Use history mode for router?
CSS Pre-processors:
-
选择CSS 预处理类型:Pick a CSS pre-processor
Linter / Formatter
-
选择Linter / Formatter规范类型:Pick a linter / formatter config
-
选择lint方式,保存时检查/提交时检查:Pick additional lint features
Testing
-
选择Unit测试方式
-
选择E2E测试方式
选择 Babel, PostCSS, ESLint 等自定义配置的存放位置 Where do you prefer placing config for Babel, PostCSS, ESLint, etc.?

创建成功。
2、修改配置
vue-cli3脚手架生成项目目录说明
│  .browserslistrc
│  .gitignore
│  .postcssrc.js // postcss 配置
│  babel.config.js
│  package.json // 依赖
│  README.md // 项目 readme
│  tsconfig.json // ts 配置
│  tslint.json // tslint 配置
│  vue.config.js // webpack 配置(~自己新建~)
│  yarn.lock
│
├─public // 静态页面
│  │—favicon.ico
│  │—index.html
│
├─src // 主目录
│  ├─assets // 静态资源
│  │      logo.png
│  │
│  ├─components
│  │      HelloWorld.vue
│  │
│  │─views // 页面
│  │      About.vue
│  │      Home.vue
│  │
│  │  App.vue // 页面主入口
│  │
│  │  main.ts // 脚本主入口
│  │
│  ├─router // 路由配置
│  │      index.ts
│  │
│  │  registerServiceWorker.ts // PWA 配置
│  │
│  │  shims-tsx.d.ts
│  │  shims-vue.d.ts
│  │
│  │
│  ├─store // vuex 配置
│  │      index.ts
│  │
│  ├─typings // 全局注入(~自己新建~)
│  │
│  ├─utils // 工具方法(axios封装,全局方法等)(~自己新建~)
│
│
└─tests // 测试用例
    ├─e2e
    │  ├─plugins
    │  │      index.js
    │  │
    │  ├─specs
    │  │      test.js
    │  │
    │  └─support
    │          commands.js
    │          index.js
    │
    └─unit
            HelloWorld.spec.ts
1、在.browserslistrc文件中添加
last 3 ie versions,
not ie <= 8
其它配置,请去https://github.com/browserslist/browserslist。npx browserslist在项目目录中运行以查看查询选择了哪些浏览器
2、tslint配置
// 关闭console
"no-console": [true, "log", "dir", "table"]

// tslint的函数前后空格:
"space-before-function-paren": ["error", {
  "anonymous": "always",
  "named": "always",
  "asyncArrow": "always"
}]


// tslint分号的配置:
"semicolon": [true, "never"]
其它规则:https://palantir.github.io/tslint/rules/
3、路由处理逻辑(登录验证、拦截等)
// main.ts文件

router.beforeEach((to: any, from: any, next: any) => {
  if (to.name === 'login') {
    next({name: 'home/index'})
  } else {
    next()
  }
})
4、axios改造
npm i axios --save
src下新建axios.d.ts axios.config.ts文件
//axios.config.ts
import axios, { AxiosInstance } from 'axios'

declare module 'Vue/types/vue' {
    interface Vue {
        $axios: AxiosInstance
    }
}
// main.ts文件
import Vue from 'vue';
import axios from 'axios';

Vue.prototype.$axios = axios;

/**
 * 创建 axios 实例
 */
const service = axios.create({
    timeout: 3000,
    baseURL: 'http://xxx',
});

/**
 * req 拦截器
 */
service.interceptors.request.use((config: object): object => {
    return config
}, (error: any): object => {
    return Promise.reject(error)
});

/**
 * res 拦截器
 */
service.interceptors.response.use((response: any) => {
    const res = response.data;
    if (res.error) {
        if (process.env.NODE_ENV !== 'production') {
            console.error(res);
        }
        return Promise.reject(res);
    }
    return Promise.resolve(res);
});
// main.ts
import './axios.config';
4、store改造
├── index.html
├── main.js
├── components
│   ├── App.vue
│   └── ...
└── store
    ├── index.ts          # 我们组装模块并导出 store 的地方
    ├── actions.ts        # 根级别的 action
    ├── mutations.ts      # 根级别的 mutation
    └── modules
        ├── cart.ts      # 购物车模块
使用:
- 使用
module形式 - 全局的一些操作,方法,放入
store中,业务逻辑尽量少放,项目全局方法可以放入。例如:cookie,global cache
action(异步): api的操作, 调用方式:this.$store.dispatch(functionName, data)
mutations(同步): dom相关操作,方法名一般使用常量,
调用方式: this.$store.commit(mutationsName, data)
  this.$store.getters[XXX] => this.$store.getters[namespaced/XXX]
  this.$store.dispatch(XXX, {}) => this.$store.dispatch(namespaced/XXX, {})
  this.$store.commit(XXX, {}) => this.$store.commit(namespaced/XXX, {})
//store/index.ts
import Vue from 'vue';
import Vuex from 'vuex';
import cart from './modules/cart';

Vue.use(Vuex);

export default new Vuex.Store({
  modules: {
    cart,
  },
});
// cart.ts
import {ActionContext} from 'vuex';
export interface State {
    token: string;
}

const state: State = {
    token: '',
};

// getters
const getters = {
    toUpperToken: (state: State) => {
        return state.token.toUpperCase();
    },
};

// actions
const actions = {
    setTokenAsync({ commit }: ActionContext<State, State>, payload: any) {
        setTimeout(() => {
            commit('setToken', payload);
        }, 1000);
    },
};

// mutations
const mutations = {
    setToken(state: State, payload: any) {
        state.token = payload;
    },
};

export default {
    namespaced: true,
    state,
    getters,
    actions,
    mutations,
};
5、vue.config.js配置
https://cli.vuejs.org/zh/config/#vue-config-js所列出的属性,可以直接配置。其它属性可以通过configureWebpack、chainWebpack配置。


