


angular+ 路由学习 (六)路由守卫
- 路由守卫的常见的应用场景
- 用户没有权限导航到目标组件
- 用户需要先登录才可以访问某组件
- 显示目标组件前,需要先获取数据
- 离开组件前,出现弹框提示需要操作才可以离开
- 路由守卫一般应用原理:
- 通过往路由配置中添加守卫,守卫返回boolean值来控制路由是否继续导航的行为
- 返回 url,守卫会取消路由当前导航而控制路由导航到这个 url;
- 一般守卫会同步返回 boolean值来控制路由行为,大多数情况下,路由守卫无法同步返回值,这个时候就需要通过异步操作(如 获取新数据,通过提问把更改保存到服务器等),当这个时候,守卫可以返回 Observable<boolean> 或 Promise<boolean> 来控制路由行为;
- 提供给路由的可观察对象必须可以结束操作,否则导航将不会继续;
- 路由守卫接口:
- CanActivate : 处理导航到某路由,管理导航类业务
- CanActivateChild: 处理导航到某子路由
- CanDeactivate : 处理从当前路由离开
- Resolve: 在路由激活之前获取路由数据
- CanLoad: 处理异步导航到某特性模块的情况
- 分层路由的级别设置守卫,其路由检查守卫顺序:
- 路由器会先从最深的子路由 从下到上 检查 CanActivateChild() 和 CanDeactivate() ;
- 路由器会 从上到下 检查 CanActivate()
- 如果异步加载到路由,会在路由加载前 检查CanLoad()
- 当其中任何一个守卫返回false ; 其他未完成的守卫会被取消,即整个导航取消;
- 使用实例:
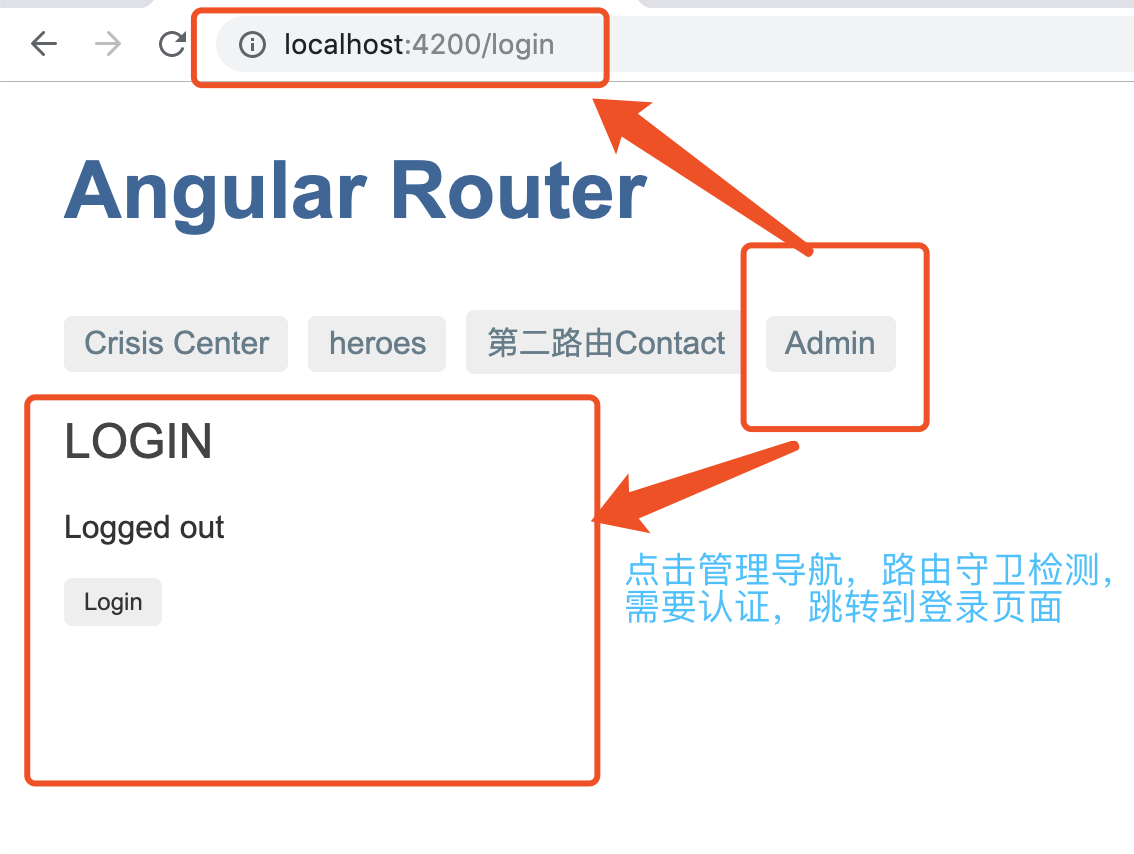
- 使用 CanActivate, CanActivateChild 登录验证: 当我们从A 路由 导航到 B 路由,此时B 路由需要权限才可以访问;直到 用户拥有权限后才可以访问;
- 准备工作:添加一个管理模块来扩展;
ng g module admin --routing // 新建一个模块目录;会自动生成路由配置文件
// 创建相关组件
ng g component admin/admin-dashboard
ng g component admin/admin
ng g component admin/manage-crises
ng g component admin/manage-heroes
<!-- admin.component.html -->
<h3>ADMIN</h3>
<nav>
  <a routerLink="./" routerLinkActive="active"
    [routerLinkActiveOptions]="{ exact: true }">Dashboard</a>
  <a routerLink="./crises" routerLinkActive="active">Manage Crises</a>
  <a routerLink="./heroes" routerLinkActive="active">Manage Heroes</a>
</nav>
<router-outlet></router-outlet>
// admin.module.ts import { NgModule } from '@angular/core'; import { CommonModule } from '@angular/common'; import { AdminRoutingModule } from './admin-routing.module';
// 可将下4个组件复制到 admin-routing.module.ts 中,方便后面配置路由生成 import { AdminDashboardComponent } from './admin-dashboard/admin-dashboard.component'; import { AdminComponent } from './admin/admin.component'; import { ManageCrisesComponent } from './manage-crises/manage-crises.component'; import { ManageHeroesComponent } from './manage-heroes/manage-heroes.component'; @NgModule({ declarations: [AdminDashboardComponent, AdminComponent, ManageCrisesComponent, ManageHeroesComponent], imports: [ CommonModule, AdminRoutingModule ] }) export class AdminModule { } - admin-routing.module.ts 配置路由,然后将admin.module.ts 导入到 app.module中,并在imports数组中注入
import { NgModule } from '@angular/core';
import { Routes, RouterModule } from '@angular/router';

import { AuthGuard } from '../auth/auth.guard';

import { AdminDashboardComponent } from './admin-dashboard/admin-dashboard.component';
import { AdminComponent } from './admin/admin.component';
import { ManageCrisesComponent } from './manage-crises/manage-crises.component';
import { ManageHeroesComponent } from './manage-heroes/manage-heroes.component';
// 使用无组件路由,即分组路由,可以不需要用来只管理分组路由的组件
const adminRoutes: Routes = [
  {
     path: 'admin', component: AdminComponent, canActivate: [AuthGuard], children: [ // 配置canActivate
      {
        path: '', canActivateChild: [AuthGuard], children: [ // 配置canActivateChild
          { path: 'crises', component: ManageCrisesComponent},
          { path: 'heroes', component: ManageHeroesComponent},
          { path: '', component: AdminDashboardComponent}
        ]
      }
  ]
}
];

@NgModule({
  imports: [RouterModule.forChild(adminRoutes)],
  exports: [RouterModule]
})
export class AdminRoutingModule { }

// ... app.module.ts 中
import { AdminModule} from './admin/admin.module';imports: [BrowserModule,FormsModule,HeroesModule,CrisisCenterModule,AdminModule,AuthModule,AppRoutingModule,BrowserAnimationsModule],
//... - 在app.component.html 主模块中加入,作为导航;
<a [routerLink]="['/admin']">Admin</a>
- 到此为止,管理模块准备工作完成,现在需要对其进行设置,保障只有登录用户可以访问;
ng g guard auth/auth //创建守卫模块
- 打开admin-routing.module.ts 进行配置
import { NgModule } from '@angular/core'; import { Routes, RouterModule } from '@angular/router'; import { AuthGuard } from '../auth/auth.guard'; // 导入路由守卫 import { AdminDashboardComponent } from './admin-dashboard/admin-dashboard.component'; import { AdminComponent } from './admin/admin.component'; import { ManageCrisesComponent } from './manage-crises/manage-crises.component'; import { ManageHeroesComponent } from './manage-heroes/manage-heroes.component'; // 使用无组件路由,即分组路由,可以不需要用来只管理分组路由的组件 const adminRoutes: Routes = [ { path: 'admin', component: AdminComponent, canActivate: [AuthGuard], children: [ // 配置路由守卫 { path: '', canActivateChild: [AuthGuard], children: [ { path: 'crises', component: ManageCrisesComponent}, { path: 'heroes', component: ManageHeroesComponent}, { path: '', component: AdminDashboardComponent} ] } ] } ]; @NgModule({ imports: [RouterModule.forChild(adminRoutes)], exports: [RouterModule] }) export class AdminRoutingModule { } - 进行路由守卫认证的配置,这里就使用登录原理;需要用户登录认证后,才可以导航到指定路由;使用 ng g service auth/auth; 创建一个权限服务,用来认证用户是否登录;
-
// auth.service.ts
import { Injectable } from '@angular/core';
import { Observable, of } from 'rxjs';
import { tap, delay } from 'rxjs/operators';
@Injectable({
  providedIn: 'root'
})
export class AuthService {
  isLoggedIn = false;
  redirectUrl: string;

  login(): Observable<boolean> { // 模拟登录
    return of(true).pipe(
      delay(1000),
      tap(val => this.isLoggedIn = true)
    );
  }
  constructor() { }
  logout(): void {
    this.isLoggedIn = false;
  }
}
- 打开刚才创建的守卫,进行导航到某路由的认证;
import { Injectable } from '@angular/core'; import { CanActivate, CanActivateChild, ActivatedRouteSnapshot, RouterStateSnapshot, UrlTree, Router } from '@angular/router'; import { Observable } from 'rxjs'; import { AuthService } from './auth.service'; // 导入 @Injectable({ providedIn: 'root' }) export class AuthGuard implements CanActivate { constructor( private authService: AuthService, // 注入服务 private router: Router ) { } canActivate( // 处理导航到某路由,返回布尔值 next: ActivatedRouteSnapshot, // 包含 即将被激活到路由 state: RouterStateSnapshot): Observable<boolean | UrlTree> | Promise<boolean | UrlTree> | boolean | UrlTree { // 包含即将到达到状态 let url: string = state.url; return this.checkLogin(url); } checkLogin(url: string): boolean { // 检测登录 if (this.authService.isLoggedIn) { return true; } this.authService.redirectUrl = url; // 保存用户来自的URL,并导航到登录页 this.router.navigate(['/login']); return false; } } - 到这里,在路由设置了路由守卫,也设置了路由守卫的相关认证逻辑,这个时候需要创建一个登录组件来见证路由守卫的功能;
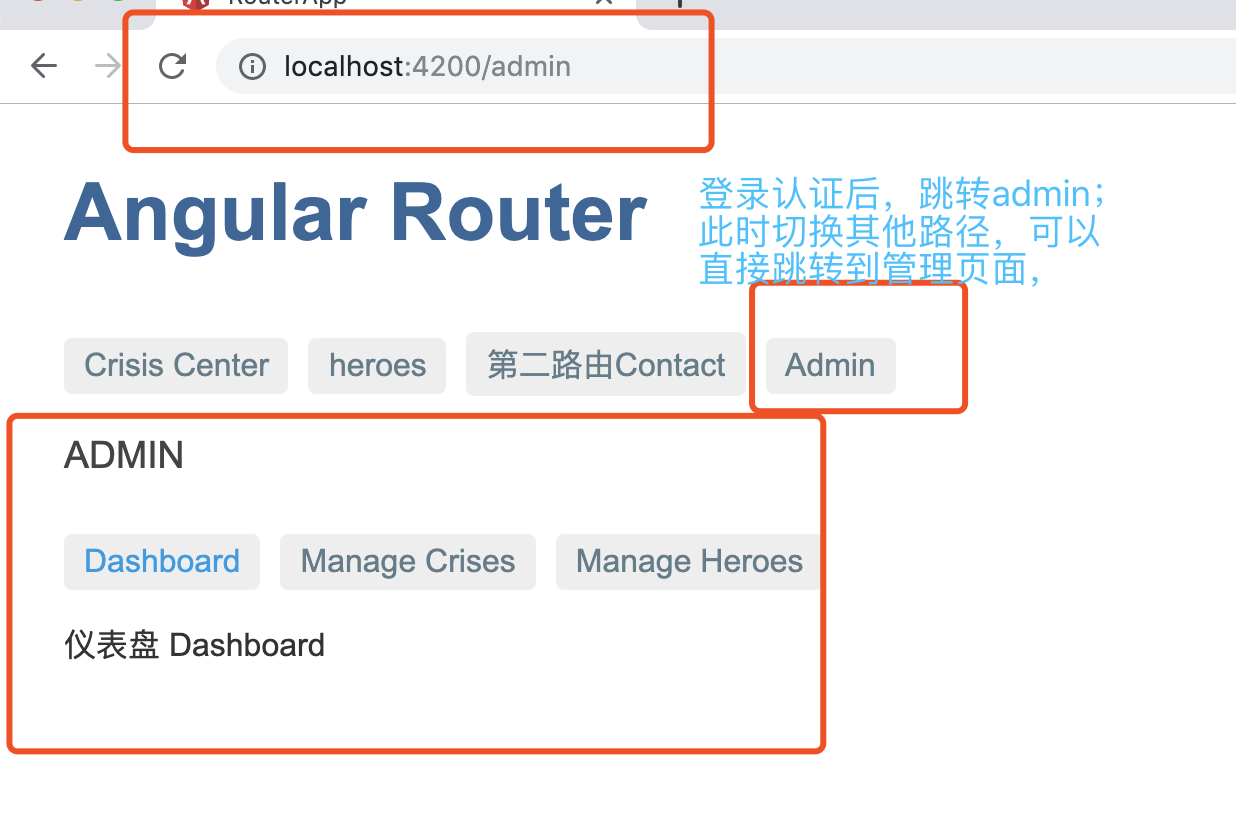
// login.html
<h2>LOGIN</h2>
<p>{{message}}</p>
<p>
  <button (click)="login()"  *ngIf="!authService.isLoggedIn">Login</button>
  <button (click)="logout()" *ngIf="authService.isLoggedIn">Logout</button>
</p>


// login.ts
import { Component } from '@angular/core';
import { Router } from '@angular/router';
import { AuthService } from '../auth.service';

@Component({
  selector: 'app-login',
  templateUrl: './login.component.html',
  styleUrls: ['./login.component.css']
})
export class LoginComponent {
  message: string;

  constructor(public authService: AuthService, public router: Router) {
    this.setMessage();
  }

  setMessage() {
    this.message = 'Logged ' + (this.authService.isLoggedIn ? 'in' : 'out');
  }

  login() {
    this.message = 'Trying to log in ...';

    this.authService.login().subscribe(() => {
      this.setMessage();
      if (this.authService.isLoggedIn) {
        // Get the redirect URL from our auth service
        // If no redirect has been set, use the default
        let redirect = this.authService.redirectUrl ? this.router.parseUrl(this.authService.redirectUrl) : '/admin';

        // Redirect the user
        this.router.navigateByUrl(redirect);
      }
    });
  }

  logout() {
    this.authService.logout();
    this.setMessage();
  }
}
- 然后配置login的路由,并将auth.module.ts 注入到app.module.ts中
// auth-routing.module.ts
import { NgModule } from '@angular/core';
import { Routes, RouterModule } from '@angular/router';
import { LoginComponent} from './login/login.component';

const authRoutes: Routes = [
  { path: 'login', component: LoginComponent }
];

@NgModule({
  imports: [RouterModule.forChild(authRoutes)],
  exports: [RouterModule]
})
export class AuthRoutingModule { }

// app.module.ts
import { AuthModule} from './auth/auth.module';

...

  imports: [
    BrowserModule,
    FormsModule,
    HeroesModule,
    CrisisCenterModule,
    AdminModule,
    AuthModule,
    AppRoutingModule,
    BrowserAnimationsModule
  ],
- 效果展示
- 准备工作:添加一个管理模块来扩展;
想买的东西很贵,想去的地方很远,喜欢的女孩很完美
