

【RabbitMQ】4、参数
1、应答参数
- 在简单模式中,消费者代码中我们监听队列,对于auto_ack我们设置的为True,意味着无论我的回调函数是否回调成功,该消息都会被消费掉并删除。这样的话会存在处理失败,则消息会丢失,怎么办呢?将auto_ack=True改为手动应答。当回调函数消费成功后,告诉rabbitmq,消费成功了,删除掉信息。如果处理失败,将信息回退给rabbitmq,重新再被消费者消费。
- 处理方式:
- 将消费者模式中的basic_consume(auto_ack=False)设置成False,为手动应答
channel.basic_consume(
    queue='hello',  # 队列
    auto_ack=False,  # 手动应答
    on_message_callback=callback  # 回调函数
)- 在回调函数中添加ch.basic_ack(delivery_tag=method.delivery_tag)
# 确定回调函数
def callback(ch, method, properties, body):
    print("[x] Received %r" % body)
ch.basic_ack(delivery_tag=method.delivery_tag)- 生产者代码:
import pika

# mq的用户名和密码,用于认证
credentials = pika.PlainCredentials(username='root', password='root')
# 1、连接rabbitmq
connection = pika.BlockingConnection(pika.ConnectionParameters(
    host='47.94.132.145',
    virtual_host='/',
    port=5672,
    credentials=credentials
))

channel = connection.channel() # 创建一个AMQP信道

# 2、创建队列
channel.queue_declare(queue='hello') # 声明队列

# 3、向指定队列插入数据
channel.basic_publish(
    exchange='',  # 简单模式,交换器为空。交换器可以精确的指定消息应该发到哪个队列中
    routing_key='hello',  # 指定队列
    body=b"Hello World"  # 发送的内容
)

print("[x] send 'Hello World'")
connection.close()- 消费者代码:
# -*- coding: utf-8 -*-
import pika

credentials = pika.PlainCredentials(username='root', password='root')

connection = pika.BlockingConnection(pika.ConnectionParameters(
    host='47.94.132.145',
    virtual_host='/',
    port=5672,
    credentials=credentials
))
channel = connection.channel()

# 创建队列
channel.queue_declare(queue='hello')


# 确定回调函数
def callback(ch, method, properties, body):
    print("[x] Received %r" % body)
    ch.basic_ack(delivery_tag=method.delivery_tag) # 告诉生产者,消息处理完成


# 确定监听队列参数
channel.basic_consume(
    queue='hello',  # 队列
    auto_ack=False,  # 手动应答
    on_message_callback=callback  # 回调函数
)

print("[*] waiting for message. to exit press CTRL+C")
# 正式监听
channel.start_consuming()
2、持久化参数
- 如果队列里还有消息,但是RabbitMQ服务端当机了,消息还在不在?肯定是不在的,如何把消息持久化呢?答案是在每次声明队列的时候,都加上durable=True。注意每个队列都得写,客户端、服务端声明的时候都要写。
channel.queue_declare(queue='hello3', durable=True)- 测试的结果发现,只是把队列持久化了,但是队列里的消息还是没了。durable的作用只是把队列持久化,距离消息持久化还差一步,在发送端(生产者)发送消息时,加上properties
properties=pika.BasicProperties(
   delivery_mode=2, # 消息持久化
)- 生产者代码:
# -*- coding: utf-8 -*-
import pika


credentials = pika.PlainCredentials(username='root', password='root')
# 1、连接rabbitmq
connection = pika.BlockingConnection(pika.ConnectionParameters(
    host='47.94.132.145',
    virtual_host='/',
    port=5672,
    credentials=credentials
))

channel = connection.channel()

# 2、声明可持久化队列
channel.queue_declare(queue='hello3', durable=True)

# 3、向指定队列插入数据
channel.basic_publish(
    exchange='',  # 简单模式,交换机为空
    routing_key='hello3',  # 指定队列
    body=b"Hello World",
    properties=pika.BasicProperties(
        delivery_mode=2  # 消息持久化
    )
)

print("[x] send 'Hello World'")
- 消费者代码:
# -*- coding: utf-8 -*-
import pika

credentials = pika.PlainCredentials(username='root', password='root')

connection = pika.BlockingConnection(pika.ConnectionParameters(
    host='47.94.132.145',
    virtual_host='/',
    port=5672,
    credentials=credentials
))
channel = connection.channel()

# 声明可持久化队列
channel.queue_declare(queue='hello3', durable=True)


# 确定回调函数
def callback(ch, method, properties, body):
    print("[x] Received %r" % body)
    ch.basic_ack(delivery_tag=method.delivery_tag)


# 确定监听队列参数
channel.basic_consume(
    queue='hello3',  # 队列
    auto_ack=False,  # 手动应答
    on_message_callback=callback  # 回调函数
)

print("[*] waiting for message. to exit press CTRL+C")
# 正式监听
channel.start_consuming()
3、分发参数
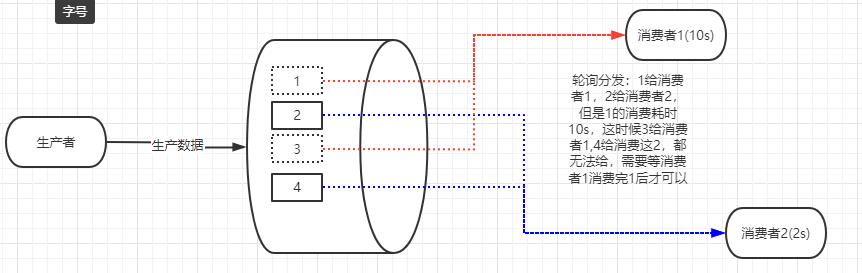
- 有两个消费者同时监听一个队列。其中一个线程sleep 2秒,另一个消费者线程sleep 1秒,但是处理的消息是一样多,这种方式叫做轮询分发(round-rpbin)。简单的说轮询分发就是有两个消费者(消费者1、消费者2),其中消费者1处理一个消费花费2秒,消费者2处理一个消费花费1秒,这时候生产者推送一条数据,先给消费者1,在推送一条数据,再给消费者2,又推送2条数据,一条给消费者1,一条消费者2,但是消费者1处于还没有消费完,只能等着,生产者推送的2条数据,都无法消费。
- 不管谁忙,都不会多给消息,总是你一个我一个。想要做到公平分发(fair dispatch),必须关闭自动应答ack,改为手动应答。使用消费者basicQos(perfetch_count=1)限制每次只发送不超过1条消息到同一个消费者,消费者必须手动反馈告知队列,才会发送下一个。简单的来说就是谁处理的快,就给谁多发,限制限制每次发送几条数据,处理完后,告诉队列。
# 公平分发
channel.basic_qos(prefetch_count=1)- 生产者代码:
# -*- coding: utf-8 -*-
import pika


credentials = pika.PlainCredentials(username='root', password='root')
# 1、连接rabbitmq
connection = pika.BlockingConnection(pika.ConnectionParameters(
    host='47.94.132.145',
    virtual_host='/',
    port=5672,
    credentials=credentials
))

channel = connection.channel()

# 2、声明可持久化队列
channel.queue_declare(queue='hello4')

# 3、向指定队列插入数据
channel.basic_publish(
    exchange='',  # 简单模式,交换机为空
    routing_key='hello4',  # 指定队列
    body=b"Hello 11",
)

print("[x] send 'Hello World'")
- 消费者1代码:
# -*- coding: utf-8 -*-
import pika

credentials = pika.PlainCredentials(username='root', password='root')

connection = pika.BlockingConnection(pika.ConnectionParameters(
    host='47.94.132.145',
    virtual_host='/',
    port=5672,
    credentials=credentials
))
channel = connection.channel()

# 创建队列
channel.queue_declare(queue='hello4')


# 确定回调函数
def callback(ch, method, properties, body):
    import time
    time.sleep(20)
    print("[x] Received %r" % body)
    ch.basic_ack(delivery_tag=method.delivery_tag)


# 公平分发
channel.basic_qos(prefetch_count=1)

# 确定监听队列参数
channel.basic_consume(
    queue='hello4',  # 队列
    auto_ack=False,  # 手动应答
    on_message_callback=callback  # 回调函数
)

print("[*] waiting for message. to exit press CTRL+C")
# 正式监听
channel.start_consuming()
- 消费者2代码和消费者1代码一样,把sleep修改一下就可以。
本文来自博客园,作者:郭祺迦,转载请注明原文链接:https://www.cnblogs.com/guojie-guojie/p/16404750.html


【推荐】国内首个AI IDE,深度理解中文开发场景,立即下载体验Trae
【推荐】编程新体验,更懂你的AI,立即体验豆包MarsCode编程助手
【推荐】抖音旗下AI助手豆包,你的智能百科全书,全免费不限次数
【推荐】轻量又高性能的 SSH 工具 IShell:AI 加持,快人一步
· TypeScript + Deepseek 打造卜卦网站:技术与玄学的结合
· 阿里巴巴 QwQ-32B真的超越了 DeepSeek R-1吗?
· 【译】Visual Studio 中新的强大生产力特性
· 10年+ .NET Coder 心语 ── 封装的思维:从隐藏、稳定开始理解其本质意义
· 【设计模式】告别冗长if-else语句:使用策略模式优化代码结构