深度学习环境搭建(Windows11)
深度学习环境的搭建(Windows11)
偶然重装了系统,在此记录下环境的恢复
基本深度学习环境的搭建,包括Anaconda+CUDA+cuDNN+Pytorch+TensorRT的安装与配置。
ps:显卡为 RTX 4060 Laptop GPU
1.安装Python
前往Python官网https://www.python.org/getit/,下载最新版Python并安装即可。
2.安装Anaconda3
前往Anaconda官网https://www.anaconda.com/download,下载最新版Anaconda安装包
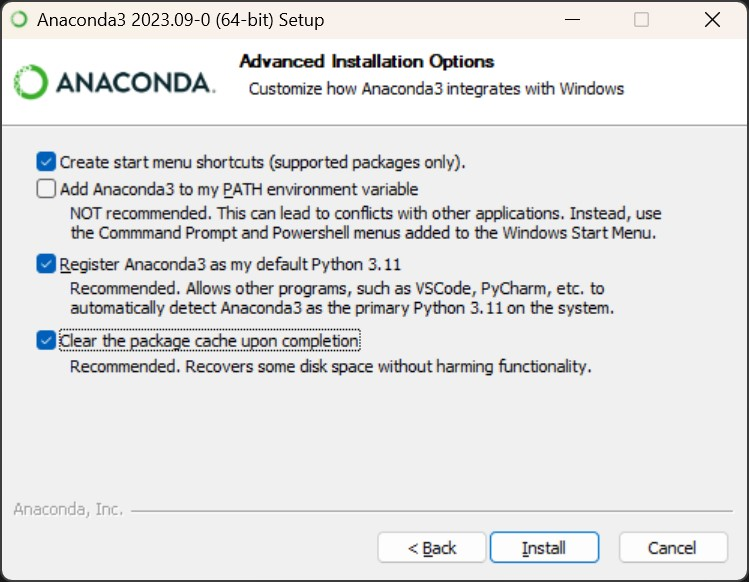
运行安装包,选择安装位置,我这里是C:\Users\username\anaconda3,大概需要5.7G空间,高级安装选项设置如下图:
2.1配置vscode终端自动激活对应的conda环境
方法一
- 首先打开
设置菜单,找到系统->开发者选项->PowerShell, 开启选项更改执行策略····, 以允许power shell加载运行本地脚本

- 以管理员身份打开Anaconda Powershell prompt,运行conda初始化脚本即可:
conda init powershell
这样,conda会在$PROFILE所在文件夹下生成一个ps1脚本,每次打开终端,就会自动执行,从而切换到conda环境,内容如下:
#region conda initialize
# !! Contents within this block are managed by 'conda init' !!
If (Test-Path "C:\Users\username\anaconda3\Scripts\conda.exe") {
    (& "C:\Users\username\anaconda3\Scripts\conda.exe" "shell.powershell" "hook") | Out-String | ?{$_} | Invoke-Expression
}
#endregion
- 大功告成。这样你的power shell就可以直接使用conda acitvate等命令了。
方法二
如果你希望你的power shell还是安装anaconda之前的状态,并且出于安全考虑,不想要更改power shell的默认执行策略,毕竟上面的选项开了之后一般就得一直开着了,什么本地power shell脚本都可以直接运行了,这时候可以考虑以下的办法:
由于vscode默认的终端为power shell,我们需要参考Anaconda Powershell prompt脚本新建一个新的终端配置:
-
首先ctrl+shift+p,输入setting,找到首选项:打开设置(json)这一项即可打开settings.json
-
在settings.json中添加如下配置:
    "terminal.integrated.profiles.windows": {
        "PowerShell": {
            "source": "PowerShell",
            "icon": "terminal-powershell"
        },
        "Command PowerShell Prompt": {
            "path": [
                "${env:windir}\\System32\\WindowsPowerShell\\v1.0\\powershell.exe"
            ],
            "args": ["-ExecutionPolicy","ByPass","-NoExit","-Command", "C:\\Users\\username\\anaconda3\\shell\\condabin\\conda-hook.ps1"],
            "icon": "terminal-powershell"
        },
        "Git Bash": {
            "source": "Git Bash"
        }
    },
    "terminal.integrated.defaultProfile.windows": "Command PowerShell Prompt"
配置内容参考自下图目标栏:
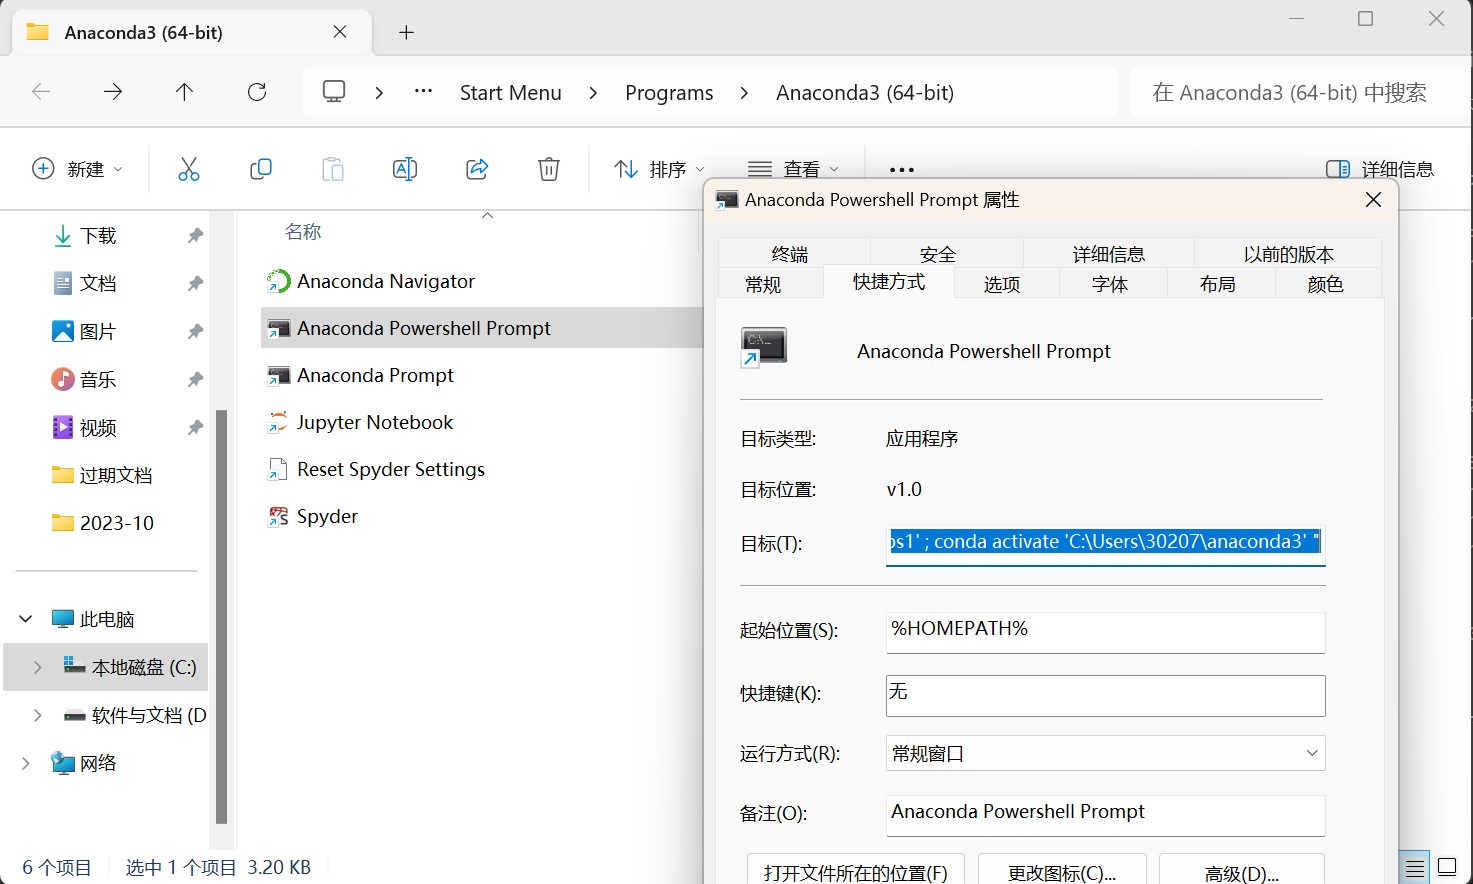
其原理就是靠着args参数中的-ExecutionPolicy参数,将执行策略设置为ByPass,临时更改执行策略以执行conda-hook脚本,从而激活虚拟环境。
3.安装Git工具
前往Git官网https://git-scm.com/download/win下载并安装即可。
4.安装CUDA Toolkit
安装CUDA前请确保已安装好驱动,nvidia驱动下载地址:https://www.nvidia.cn/Download/index.aspx?lang=cn
然后在命令行中输入nvidia-smi 查看显卡支持的最高CUDA版本,我这个是12.0
PS C:\Users\username> nvidia-smi
Thu Oct 19 11:40:58 2023
+-----------------------------------------------------------------------------+
| NVIDIA-SMI 528.92       Driver Version: 528.92       CUDA Version: 12.0     |
|-------------------------------+----------------------+----------------------+
| GPU  Name            TCC/WDDM | Bus-Id        Disp.A | Volatile Uncorr. ECC |
| Fan  Temp  Perf  Pwr:Usage/Cap|         Memory-Usage | GPU-Util  Compute M. |
|                               |                      |               MIG M. |
|===============================+======================+======================|
|   0  NVIDIA GeForce ... WDDM  | 00000000:01:00.0 Off |                  N/A |
| N/A   39C    P0    17W /  80W |      0MiB /  8188MiB |      0%      Default |
|                               |                      |                  N/A |
+-------------------------------+----------------------+----------------------+

+-----------------------------------------------------------------------------+
| Processes:                                                                  |
|  GPU   GI   CI        PID   Type   Process name                  GPU Memory |
|        ID   ID                                                   Usage      |
|=============================================================================|
|  No running processes found                                                 |
+-----------------------------------------------------------------------------+
PS C:\Users\username>
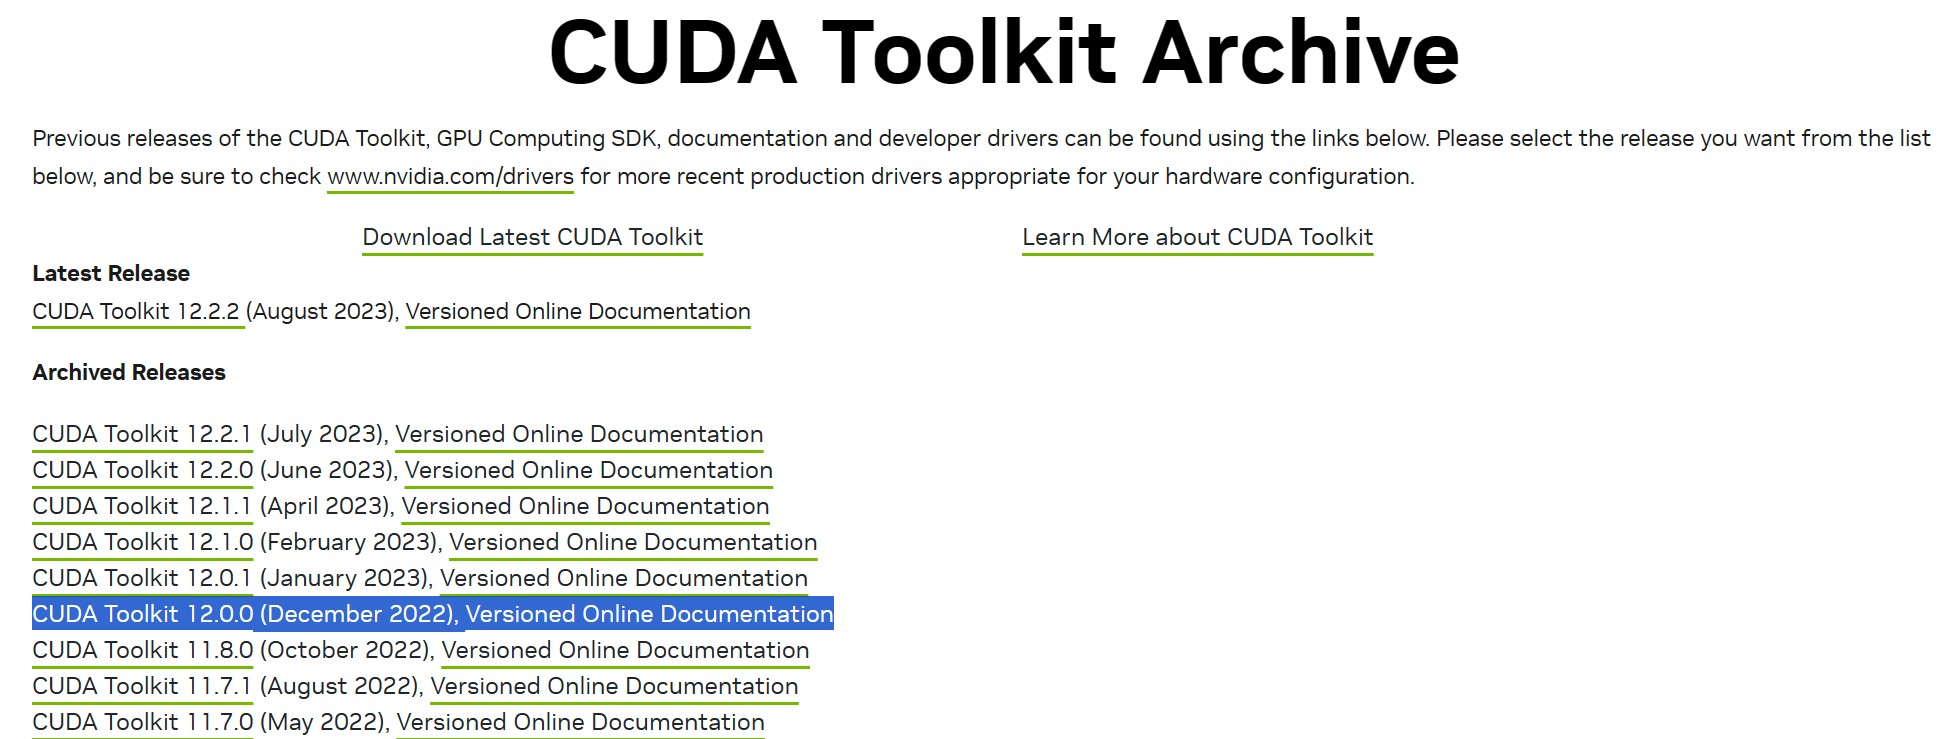
接着下载对应版本号12.0的CUDA驱动,下载地址:https://developer.nvidia.com/cuda-toolkit-archive
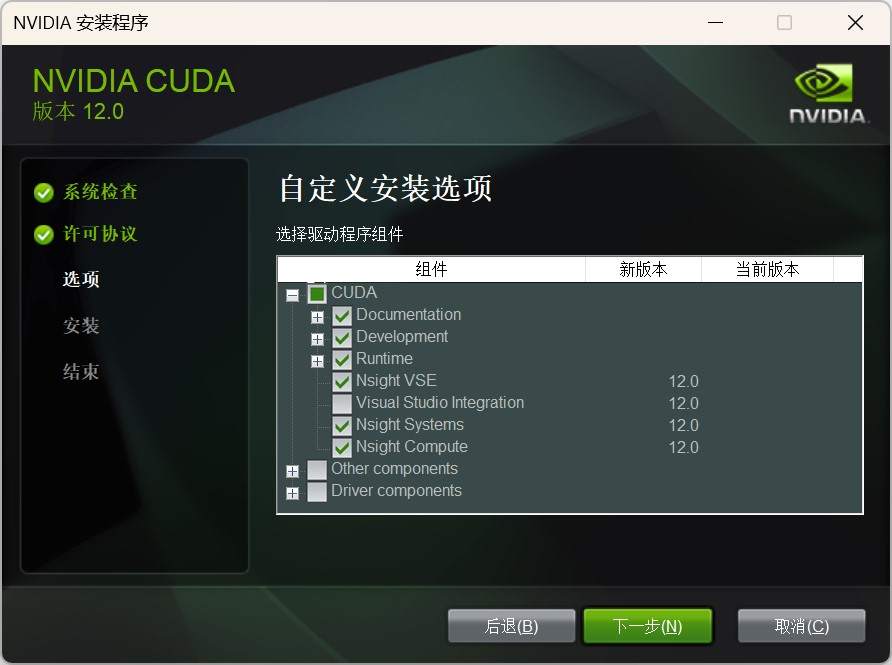
下载完成后点击安装,安装时选择自定义安装,仅勾选CUDA即可,如果之前没有安装Visual Studio,也需要取消勾选Visual Studio Integration,否则会安装不成功。安装位置自己选,一般C盘就行。
安装完成后,在终端中输入nvcc -V出现如下内容代表安装成功。
PS C:\Users\username> nvcc -V
nvcc: NVIDIA (R) Cuda compiler driver
Copyright (c) 2005-2022 NVIDIA Corporation
Built on Mon_Oct_24_19:40:05_Pacific_Daylight_Time_2022
Cuda compilation tools, release 12.0, V12.0.76
Build cuda_12.0.r12.0/compiler.31968024_0
PS C:\Users\username>
5.安装cuDNN
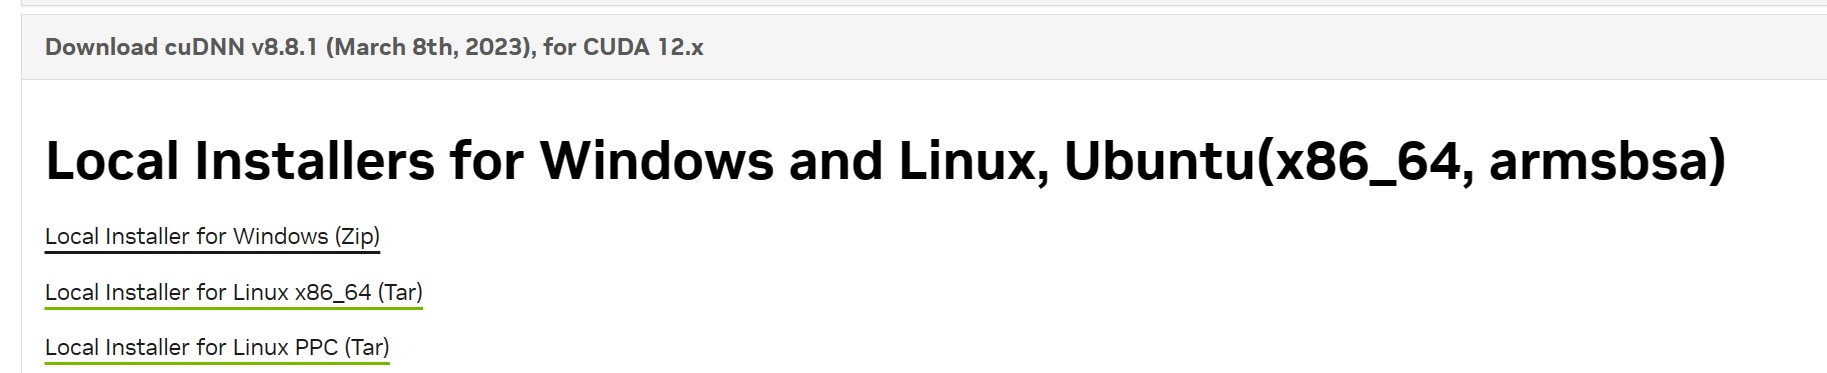
首先前往官网寻找与自己CUDA版本相匹配的cuDNN:https://developer.nvidia.com/rdp/cudnn-download
比如我的CUDA版本是12.0,对应的cuDNN版本为8.8.1,那就应该下载Download cuDNN v8.8.1 (March 8th, 2023), for CUDA 12.x选项卡中的Local Installer for Windows (Zip)。
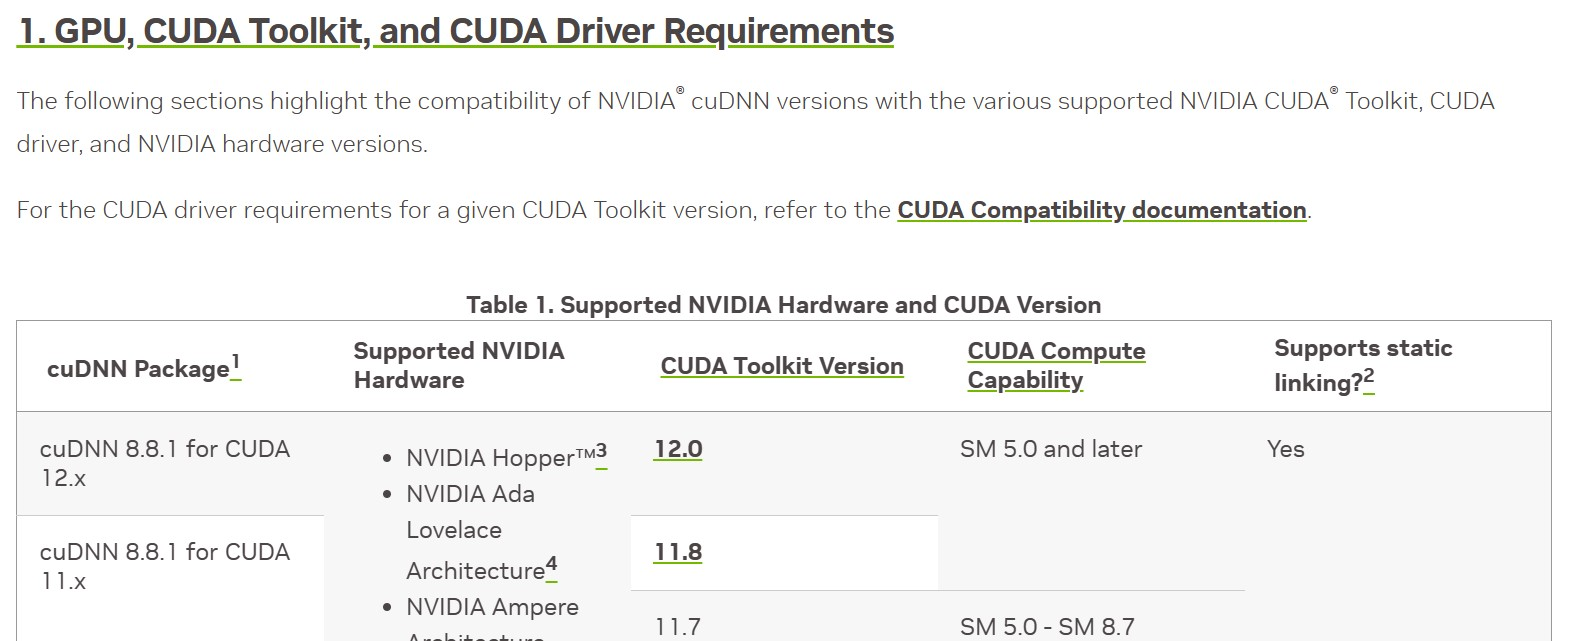
其余不同版本cuDNN对应的CUDA版本可在官网自行查看:https://docs.nvidia.com/deeplearning/cudnn/archives/index.html
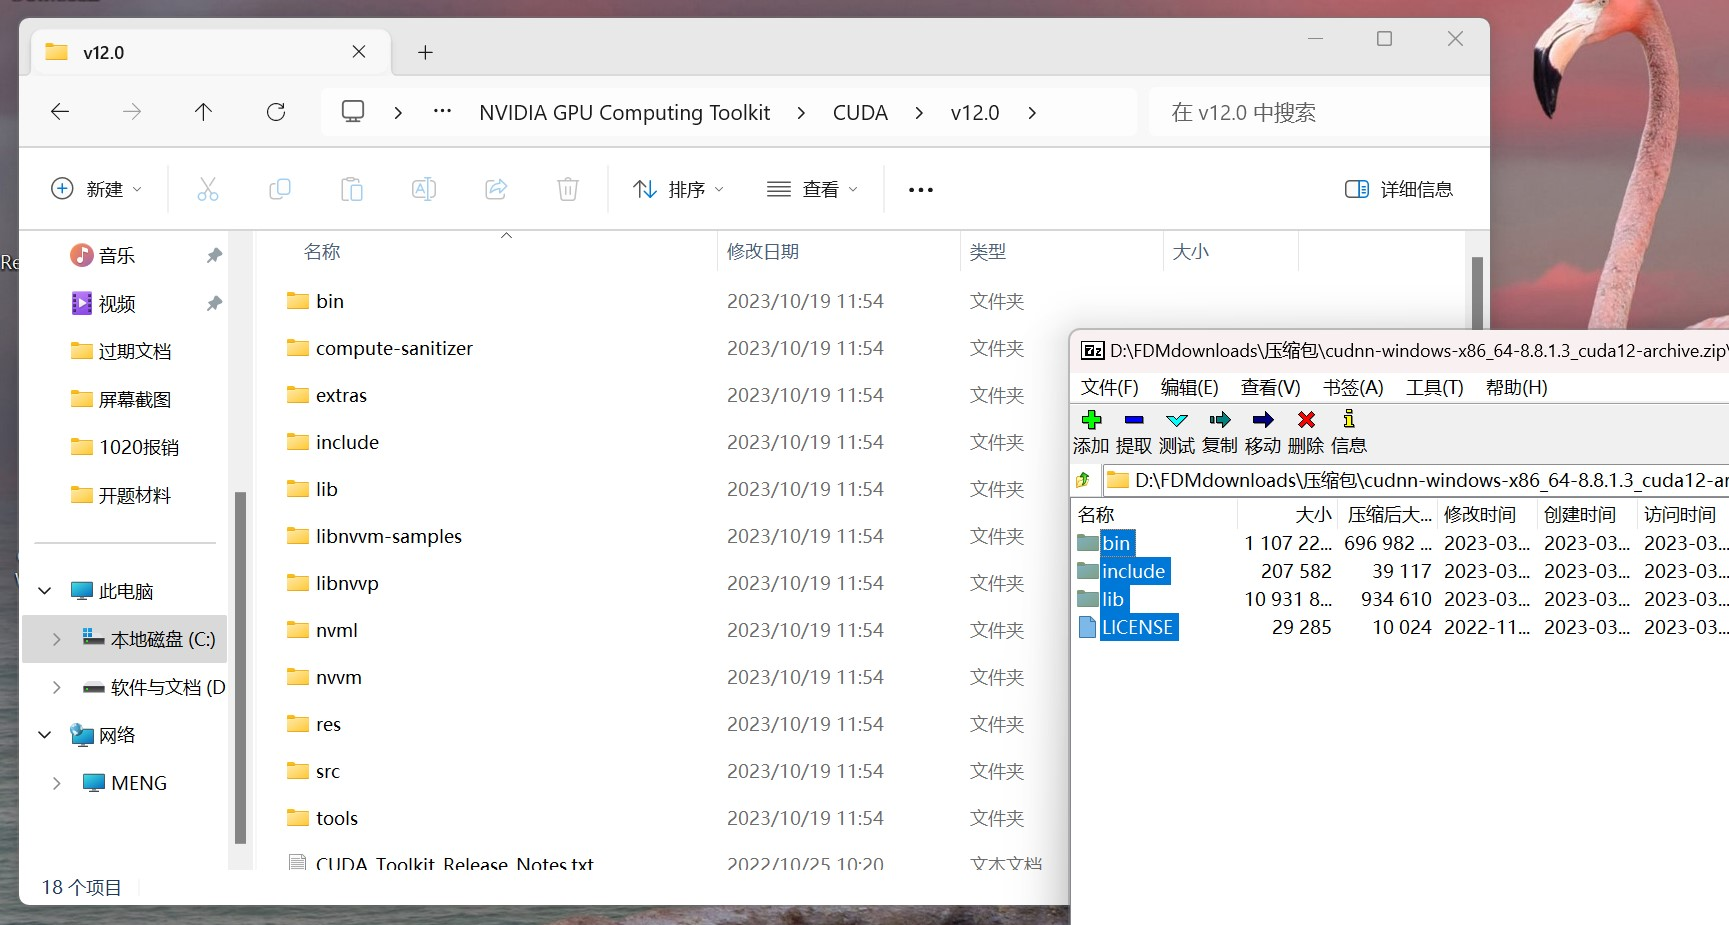
下载完成后打开压缩包,将压缩包内的文件夹复制到CUDA目录下即可。如下图所示:
安装后可在***\NVIDIA GPU Computing Toolkit\CUDA\v12.0\extras\demo_suite文件夹下用powershell运行bandwidthTest.exe程序,出现如下结果则代表cuDNN安装成功。
PS C:\Program Files\NVIDIA GPU Computing Toolkit\CUDA\v12.0\extras\demo_suite> .\bandwidthTest.exe
[CUDA Bandwidth Test] - Starting...
Running on...

 Device 0: NVIDIA GeForce RTX 4060 Laptop GPU
 Quick Mode

 Host to Device Bandwidth, 1 Device(s)
 PINNED Memory Transfers
   Transfer Size (Bytes)        Bandwidth(MB/s)
   33554432                     12215.0

 Device to Host Bandwidth, 1 Device(s)
 PINNED Memory Transfers
   Transfer Size (Bytes)        Bandwidth(MB/s)
   33554432                     12826.1

 Device to Device Bandwidth, 1 Device(s)
 PINNED Memory Transfers
   Transfer Size (Bytes)        Bandwidth(MB/s)
   33554432                     226792.0

Result = PASS

NOTE: The CUDA Samples are not meant for performance measurements. Results may vary when GPU Boost is enabled.
最后附上官方的安装教程:https://docs.nvidia.com/deeplearning/cudnn/archives/cudnn-881/install-guide/index.html#install-windows
6.安装Pytorch
首先使用Anaconda创建一个虚拟环境并激活,名字随意,例如Pytorch。
conda create -n Pytorch python=3.11
conda activate Pytorch
然后前去Pytorch官网根据自己需要获取安装Pytorch的命令:
https://pytorch.org/get-started/locally/
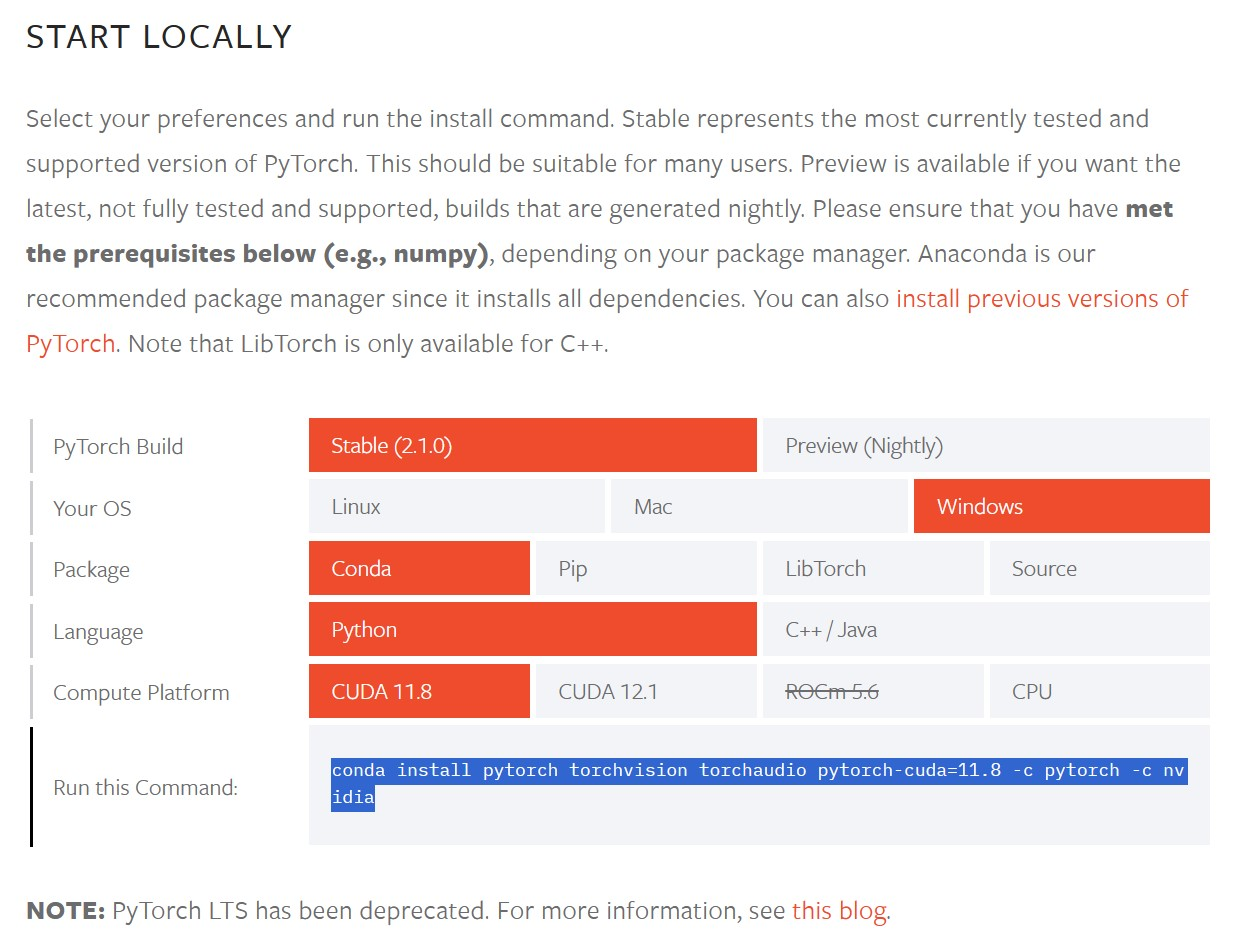
在新激活的虚拟环境Pytorch中运行此命令,静静等待安装完成即可。
# 安装pytorch
conda install pytorch torchvision torchaudio pytorch-cuda=11.8 -c pytorch -c nvidia
验证pytorch是否安装成功(输出结果为True则代表pytorch安装成功):
(Pytorch) PS D:\学习资料\我的博客> python
Python 3.11.5 | packaged by Anaconda, Inc. | (main, Sep 11 2023, 13:26:23) [MSC v.1916 64 bit (AMD64)] on win32
Type "help", "copyright", "credits" or "license" for more information.
>>> import torch
>>> torch.cuda.is_available()
True
>>>
7.安装TensorRT
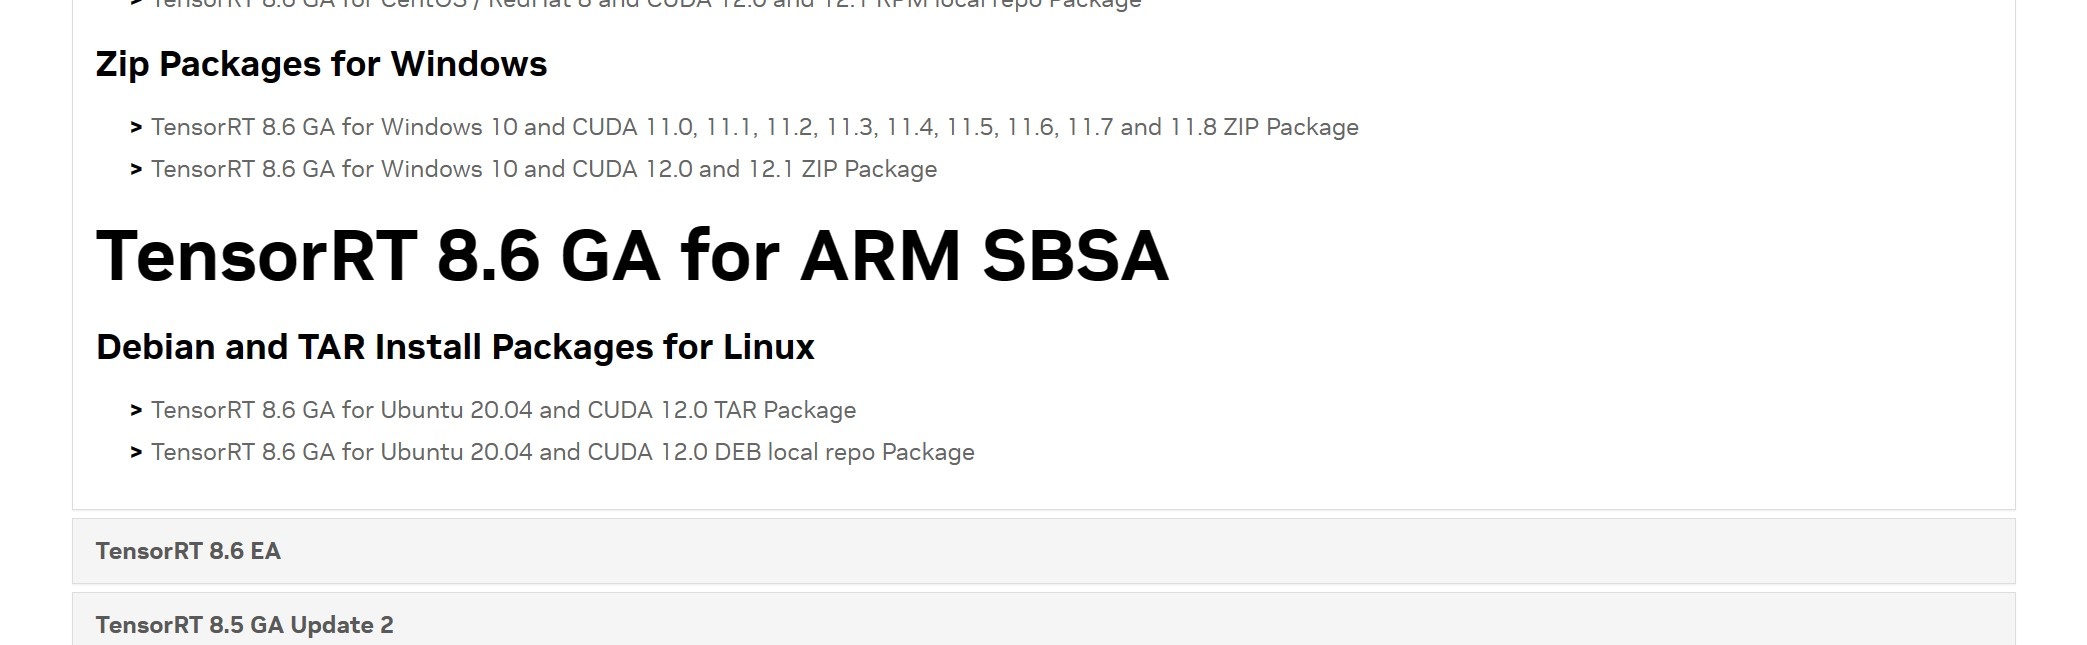
首先前往官网根据自己的CUDA版本选择并下载合适版本的TensorRT安装包,比如我的是CUDA12.0,则应该下载TensorRT 8.6 GA for Windows 10 and CUDA 12.0 and 12.1 ZIP Package
其余CUDA版本对应的TensorRT版本详见官方文档中NVIDIA TensorRT Support Matrix链接:
https://docs.nvidia.com/deeplearning/tensorrt/archives/index.html
下载完成后根据官方安装教程进行安装(windows版):
首先解压下载后的安装包,并将lib目录添加到系统Path环境变量中。

然后根据自己的python版本安装tensorrt的python wheel,例如我是python3.11,则应该运行如下命令:
# 切换到TensorRT安装目录
cd D:/Environment/TensorRT-8.6.1.6
# 必选,安装tensorRT
pip install ./python/tensorrt-8.6.1-cp311-none-win_amd64.whl
# 可选,安装TensorRT精简和调度运行时轮子文件
pip install ./python/tensorrt_lean-8.6.1-cp311-none-win_amd64.whl
pip install ./python/tensorrt_dispatch-8.6.1-cp311-none-win_amd64.whl
要想验证TensorRT是否安装成功,可以打开D:\Environment\TensorRT-8.6.1.6\samples文件夹,即tensorRT安装目录下的samples文件夹,选择一个示例项目,如sampleOnnxMNIST并用Visual Studio打开,根据README的教程测试即可。
如果需要在Pytorch中使用TensorRT,还需要安装TensorRT安装目录下的3个whl文件,安装命令如下:
# 切换到TensorRT安装目录
cd D:/Environment/TensorRT-8.6.1.6
# 依次进行安装
pip install ./graphsurgeon/graphsurgeon-0.4.6-py2.py3-none-any.whl
pip install ./uff/uff-0.6.9-py2.py3-none-any.whl
pip install ./onnx_graphsurgeon/onnx_graphsurgeon-0.3.12-py2.py3-none-any.whl
然后就大功告成啦。
8.结束
这样一来基本的深度学习环境就装好了~

 浙公网安备 33010602011771号