

FPGA系统级调试技术之System Console
——实例讲解3
使用JTAG to Avalon Master Bridge调试On-Chip FIFO
本文是FPGA系统级调试技术系列文章之一,以实例的形式讲解System Console在Avalon Slave设计方面的应用。
本文将以On-Chip FIFO为例。
On-Chip FIFO 有三个端口,其中csr是控制状态从端口,另外两个有四种方式:
输入 : 输出
方式1 从端口 从端口
方式2 从端口 流发送器
方式3 流接收器 从端口
方式4 流接收器 流发送器
详情请参考官方手册。本系统只例化JTAG to Avalon Master Bridget和On-Chip FIFO,且输入输出都使用从端口方式。系统图参见附录部分。下面假定已经将配置文件下载到FPGA,打开NiosII Command Shell,输入system-console启动之,如下图:

首先说明“%”不是命令的一部分,拷贝时不要包含,否则TCL会解析出错,命令下方是返回值。
设置master路径
% set master_path [get_service_paths master]
{/root/connections/ByteBlasterII [LPT1]/EP2C15/20/[MFG:110 ID:132 INST:0 VER:1]}
打开master服务
% open_service master $master_path
读初始时FIFO的状态,
% master_read_32 $master_path 0x20 0x6
0x00000000 0x0000000a 0x00000000 0x00000000 0x0000003f 0x00000001
从返回的6个32-bit寄存器的值从左到右解释如下:1,fill _level为0,当前FIFO没有内容;2,i_status的empty和almost_empty为1,当前FIFO空和几乎空;3,event初始为0;4,interrupt_enable为0,中断全部禁止;5,almost_full为0x3f即十进制63(FIFO深度为64)表示FIFO中填充63条数据时为几乎满;6,同理,almost_empty为1表示当只有一条数据时,几乎空
现在先改写almost_full和almost_empty的初始设置,将前者设为0x3b,后者设为0x4。注意,从系统图上的地址分配可知,输入端:0x0~0x3,输出端:0x4~0x7,控制状态端:0x20~0x3f。
% master_write_32 $master_path 0x30 0x3b
% master_read_32 $master_path 0x30 0x1
0x0000003b
从以上两条命令可以看出,0x3b已经正确写入almost_full寄存器了(基地址0x30)。
再看,
% master_write_32 $master_path 0x34 0x4
% master_read_32 $master_path 0x34 0x1
0x00000004
almost_empty寄存器被正确设置了。
现在再写入数据,
% master_write_32 $master_path 0x0 0x66
% master_read_32 $master_path 0x20 0x6
0x00000001 0x00000008 0x00000000 0x00000000 0x0000003b 0x00000004
返回的第一个32位表明当前FIFO中有一条数据。接着,
% master_write_32 $master_path 0x0 0x55
% master_read_32 $master_path 0x20 0x6
0x00000002 0x00000008 0x00000000 0x00000000 0x0000003b 0x00000004
当前FIFO中有两条数据了。再写入三条数据试试,
% master_write_32 $master_path 0x0 0x44
% master_write_32 $master_path 0x0 0x33
% master_write_32 $master_path 0x0 0x22
% master_read_32 $master_path 0x20 0x6
0x00000005 0x00000000 0x00000000 0x00000000 0x0000003b 0x00000004
当前有5条数据了,注意第二个32位值,almost_empty标志被清0了。
现在开始测试中断,首先将中断使能。
% master_write_32 $master_path 0x2c 0x3f
% master_read_32 $master_path 0x2c 0x1
0x0000003f
然后,读出一条,
% master_read_32 $master_path 0x4 0x1
0x00000066
% master_read_32 $master_path 0x4 0x1
0x00000055
% master_read_32 $master_path 0x20 0x6
0x00000003 0x00000008 0x00000008 0x0000003f 0x0000003b 0x00000004
现在看到event寄存器的almost_empty事件位设置为1了,此时中断使能,将能看到IRQ信号电平。
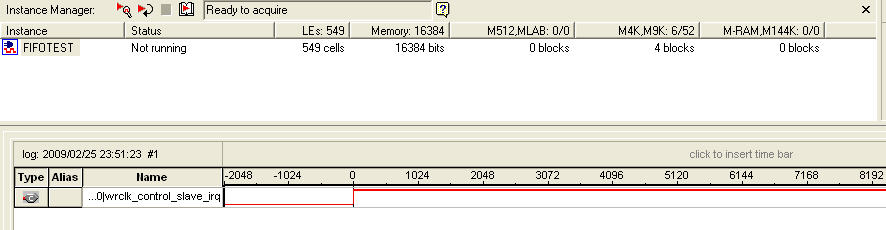
从SignalTapII采集到的波形来看,此时,irq信号由低变高,并且在手动清除前一直为高电平。(设置irq为上升沿触发)
结果正确。
最后,
% close_service master $master_path
关掉master 服务。
至此,关于System Console调试外设实例3—On-Chip FIFO告一段落。本文并没有测试所有项目,只是以一些为例来讲解,有兴趣的朋友不妨一试。
以下特附上On-Chip FIFO的一些相关说明,以便理解。若想了解得更祥细些,请参考Atera公司的手册。
图1,系统结构,只包含一个JTAG to Avalon Master Bridge和一个On-Chip FIFO

图2,控制状态寄存器映射
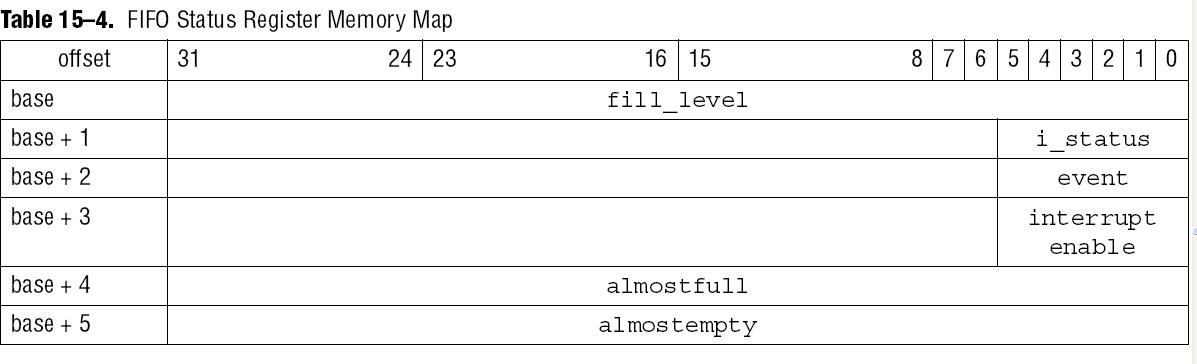
图3,状态域描述(第一部分)
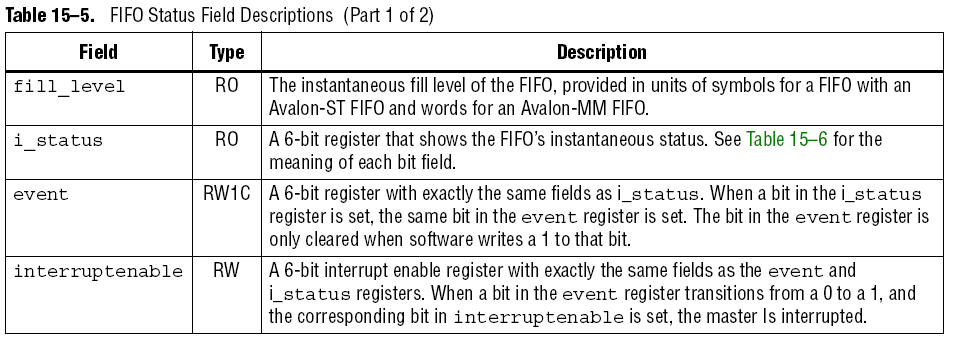
图4,状态域描述(第二部分)

图5,状态标志域描述

图6,事件寄存器位域描述

图7,中断使能寄存器位域描述

表1,System Console指令
add_help
bytestream_receive
bytestream_send
close_service
device_download_sof
device_load_jdi
elf_download
get_service_paths
get_service_types
help
is_service_open
jtag_debug_loop
jtag_debug_reset_system
jtag_debug_sample_clock
jtag_debug_sample_reset
jtag_debug_sense_clock
master_read_16
master_read_32
master_read_8
master_read_memory
master_write_16
master_write_32
master_write_8
master_write_memory
open_service
processor_get_register
processor_get_register_names
processor_in_debug_mode
processor_reset
processor_run
processor_set_register
processor_step
processor_stop
sld_access_dr
sld_access_ir
2009年2月26日星期四
1时4分58秒
Rodney Chen

 浙公网安备 33010602011771号