SpringBoot框架:使用mybatis连接mysql数据库完成数据访问(二)

一、导入依赖包

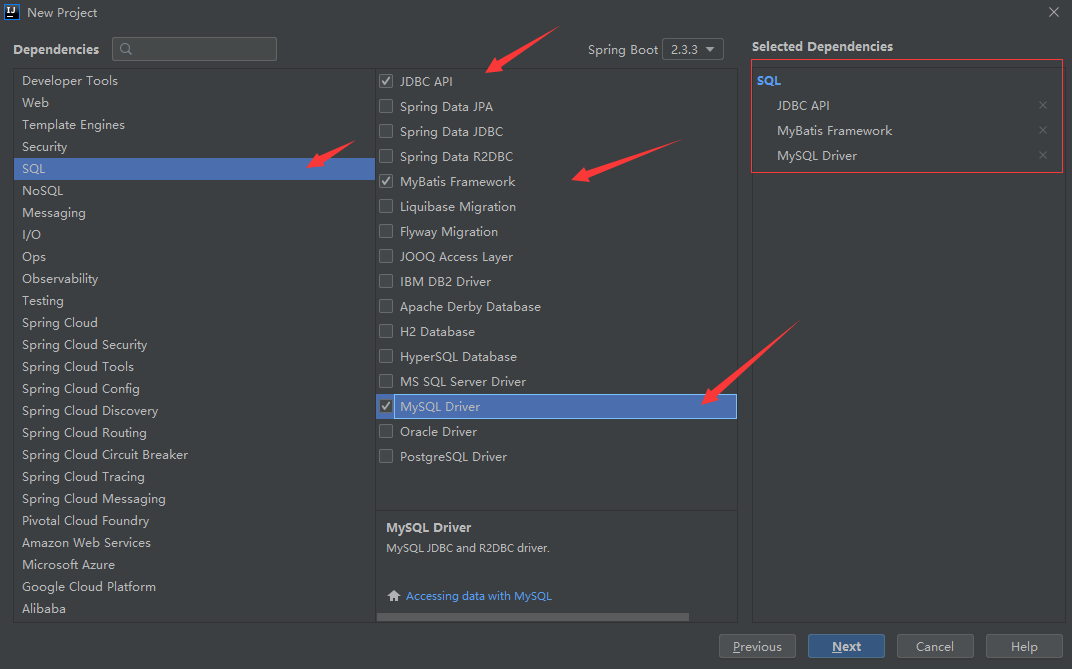
  1、在创建项目时勾选:


  勾选SQL中的JDBC API、MyBatis Framework、MySQL Driver,创建项目后就会自动配置和引入这些包。

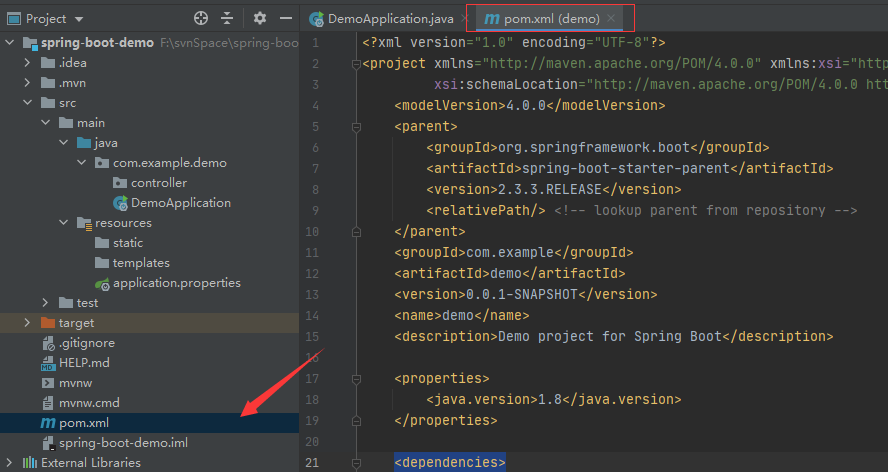
  2、在pom.xml文件中添加依赖:


  <dependencies></dependencies>中添加以下代码,引入jdbc、mybatis和mysql依赖包:

        <!-- jdbc -->
        <dependency>
            <groupId>org.springframework.boot</groupId>
            <artifactId>spring-boot-starter-jdbc</artifactId>
        </dependency>
        <!-- mybatis -->
        <dependency>
            <groupId>org.mybatis.spring.boot</groupId>
            <artifactId>mybatis-spring-boot-starter</artifactId>
            <version>2.1.3</version>
        </dependency>
        <!-- mysql -->
        <dependency>
            <groupId>mysql</groupId>
            <artifactId>mysql-connector-java</artifactId>
            <scope>runtime</scope>
        </dependency>

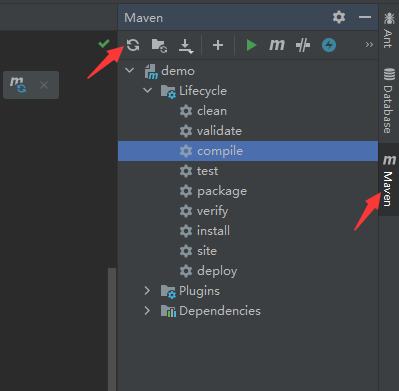
  在Maven管理中点击Reload All Maven Projects,重新加载项目:


  3、在导入数据库的依赖包之后,再运行程序,就会出现以下问题:

  'url' attribute is not specified and no embedded datasource could be configured.

  问题处理:SpringBoot框架:'url' attribute is not specified and no embedded datasource could be configured问题处理

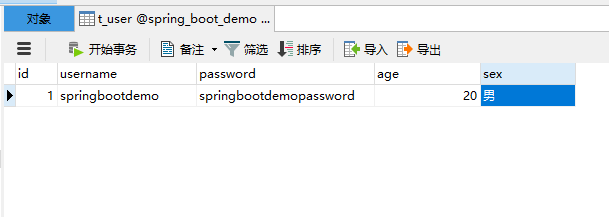
二、创建数据库表

  数据库名:spring_boot_demo

  数据库表:t_user

  字段:id,username,password,age,sex


  预先存入一条数据,方便后续操作。

三、配置数据库连接信息

  springboot中默认的配置文件是application.properties,修改后缀名为application.yml,打开编辑配置信息:

  注:两者的区别不大,简单了解下就可以了。

    哪个也可以用,主要还是看个人习惯(application.properties和application.yml的区别

  1、先简单配下端口和路径:

server:
  port: 8080
  servlet:
    context-path: /cn

  2、配置数据库连接信息:

spring:
  datasource:
    url: jdbc:mysql://localhost:3306/spring_boot_demo?useUnicode=true&characterEncoding=utf-8&useSSL=false&allowMultiQueries=true&serverTimezone=Asia/Shanghai
    username: root
    password: root
    driver-class-name: com.mysql.jdbc.Driver

四、建立三层架构实现数据访问

  1、数据访问层

  结构如下:


  (1)UserPO类:

package com.example.demo.po;

import java.io.Serializable;

/**
 * @author 我命倾尘
 */
public class UserPO implements Serializable {
    /** 用户ID */
    private int id;
    /** 用户名 */
    private String username;
    /** 用户密码 */
    private String password;
    /** 年龄 */
    private int age;
    /** 性别 */
    private String sex;

    public int getId() {
        return id;
    }

    public void setId(int id) {
        this.id = id;
    }

    public String getUsername() {
        return username;
    }

    public void setUsername(String username) {
        this.username = username;
    }

    public String getPassword() {
        return password;
    }

    public void setPassword(String password) {
        this.password = password;
    }

    public int getAge() {
        return age;
    }

    public void setAge(int age) {
        this.age = age;
    }

    public String getSex() {
        return sex;
    }

    public void setSex(String sex) {
        this.sex = sex;
    }
}

  User类implements了一个Serializable类,该类的作用是序列化

  (2)UserMapper接口:

package com.example.demo.mapper;

import org.springframework.stereotype.Repository;

/**
 * @author 我命倾尘
 */
@Repository
public interface UserMapper {
    int getAgeByUsername(String username);
}

  @Repository注解是把这个接口的一个实现类交给spring管理。

  (3)UserMapper.xml配置文件:

<?xml version="1.0" encoding="UTF-8" ?>
<!DOCTYPE mapper
        PUBLIC "-//mybatis.org//DTD Mapper 3.0//EN"
        "http://mybatis.org/dtd/mybatis-3-mapper.dtd">
<mapper namespace="com.example.demo.mapper.UserMapper">
    <select id="getAgeByUsername" resultType="int">
        select
        age
        from
        t_user
        where
        username=#{username,jdbcType=VARCHAR}
    </select>
</mapper>

  mapper的namespace指定了该xml文件指向的Mapper接口,里面的sql语句接受传来的username数据进行数据访问。

  语句的id="getAgeByUsername"则是对应mapper接口中的方法resultType="int"指定本次数据访问的数据返回类型

  (4)在application.yml中添加配置mapper.xml文件的路径:

mybatis:
  mapper-locations:
    - classpath:mybatis/*.xml

  (5)在程序入口类中添加扫描:

@MapperScan("com.example.demo.mapper")

  添加该注解后,运行程序时会自动扫描指定路径中的mapper接口实现类。

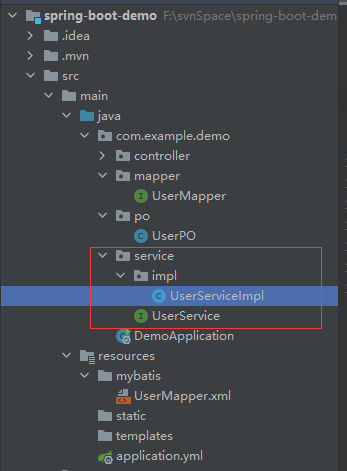
  2、业务逻辑层

  结构如下:


  (1)UserService类:

package com.example.demo.service;

/**
 * @author 我命倾尘
 */
public interface UserService {
    int getAgeByUsername(String username);
}

  (2)UserServiceImpl类:

package com.example.demo.service.impl;

import com.example.demo.mapper.UserMapper;
import com.example.demo.service.UserService;
import org.springframework.beans.factory.annotation.Autowired;
import org.springframework.stereotype.Service;

/**
 * @author 我命倾尘
 */
@Service
public class UserServiceImpl implements UserService {

    @Autowired
    UserMapper userMapper;

    @Override
    public int getAgeByUsername(String username) {
        return userMapper.getAgeByUsername(username);
    }
}

  在service接口的实现类中,要加上@Service注解,把实现类交给spring处理。

  通过@Autowired注解获得自动注入的userMapper实现类,在重写的方法中进行调用,获得数据。

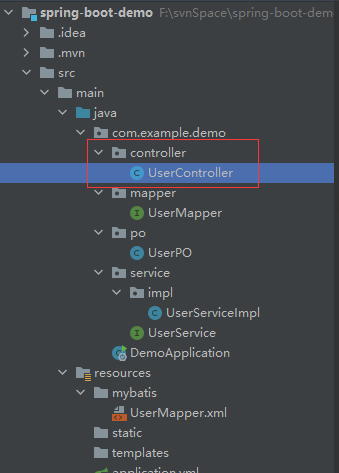
  3、页面展示层:

  结构如下:


  (1)UserController类:  

package com.example.demo.controller;

import com.example.demo.service.UserService;
import org.springframework.beans.factory.annotation.Autowired;
import org.springframework.web.bind.annotation.RequestMapping;
import org.springframework.web.bind.annotation.RestController;

/**
 * @author 我命倾尘
 */
@RestController
public class UserController {

    @Autowired
    UserService userService;

    @RequestMapping("/user/age")
    public int getAgeOfUser(){
        return userService.getAgeByUsername("springbootdemo");
    }
}

五、运行程序

  按照配置的端口和映射URL,页面的路径应该是http://localhost:8080/cn/user/age

  访问该页面,结果如下:


  结果与我们预存在数据库中的数据一致。


  前言:SpringBoot框架:快速入门搭建运行一个应用程序(一)

  后文:SpringBoot框架:通过AOP和自定义注解完成druid连接池的动态数据源切换(三) 


posted @ 2020-09-17 13:35  我命倾尘  阅读(7145)  评论(0编辑  收藏  举报