配置https and http2 local本地开发环境
在启动过程中,我们决定使用HTTPS来保护我们的AWS Elastic Load Balancer endpoints,作为增强安全性的一部分。一开始的时候我遇到了一个问题,我的本地开发环境对服务器的请求被拒绝。
通过快速谷歌搜索后,我发现一些文章也许对我有用,像这个,这个或者这个,它们都有关于localhost如何实现HTTPS的详细说明。但即使按照这些指示亦步亦趋,最后却都失败了。Chrome总是向我抛出一个NET::ERR_CERT_COMMON_NAME_INVALID。
在着手配置https开发环境之前建议浏览这篇文章搞清楚https的工作原理及相关概论
如果对各种类型的证书类型及其作用不了解可以参考这篇文章
问题
这些文章中的所有步骤都是正确的,但那仅限于它们被发布的时间点,而不是现在。
经过大量的谷歌搜索之后,我发现我的本地证书被拒绝的原因是,Chrome已经不再支持证书中的commonName匹配,实际上,自2017年1月起需要subjectAltName这个规则了。
解决方案
第一步:创建根证书
如果对根证书的概念不了解可以参考以下文章
https introduction 和 What is a Root SSL Certificate?
生成一个RSA-2048密钥并保存到一个文件rootCA.key。该文件将被用作生成根SSL证书的密钥。系统将提示您输入密码,每次使用此特定密钥生成证书时都需要输入该密码
$ openssl genrsa -des3 -out rootCA.key 2048
您可以使用您生成的密钥来创建新的根SSL证书。并将其保存为companyCA.pem。这个证书将有3,650天的有效期。你可以随意将其更改为任何您想要的天数。在这一过程中,你还将被提示输入其他可选信息。(模拟顶级CA - Certificaton agent给某公司或orgnization颁发证书)
openssl req -x509 -new -nodes -key rootCA.key -sha256 -days 3650 -out companyCA.pem
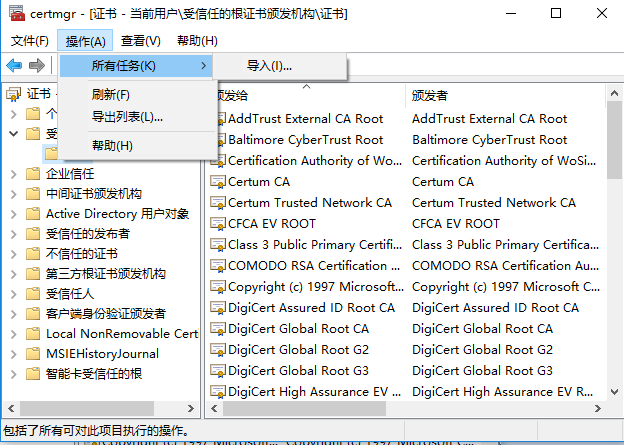
第2步:如何把根SSL证书导入到Windows根证书存储区
打开控制面板 -> 系统与安全
输入关键字cer搜索,选择管理用户证书或者管理计算机证书

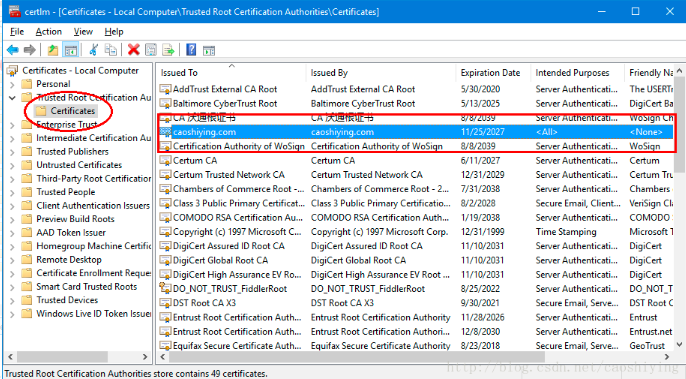
打开受信任的根证书
从菜单导入


查看导入结果

第3步:创建域SSL证书(模拟公司拿到root CA 颁发的证书后,给公司主域名下的子域名生成证书,这里假设localhost公司子域名之一)
当然也可以通过修改本地host文件或公司DNS服务器配置模拟出一个子域名 如dev.xxxx.com。
根SSL证书(companyCA.pem)现在可以用来为您的本地localhost开发环境专门发行证书。
创建一个新的OpenSSL配置文件server.csr.cnf以便在创建证书时可以导入这些设置,而不必在命令行上输入它们。
修改 DNS.1为自己的域名
[ req ]

default_bits        = 2048
default_keyfile     = companyCA.pem
distinguished_name  = subject
req_extensions      = req_ext
x509_extensions     = x509_ext
string_mask         = utf8only

[ subject ]

countryName                 = Country Name (2 letter code)
countryName_default         = US

stateOrProvinceName         = State or Province Name (full name)
stateOrProvinceName_default = NY

localityName                = Locality Name (eg, city)
localityName_default        = New York

organizationName            = Organization Name (eg, company)
organizationName_default    = Example, LLC

commonName                  = Common Name (e.g. server FQDN or YOUR name)
commonName_default          = Example Company

emailAddress                = Email Address
emailAddress_default        = test@example.com

[ x509_ext ]

subjectKeyIdentifier   = hash
authorityKeyIdentifier = keyid,issuer

basicConstraints       = CA:FALSE
keyUsage               = digitalSignature, keyEncipherment
subjectAltName         = @alternate_names
nsComment              = "OpenSSL Generated Certificate"

[ req_ext ]

subjectKeyIdentifier = hash

basicConstraints     = CA:FALSE
keyUsage             = digitalSignature, keyEncipherment
subjectAltName       = @alternate_names
nsComment            = "OpenSSL Generated Certificate"

[ alternate_names ]

DNS.1       = localhost
创建证书密钥以localhost使用存储在其中的配置设置server.csr.cnf。该密钥存储在server.key。
openssl req -new -sha256 -nodes -out server.csr -newkey rsa:2048 -keyout server.key -config server.csr.cnf
证书签名请求通过我们之前创建的根SSL证书颁发,创建出一个localhost的域名证书。输出是一个名为的证书文件server.crt。
openssl x509 -req -in server.csr -CA companyCA.pem -CAkey rootCA.key -CAcreateserial \
-out server.crt -days 500 -sha256 -extensions x509_ext -extfile server.csr.cnf
创建keystore和密钥对
此时系统会要求设置keystore密码,设置密码,例如changeit, 并记住它后面配置gretty会用到此密码
keytool -genkey -alias mydomain -keyalg RSA -keystore keystore.jks -keysize 2048 -ext san=dns:your_domain
导入根证书或中级证书到keystore
keytool -import -trustcacerts -alias root -file server.crt -keystore keystore.jks
列出keystore存在的所有证书
keytool -list -v -keystore keystore.jks
配置gretty属性
gretty {
  servletContainer = "tomcat9"
  serverConfigFile = "tomcat.xml"
  integrationTestTask = 'test'
}
put tomcat.xml under %project_home%/tomcat/tomcat.xml with the content below
<Server port="8005" shutdown="SHUTDOWN">
    <Listener className="org.apache.catalina.core.AprLifecycleListener" SSLEngine="on" />
    <Listener className="org.apache.catalina.core.JreMemoryLeakPreventionListener" />
    <Listener className="org.apache.catalina.mbeans.GlobalResourcesLifecycleListener" />
    <Listener className="org.apache.catalina.core.ThreadLocalLeakPreventionListener" />

    <Service name="Catalina">
        <Connector protocol="HTTP/1.1" port="80" maxHttpHeaderSize="8192" maxThreads="500" minSpareThreads="25" maxSpareThreads="75"
                   enableLookups="false" redirectPort="443" acceptCount="100"
                   connectionTimeout="20000" disableUploadTimeout="true" >
            <UpgradeProtocol className="org.apache.coyote.http2.Http2Protocol" />
        </Connector>

       <!--<Connector
                protocol="org.apache.coyote.http11.Http11AprProtocol"
                port="443" maxThreads="200"
                scheme="https" secure="true" SSLEnabled="true"
                keystoreFile="c:\Users\user_name\ssl\keystore.p12" keystorePass="changeit"
                clientAuth="false" sslProtocol="TLS">
            <UpgradeProtocol className="org.apache.coyote.http2.Http2Protocol" />
        </Connector>-->
        <Connector port="443" protocol="org.apache.coyote.http11.Http11AprProtocol" maxThreads="150" SSLEnabled="true">
            <UpgradeProtocol className="org.apache.coyote.http2.Http2Protocol"/>
            <SSLHostConfig honorCipherOrder="false">
                <Certificate certificateKeyFile="c:\Users\user_name\ssl\server.key"
                             certificateFile="c:\Users\user_name\ssl\server.crt"/>
            </SSLHostConfig>
        </Connector>

        <Connector port="8009" enableLookups="false" redirectPort="443" protocol="AJP/1.3" />
        <Engine name="Catalina" defaultHost="localhost">
            <Host name="localhost"  appBase="webapps" unpackWARs="true" autoDeploy="true">
            </Host>
        </Engine>
    </Service>
</Server>
For the protocal Http11AprProtocol need download Apr native dll(tcnative-1.dll) and put it under JDK/bin and restart machine
refer to here for detailed instructions
cd project_home
gradle appRun
重启Chrome(很重要)
打开网站
看到浏览器上的小锁,即成功
参考文献
https://deliciousbrains.com/https-locally-without-browser-privacy-errors/
https://www.cnblogs.com/chyingp/p/https-introduction.html
推荐以下文章
https://superuser.com/questions/1083766/how-do-i-deal-with-neterr-cert-authority-invalid-in-chrome
https://www.chinassl.net/ssltools/keytool-commands.html
https://juejin.im/post/5a6db896518825732d7fd8e0
https over nio: https://www.cnblogs.com/librena/p/6707646.html
posted on 2019-01-22 00:29 eagle.supper 阅读(1442) 评论(0) 编辑 收藏 举报


