springboot源码分析(五)-监听器实现原理(下)
本文承接上文:springboot源码分析(五)-监听器实现原理(中)
概述
上一篇文章已经把springboot中的监听器从源码的角度分析了一遍,有兴趣的可以去看一下,如果不想看源码,只是看一下如何自定义监听器,也可以一下这篇文章,这篇文章主要介绍一下自定义监听器的方法,以及如何让自定义的监听器生效,初次之外呢,还会介绍一下springboot在启动过程中都有哪些事件,执行的顺序是什么。
自定义监听器
通过实现ApplicationListener自定义监听器
@Order(1)
public class FirstApplicationListener implements ApplicationListener<ApplicationStartedEvent> {

    @Override
    public void onApplicationEvent(ApplicationStartedEvent applicationStartedEvent) {
        System.out.println("first, springboot start");
    }
}
这是第一个监听器,我们实现了ApplicationListener接口,并且在接口中我们指定了ApplicationStartedEvent作为我们感兴趣的事件,当springboot启动是,调用到 listeners.starting(); 的时候,就会被我们自定义的监听器监听到,会执行我们重写的onApplicationEvent方法。
我们还是老规矩,在resource目录下新建META-INF目录,之后在这个目录下新建spring.factories文件,在文件中加入如下配置项
org.springframework.context.ApplicationListener=com.example.demo.listener.FirstApplicationListener
等号后面是我们自定义的监听器的路径,大家根据自己的路径填写。
ok我们启动springboot项目,可以看到如下打印结果:
  .   ____          _            __ _ _
 /\\ / ___'_ __ _ _(_)_ __  __ _ \ \ \ \
( ( )\___ | '_ | '_| | '_ \/ _` | \ \ \ \
 \\/  ___)| |_)| | | | | || (_| |  ) ) ) )
  '  |____| .__|_| |_|_| |_\__, | / / / /
 =========|_|==============|___/=/_/_/_/
 :: Spring Boot ::        (v2.2.6.RELEASE)

firstApplicationContextInitializer is start
thirdApplicationContextInitializer is start
secondApplicationContextInitializer is start
2020-06-04 19:58:56.194  INFO 56577 --- [           main] com.example.demo.DemoApplication         : Starting DemoApplication on ganxinledeMacBook-Pro.local with PID 56577 (/Users/ganxinle/workspace/demo/target/classes started by ganxinle in /Users/ganxinle/workspace/demo)
2020-06-04 19:58:56.197  INFO 56577 --- [           main] com.example.demo.DemoApplication         : No active profile set, falling back to default profiles: default
2020-06-04 19:58:56.920  INFO 56577 --- [           main] o.s.b.w.embedded.tomcat.TomcatWebServer  : Tomcat initialized with port(s): 8080 (http)
2020-06-04 19:58:56.929  INFO 56577 --- [           main] o.apache.catalina.core.StandardService   : Starting service [Tomcat]
2020-06-04 19:58:56.930  INFO 56577 --- [           main] org.apache.catalina.core.StandardEngine  : Starting Servlet engine: [Apache Tomcat/9.0.33]
2020-06-04 19:58:56.987  INFO 56577 --- [           main] o.a.c.c.C.[Tomcat].[localhost].[/]       : Initializing Spring embedded WebApplicationContext
2020-06-04 19:58:56.987  INFO 56577 --- [           main] o.s.web.context.ContextLoader            : Root WebApplicationContext: initialization completed in 752 ms
2020-06-04 19:58:57.115  INFO 56577 --- [           main] o.s.s.concurrent.ThreadPoolTaskExecutor  : Initializing ExecutorService 'applicationTaskExecutor'
2020-06-04 19:58:57.243  INFO 56577 --- [           main] o.s.b.w.embedded.tomcat.TomcatWebServer  : Tomcat started on port(s): 8080 (http) with context path ''
2020-06-04 19:58:57.246  INFO 56577 --- [           main] com.example.demo.DemoApplication         : Started DemoApplication in 1.328 seconds (JVM running for 1.662)
first, springboot start
说明我们的配置成功了,但是有的小伙伴可能有疑问,为什么是最后打印的,这个有兴趣的小伙伴自己去探究,我没有深究😂
通过实现SmartApplicationListener自定义监听器
@Order(1)
public class SecondApplicationListener implements SmartApplicationListener {
    @Override
    public boolean supportsEventType(Class<? extends ApplicationEvent> aClass) {
        if (ApplicationStartedEvent.class.isAssignableFrom(aClass)){
            return true;
        }
        return false;
    }

    @Override
    public void onApplicationEvent(ApplicationEvent applicationEvent) {
        System.out.println("second,springboot start");
    }
}
我们实现了里面的两个方法,第一个方法就是在上一篇文章讲的,当寻找对当前事件感兴趣的监听器的时候,会调用这个方法来判断,我们在if中使用了isAssignableFrom方法来判断当前事件是不是ApplicationStartedEvent事件的字类或者是他本身,对这个方法不太熟悉的,我会在附录中把解释这个的文章的链接贴出来,大家看一下就明白了。
我们修改springboot的启动类,把这个监听器加入到监听器列表中
@SpringBootApplication
public class DemoApplication {
    public static void main(String[] args) {
        SpringApplication application = new SpringApplication(DemoApplication.class);
        application.addListeners(new SecondApplicationListener());
        application.run(args);
    }
}
至于为什么这样可以生效,大家可以看一下上一篇文章,我这里就不重复了。
👌,我们启动springboot项目
 .   ____          _            __ _ _
 /\\ / ___'_ __ _ _(_)_ __  __ _ \ \ \ \
( ( )\___ | '_ | '_| | '_ \/ _` | \ \ \ \
 \\/  ___)| |_)| | | | | || (_| |  ) ) ) )
  '  |____| .__|_| |_|_| |_\__, | / / / /
 =========|_|==============|___/=/_/_/_/
 :: Spring Boot ::        (v2.2.6.RELEASE)

firstApplicationContextInitializer is start
thirdApplicationContextInitializer is start
secondApplicationContextInitializer is start
2020-06-04 19:58:56.194  INFO 56577 --- [           main] com.example.demo.DemoApplication         : Starting DemoApplication on ganxinledeMacBook-Pro.local with PID 56577 (/Users/ganxinle/workspace/demo/target/classes started by ganxinle in /Users/ganxinle/workspace/demo)
2020-06-04 19:58:56.197  INFO 56577 --- [           main] com.example.demo.DemoApplication         : No active profile set, falling back to default profiles: default
2020-06-04 19:58:56.920  INFO 56577 --- [           main] o.s.b.w.embedded.tomcat.TomcatWebServer  : Tomcat initialized with port(s): 8080 (http)
2020-06-04 19:58:56.929  INFO 56577 --- [           main] o.apache.catalina.core.StandardService   : Starting service [Tomcat]
2020-06-04 19:58:56.930  INFO 56577 --- [           main] org.apache.catalina.core.StandardEngine  : Starting Servlet engine: [Apache Tomcat/9.0.33]
2020-06-04 19:58:56.987  INFO 56577 --- [           main] o.a.c.c.C.[Tomcat].[localhost].[/]       : Initializing Spring embedded WebApplicationContext
2020-06-04 19:58:56.987  INFO 56577 --- [           main] o.s.web.context.ContextLoader            : Root WebApplicationContext: initialization completed in 752 ms
2020-06-04 19:58:57.115  INFO 56577 --- [           main] o.s.s.concurrent.ThreadPoolTaskExecutor  : Initializing ExecutorService 'applicationTaskExecutor'
2020-06-04 19:58:57.243  INFO 56577 --- [           main] o.s.b.w.embedded.tomcat.TomcatWebServer  : Tomcat started on port(s): 8080 (http) with context path ''
2020-06-04 19:58:57.246  INFO 56577 --- [           main] com.example.demo.DemoApplication         : Started DemoApplication in 1.328 seconds (JVM running for 1.662)
first, springboot start
second,springboot start
可以发现第二个也顺利打印出来了。
以上我只列举了两种把自定义监听器加入到系统的中方法,其实还有别的方法,我这里就不介绍了,知道这两种我觉得就够了。
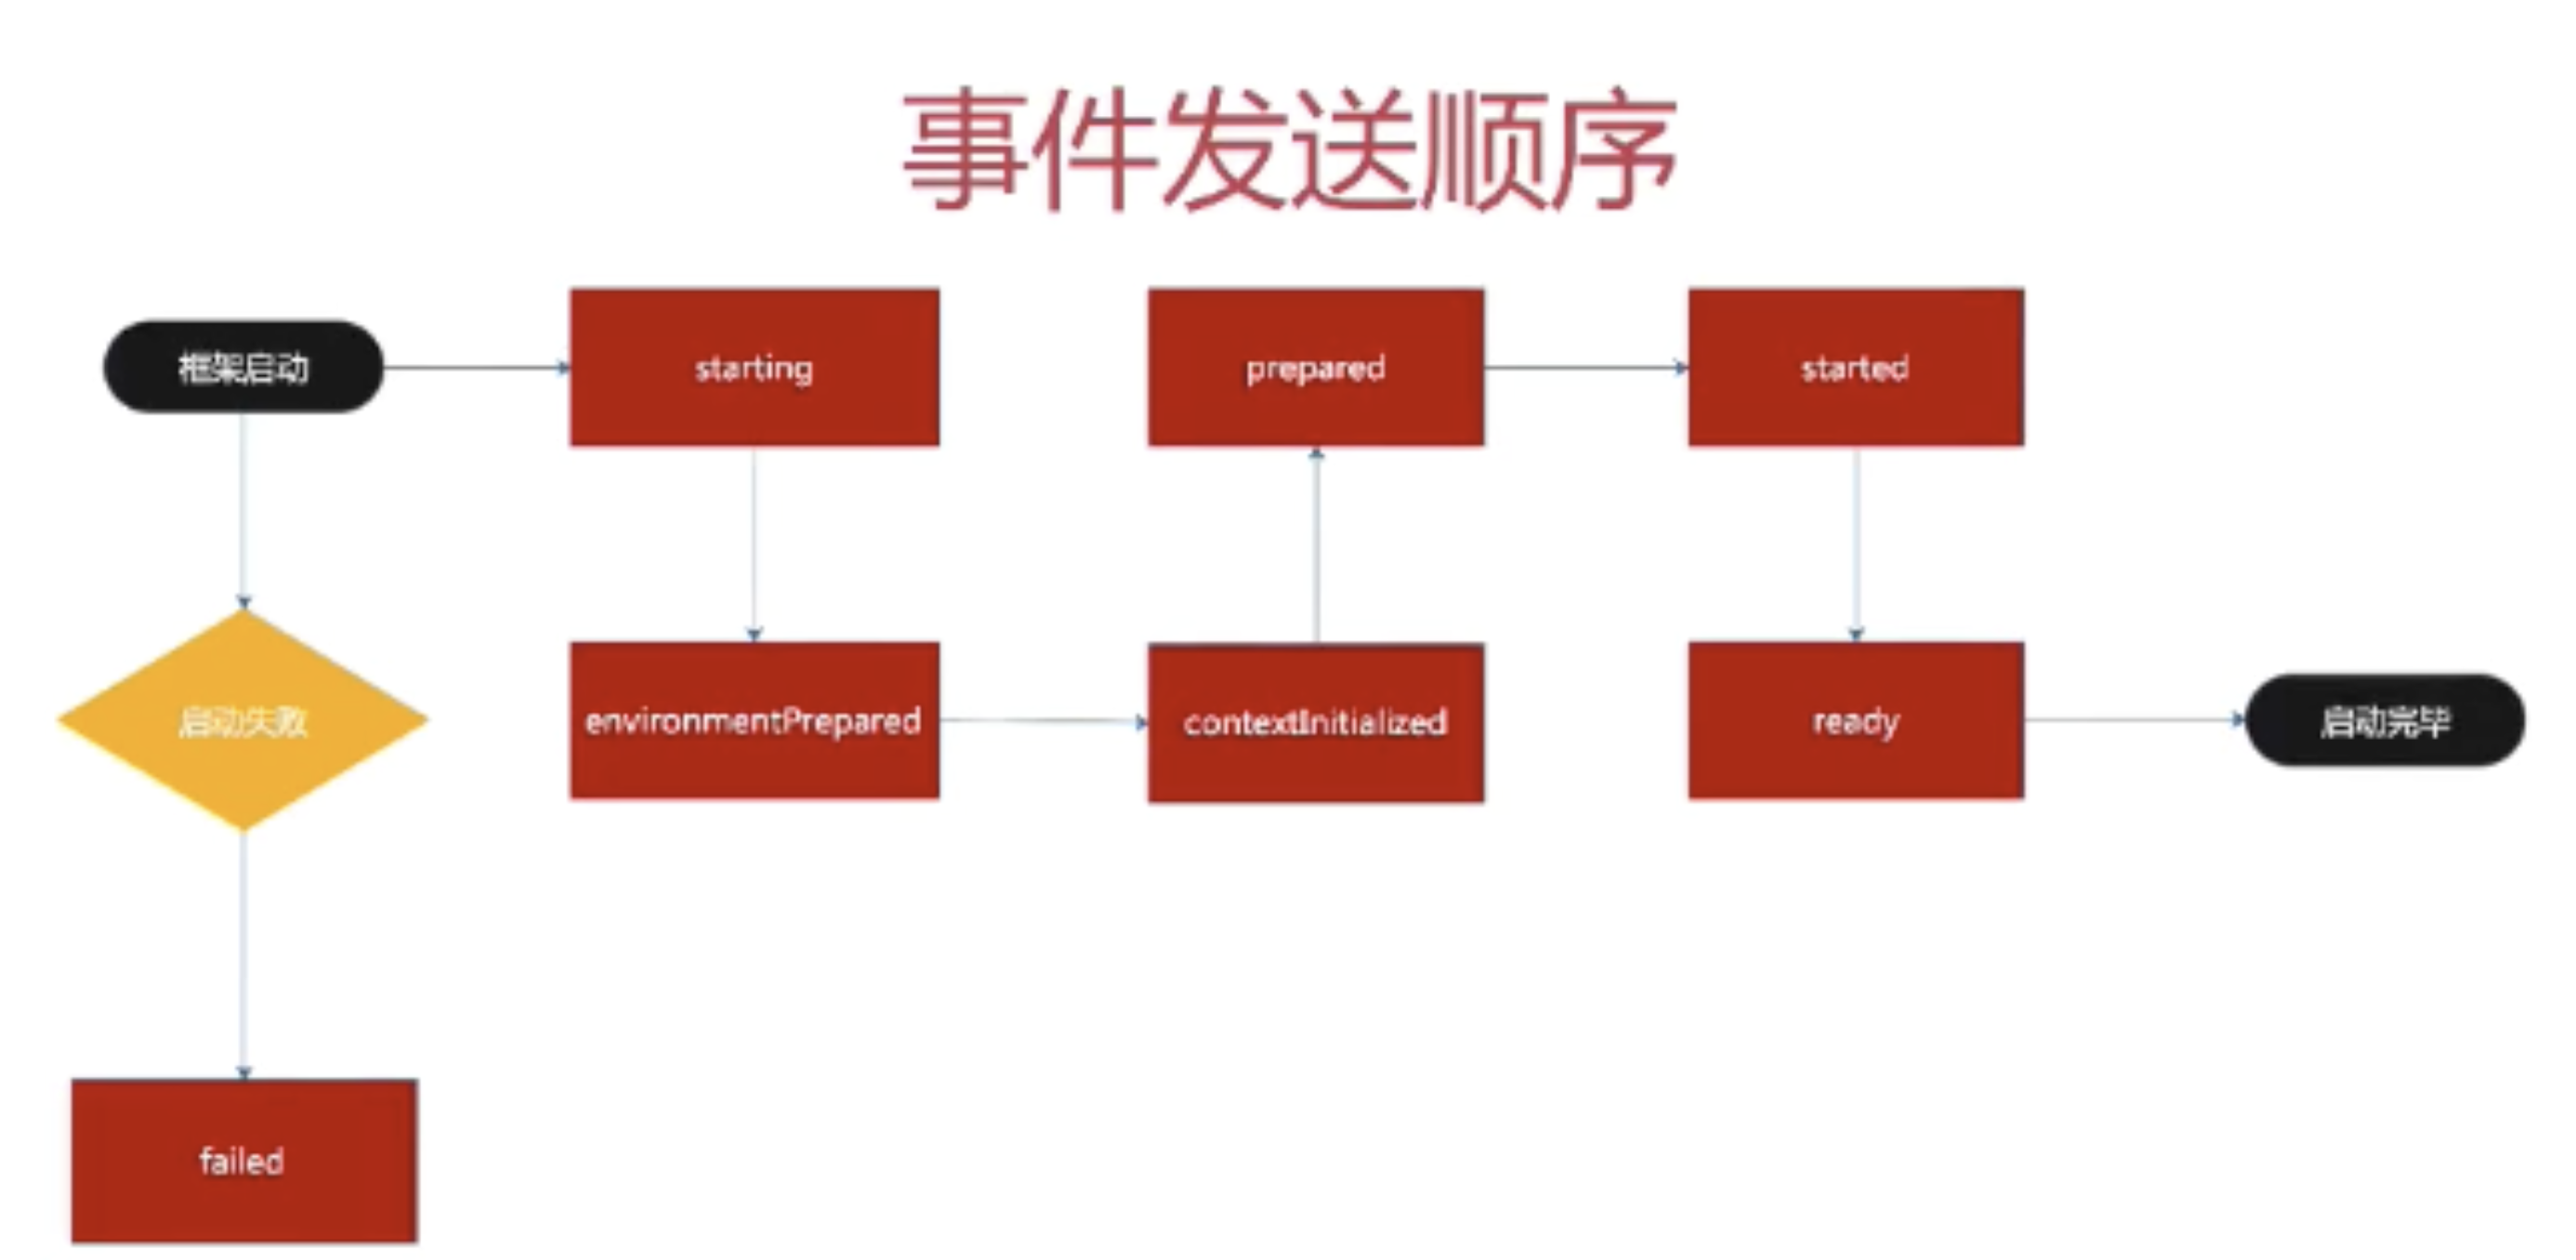
springboot在启动过程中都执行了哪些事件,顺序是什么

从启动开始分别执行的事件如下:
ApplicationStartingEvent -> ApplicationEnvironmentPreparedEvent -> ApplicationContextInitializedEvent -> ApplicationPreparedEvent -> ApplicationStartedEvent -> ApplicationReadyEvent
启动失败执行ApplicationFailedEvent事件

这些个事件基本都是SpringApplicationEvent的子类。
总结
基本上来说如果看过上一篇文章之后,对于这一篇介绍的自定义监听器应该很容易理解,至于后面的执行的事件的流程那个东东,需要对整个springboot的启动流程有一个很清楚的了解,这个现在可以先了解一下,以后会慢慢分享。
番外话:监听器系列写完了,终于知道springboot中是怎么使用设计模式的了,以后如果自己实现什么大型一点的系统,就可以仿照这个玩意也搞一个监听器模式,😄


