springboot源码解析(三)-从源码角度分析系统初始化器排序原理
概述
前面两篇文章分别分析了系统初始化的作用,以及自定义系统初始化器的3种方法,而且还从源码的角度分析了系统初始化器的实现原理,这篇文章分析一下上一篇文章的一个遗留问题,系统初始化器是如何排序的。
系统初始化器排序源码位置
在SpringApplication的构造方法
public SpringApplication(ResourceLoader resourceLoader, Class<?>... primarySources) {
        this.sources = new LinkedHashSet();
        this.bannerMode = Mode.CONSOLE;
        this.logStartupInfo = true;
        this.addCommandLineProperties = true;
        this.addConversionService = true;
        this.headless = true;
        this.registerShutdownHook = true;
        this.additionalProfiles = new HashSet();
        this.isCustomEnvironment = false;
        this.lazyInitialization = false;
        this.resourceLoader = resourceLoader;
        Assert.notNull(primarySources, "PrimarySources must not be null");
        this.primarySources = new LinkedHashSet(Arrays.asList(primarySources));
        this.webApplicationType = WebApplicationType.deduceFromClasspath();
     //下面一行就是从spring-factories中加载系统初始化的代码,在上一篇文章有标注
     this.setInitializers(this.getSpringFactoriesInstances(ApplicationContextInitializer.class));
        this.setListeners(this.getSpringFactoriesInstances(ApplicationListener.class));
        this.mainApplicationClass = this.deduceMainApplicationClass();
    }
进入this.getSpringFactoriesInstances
private <T> Collection<T> getSpringFactoriesInstances(Class<T> type) {
        return this.getSpringFactoriesInstances(type, new Class[0]);
    }

    private <T> Collection<T> getSpringFactoriesInstances(Class<T> type, Class<?>[] parameterTypes, Object... args) {
        ClassLoader classLoader = this.getClassLoader();
        Set<String> names = new LinkedHashSet(SpringFactoriesLoader.loadFactoryNames(type, classLoader));
        List<T> instances = this.createSpringFactoriesInstances(type, parameterTypes, classLoader, args, names);
    //这一行就是实现排序的代码
        AnnotationAwareOrderComparator.sort(instances);
        return instances;
    }
我们进入sort方法
public static void sort(List<?> list) {
        if (list.size() > 1) {
            list.sort(INSTANCE);
        }

    }
为了把这一块彻底搞清楚,我还专门去看了这个sort排序的源码:java8中List中sort方法解析,感兴趣的小伙伴可以先看看这个,如果觉得写的太长了,这里只要明白一点就可以了,sort方法的参数需要传入一个实现了Comparator接口的实现类,主要需要实现这个接口的compare(T o1, T o2)方法,list排序比较大小就是根据这个方法实现的。
我们进入INSTANCE的compare方法
public int compare(@Nullable Object o1, @Nullable Object o2) {
        return this.doCompare(o1, o2, (OrderComparator.OrderSourceProvider)null);
    }
我们继续进入doCompare(o1, o2, (OrderComparator.OrderSourceProvider)null);方法
private int doCompare(@Nullable Object o1, @Nullable Object o2, @Nullable OrderComparator.OrderSourceProvider sourceProvider) {
        //这里的意思是说如果需要比较的对象实现了Priorityordered接口的话,就返回true,否则false
        boolean p1 = o1 instanceof PriorityOrdered;
        boolean p2 = o2 instanceof PriorityOrdered;
     //这里会发现如果实现了PriorityOrdered接口,比较的方法很简单,这里注意返回1,就是o1 > o2,否则相反
        if (p1 && !p2) {
            return -1;
        } else if (p2 && !p1) {
            return 1;
        } else {
            //下面这两个getOrder方法就是分别获取o1和o2对象的order的值
            int i1 = this.getOrder(o1, sourceProvider);
            int i2 = this.getOrder(o2, sourceProvider);
            //后去到order值之后,直接调用Integer对象的比较器进行比较,因为Integer是实现了Comparator接口的
            return Integer.compare(i1, i2);
        }
    }
还记得在上一篇文章中说过,实现排序有两种方式,第一种是通过@Order注解,第二种是实现Order接口,一会看代码大家会发现有些系统初始化器即没有使用@Order注解,也没有实现Order接口,这时getOrder会返回一个非常大的值,意思就是说你排在最后。
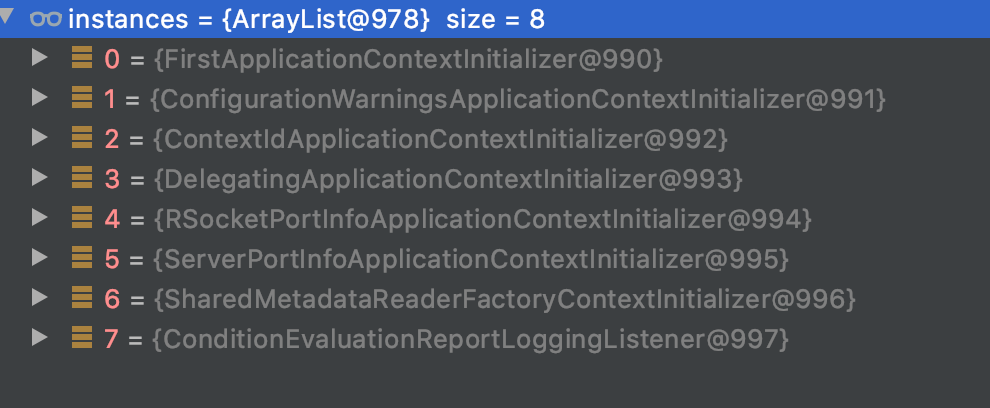
先看一下我的代码中有哪些系统初始化器

下面我就举几个例子:
排在第一的FirstApplicationContextInitializer是自定义的系统初始化器使用了@Order注解
排在第二的ConfigurationWarningsApplicationContextInitializer,大家可以自己在idea中看一下,这个系统初始化器即没有实现Order接口,也没有使用@Order注解
排在第四的DelegatingApplicationContextInitializer,这个系统初始化器在上一篇文章中讲过,实现了Order接口
this.getOrder(o1, sourceProvider); 方法过程如下。
private int getOrder(@Nullable Object obj, @Nullable OrderComparator.OrderSourceProvider sourceProvider) {
        Integer order = null;
        //由于上面传的sourcProvider为null这个if的就不分析了
        if (obj != null && sourceProvider != null) {
            Object orderSource = sourceProvider.getOrderSource(obj);
            if (orderSource != null) {
                if (orderSource.getClass().isArray()) {
                    Object[] sources = ObjectUtils.toObjectArray(orderSource);
                    Object[] var6 = sources;
                    int var7 = sources.length;

                    for(int var8 = 0; var8 < var7; ++var8) {
                        Object source = var6[var8];
                        order = this.findOrder(source);
                        if (order != null) {
                            break;
                        }
                    }
                } else {
                    order = this.findOrder(orderSource);
                }
            }
        }
        //这里order=null,执行this.getOrder(obj)
        return order != null ? order : this.getOrder(obj);
    }
进入this.getOrder(obj);
protected int getOrder(@Nullable Object obj) {
        if (obj != null) {
       //这一步就是找order的
            Integer order = this.findOrder(obj);
            if (order != null) {
                return order;
            }
        }
     //如果obj即没有使用@Order注解,也没有实现Order接口,就返回这个
        return 2147483647;
    }
进入this.findOrder(obj); 大家注意这个this,是字类AnnotationAwareOrderComparator,而不是父类OrderComparator,我这里只贴出来方法,大家要结合自己的代码看
@Nullable
protected Integer findOrder(Object obj) {
   //<1.1> 这个就是调用父类OrderComparator中的findOrder,主要是看对象obj是否实现了Order接口,如果实现了,这里就会直接后去到值
    Integer order = super.findOrder(obj);
  //<1.2> 如果order为null,说明obj没有实现Order接口,那就从注解中找
    return order != null ? order : this.findOrderFromAnnotation(obj);
}
进入<1.1>super.findOrder(obj);
@Nullable
    protected Integer findOrder(Object obj) {
     //这里就是判断obj有没有实现Ordered接口,如果实现了就直接调用getOrder方法
        return obj instanceof Ordered ? ((Ordered)obj).getOrder() : null;
    }
进入((Ordered)obj).getOrder(),这里就是调用obj中getOrder()方法,我们假设这个obj就是DelegatingApplicationContextInitializer,我们进入里面看一下getOrder()方法
public class DelegatingApplicationContextInitializer implements ApplicationContextInitializer<ConfigurableApplicationContext>, Ordered {

    private int order = 0;
    public int getOrder() {
            return this.order;
        }
   //这里省略了大部分方法
}
可以发现,这里返回的order就是0.这就解释了上一节没有解释的一个问题,就是没有使用@Order注解的类如何使内部定义的order生效
进入注释<1.2>,this.findOrderFromAnnotation(obj);
@Nullable
    private Integer findOrderFromAnnotation(Object obj) {
     //一般的obj都不会实现AnnotatedElement,但是Class实现了这个接口,至于这个接口的作用大家自己百度
        AnnotatedElement element = obj instanceof AnnotatedElement ? (AnnotatedElement)obj : obj.getClass();
     //获取注解
        MergedAnnotations annotations = MergedAnnotations.from((AnnotatedElement)element, SearchStrategy.TYPE_HIERARCHY);
     //从注解中后去order注解,并获取其值
        Integer order = OrderUtils.getOrderFromAnnotations((AnnotatedElement)element, annotations);
        return order == null && obj instanceof DecoratingProxy ? this.findOrderFromAnnotation(((DecoratingProxy)obj).getDecoratedClass()) : order;
    }
看一下我程序中FirstApplicationContextInitializer的debug结果

如果大家对Class类是怎么获取到注解的感兴趣可以看一下这篇文章:AnnotatedElement
至此,基本已经分析完成获取order的过程,springboot启动过程的系统初始化器也就完全分析完了,本人也很小白,望大家多多指教,其实对于Java到底是怎么加载到注解的我之前也很困惑,今天才发现很多是通过Class类获取的注解,而且使用的是一个本地的native方法获取的,而且使用了Java中的一个魔法类Unsafe,这个还不太懂,以后还要学一下这个魔法类,感觉很厉害的样子。
参考文章:


