Hexo-Matery主题性能优化
大家可以来我Hexo博客主页看看具体效果,欢迎留言评论 传送门
文章生成永久链接
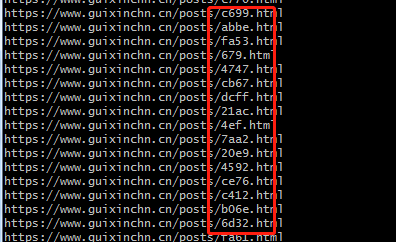
原来的文章链接地址会出现一大串字符编码,不好看,而给文章生成永久链接有利于SEO,给更加美观
首先安装插件
npm install hexo-abbrlink --save
再站点配置文件下添加如下配置:
abbrlink:
    alg: crc16   #算法: crc16(default) and crc32
    rep: hex     #进制: dec(default) and hex: dec #输出进制:十进制和十六进制,默认为10进制。丨dec为十进制,hex为十六进制
将站点配置文件的 permalink 的值修改为:
permalink: posts/:abbrlink.html # 此处可以自己设置,也可以直接使用 :/abbrlink
图片懒加载

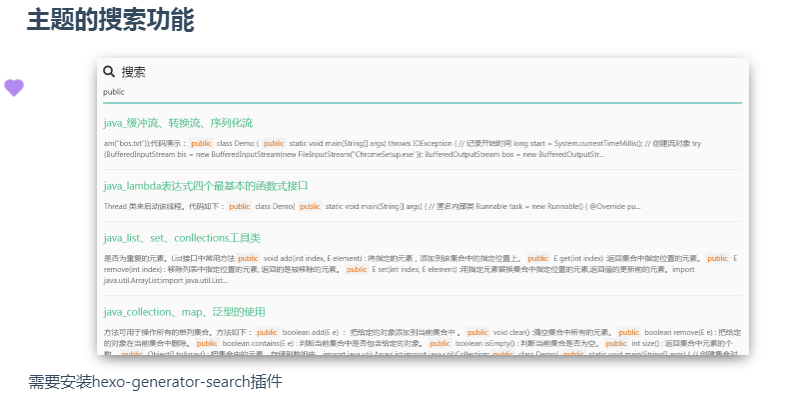
懒加载对服务器前端有一定的缓解压力作用
使用图片懒加载需要安装插件:hexo-lazyload-image
npm install hexo-lazyload-image --save
之后在站点配置文件下添加下面的代码:
#loading-image
lazyload:
  enable: true
  onlypost: false
  loadingImg: /medias/loading.gif
存在问题:
查看大图,发现全部为 loading 加载图,原因是因为懒加载插件与 lightgallery 插件冲突,解决办法如下:
修改主题文件下的 matery.js,在 108 行左右添加以下代码:
$(document).find('img[data-original]').each(function(){
		$(this).parent().attr("href", $(this).attr("data-original"));
});
懒加载优化
打开 Hexo根目录 >node_modules > hexo-lazyload-image > lib > simple-lazyload.js 文件
第 9 行修改为:
&& rect.top <= (window.innerHeight +240 || document.documentElement.clientHeight +240)
作用:提前 240 个像素加载图片;当然这个值也可以根据自己情况修改
代码压缩
gulp 代码压缩
因为 hexo 生成的 html、css、js 等都有很多的空格或者换行,而空格和换行也是占用字节的,所以需要将空格换行去掉也就是我要进行的 “压缩”。
进入站点根目录下依次执行下面的命令:
# 全局安装gulp模块
npm install gulp -g
# 安装各种小功能模块  执行这步的时候,可能会提示权限的问题,最好以管理员模式执行
npm install gulp gulp-htmlclean gulp-htmlmin gulp-minify-css gulp-uglify gulp-imagemin --save
# 额外的功能模块
npm install gulp-debug gulp-clean-css gulp-changed gulp-if gulp-plumber gulp-babel babel-preset-es2015 del @babel/core --save
在 Hexo 根目录新建文件 gulpfile.js,并复制以下内容到文件中,有中文注释,可以根据自己需求修改。(注意:文件名不能错,一定为 gulpfile.js,否则会出错!)
var gulp = require("gulp");
var debug = require("gulp-debug");
var cleancss = require("gulp-clean-css"); //css压缩组件
var uglify = require("gulp-uglify"); //js压缩组件
var htmlmin = require("gulp-htmlmin"); //html压缩组件
var htmlclean = require("gulp-htmlclean"); //html清理组件
var imagemin = require("gulp-imagemin"); //图片压缩组件
var changed = require("gulp-changed"); //文件更改校验组件
var gulpif = require("gulp-if"); //任务 帮助调用组件
var plumber = require("gulp-plumber"); //容错组件(发生错误不跳出任务,并报出错误内容)
var isScriptAll = true; //是否处理所有文件,(true|处理所有文件)(false|只处理有更改的文件)
var isDebug = true; //是否调试显示 编译通过的文件
var gulpBabel = require("gulp-babel");
var es2015Preset = require("babel-preset-es2015");
var del = require("del");
var Hexo = require("hexo");
var hexo = new Hexo(process.cwd(), {}); // 初始化一个hexo对象

// 清除public文件夹
gulp.task("clean", function () {
    return del(["public/**/*"]);
});

// 下面几个跟hexo有关的操作,主要通过hexo.call()去执行,注意return
// 创建静态页面 (等同 hexo generate)
gulp.task("generate", function () {
    return hexo.init().then(function () {
        return hexo
            .call("generate", {
                watch: false
            })
            .then(function () {
                return hexo.exit();
            })
            .catch(function (err) {
                return hexo.exit(err);
            });
    });
});

// 启动Hexo服务器
gulp.task("server", function () {
    return hexo
        .init()
        .then(function () {
            return hexo.call("server", {});
        })
        .catch(function (err) {
            console.log(err);
        });
});

// 部署到服务器
gulp.task("deploy", function () {
    return hexo.init().then(function () {
        return hexo
            .call("deploy", {
                watch: false
            })
            .then(function () {
                return hexo.exit();
            })
            .catch(function (err) {
                return hexo.exit(err);
            });
    });
});

// 压缩public目录下的js文件
gulp.task("compressJs", function () {
    return gulp
        .src(["./public/**/*.js", "!./public/libs/**"]) //排除的js
        .pipe(gulpif(!isScriptAll, changed("./public")))
        .pipe(gulpif(isDebug, debug({ title: "Compress JS:" })))
        .pipe(plumber())
        .pipe(
            gulpBabel({
                presets: [es2015Preset] // es5检查机制
            })
        )
        .pipe(uglify()) //调用压缩组件方法uglify(),对合并的文件进行压缩
        .pipe(gulp.dest("./public")); //输出到目标目录
});

// 压缩public目录下的css文件
gulp.task("compressCss", function () {
    var option = {
        rebase: false,
        //advanced: true, //类型:Boolean 默认:true [是否开启高级优化(合并选择器等)]
        compatibility: "ie7" //保留ie7及以下兼容写法 类型:String 默认:''or'*' [启用兼容模式; 'ie7':IE7兼容模式,'ie8':IE8兼容模式,'*':IE9+兼容模式]
        //keepBreaks: true, //类型:Boolean 默认:false [是否保留换行]
        //keepSpecialComments: '*' //保留所有特殊前缀 当你用autoprefixer生成的浏览器前缀,如果不加这个参数,有可能将会删除你的部分前缀
    };
    return gulp
        .src(["./public/**/*.css", "!./public/**/*.min.css"]) //排除的css
        .pipe(gulpif(!isScriptAll, changed("./public")))
        .pipe(gulpif(isDebug, debug({ title: "Compress CSS:" })))
        .pipe(plumber())
        .pipe(cleancss(option))
        .pipe(gulp.dest("./public"));
});

// 压缩public目录下的html文件
gulp.task("compressHtml", function () {
    var cleanOptions = {
        protect: /<\!--%fooTemplate\b.*?%-->/g, //忽略处理
        unprotect: /<script [^>]*\btype="text\/x-handlebars-template"[\s\S]+?<\/script>/gi //特殊处理
    };
    var minOption = {
        collapseWhitespace: true, //压缩HTML
        collapseBooleanAttributes: true, //省略布尔属性的值 <input checked="true"/> ==> <input />
        removeEmptyAttributes: true, //删除所有空格作属性值 <input id="" /> ==> <input />
        removeScriptTypeAttributes: true, //删除<script>的type="text/javascript"
        removeStyleLinkTypeAttributes: true, //删除<style>和<link>的type="text/css"
        removeComments: true, //清除HTML注释
        minifyJS: true, //压缩页面JS
        minifyCSS: true, //压缩页面CSS
        minifyURLs: true //替换页面URL
    };
    return gulp
        .src("./public/**/*.html")
        .pipe(gulpif(isDebug, debug({ title: "Compress HTML:" })))
        .pipe(plumber())
        .pipe(htmlclean(cleanOptions))
        .pipe(htmlmin(minOption))
        .pipe(gulp.dest("./public"));
});

// 压缩 public/medias 目录内图片
gulp.task("compressImage", function () {
    var option = {
        optimizationLevel: 5, //类型:Number 默认:3 取值范围:0-7(优化等级)
        progressive: true, //类型:Boolean 默认:false 无损压缩jpg图片
        interlaced: false, //类型:Boolean 默认:false 隔行扫描gif进行渲染
        multipass: false //类型:Boolean 默认:false 多次优化svg直到完全优化
    };
    return gulp
        .src("./public/medias/**/*.*")
        .pipe(gulpif(!isScriptAll, changed("./public/medias")))
        .pipe(gulpif(isDebug, debug({ title: "Compress Images:" })))
        .pipe(plumber())
        .pipe(imagemin(option))
        .pipe(gulp.dest("./public"));
});
// 执行顺序: 清除public目录 -> 产生原始博客内容 -> 执行压缩混淆 -> 部署到服务器
gulp.task(
    "build",
    gulp.series(
        "clean",
        "generate",
        "compressHtml",
        "compressCss",
        "compressJs",
        "compressImage",
        gulp.parallel("deploy")
    )
);

// 默认任务
gulp.task(
    "default",
    gulp.series(
        "clean",
        "generate",
        gulp.parallel("compressHtml", "compressCss", "compressJs","compressImage")
    )
);
//Gulp4最大的一个改变就是gulp.task函数现在只支持两个参数,分别是任务名和运行任务的函数
直接在 Hexo 根目录执行 gulp 或者 gulp default ,这个命令相当于 hexo cl&&hexo g 并且再把代码和图片压缩。
在 Hexo 根目录执行 gulp build ,这个命令与第 1 种相比是:在最后又加了个 hexo d ,等于说生成、压缩文件后又帮你自动部署了
如果不想用图片压缩可以把第 154 行的 "compressImage", 和第 165 行的 ,"compressImage" 去掉即可
添加 Valine 评论系统
如果注册过 LeanCloud,请点击此处进行登录,未注册的请点击注册
步骤:
-
首先创建一个云存储开发版,名称自定义
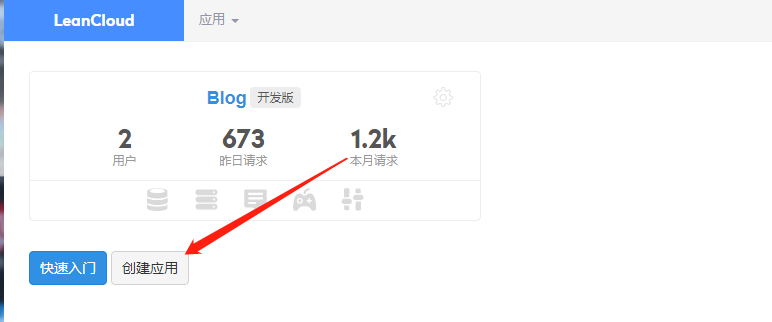
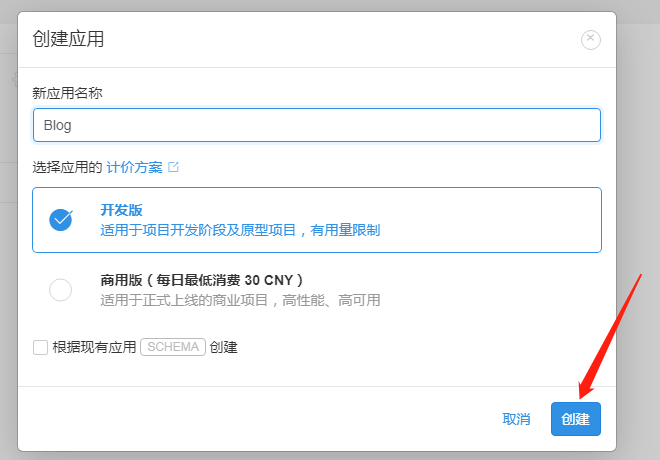
-
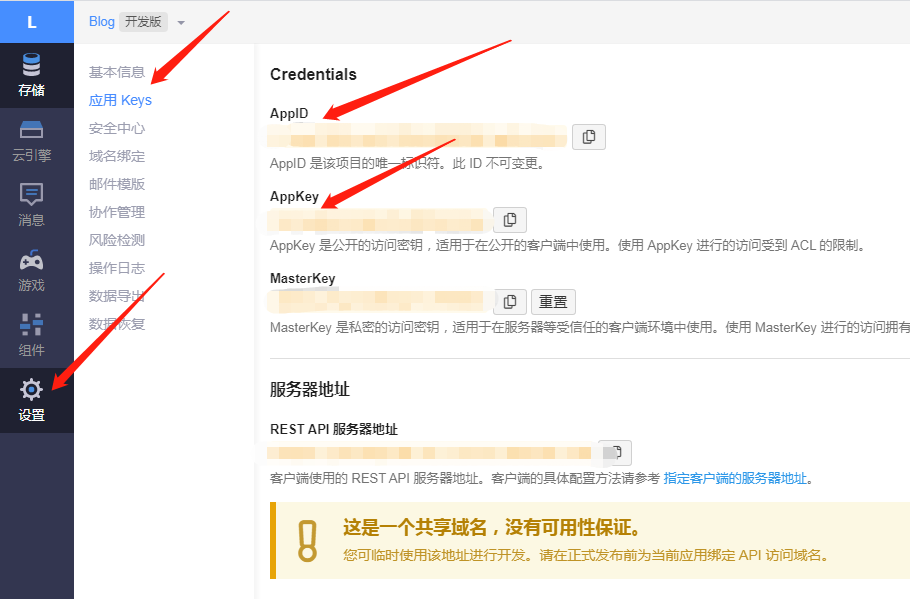
在“设置“,”应用 Keys”,找到你的appid和appke,配置到主题中valine配置的地方,启用valine
# The configuration of the Valine comment module is not activated by default.
# To use it, activate the configuration item and set appId and appKey.
# Valine 评论模块的配置,默认为不激活,如要使用,就请激活该配置项,并设置 appId 和 appKey.
valine:
  enable: false  # true即为开启评论系统
  appId:   #此处填写你的appid
  appKey:  #此处填写你的appkey
  notify: false
  verify: false
  visitor: true
  avatar: 'mm' # Gravatar style : mm/identicon/monsterid/wavatar/retro/hide
  pageSize: 10
  placeholder: 'just go go' # Comment Box placeholder
  background:  /medias/comment_bg.png
然后执行相关部署命令,查看效果即可
-
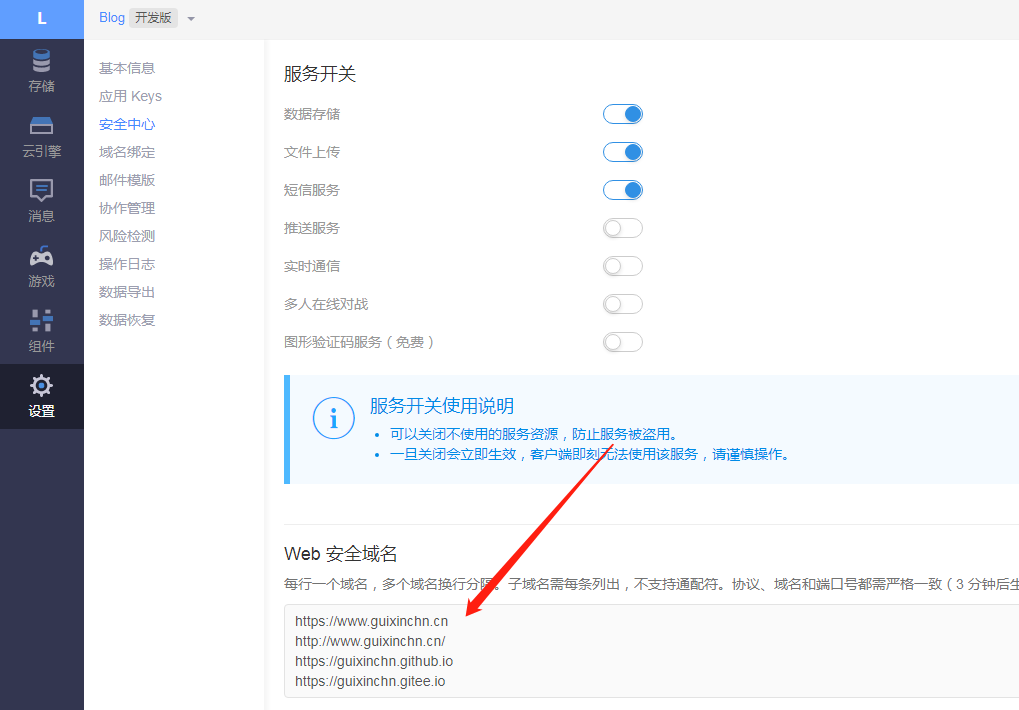
在“设置“,”安全中心”,”Web 安全域名”,添加自己的域名。
-
在“设置“,”安全中心”,”服务开关”,数据存储要打开。
Valine升级

拷贝我的Valine.min.js文件,直接替换你主题目录 /source/libs/valine/下的 Valine.min.js文件
有些属性调整了,主题下的_config.yml的valine属性如下:
# To use it, activate the configuration item and set appId and appKey.
# Valine 评论模块的配置,默认为不激活,如要使用,就请激活该配置项,并设置 appId 和 appKey.
valine:
  enable: true
  appId: xxxxxxxxxxxxxxxx
  appKey: xxxxxxxxxxxx
  notify: true
  verify: true
  visitor: true
  avatar: 'monsterid' # Gravatar style : mm/identicon/monsterid/wavatar/retro/hide
  pageSize: 10
  placeholder: '留下你的足迹..' # Comment Box placeholder
  background: /medias/comment_bg.png
  count: true
  enableQQ: 673888718
  recordIP: true
  requiredFields:
    - nick
    - mail
  guest_info:
    - nick
    - mail
    - link
  master:
    - xxxxxxxxxxxxxxx  # md5加密后的博主邮箱
  metaPlaceholder:  # 输入框的背景文字
    nick: 昵称/QQ号(必填)
    mail: 邮箱(必填)
    link: 网址(https://)
  lang: zh-CN
  tagMeta: # The String Array of Words to show Flag.[Just Only xCss Style mode]
    - 博主
    - 小伙伴
    - 访客
  friends: # The MD5 String Array of friends Email to show friends Flag.[Just Only xCss Style mode]
    - xxxxxxxxxxxxxx
    -
修改valine.ejs
Matery 主题使用的ejs模板预编译,在主题目录下的layout_partial/valine.ejs中修改,原始为:
new Valine({
        el: '#vcomments',
        appId: '<%- theme.valine.appId %>',
        appKey: '<%- theme.valine.appKey %>',
        notify: '<%- theme.valine.notify %>' === 'true',
        verify: '<%- theme.valine.verify %>' === 'true',
        visitor: '<%- theme.valine.visitor %>' === 'true',
        avatar: '<%- theme.valine.avatar %>',
        pageSize: '<%- theme.valine.pageSize %>',
        lang: '<% if (config.language == "zh-CN") {  %>zh-cn<% } else { %>en<% } %>',
        placeholder: '<%= theme.valine.placeholder %>'
    });
修改后为:
let metaPlaceholder = <%-  JSON.stringify(theme.valine.metaPlaceholder) %> ;
//这里要换行
new Valine({
        el: '#vcomments',
        appId: '<%- theme.valine.appId %>',
        appKey: '<%- theme.valine.appKey %>',
        notify: '<%- theme.valine.notify %>' === 'true',
        verify: '<%- theme.valine.verify %>' === 'true',
        visitor: '<%- theme.valine.visitor %>' === 'true',
        avatar: '<%- theme.valine.avatar %>',
        pageSize: '<%- theme.valine.pageSize %>',
        lang: '<%- theme.valine.lang %>',
        placeholder: '<%= theme.valine.placeholder %>',
        meta: <%- '["' + theme.valine.guest_info.join('", "') + '"]' %>,
        recordIP: '<%- theme.valine.recordIP %>' === 'true',
        enableQQ: '<%- theme.valine.avatar %>',
        requiredFields: <%- '["' + theme.valine.master.join('", "') + '"]' %>,
        master: <%- '["' + theme.valine.master.join('", "') + '"]' %>,
        friends: <%- '["' + theme.valine.friends.join('", "') + '"]' %>,
        tagMeta: <%- '["' + theme.valine.tagMeta.join('", "') + '"]' %>,
        metaPlaceholder: metaPlaceholder,

    });
验证昵称和邮箱可以加上以下代码:
document.body.addEventListener('click', function(e) {
    if (e.target.classList.contains('vsubmit')) {
        const email = document.querySelector('input[type=email]');
        const nick = document.querySelector('input[name=nick]');
        const reg = /^[A-Za-z0-9_-\u4e00-\u9fa5]+@[a-zA-Z0-9_-]+(\.[a-zA-Z0-9_-]+)+$/;
        if (!email.value || !nick.value || !reg.test(email.value)) {
            const str = `<div class="valert txt-center"><div class="vtext">请填写正确的昵称和邮箱!</div></div>`;
            const vmark = document.querySelector('.vmark');
            vmark.innerHTML = str;
            vmark.style.display = 'block';

            e.stopPropagation();

            setTimeout(function() {
                vmark.style.display = 'none';
                vmark.innerHTML = '';
            }, 2500);
        }
    }
    }, true);
填写昵称邮箱和网址的地方样式修改:
.v[data-class="v"] .vwrap .vheader .vinput {
  width: 32%;
  border-bottom: 1px dashed #dedede;
}
增强 Valine 的邮件通知
开始部署项目
依次点击左侧的云引擎 -> 部署 -> 项目部署 ->Git 部署 -> 配置 Git。然后 Git 的地址填写:https://github.com/sviptzk/Valine-Admin-Server。然后再次点击 Git 部署 -> 部署即可
绑定评论管理的域名
国区版LeanCloud 不给予免费的二级域名了,因此必须绑定备案域名。
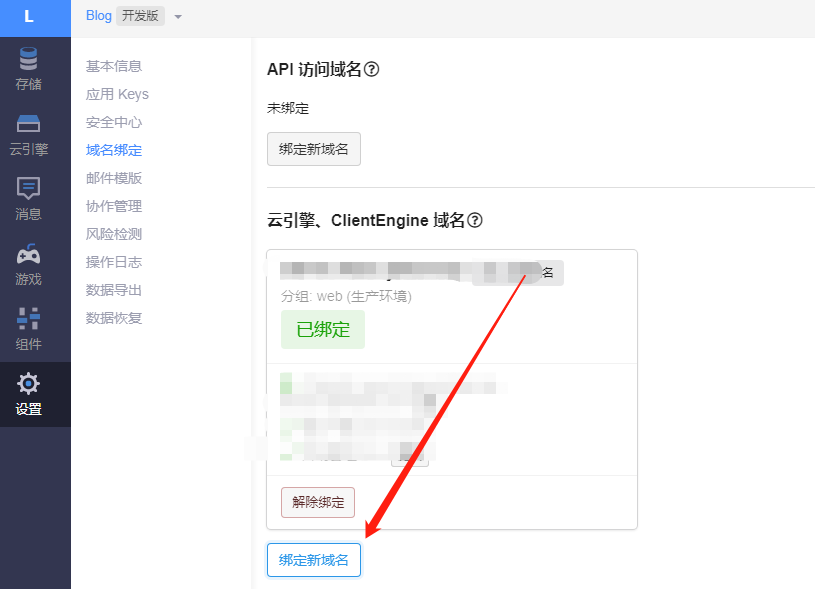
国际版LeanCloud 给予一个免费的二级域名。
设置域名白名单
域名可设置多个,一行一个。需要写协议头。
设置环境变量
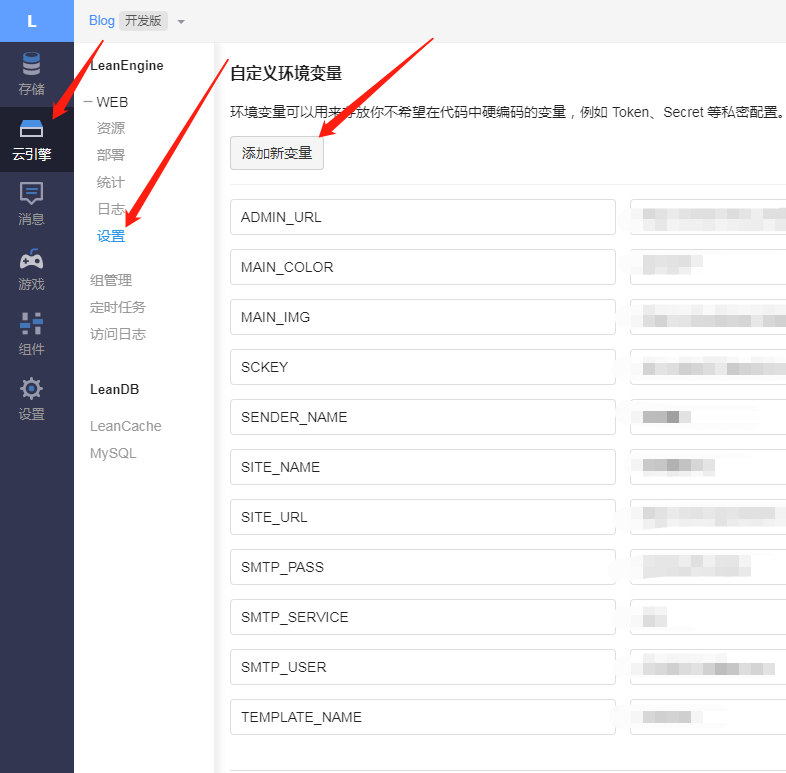
| 变量名 | 说明 | 示例 |
|---|---|---|
| SITE_NAME | [必填] 网站名称 | 咕咕星Blog |
| SITE_URL | [必填] 网站地址,最后不要加 / |
https://www.guixinchn.cn |
| SMTP_USER | [必填] SMTP 服务用户名,一般为邮箱地址。 | 673888718@qq.com |
| SMTP_PASS | [必填] SMTP 密码,一般为授权码,而不是邮箱的登陆密码,请自行查询对应邮件服务商的获取方式 | fvcfqhgudnalzyqa |
| SMTP_SERVICE | [新版支持] 邮件服务提供商,内置支持 | |
| SENDER_NAME | [必填] 寄件人名称。 | 咕咕星 |
| TO_EMAIL | [可选] 博主通知收件地址,默认使用 SMTP_USER | 673888718@qq.com |
| BLOGGER_EMAIL | [可选] 如果设置则作为后台管理员邮箱(/sign-up 页面设置),不设置则默认以 SMTP_USER |
673888718@qq.com |
| TEMPLATE_NAME | [必填] 设置提醒邮件的主题 | custom2 |
| AKISMET_KEY | [可选] Akismet Key 用于垃圾评论检测,设为 MANUAL_REVIEW 开启人工审核,留空不使用反垃圾 | xxxx |
| ADMIN_URL | [可选] 后台管理地址 (非博客地址) | https://server.guixinchn.cn |
| COMMENT | [可选] 评论 div 的 ID 名 | #post-comment |
| SCKEY | [可选] server 酱的 SCKEY | xxx |
| AKISMET_KEY | [可选] Akismet Key 用于垃圾评论检测 | xxxxxxxxxxxx |
| ICP | [可选] 备案信息,直接填写即可。 | xxxxxx |
| INFO | [可选] 自定义信息输出,支持 HTML 代码 | <p style='color:red'>test<p> |
| favicon | [可选] 网页 favicon 图标 | https://cdn.jsdelivr.net/gh/guixinchn/image/blog/favicon.png |
| SPAM_WORDS | [可选] 需要对屏蔽的关键词,关键词用半角逗号分隔 | 单号,物流 |
| MAIN_COLOR | [可选] 仅针对 custom2 模板主题的主要颜色 |
#2558FF |
| MAIN_IMG | [可选] 仅针对 custom2 模板主题的头图 |
https://cdn.jsdelivr.net/gh/guixinchn/image/blog/favicon.png` |
此项目的主题字段
| 主题 | 说明 |
|---|---|
| default | 默认主题 |
| rainbow | 原版的 rainbow |
| custom1 | 基于🎉梨花町の肾兄さん🎉的模板 |
| custom2 | 对 custom1 的改进版 |
添加完成后,点击保存。并且重新部署实例。
登录后台为刚刚设置的后台域名,如果登录不上则在域名后面加上/sign-up
微信公众号通知
首先需要到 server 的官网,开启微信提醒并获取 SCKEY。
官网写的很详细,这里不在过多赘述
防止服务器休眠
关于自动休眠的官方说法:点击查看
关于服务器休眠唤醒的问题,以前的方法是通过自带的定时任务进行唤醒,但现在不可以了,因为官方进行限制了。因此使用的是 GitHub+Actions
进入自己的Github首页-->右上角settings-->左下角Developer settings-->选择 Personal access tokens-->Generate new token
设置名字为 GITHUB_TOKEN , 然后勾选 repo , admin:repo_hook , workflow 等选项,最后点击 Generate token 即可
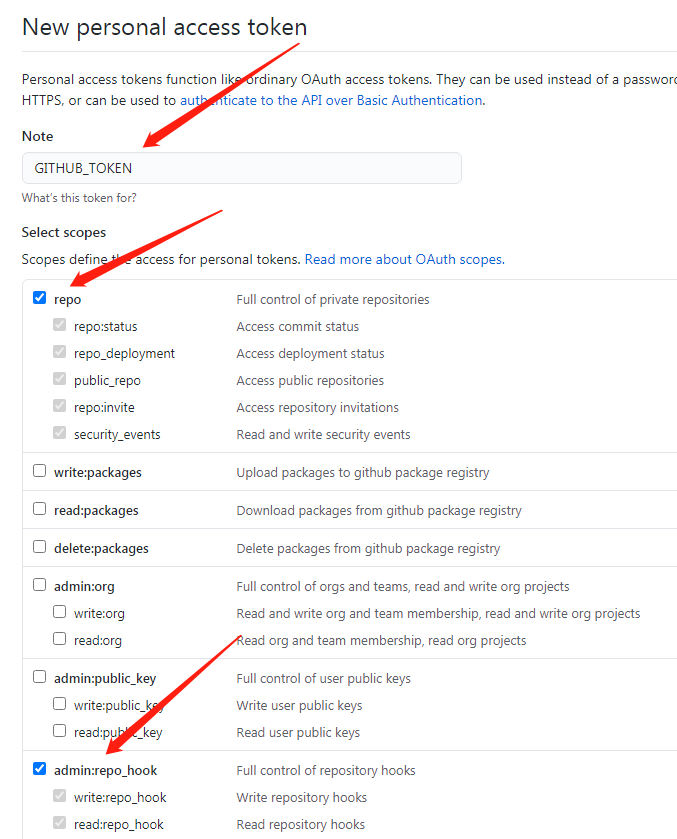
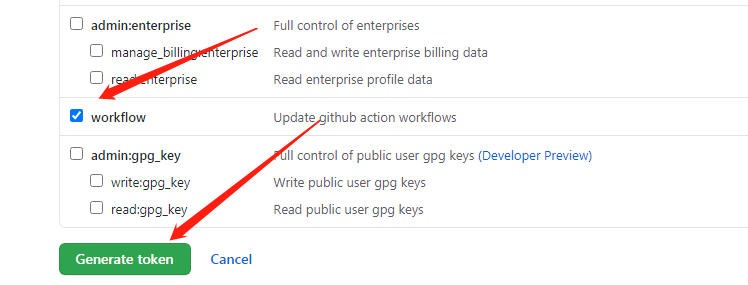
接下来 FORK 项目。
地址:https://github.com/blogimg/WakeLeanCloud
成功 FORK 后,进入项目的设置。添加你的 leancloud 的后台地址(也就是评论管理的后台地址)
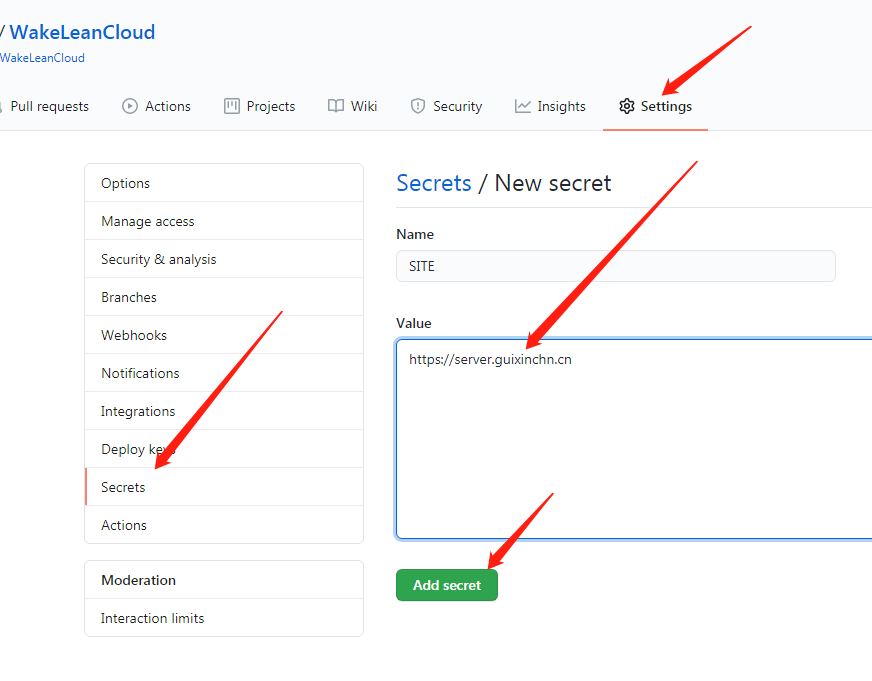
选择 Secrets,添加你的评论后台地址,一定是 Leancloud 的后台地址(环境变量 ADMIN_URL),而不是你的博客地址。
接下来对自己的项目点个 star 就能启动了,启动后请切换到 actions,看看是否运行成功。
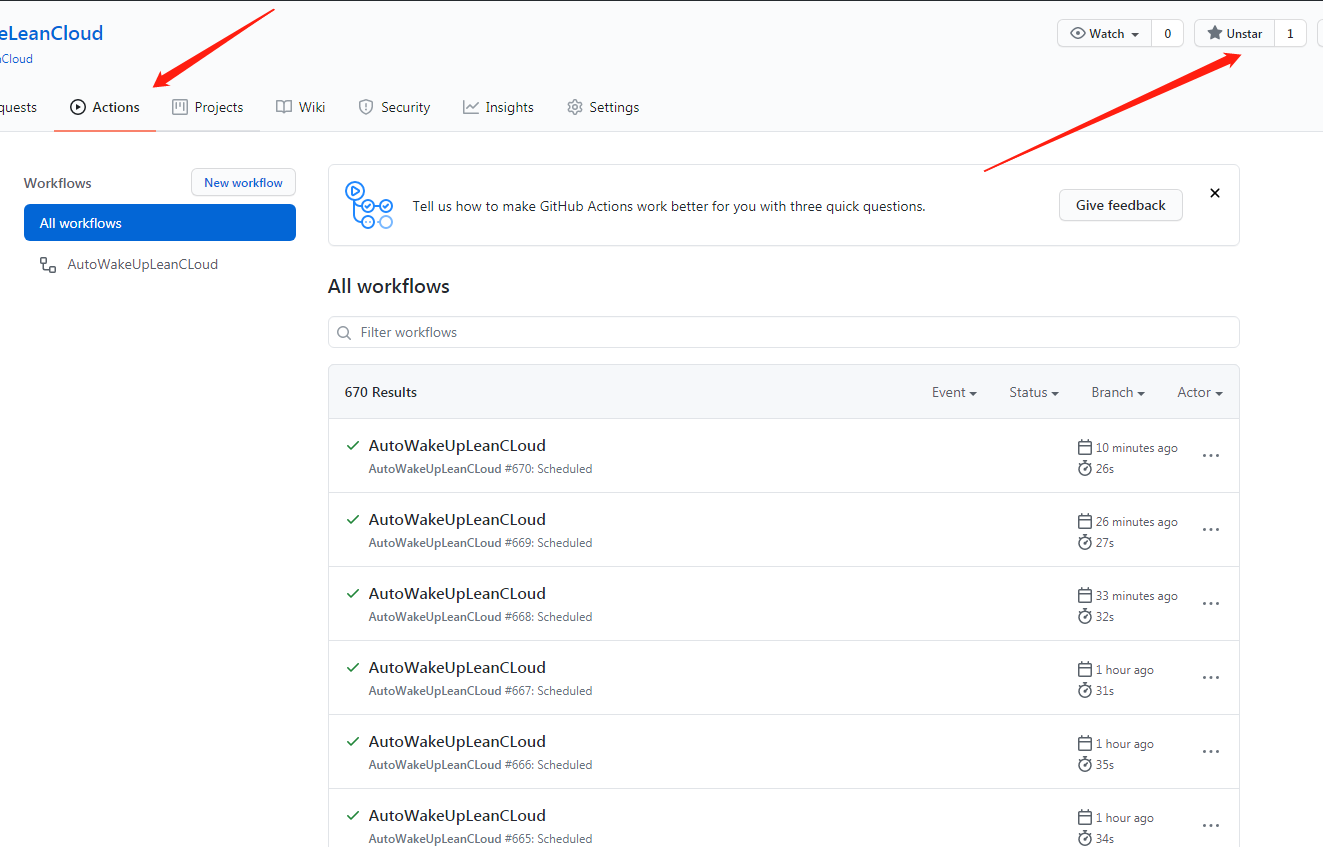
在leanclound中云引擎日志中也可以看到有没有被Get到
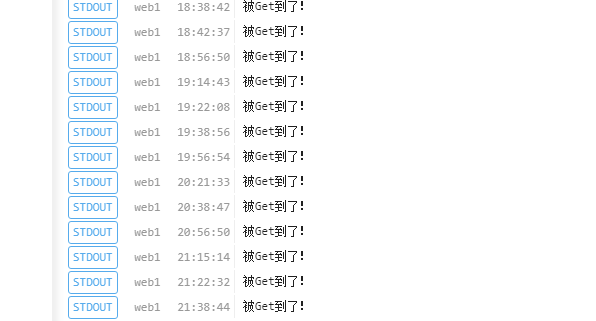
至于重发函数,还是和往常一样,但由于流控限制,因此最好能保证重发时机器是活着的。不然很可能会触发因流控原因,通过定时任务唤醒体验版实例失败,建议升级至标准版云引擎实例避免休眠
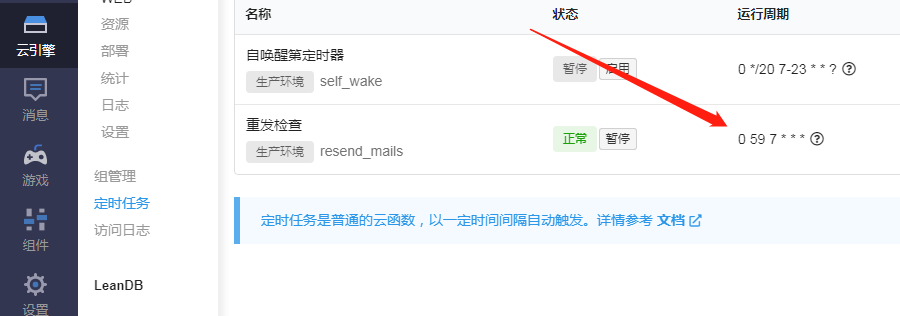
选择 resend-mails 云函数,Cron 表达式为 0 59 7 * * *,表示每天早 8 点 20 分检查过去 24 小时内漏发的通知邮件并补发(请尽量确保你设置的时间机器是醒着的)
GitHub评论系统
可以先去这个地方看一下 Gitalk 的效果 传送门
-
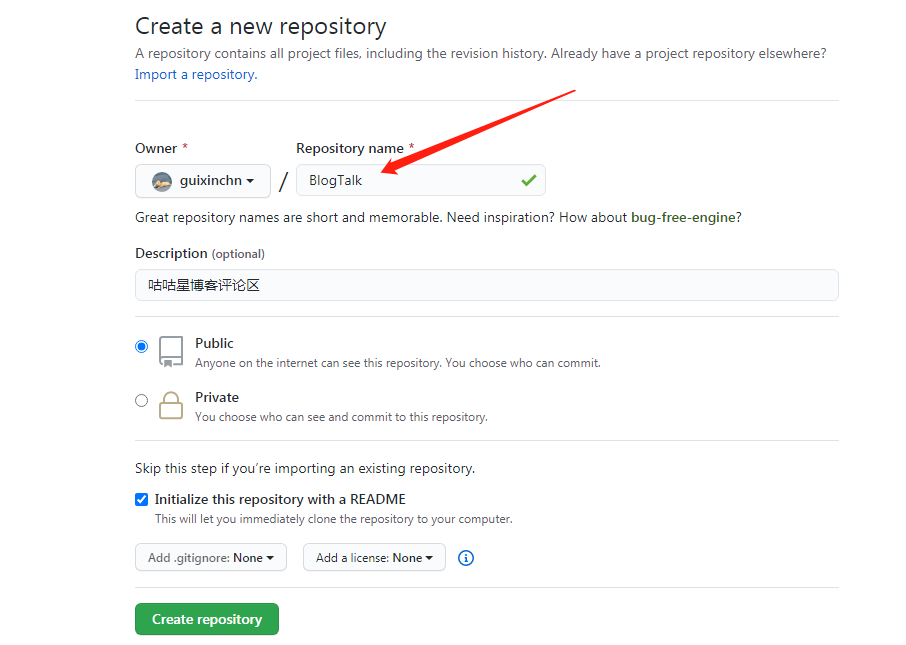
首先要在GitHub上去新建一个仓库用于存放评论的内容
-
在本仓库Settings中下拉可以看到issues功能默认开启,没有的话需要打开

-
需要注册一个Github Application
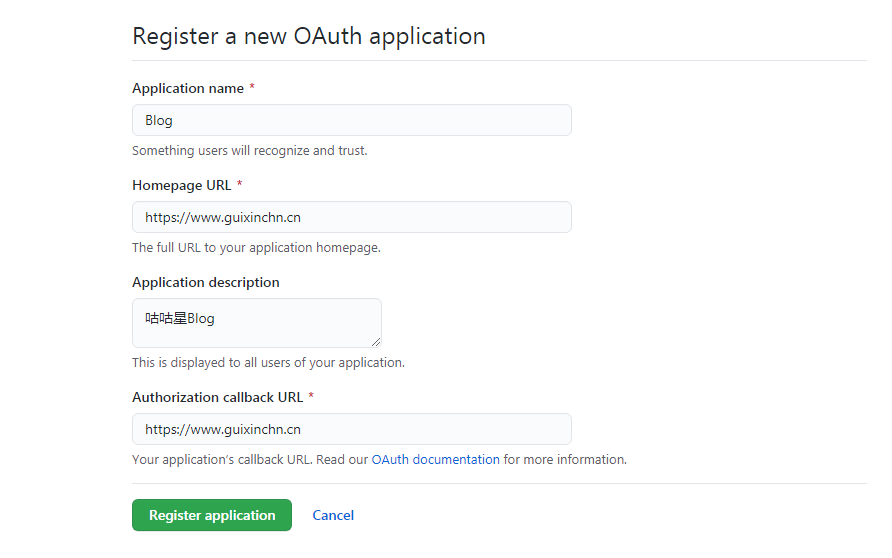
注意两个URL就是你网站的域名
-
完成之后便到了如下页面,其中
Client ID和Client Secret是我们需要的东西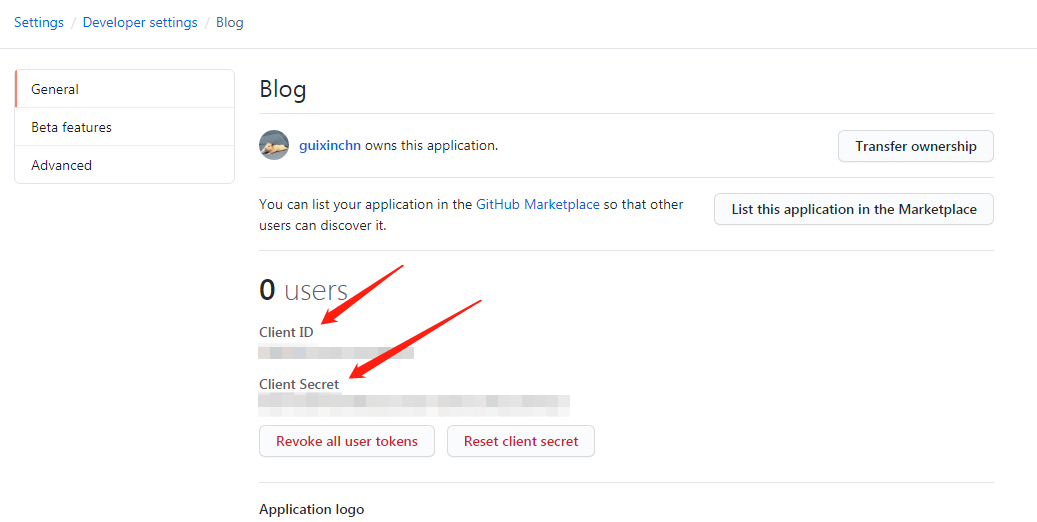
-
最后设置 Theme 目录下
_config.yml文件# the Gitalk config,default disabled # Gitalk 评论模块的配置,默认为不激活 gitalk: enable: true owner: guixinchn repo: BlogTalk oauth: clientId: xxxxxxxxxx clientSecret: xxxxxxxxxxxxxxxxxx admin: guixinchn
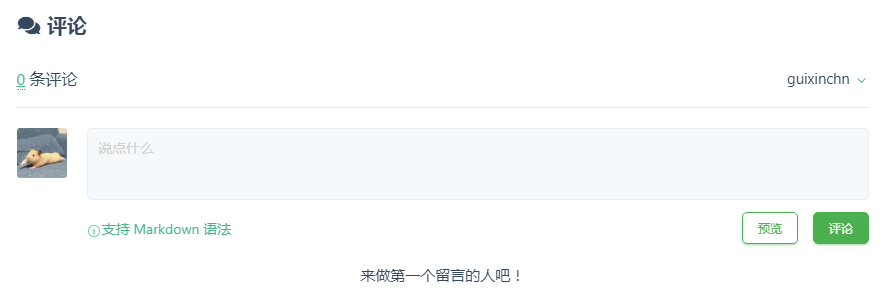
第一次查看效果需要登录 github 账号,关联授权后,就可以使用评论系统了,如果出现404,则把刚刚的clientId参数也传过去
网站提交
百度收录
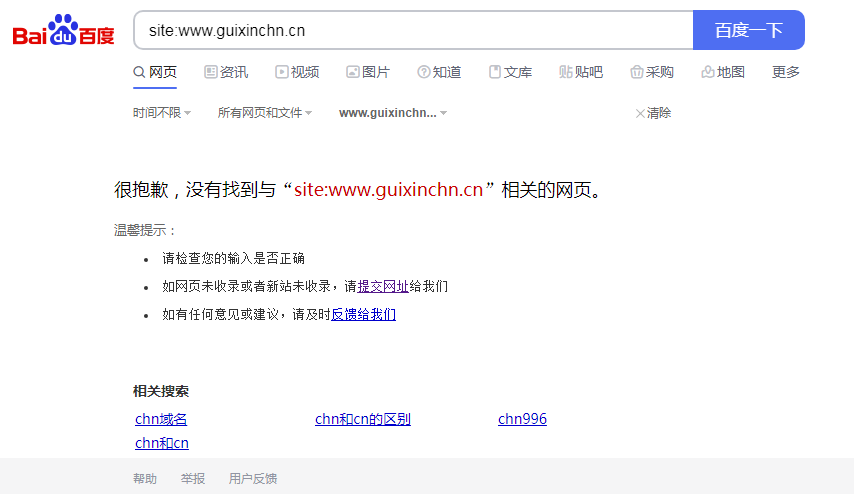
可以在百度搜索引擎中输入:site:www.guixinchn.cn来查看网站是否被收录
如果没有,可以在下面提交网址
添加自己的站点到百度
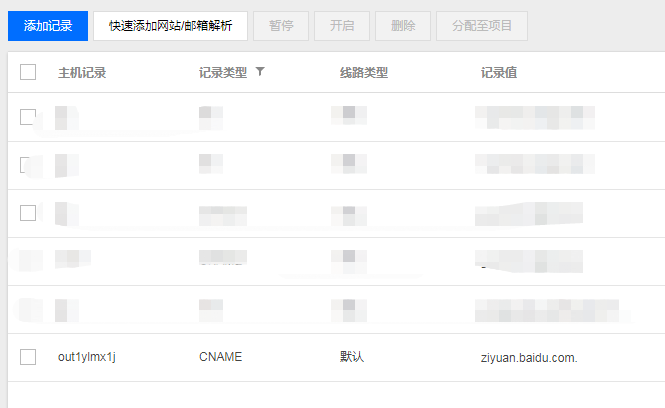
登录百度搜索资源平台,站点管理->添加网站,输入域名再验证所有权即可。如果是用的是GitHub,则不能使用HTML标签验证,因为百度的蜘蛛爬取不到GitHub的内容。
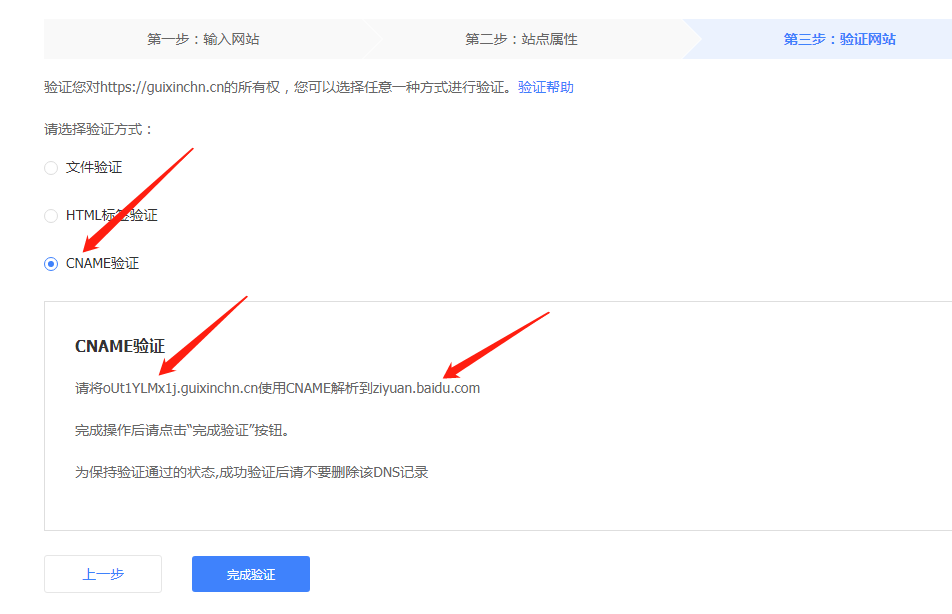
我使用第三种dns解析,复制二级域名前面的英文,粘贴在对应的位置如图所示:
向百度推送自己的资源
经过以上步骤,百度已经知道有我们网站的存在了,但是百度还不知道我们的网站上有什么内容,所以要向百度推送我们的内容。
手动提交即手动地将链接一次性提交给百度。自动提交有:主动推送,自动推送,sitemap。主动推送需要安装相关插件,自动推送Metary主题已经自带了,并且默认开启,sitemap提交填写baidusitemap.xml文件地址即可
安装相应的站点地图插件
npm install hexo-generator-sitemap --save              #sitemap
npm install hexo-generator-baidu-sitemap --save        #百度sitemap
这两个插件是用来生成 Sitemap文件 的插件,而 Sitemap 是用来告知搜索引擎我们的网站上有哪些可供抓取的网页的。
hexo配置文件中的url一定要改成你的域名,这两个插件是根据你的url生成站点地图的
安装后直接执行hexo cl&&hexo g命令,然后就会在网站根目录生成sitemap.xml文件和baidusitemap.xml文件,其中sitemap.xml文件是搜索引擎通用的文件,baidusitemap.xml是百度专用的sitemap文件。
使用sitemap方式推送
有sitemap文件之后,再将生成的sitemap文件提交给百度或者其他搜索引擎
百度方式:在普通收录,资源提交的sitemap那里填写自己sitemap文件的URL地址即可
https://你的域名/baidusitemap.xml
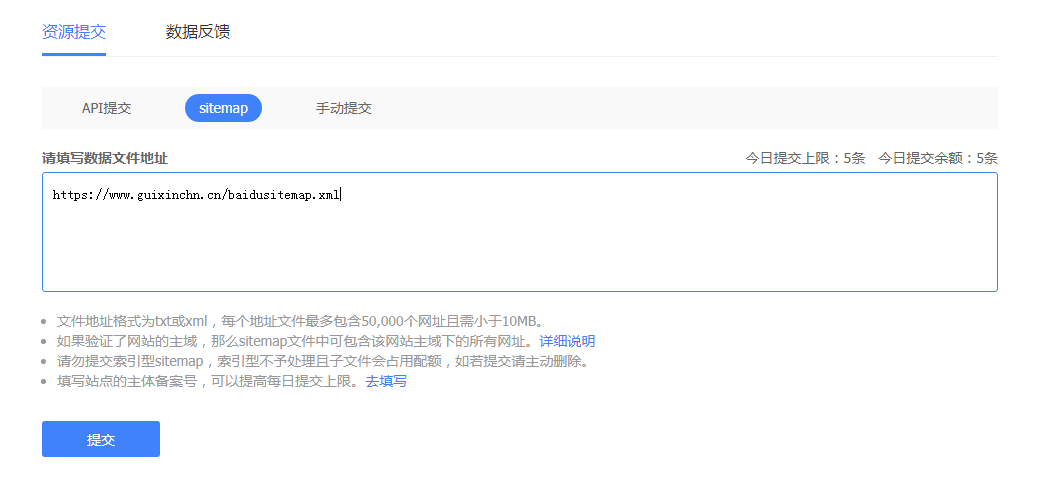
提交后会有状态提示:

这里需要注意严格区分http和https
自动推送方式
只要每个需要被百度爬取的HTML页面中加入一段JS代码即可:
<script>
(function(){
    var bp = document.createElement('script');
    var curProtocol = window.location.protocol.split(':')[0];
    if (curProtocol === 'https') {
        bp.src = 'https://zz.bdstatic.com/linksubmit/push.js';
    }
    else {
        bp.src = 'http://push.zhanzhang.baidu.com/push.js';
    }
    var s = document.getElementsByTagName("script")[0];
    s.parentNode.insertBefore(bp, s);
})();
</script>
matery主题可以自动给每个页面加上这段代码,只需在主题配置文件中配置:
# 百度搜索资源平台提交链接
baiduPush: true
主动推送方式
安装主动推送插件:hexo-baidu-url-submit
npm install hexo-baidu-url-submit --save
然后打开hexo配置文件,在末尾加入以下配置:
# hexo-baidu-url-submit  百度主动推送
baidu_url_submit:
  count: 80 # 提交最新的一个链接
  host: www.guixinchn.cn # 在百度站长平台中注册的域名
  token: xxxxxxx # 请注意这是您的秘钥, 所以请不要把博客源代码发布在公众仓库里!
  path: baidu_urls.txt # 文本文档的地址, 新链接会保存在此文本文档里
密匙的获取是在百度的自动提交的主动推送那里。
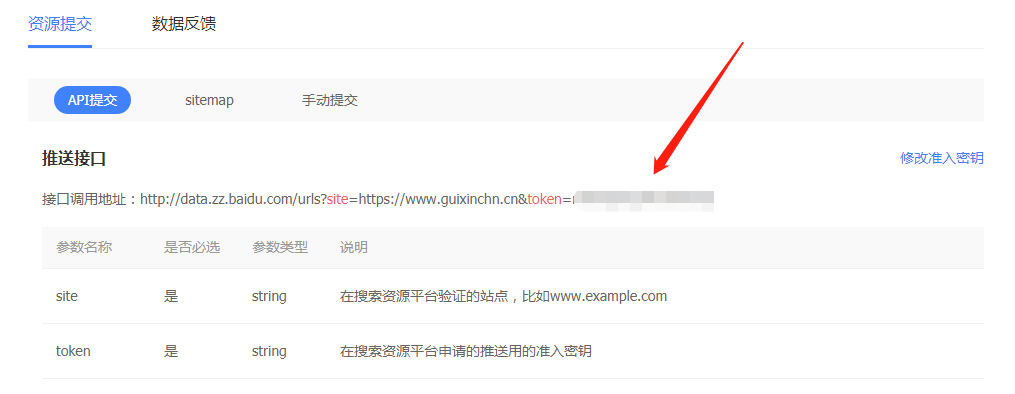
再加入新的deploy:
deploy:
- type: baidu_url_submitter
如图:
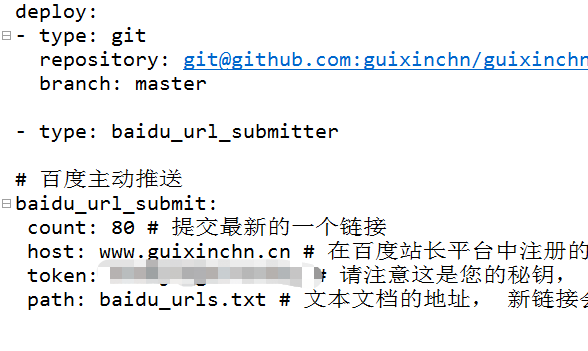
这样每次执行 hexo d 的时候,新的链接就会被推送了。
推送成功时,会有如下终端提示!
如图39个链接推送成功

谷歌收录
同样可以在百度搜索引擎中输入:site:www.guixinchn.cn来查看网站是否被收录
如果没有,可以在下面提交网址
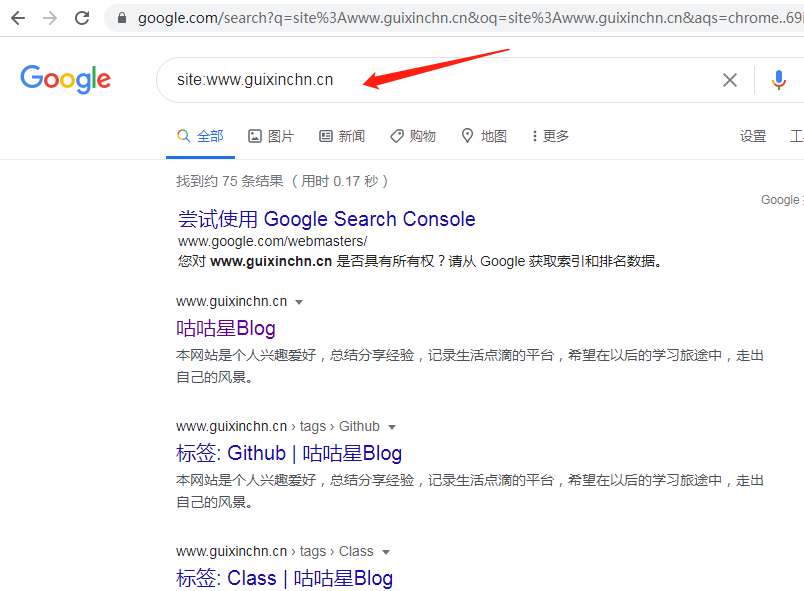
登录谷歌站长平台,添加自己的域名
DNS验证(就是验证下网站是不是你的)就是域名解析那里添加一条TXT解析记录

然后点击验证即可
再到谷歌的Search Console,添加自己的sitemap地址查看
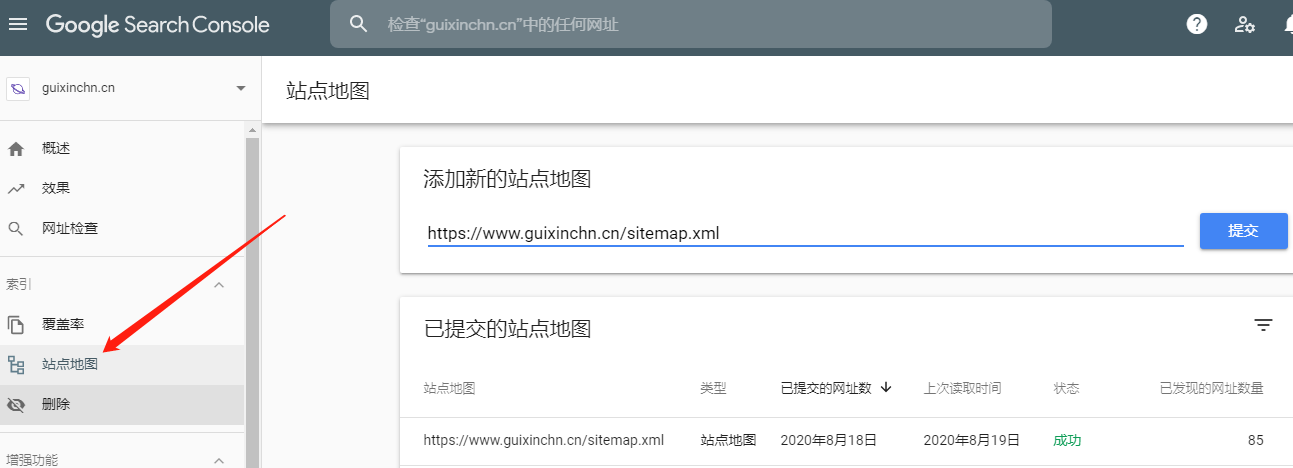
接下来就是等待谷歌收录了

