[原创]Android Camera 开发之实现一 附源码
2012-06-17 14:22 和尚释然 阅读(4672) 评论(2) 编辑 收藏 举报一、 Android Camera实现方式
Android提供两种实现方式给开发员来实现拍照功能:Camera API和Camera Intent.下面的章节主要是讲解如何使用Camera Intent进行Camera开发.
Camera Intent
通过”Camera Intent”方式可以快速,方便以及更少的代码来完成Camera功能.其通过Android的Intent调用系统现有的Camera应用程序来实现此功能.并实现”onActivityResult()”获取并处理拍照返回的结果.
调用Camera Intent流程主要分为如下几个步骤:
构建一个Camera Intent来向Android系统请求图片和视频
MediaStore.ACTION_IMAGE_CAPTURE 请求图像
MediaStore.ACTION_VIDEO_CAPTURE 请求视频
启动Camera Intent
使用startActivityForResult()方法启动Camera Intent
接收Camera Intent返回的结果
创建onActivityResult()方法接收回调和返回图像数据
图像拍照意图(Image capture intent)
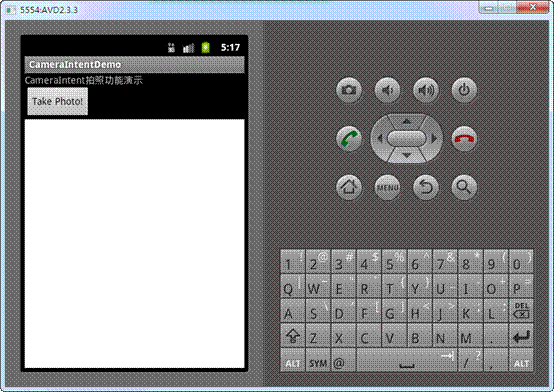
首先来看一下Demo的运行效果图,具体操作是点击”Take Photo!”按钮打开系统自带的Camera界面,拍摄完毕后将拍摄的照片显示ImageView中.

开发步骤:
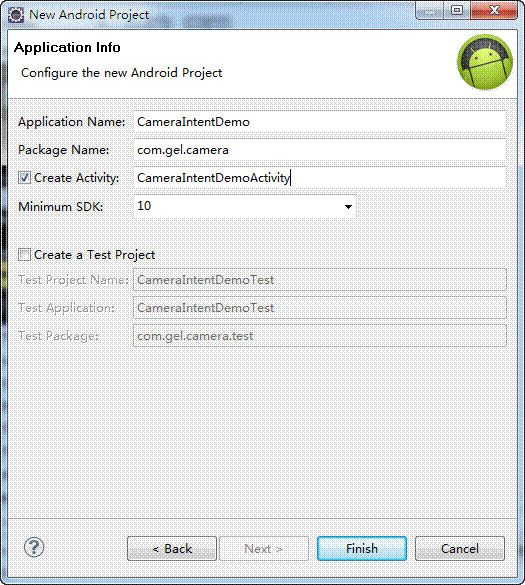
A. 新建一个Android项目,取名为”CameraIntentDemo”.

B. 构建主界面元素.
main.xml文件内容如下:
|
<?xml version="1.0" encoding="utf-8"?> <LinearLayout xmlns:android="http://schemas.android.com/apk/res/android" android:layout_width="fill_parent" android:layout_height="fill_parent" android:orientation="vertical" >
<TextView android:layout_width="fill_parent" android:layout_height="wrap_content" android:text="@string/hello" />
<Button android:id="@+id/btnTakePhoto" android:layout_width="wrap_content" android:layout_height="wrap_content" android:text="Take Photo!" />
<ImageView android:id="@+id/imgvTakePhoto" android:layout_width="fill_parent" android:layout_height="fill_parent" android:background="#FFFFFF"/>
</LinearLayout> |
C. 使用Intent来启动Camera功能.
首先声明一个Intent,并以MediaStore.ACTION_IMAGE_CAPTURE实例化该Intent.
Intent intent = new Intent(MediaStore.ACTION_IMAGE_CAPTURE);
然后设置Intent的MediaStore.EXTRA_OUTPUT属性可以将拍摄的图像保存到指定路径.
// set the image file name
intent.putExtra(MediaStore.EXTRA_OUTPUT, fileUri);
最后调用startActivityForResult方法来启动系统的Camera功能.
D. 捕获系统Camera的回调
重写onActivityResult()方法,通过requestCode参数可以知道是否Camera Intent的Result,然后再根据Intent参数对接收到图像数据进行处理或者保存.如果通过
MediaStore.EXTRA_OUTPUT属性自动将图像数据保存到指定的位置,那么在
onActivityResult()得到的Intent的数据是为NULL的.这一点大家需要注意一下.
E. 在AndroidManifest.xml添加访问SD权限声明.
<!-- 在SDCard中创建与删除文件权限 -->
<uses-permission android:name="android.permission.MOUNT_UNMOUNT_FILESYSTEMS" />
<!-- 往SDCard写入数据权限 -->
<uses-permission android:name="android.permission.WRITE_EXTERNAL_STORAGE" />
CameraIntentDemoActivity.java文件内容:
|
public class CameraIntentDemoActivity extends Activity {
private static final int MEDIA_TYPE_IMAGE = 1; private static final int MEDIA_TYPE_VIDEO = 2; private Uri fileUri;
private static Uri getOutputMediaFileUri(int type) { return Uri.fromFile(getOutputMediaFile(type)); }
private static File getOutputMediaFile(int type){ // To be safe, you should check that the SDCard is mounted // using Environment.getExternalStorageState() before doing this.
File mediaStorageDir = new File(Environment.getExternalStoragePublicDirectory(Environment.DIRECTORY_PICTURES), "MyCameraApp"); // This location works best if you want the created images to be shared // between applications and persist after your app has been uninstalled.
// Create the storage directory if it does not exist if (! mediaStorageDir.exists()){ if (! mediaStorageDir.mkdirs()){ Log.d("MyCameraApp", "failed to create directory"); return null; } }
// Create a media file name String timeStamp = new SimpleDateFormat("yyyyMMdd_HHmmss").format(new Date()); File mediaFile; if (type == MEDIA_TYPE_IMAGE){ mediaFile = new File(mediaStorageDir.getPath() + File.separator + "IMG_"+ timeStamp + ".jpg"); } else if(type == MEDIA_TYPE_VIDEO) { mediaFile = new File(mediaStorageDir.getPath() + File.separator + "VID_"+ timeStamp + ".mp4"); } else { return null; }
return mediaFile; }
@Override public void onCreate(Bundle savedInstanceState) { super.onCreate(savedInstanceState); setContentView(R.layout.main);
Button btnTakePhoto = (Button)this.findViewById(R.id.btnTakePhoto); btnTakePhoto.setOnClickListener(new View.OnClickListener() {
@Override public void onClick(View v) { Intent cameraIntent = new Intent(MediaStore.ACTION_IMAGE_CAPTURE); // create a file to save the image fileUri = getOutputMediaFileUri(MEDIA_TYPE_IMAGE); // set the image file name cameraIntent.putExtra(MediaStore.EXTRA_OUTPUT, fileUri); // start the image capture Intent startActivityForResult(cameraIntent, 0); } });
}
@Override protected void onActivityResult(int requestCode, int resultCode, Intent data) { try { if (requestCode != 0) { return; } Bitmap bmp = null; super.onActivityResult(requestCode, resultCode, data); if (data != null) { Bundle extras = data.getExtras(); bmp = (Bitmap)extras.get("data"); } else { FileInputStream fis = new FileInputStream(fileUri.getPath()); bmp = BitmapFactory.decodeStream(fis); }
ImageView imag = (ImageView)this.findViewById(R.id.imgvTakePhoto); imag.setImageBitmap(bmp);
} catch (Exception e){ System.out.println(e.getMessage()); }
} } |
视频拍摄意图(Video capture intent)
使用Camera Intent同样可以快速,方便以及更少代码实现视频拍摄.它还支持多种扩展特性.
• MediaStore.EXTRA_OUTPUT – 设置视频输出位置.
• MediaStore.EXTRA_VIDEO_QUALITY – 设置视频质量,0为最差,1为最清晰.
• MediaStore.EXTRA_DURATION_LIMIT – 设置视频的限制长度.
• MediaStore.EXTRA_SIZE_LIMIT – 设置视频的限制大小.
开发步骤:
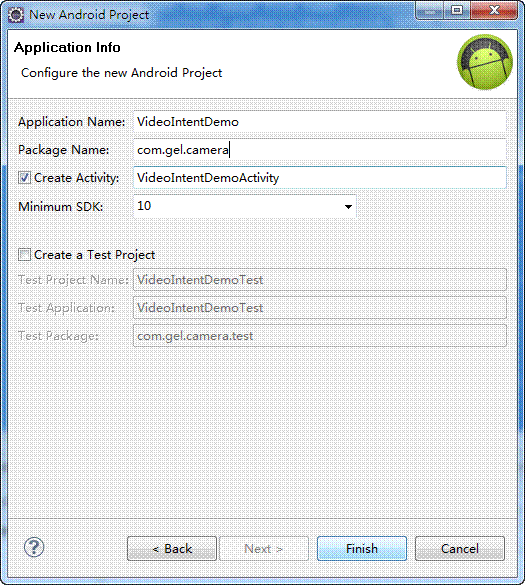
A. 新建一个Android Project命名为VideoIntentDemo,指定最低版本号.

B. 构建界面元素
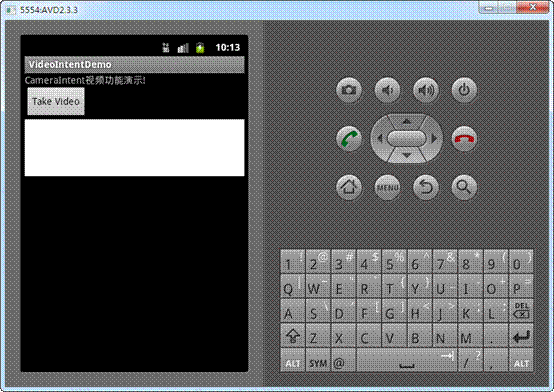
同样是放置一个Button来触发视频拍摄,下面放置一个TextView用来存放返回信息.
界面布局:

|
<?xml version="1.0" encoding="utf-8"?> <LinearLayout xmlns:android="http://schemas.android.com/apk/res/android" android:layout_width="fill_parent" android:layout_height="fill_parent" android:orientation="vertical" >
<TextView android:layout_width="fill_parent" android:layout_height="wrap_content" android:text="@string/hello" />
<Button android:id="@+id/btTakeVideo" android:layout_width="wrap_content" android:layout_height="wrap_content" android:text="Take Video" />
<TextView android:layout_width="fill_parent" android:layout_height="wrap_content" android:background="#FFFFFF" android:id="@+id/tvActivityResult" android:minLines="5" />
</LinearLayout> |
C. 代码实现
首先声明一个Uri对象用来保存视频文件保存的路径.
private Uri fileUri;
然后实现Video功能代码.
// create new Intent
Intent intent = new Intent(MediaStore.ACTION_VIDEO_CAPTURE);
// create a file to save the video
fileUri = getOutputMediaFileUri(MEDIA_TYPE_VIDEO);
// set the video file name
intent.putExtra(MediaStore.EXTRA_OUTPUT, fileUri);
// set the video image quality to high
intent.putExtra(MediaStore.EXTRA_VIDEO_QUALITY, 1);
// start the Video Capture Intent
startActivityForResult(intent, 1);
VideoIntentDemoActivity.java文件内容:
|
public class VideoIntentDemoActivity extends Activity {
private Uri fileUri;
private static final int MEDIA_TYPE_IMAGE = 1; private static final int MEDIA_TYPE_VIDEO = 2;
private static Uri getOutputMediaFileUri(int type) { return Uri.fromFile(getOutputMediaFile(type)); }
private static File getOutputMediaFile(int type){ // To be safe, you should check that the SDCard is mounted // using Environment.getExternalStorageState() before doing this.
File mediaStorageDir = new File(Environment.getExternalStoragePublicDirectory(Environment.DIRECTORY_PICTURES), "MyCameraApp"); // This location works best if you want the created images to be shared // between applications and persist after your app has been uninstalled.
// Create the storage directory if it does not exist if (! mediaStorageDir.exists()){ if (! mediaStorageDir.mkdirs()){ Log.d("MyCameraApp", "failed to create directory"); return null; } }
// Create a media file name String timeStamp = new SimpleDateFormat("yyyyMMdd_HHmmss").format(new Date()); File mediaFile; if (type == MEDIA_TYPE_IMAGE){ mediaFile = new File(mediaStorageDir.getPath() + File.separator + "IMG_"+ timeStamp + ".jpg"); } else if(type == MEDIA_TYPE_VIDEO) { mediaFile = new File(mediaStorageDir.getPath() + File.separator + "VID_"+ timeStamp + ".mp4"); } else { return null; }
return mediaFile; }
@Override public void onCreate(Bundle savedInstanceState) { super.onCreate(savedInstanceState); setContentView(R.layout.main);
Button btnTakeVideo = (Button)this.findViewById(R.id.btTakeVideo); btnTakeVideo.setOnClickListener(new View.OnClickListener() {
@Override public void onClick(View v) { // create new Intent Intent intent = new Intent(MediaStore.ACTION_VIDEO_CAPTURE);
// create a file to save the video fileUri = getOutputMediaFileUri(MEDIA_TYPE_VIDEO); // set the video file name intent.putExtra(MediaStore.EXTRA_OUTPUT, fileUri); // set the video image quality to high intent.putExtra(MediaStore.EXTRA_VIDEO_QUALITY, 1);
// start the Video Capture Intent startActivityForResult(intent, 1); } }); }
@Override protected void onActivityResult(int requestCode, int resultCode, Intent data) { TextView tvVideo = (TextView)this.findViewById(R.id.tvActivityResult); try { if (requestCode == 1) { tvVideo.setText("视频保存成功,路径为:" + fileUri.getPath()); } super.onActivityResult(requestCode, resultCode, data); } catch (Exception e) { tvVideo.setText(e.getLocalizedMessage()); } } } |
D. 在AndroidManifest.xml添加访问SD权限声明.
<!-- 在SDCard中创建与删除文件权限 -->
<uses-permission android:name="android.permission.MOUNT_UNMOUNT_FILESYSTEMS" />
<!-- 往SDCard写入数据权限 -->
<uses-permission android:name="android.permission.WRITE_EXTERNAL_STORAGE" />
最后附上源码下载:
作者:顾恩礼
出处:http://www.cnblogs.com/guenli/
本文版权归作者和博客园共有,欢迎转载,但未经作者同意必须保留此段声明,且在文章页面明显位置给出原文连接,否则保留追究法律责任的权利。


