Vue.js-vuex 详解
1.1 Vuex是做什么的?
Vuex 是一个专为 Vue.js 应用程序开发的状态管理模式。
它采用 集中式存储管理 应用的所有组件的状态,并以相应的规则保证状态以一种可预测的方式发生变化。
Vuex 也集成到 Vue 的官方调试工具 devtools extension,提供了诸如零配置的 time-travel 调试、状态快照导入导出等高级调试功能。
状态管理到底是什么?
可以简单的将其看成把需要多个组件共享的变量全部存储在一个对象里面。然后,将这个对象放在顶层的Vue实例中,让其他组件可以使用。
Vuex就是为了提供这样一个在多个组件间共享状态的插件。
管理什么状态呢?
如果你做过大型开放,一定遇到过多个状态,在多个界面间的共享问题。比如用户的登录状态、用户名称、头像、地理位置信息等等。比如商品的收藏、购物车中的物品等等。
这些状态信息,我们都可以放在统一的地方,对它进行保存和管理,而且它们还是响应式的。
1.2 单界面的状态管理

State:不用多说,就是我们的状态。(可以当做就是data中的属性)
View:视图层,可以针对State的变化,显示不同的信息。
Actions:这里的Actions主要是用户的各种操作:点击、输入等等,会导致状态的改变。
代码示例
counter需要某种方式被记录下来,也就是我们的State。
counter目前的值需要被显示在界面中,也就是View部分。
界面发生某些操作时(这里是用户的点击,也可以是用户的input),需要去更新状态,也就是我们的Actions
<template>
  <div class="test">
    <div>当前计数:{{counter}}</div>
    <button @click="counter+=1">+1</button>
    <button @click="counter-=1">-1</button>
  </div>
</template>

<script>
export default {
  name: "hello",
  data(){
    return {
      counter:0
    }
  }
}
</script>

<style scoped>

</style>
1.3 多界面状态管理
创建项目vue init webpack vuetest
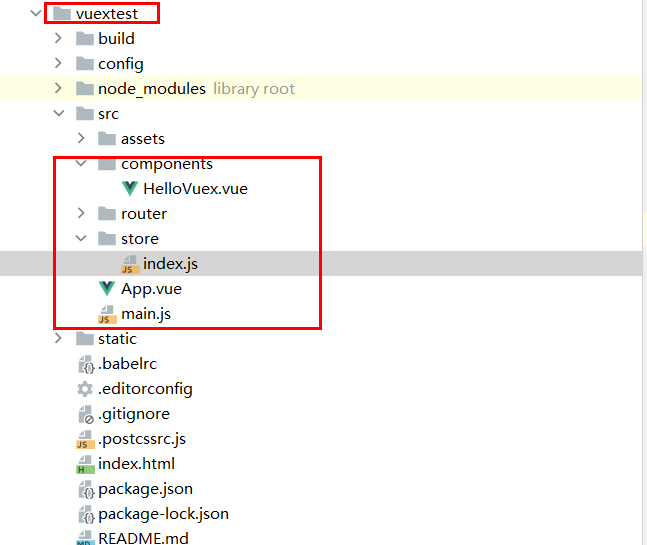
进入项目终端执行cnpm install vuex --save 命令,安装vuex插件。
全局单例模式(大管家)
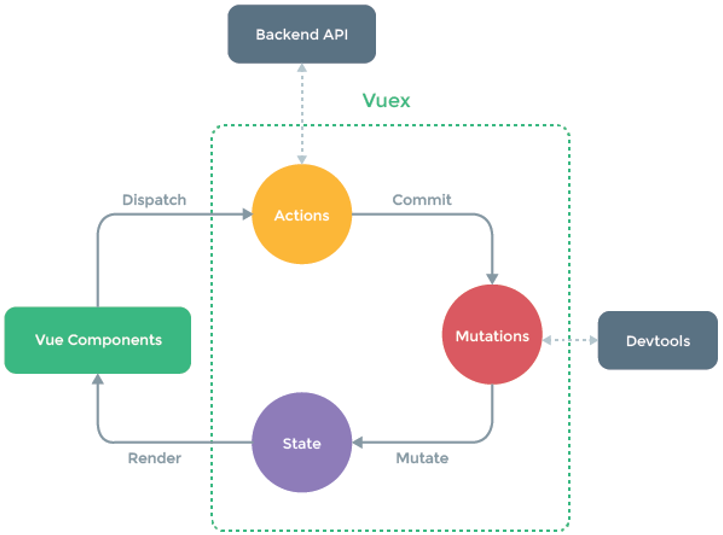
现在要做的就是将共享的状态抽取出来,交给我们的大管家,统一进行管理。
之后,每个试图,按照规定好的规定,进行访问和修改等操作。这就是Vuex背后的基本思想。
代码示例
先创建一个文件夹store,并且在其中创建一个index.js文件
index.js
// 导入vue
import Vue from 'vue'
import Vuex from 'vuex'

// 安装插件
Vue.use(Vuex)

// 创建对象
const store = new Vuex.Store({
  // 放置状态相关的信息
  state:{
    counter: 1000
  },
  // 方法
  mutations:{
    increment(state){
      state.counter++
    },
    decrement(state){
      state.counter--
    }
  }
})

// 导出store
export default store
挂载到Vue实例中,导入store对象,并且放在new Vue中。
这样,在其他Vue组件中,就可以通过this.$store的方式,获取到这个store对象了。
main.js
import Vue from 'vue'
import App from './App'
import router from './router'
import store from "./store";

Vue.config.productionTip = false

/* eslint-disable no-new */
new Vue({
  el: '#app',
  router,
  store,
  render: h => h(App)
})
HelloVuex.vue
<template>
  <div>
    <h3>{{$store.state.counter}}</h3>
  </div>
</template>

<script>
export default {
  name: "HelloVuex"
}
</script>

<style scoped>
</style>
APP.vue
通过提交mutation的方式,而非直接改变store.state.count。
Vuex可以更明确的追踪状态的变化,所以不要直接改变store.state.count的值。
<template>
  <div id="app">
    <h3>====APP组件====</h3>
    <h3>{{$store.state.counter}}</h3>
    <button @click="addition">+</button>
    <button @click="subtraction">-</button>

    <h3>++++HelloVuex组件++++</h3>
    <HelloVuex/>
  </div>
</template>

<script>
import HelloVuex from "./components/HelloVuex";
export default {
  name: 'App',
  // 注册组件
  components:{
    HelloVuex
  },
  data(){
    return{
      message: 'hello Vue.js!!!'
    }
  },
  methods:{
    addition(){
      this.$store.commit('increment')
    },
    subtraction(){
      this.$store.commit('decrement')
    }
  }
}
</script>

<style>
</style>
执行结果
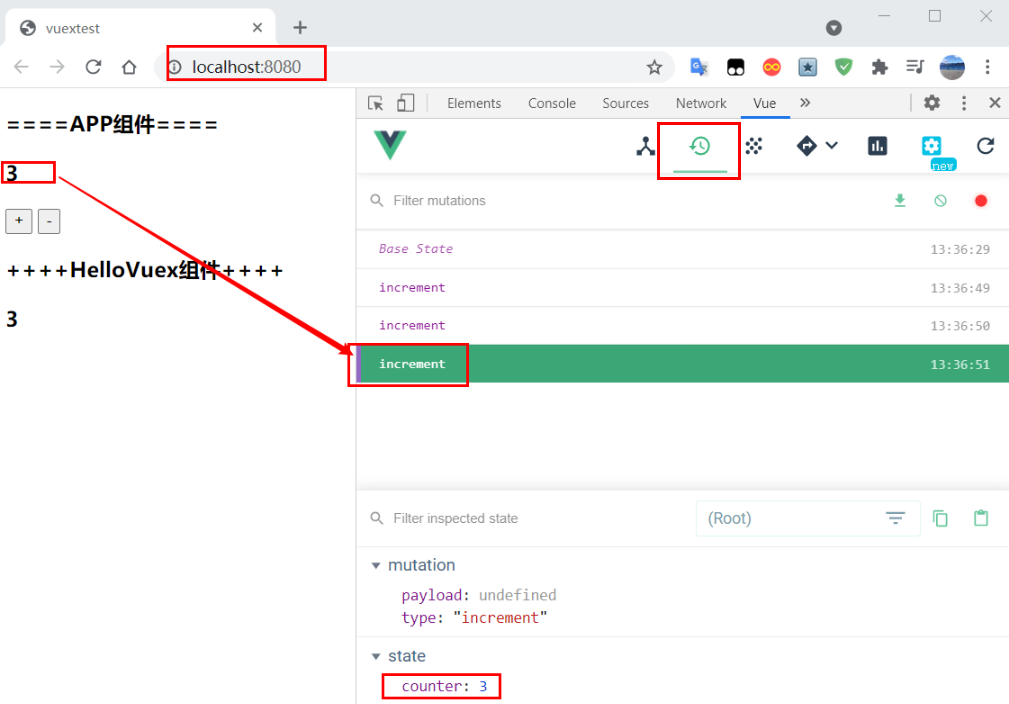
1.4 Vuex核心概念
1.4.1 Getters基本使用
有时候,我们需要从store中获取一些state变异后的状态。
获取学生年龄大于20的个数
// 创建对象
const store = new Vuex.Store({
  // 放置状态相关的信息
  state:{
    students:[
      {id:1, name: 'guardwhy', age:18},
      {id:2, name: 'kobe', age:41},
      {id:3, name: 'James', age:35},
      {id:4, name: 'Rondo', age:32}
    ]
  }
})
可以在Store中定义getters
getters:{
   arrayStu(state){
    // 返回结果
    return state.students.filter(s =>s.age > 20)
  }
}
代码示例
index.js
// 导入vue
import Vue from 'vue'
import Vuex from 'vuex'

// 安装插件
Vue.use(Vuex)

// 创建对象
const store = new Vuex.Store({
  // 放置状态相关的信息
  state:{
    students:[
      {id:1, name: 'guardwhy', age:18},
      {id:2, name: 'kobe', age:41},
      {id:3, name: 'James', age:35},
      {id:4, name: 'Rondo', age:32}
    ]
  },
  getters:{
    arrayStu(state){
      // 返回结果,获取学生年龄大于20的个数
      return state.students.filter(s =>s.age > 20)
    },
    arrayStuLength(state, getters){
      return getters.arrayStu.length
    },
    // 判断年龄
    arrayStuAge(state){
      // return function (age){
      //   return state.students.filter(s => s.age > age)
      // }
      return age =>{
        return state.students.filter(s => s.age > age)
      }
    }
  }
})

// 导出store
export default store
HelloVuex.vue
<template>
  <div>
    <h3>{{$store.state.counter}}</h3>
    <h3>{{$store.getters.arrayStu}}</h3>

  </div>
</template>

<script>
export default {
  name: "HelloVuex"
}
</script>

<style scoped>

</style>
APP.vue
<template>
  <div id="app">
    <h3>++++App组件内容:getters相关信息++++</h3>
    <h3>{{$store.getters.arrayStu}}</h3>
    <h3>{{$store.getters.arrayStuLength}}</h3>
    <h3>{{$store.getters.arrayStuAge(33)}}</h3>

    <h3>++++HelloVuex组件内容:getters相关信息++++++++</h3>
    <HelloVuex/>
  </div>
</template>

<script>
import HelloVuex from "./components/HelloVuex";
export default {
  name: 'App',
  // 注册组件
  components:{
    HelloVuex
  }
}
</script>

<style>
</style>
执行结果
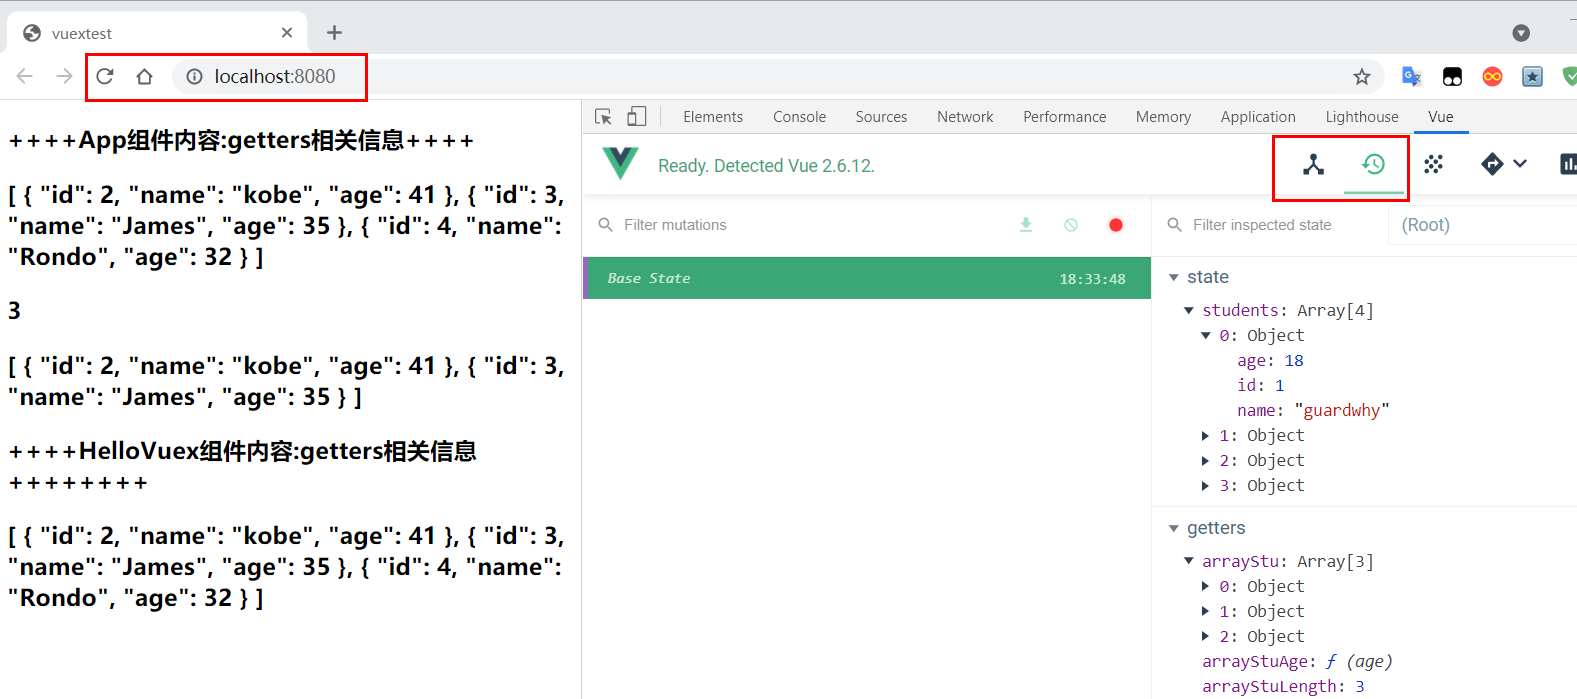
1.4.2 Mutation基本使用
Vuex的store状态的更新唯一方式:提交Mutation。
Mutation主要包括两部分
一个是字符串的事件类型(type)。
一个是回调函数(handler),该回调函数的第一个参数就是state。
mutation的定义
mutations:{
    increment(state){
        state.counter++
    },
    decrement(state){
        state.counter--
    }
}
通过mutation更新
increment: function(){
  this.$store.commit('increment')
}
Mutation传递参数
在通过mutation更新数据的时候, 有可能希望携带一些额外的参数,参数被称为是mutation的载荷(Payload)。
如果参数不是一个,比如有很多参数需要传递,通常会以对象的形式传递, 也就是payload是一个对象。这个时候可以再从对象中取出相关的信息。
index.js
// 导入vue
import Vue from 'vue'
import Vuex from 'vuex'

// 安装插件
Vue.use(Vuex)

// 创建对象
const store = new Vuex.Store({
  // 放置状态相关的信息
  state:{
    counter:10,
    students:[
      {id:1, name: 'guardwhy', age:18},
      {id:2, name: 'kobe', age:41},
      {id:3, name: 'James', age:35},
      {id:4, name: 'Rondo', age:32}
    ]
  },
  // 方法
  mutations:{
    increment(state){
      state.counter++
    },
    decrement(state){
      state.counter--
    },
    // 普通提交方式: payload(负载)
    incrementCount(state, count){
     state.counter += count
    },
    addStudent(state, stu){
      state.students.push(stu)
    }
  },
  getters:{
    arrayStu(state){
      // 返回结果
      return state.students.filter(s =>s.age > 20)
    }
  }
})

// 导出store
export default store
App.vue
<template>
  <div id="app">
    <h3>====APP组件内容====</h3>
    <h3>{{$store.state.counter}}</h3>
    <button @click="addition">+</button>
    <button @click="subtraction">-</button>
    <button @click="addCount(5)">+5</button>
    <button @click="addCount(10)">+10</button>
    <button @click="addStudent">添加学生</button>


    <h3>++++App组件内容:getters相关信息++++</h3>
    <h3>{{$store.getters.arrayStu}}</h3>
    <h3>++++HelloVuex组件内容:getters相关信息++++++++</h3>
    <HelloVuex/>
  </div>
</template>

<script>
import HelloVuex from "./components/HelloVuex";
export default {
  name: 'App',
  // 注册组件
  components:{
    HelloVuex
  },
  methods:{
    addition(){
      this.$store.commit('increment')
    },
    subtraction(){
      this.$store.commit('decrement')
    },
    addCount(count){
      // 1.普通的提交封装
      this.$store.commit('incrementCount', count)
    },
    addStudent(){
      // 创建学生对象
      const stu = {id: 5, name: 'curry', age:34}
      this.$store.commit('addStudent', stu)
    },
  }
}
</script>
<style>
</style>
执行结果
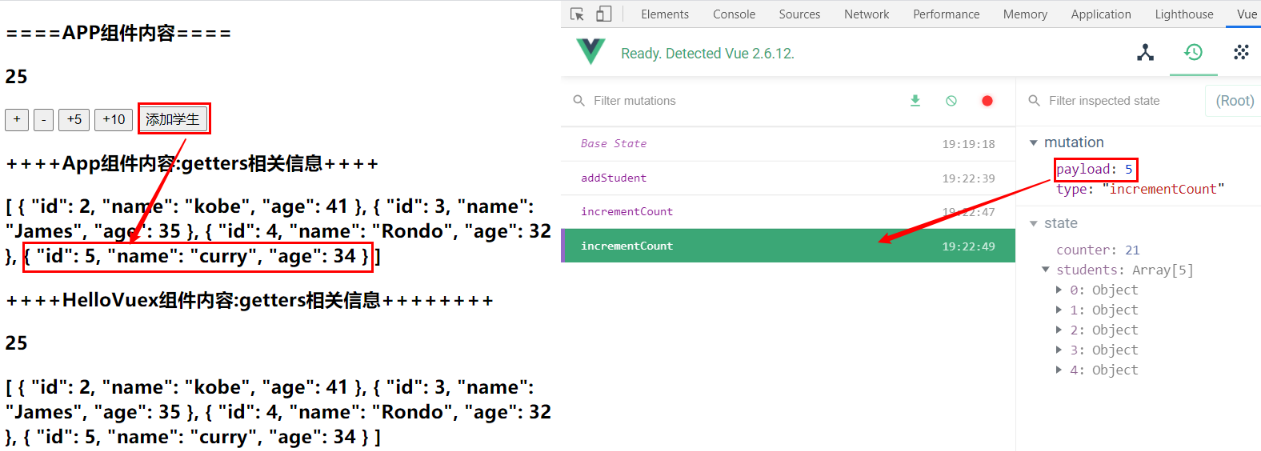
1.4.3 Mutation提交风格
Vue还提供了另外一种风格, 它是一个包含type属性的对象。
index.js
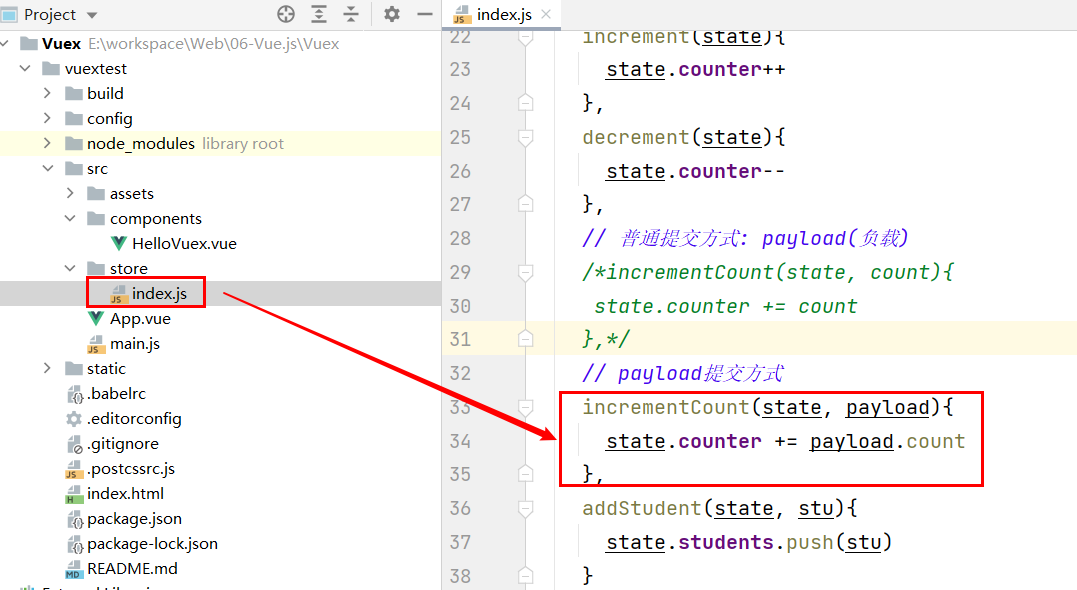
App.vue
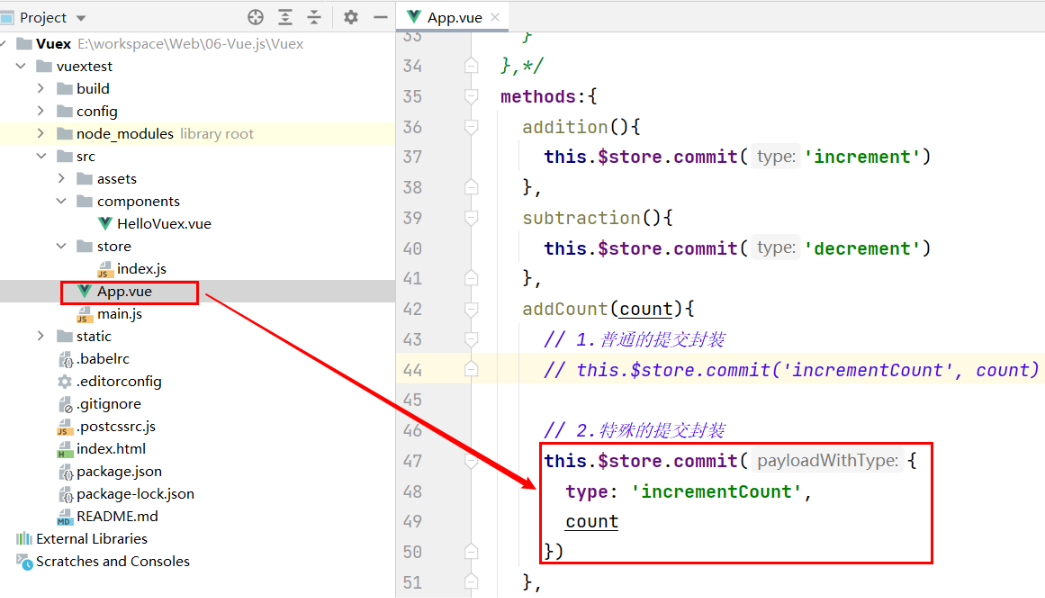
执行结果
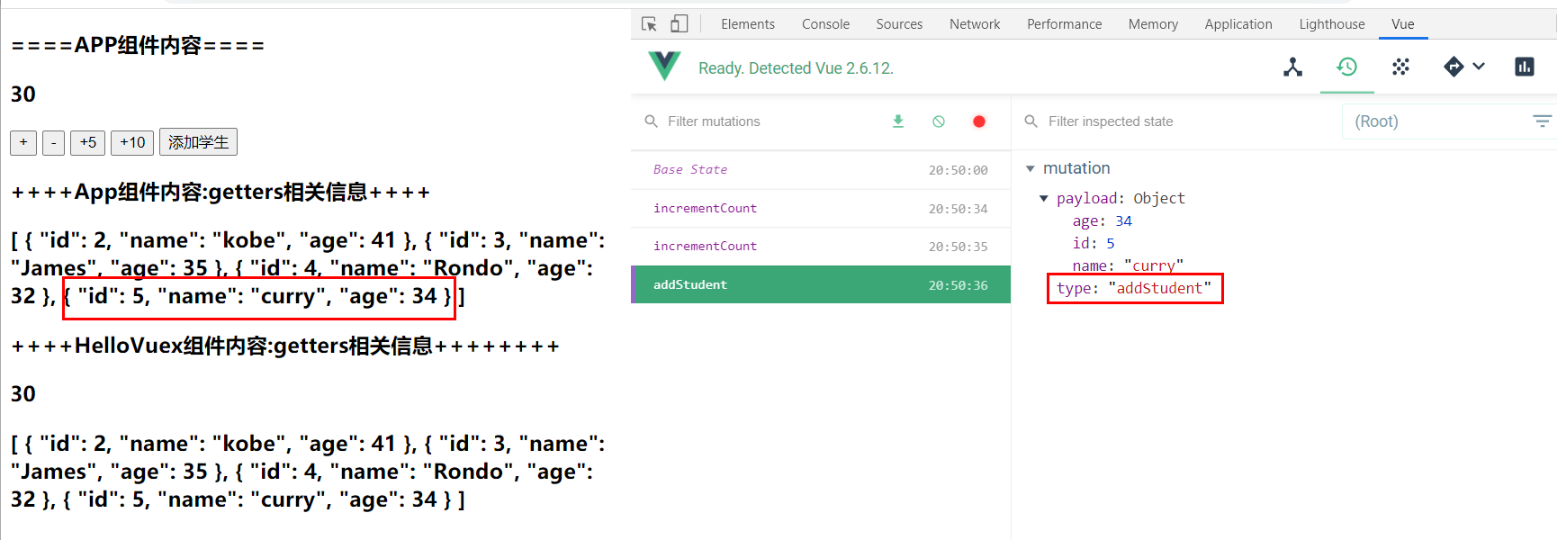
Mutation响应规则
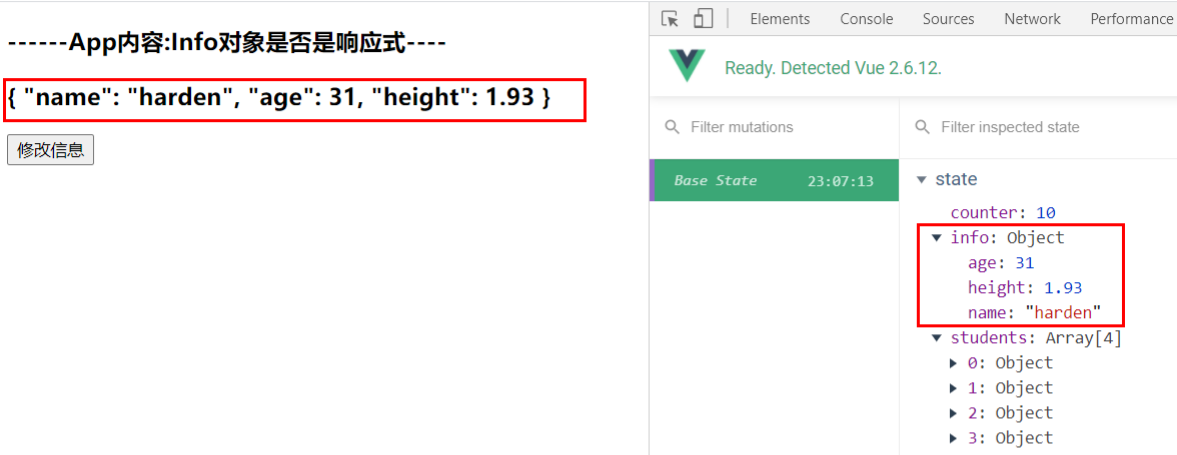
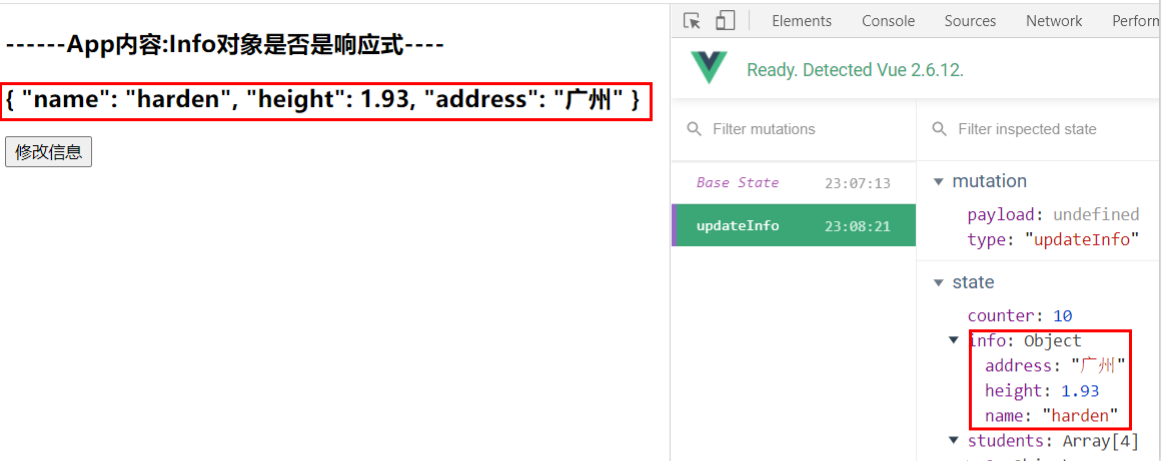
Vuex的store中的state是响应式的, 当state中的数据发生改变时, Vue组件会自动更新。
这就要求必须遵守一些Vuex对应的规则,提前在store中初始化好所需的属性。
index.js
这些属性都会被加入到响应式系统中,而响应式系统会监听属性的变化,当属性发生变化时,会通知所有界面中的用到该属性的地方,让界面发生刷新。
// 导入vue
import Vue from 'vue'
import Vuex from 'vuex'

// 安装插件
Vue.use(Vuex)

// 创建对象
const store = new Vuex.Store({
  // 放置状态相关的信息
  state:{
    info:{
      name: 'harden',
      age: 31,
      height: 1.93
    }
  },
  // 方法
  mutations:{
    updateInfo(state){
      // state.info.name = 'guardwhy'
      /*
      * 这方式是无法做到响应式的
      * state.info['address'] = '广州'
      * delete state.info.age
      */
      Vue.set(state.info, 'address', '广州')
      // 删除age
      Vue.delete(state.info, 'age')
    }
  }
})

// 导出store
export default store
App.vue
<template>
  <div id="app">
    <h3>------App内容:Info对象是否是响应式----</h3>
    <h3>{{$store.state.info}}</h3>
    <button @click="updateInfo">修改信息</button>
  </div>
</template>

<script>
import HelloVuex from "./components/HelloVuex";
    export default {
      name: 'App',
      // 注册组件
      components:{
        HelloVuex
      },
      methods:{
        updateInfo(){
          this.$store.commit('updateInfo')
        }
      }
    }
</script>
<style>
</style>
修改信息前
修改信息响应后
1.4.4 Action的基本使用
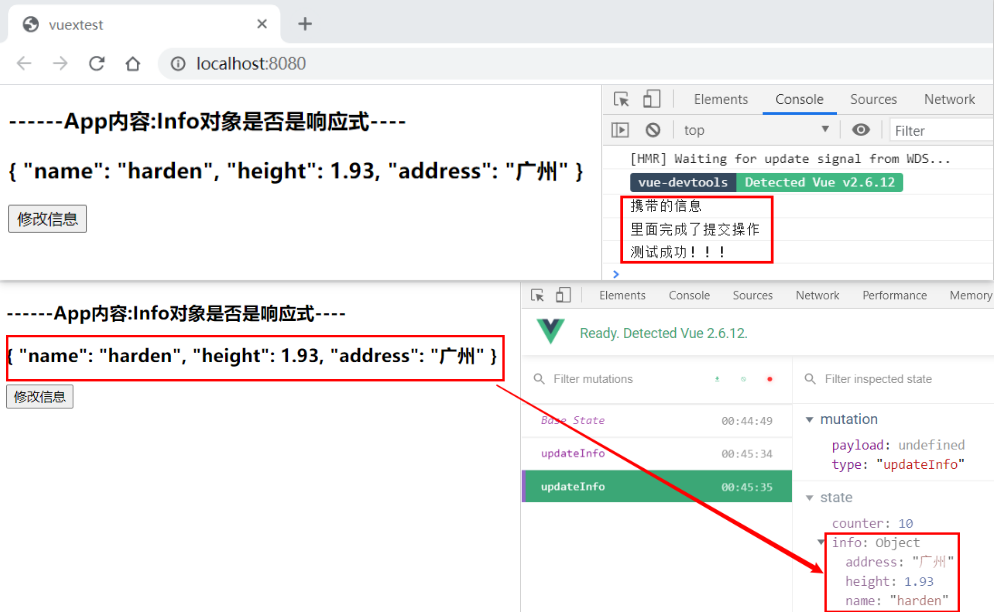
不要再Mutation中进行异步操作,Action类似于Mutation, 但是是用来代替Mutation进行异步操作的。
context是什么?
context是和store对象具有相同方法和属性的对象。
也就是说, 可以通过context去进行commit相关的操作, 也可以获取context.state等。
index.js
// 导入vue
import Vue from 'vue'
import Vuex from 'vuex'

// 安装插件
Vue.use(Vuex)

// 创建对象
const store = new Vuex.Store({
  // 放置状态相关的信息
  state:{
    info:{
      name: 'harden',
      age: 31,
      height: 1.93
    }
  },
  // 方法
  mutations:{
    updateInfo(state){
      Vue.set(state.info, 'address', '广州')
      // 删除age
      Vue.delete(state.info, 'age')
    }
  },
  getters:{
    arrayStu(state){
      // 返回结果
      return state.students.filter(s =>s.age > 20)
    }
  },
  actions:{
    // 方式1
    /*
    aUpdateInfo(context, payload){
      setTimeout(()=>{
        context.commit('updateInfo')
        console.log(payload.message);
        payload.success()
      },1000)
    }
    */

    // 方式二
    aUpdateInfo(context, payload){
      return new Promise((resolve, reject) =>{
        setTimeout(()=>{
          context.commit('updateInfo');
          // 打印结果
          console.log(payload)
          resolve('测试成功!!!')
        },1000)
      })
    }
  }
})

// 导出store
export default store
App.vue
<template>
  <div id="app">
    <h3>------App内容:Info对象是否是响应式----</h3>
    <h3>{{$store.state.info}}</h3>
    <button @click="updateInfo">修改信息</button>
  </div>
</template>

<script>
import HelloVuex from "./components/HelloVuex";
export default {
  name: 'App',
  // 注册组件
  components:{
    HelloVuex
  },
  methods:{
    updateInfo(){
      // this.$store.commit('updateInfo')

      // 方式1:异步操作
      /*
      this.$store.commit('updateInfo')
      this.$store.dispatch('aUpdateInfo',{
        message: '携带的信息!!',
        success:() =>{
          console.log('里面已经完成了');
        }
      })
      */
      // 方式二: 异步操作
      this.$store
          .dispatch('aUpdateInfo', '携带的信息')
          .then(res =>{
            console.log('里面完成了提交操作')
            console.log(res)
          })
    }
  }
}
</script>

<style>
</style>
执行结果
1.4.5 认识Module
为什么在Vuex中我们要使用模块呢?
- Vue使用单一状态树,那么也意味着很多状态都会交给Vuex来管理。
- 当应用变得非常复杂时,store对象就有可能变得相当臃肿。
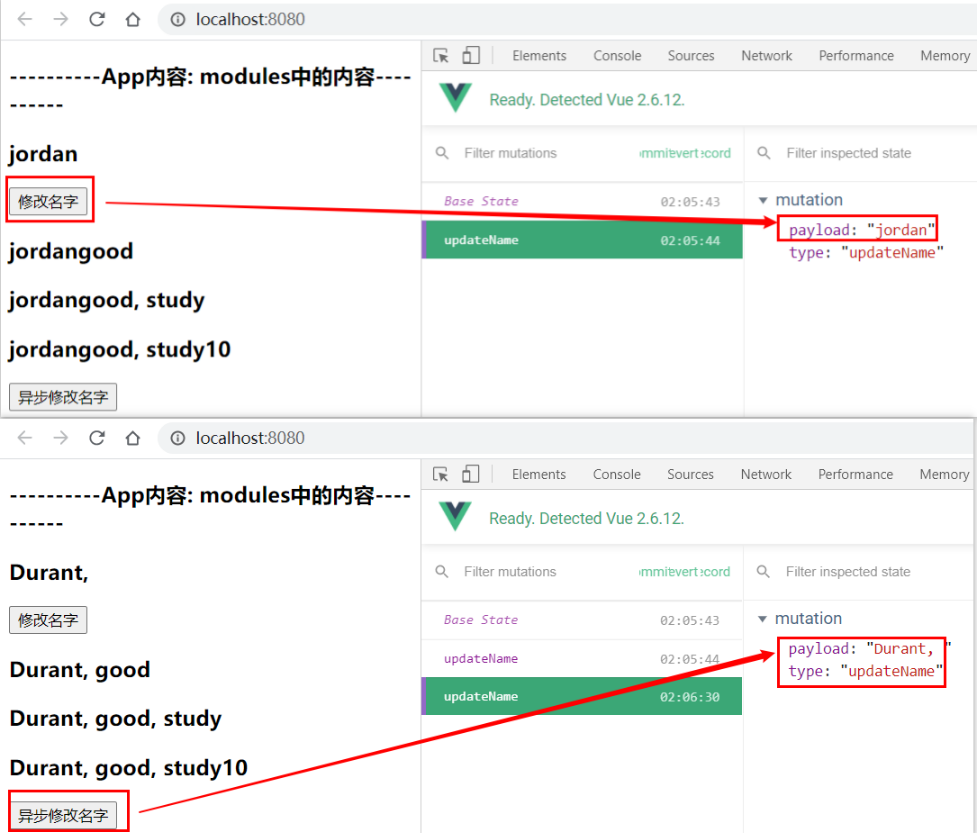
- 为了解决这个问题, Vuex允许我们将store分割成模块(Module), 而每个模块拥有自己的states、mutations、actions、getters等。
代码示例
index.js
// 导入vue
import Vue from 'vue'
import Vuex from 'vuex'

// 安装插件
Vue.use(Vuex)

// 创建module对象
const moduleA = {
  state: {
    name: 'Duncan'
  },
  mutations: {
    updateName(state, payload){
      state.name = payload
    }
  },
  getters: {
    onename(state) {
      return state.name + 'good'
    },
    secondname(state, getters) {
      return getters.onename + ', study'
    },
    threename(state, getters, rootState) {
      return getters.secondname + rootState.counter
    }
  },
  actions: {
    aUpdateName(context){
      // 打印上下文
      console.log(context);
      setTimeout(() => {
        context.commit('updateName', 'Durant')
      }, 1000)
    }
  }
}

// 创建对象
const store = new Vuex.Store({
  // 放置状态相关的信息
  state:{
    counter:10
  },
  modules: {
    a: moduleA
  }
})

// 导出store
export default store
App.vue
<template>
  <div id="app">
    <h3>----------App内容: modules中的内容----------</h3>
    <h3>{{$store.state.a.name}}</h3>
    <button @click="updateName">修改名字</button>
    <h3>{{$store.getters.onename}}</h3>
    <h3>{{$store.getters.secondname}}</h3>
    <h3>{{$store.getters.threename}}</h3>
    <button @click="asyncUpdateName">异步修改名字</button>
  </div>
</template>

<script>
import HelloVuex from "./components/HelloVuex";
export default {
  name: 'App',
  // 注册组件
  components:{
    HelloVuex
  },
  methods:{
    updateName(){
      this.$store.commit('updateName', 'jordan')
    },
    asyncUpdateName(){
      this.$store.dispatch('aUpdateName')
    }
  }
}
</script>
<style>
</style>
执行结果


 浙公网安备 33010602011771号