nginx+keepalived高可用实战
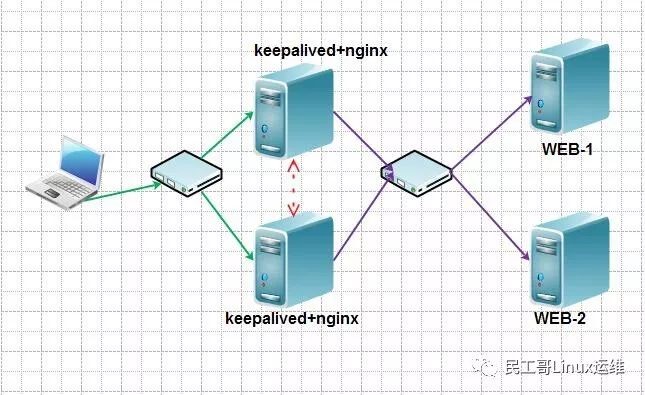
 1、整体架构图如下
2、环境准备
今天所配置的是keepalived+nginx 的负载均衡
下载keepalived软件
[root@LB01 tools]# wget http://www.keepalived.org/software/keepalived-1.1.17.tar.gz
注意安装前检查内核的link文件
root@LB02 tools]# ll /usr/src/
total 8
drwxr-xr-x. 2 root root 4096 Sep 23 2011 debug
drwxr-xr-x. 3 root root 4096 Oct 19 02:03 kernels
lrwxrwxrwx. 1 root root 43 Oct 19 02:05 linux -> /usr/src/kernels/2.6.32-642.6.1.el6.x86_64/
安装keepalived之前,安装几个依赖包
yum install openssl-devel -y
yum install popt* -y
然后进行编译安装keepalived,前面介绍了安装过程,这里就不演示了
./configure得出下面的结果
Keepalived configuration
------------------------
Keepalived version : 1.1.17
Compiler : gcc
Compiler : -g -O2
Extra Lib : -lpopt -lssl -lcrypto
Use IPVS Framework : Yes
IPVS sync daemon support : Yes
Use VRRP Framework : Yes
Use LinkWatch : No
Use Debug flags : No
注意./configure之后的结果,没有错误就可以了
make && make install
之后规范配置、启动文件路径
/bin/cp /usr/local/etc/rc.d/init.d/keepalived /etc/init.d/
/bin/cp /usr/local/etc/sysconfig/keepalived /etc/sysconfig/
mkdir /etc/keepalived -p
/bin/cp /usr/local/etc/keepalived/keepalived.conf /etc/keepalived/
/bin/cp /usr/local/sbin/keepalived /usr/sbin/
/etc/init.d/keepalived start
注:nginx负载均衡相关配置请参考前面的文章
3、实战配置keepalived
[root@LB01 keepalived]# vi keepalived.conf
! Configuration File for keepalived
global_defs {
notification_email {
abc@qq.com
}
notification_email_from Alexandre.Cassen@firewall.loc
smtp_server 1.1.1.1
smtp_connect_timeout 30
router_id LVS_3
}
vrrp_instance VI_1 {
state MASTER
interface eth0
virtual_router_id 19
priority 150
advert_int 1
authentication {
auth_type PASS
auth_pass 1111
}
virtual_ipaddress {
192.168.1.254/24
}
}
[root@LB02 keepalived]# vi keepalived.conf
! Configuration File for keepalived
global_defs {
notification_email {
abc@qq.com
}
notification_email_from Alexandre.Cassen@firewall.loc
smtp_server 1.1.1.1
smtp_connect_timeout 30
router_id LVS_6
}
vrrp_instance VI_1 {
state BACKUP
interface eth0
virtual_router_id 19
priority 100
advert_int 1
authentication {
auth_type PASS
auth_pass 1111
}
virtual_ipaddress {
192.168.1.254/24
}
}
[root@LB01 keepalived]# /etc/init.d/keepalived start
Starting keepalived: [ OK ]
[root@LB02 keepalived]# /etc/init.d/keepalived start
Starting keepalived [ OK ]
[root@LB01 keepalived]# ip add|grep 192.168.1.254
inet 192.168.1.254/24 scope global secondary eth0
[root@LB02 keepalived]# ip add|grep 192.168.1.254
测试访问

表明可以正常切换
现在我们模拟keepalived主宕机,再测试
[root@LB01 conf]# /etc/init.d/keepalived stop
Stopping keepalived: [ OK ]
[root@LB02 ~]# ip add|grep 254
inet 192.168.1.254/24 scope global secondary eth0

4、反向代理服务故障自动切换
如果实际生产环境中当keeplived主的服务器nginx服务宕机,但是主又有VIP,这时就出现无法访问的现象,因此可以做如下的配置,使得这种情况可自已切换
vi check_nginx.sh
#!/bin/sh
white true
do
PNUM=`ps -ef|grep nginx|wc -l`
#这里也可使用nmap 192.168.1.3 -p 80|grep open|wc -l来判断个数
if [ $PNUM -lt 3 ];then
/etc/init.d/keepalived stop >/dec/null 2>&1
kill -9 keealived >/dec/null 2>&1
kill -9 keealived >/dec/null 2>&1
fi
sleep 5
done
sh check_nginx.sh &
启动个守护进程进行检查(或者加入定时任务定时执行检查),如果nginx服务出现故障,就立马停掉keepalived的服务,让它自动切换到备节点上去,这样就实现了自动切换的工作


