CSS3 ::before和::after伪元素的实际应用
实例
1.清除浮动
通常我们清除清除浮动的方式就是在浮动元素后面添加一个空的Div标签,然后在设置它的清除浮动要是,使用after伪元素,我们就不需要添加无意义的div标签在html中了,下面的例子就使用了伪元素清除浮动
<!DOCTYPE html>
<html>
<head>
    <meta charset="UTF-8">
  <style type="text/css">
      ul {
          margin: 200px;
          background: #ccc;
          padding: 10px;
          border: 1px solid #999;
          list-style:none;
      }
      ul::after {
          clear: both;
          content: '';
          display: block;
      }
      li {
          float: left;
          margin-left: 10px;
      }
      li::after {
          content: '/';
          margin-left: 10px;
      }
      li:last-child::after{
          content: none;
      }
  </style>
</head>
<body>
<ul>
    <li>篮球</li>
    <li>网球</li>
    <li>棒球</li>
</ul>
</body>

</html>
效果:

没有清除浮动:

2.常见消息框
注意,此时伪类content:' ',而非content:'',而且伪类4条边必须宽度相同,而且其他三条边为transparent才可以;对于-webkit-transform设置在之前的文章中已经讲过,可以通过设置定位元素left,top值为50%,translate(-50%,-50%) 来使任意宽高的元素居中。
<!DOCTYPE html>
<html>
<head>
    <meta charset="UTF-8">
  <style type="text/css">
      div{
          width:300px;
          background-color:rgba(0,0,0,0.7);
          color:#fff;
          font-family:'Microsoft YaHei';
          text-align:center;
          padding:5px;
          margin:100px auto;
          position:relative;
           }
      div::before{
          content:' ';
          width:0px;
          height:0px;
          position:absolute;
          left:-12px;
          top:50%;
          -webkit-transform:translate(0px,-50%);
          border:6px solid rgba(0,0,0,0.7);
          border-color:transparent rgba(0,0,0,0.7) transparent transparent
              }

  </style>
</head>
<body>
<div>你好吗我哼好</div>
</body>
</html>
效果:

3..阴影
通过设置before,after不同位置,不同旋转角度,可以实现现在网络很流行的阴影效果,同时要保证伪类的颜色及z-index。有了这种方法 我们就可以扩展出各种各样的阴影效果
<!DOCTYPE html>
<html>
<head>
    <meta charset="UTF-8">
    <title></title>
    <style type="text/css">
        body{background-color:#ebebeb}
        div.outer{width:400px;
            height:250px;
            padding:5px;
            margin:100px auto;
            position:relative;
        }
        div.child{
            position:absolute;
            top:0px;
            left:0px;
            right:0px;
            bottom:0px;
            background-color:#fff;
            color:#000;
            line-height:250px;
            font-family:'Microsoft YaHei';
            text-align:center;
            z-index:2
        }
        div.outer::before,div.outer::after{content:'';
            z-index:1;
            width:50%;
            height:3px;
            position:absolute;
            left:10px;
            bottom:7px;
            background-color:transparent;
            box-shadow:5px 5px 10px rgba(0,0,0,0.5);
            -webkit-transform:rotate(-3deg);

        }
        div.outer::after{
            left:auto;
            right:10px;
            -webkit-transform:rotate(3deg)
        }
    </style>

</head>
<body>
<div class='outer'>
    <div class='child '>
        我是内容我是内容我是内容
    </div>

</div>
</body>
</html>
效果:

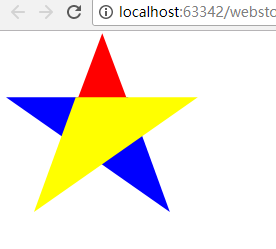
4.做出各种图形效果
<!DOCTYPE html>
<html lang="en">
<head>
    <meta charset="UTF-8">
    <title></title>
    <style type="text/css">
        #star-five {
            margin-top: 60px;
            width: 0;
            height: 0;
            border-left: 100px solid transparent;
            border-right: 100px solid transparent;
            border-bottom: 70px solid blue;
            position: relative;
            transform: rotate(35deg);
        }
        #star-five:before {
            border-bottom: 80px solid red;
            border-left: 30px solid transparent;
            border-right: 30px solid transparent;
            position: absolute;
            height: 0;
            width: 0;
            top: -45px;
            left: -65px;
            content: '';
            transform: rotate(-35deg);
        }
        #star-five:after {
            width: 0;
            height: 0;
            border-left: 100px solid transparent;
            border-right: 100px solid transparent;
            border-bottom: 70px solid yellow;
            top: 7px;
            left: -110px;
            position: absolute;
            display: block;
            content: '';
            transform: rotate(-70deg);
        }


    </style>

</head>
<body>
<div id='star-five'></div>
</body>
</html>
效果:

举例:一个六角星

<style>
#star-six {
  width: 0;
  height: 0;
  border-left: 50px solid transparent;
  border-right: 50px solid transparent;
  border-bottom: 100px solid red;
  position: relative;
}
#star-six::after {
  width: 0;
  height: 0;
  border-left: 50px solid transparent;
  border-right: 50px solid transparent;
  border-top: 100px solid red;
  position: absolute;
  content: "";
  top: 30px;
  left: -50px;
}
</style>
<body>
<div id="star-six"></div>
</body>
<style>
#star-six {
  width: 0;
  height: 0;
  border-left: 50px solid transparent;
  border-right: 50px solid transparent;
  border-bottom: 100px solid red;
  position: relative;
}
#star-six::after {
  width: 0;
  height: 0;
  border-left: 50px solid transparent;
  border-right: 50px solid transparent;
  border-top: 100px solid red;
  position: absolute;
  content: "";
  top: 30px;
  left: -50px;
}
</style>
<body>
<div id="star-six"></div>
</body>
#star-six的div是一个正三角行,#star-six::after是一个倒三角形,通过绝对定位,调整其位置即可实现六角星的效果。

5.content属性
::before和::after必须配合content属性来使用,content用来定义插入的内容,content必须有值,至少是空。默认情况下,伪类元素的display是默认值inline,可以通过设置display:block来改变其显示。
content可取以下值。
string
使用引号包一段字符串,将会向元素内容中添加字符串。如:a:after{content:""}
举例:
<!DOCTYPE html>
<meta charset="utf-8" />
<style type="text/css">
p::before{
    content: "《";
    color: red;
}
p::after{
    content: "》";
    color: red;
}
</style>
<p>平凡的世界</p>
效果:

attr()
通过attr()调用当前元素的属性,比如将图片alt提示文字或者链接的href地址显示出来。
<!DOCTYPE html>
<html lang="en">
<head>
    <meta charset="UTF-8">
    <title></title>
    <style type="text/css">
    a::after{
        content: "("attr(href)")";
    }


    </style>

</head>
<body>
<a href="http://www.baidu.com">百度</a>
</body>
</html>
效果:

rl()/uri()
用于引用媒体文件。
举例:“百度”前面给出一张图片,后面给出href属性。
<!DOCTYPE html>
<html lang="en">
<head>
    <meta charset="UTF-8">
    <title></title>
    <style type="text/css">
     a::before{
         content: url("https://www.baidu.com/img/baidu_jgylogo3.gif");
     }
    a::after{
        content: "("attr(href)")";
    }
    </style>

</head>
<body>
<a href="http://www.baidu.com">百度</a>
</body>
</html>
效果:

counter()
调用计数器,可以不使用列表元素实现序号功能。
配合counter-increment和counter-reset属性使用:
h2:before { counter-increment: chapter; content: "Chapter " counter(chapter) ". " }
<!DOCTYPE html>
<html lang="en">
<head>
    <meta charset="UTF-8">
    <title></title>
    <style type="text/css">
        body{
            counter-reset: section;
        }
        h1{
            counter-reset: subsection;
        }
        h1:before{
            counter-increment:section;
            content:counter(section) "、";
        }
        h2:before{
            counter-increment:subsection;
            content: counter(section) "." counter(subsection) "、";
        }
    </style>

</head>
<body>
<h1>HTML tutorials</h1>
<h2>HTML Tutorial</h2>
<h2>XHTML Tutorial</h2>
<h2>CSS Tutorial</h2>

<h1>Scripting tutorials</h1>
<h2>JavaScript</h2>
<h2>VBScript</h2>

<h1>XML tutorials</h1>
<h2>XML</h2>
<h2>XSL</h2>

</body>
</html>
效果:

6.给blockquote添加引号
经常用到给blockquote 引用段添加巨大的引号作为背景,可以用 ::before 来代替 background 。好处是即可以给背景留下空间,还可以直接使用文字而非图片:
<!DOCTYPE html>
<meta charset="utf-8" />
<style type="text/css">
    blockquote::before {
        content: open-quote;
        color: #ddd;
        z-index: -1;
        font-size:80px;
    }
</style>
<body>
<blockquote>引用一个段落,双引号用::before伪元素实现</blockquote>
</body>
</html>
效果:

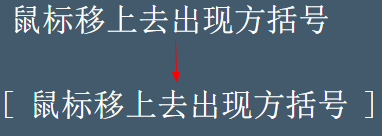
7、超链接特效
举例:配合 CSS定位实现一个鼠标移上去,超链接出现方括号的效果
<meta charset="utf-8" />
<style type="text/css">
body{
    background-color: #425a6c;
}
    a {
    position: relative;
    display: inline-block;
    outline: none;
    color: #fff;
    text-decoration: none;
    font-size: 32px;
    padding: 5px 20px;
}
a:hover::before, a:hover::after { position: absolute; }
a:hover::before { content: "\5B"; left: -10px; }
a:hover::after { content: "\5D"; right:  -10px; }
</style>
<a>鼠标移上去出现方括号</a>
效果:

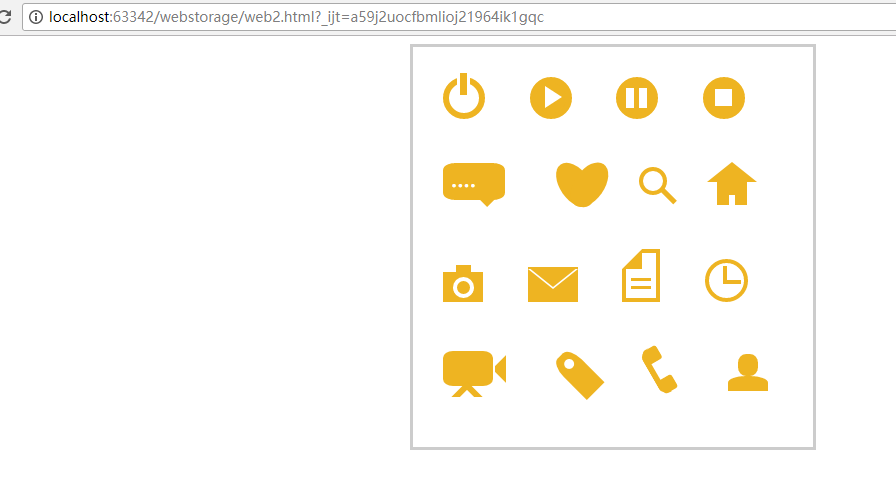
8.不使用图片创建小图标
<!doctype html>
<html>
<head>
    <title>伪类标签使用</title>
</head>
<style type="text/css">
    #wraper{padding:10px;width:380px;height:380px;border:3px solid #ccc;margin:auto;}
    #power{width: 30px;height: 30px;margin:20px;border: 6px solid #EEB422;border-radius: 50%;position: relative;display: inline-block;}
    #power:before{width:7px;height:22px;background:#EEB422;position: absolute;left:8px;top:-13px;content: "";border: 3px solid #fff;}
    #play{width: 30px;height: 30px;margin:20px;border: 6px solid #EEB422;border-radius: 50%;position:relative;display: inline-block;background: #EEB422;}
    #play:before{border:11px solid transparent;border-left:17px solid #fff;content: "";position: absolute;left:9px;top: 3px;}
    #pause{width: 30px;height: 30px;margin:20px;border: 6px solid #EEB422;border-radius: 50%;position:relative;display: inline-block;background: #EEB422;}
    #pause:before{height:20px;width:5px;border:0px solid transparent;border-left:8px solid #fff;border-right:8px solid #fff;content: "";position: absolute;left:4px;top: 5px;}
    #stop{width: 30px;height: 30px;margin:20px;border: 6px solid #EEB422;border-radius: 50%;position:relative;display: inline-block;background: #EEB422;}
    #stop:before{height:17px;width:17px;background:#fff;content: "";position: absolute;left:6px;top: 6px;}
    #comment{width: 50px;height: 25px;margin:20px;border: 6px solid #EEB422;border-radius: 20%;position:relative;display: inline-block;background: #EEB422;}
    #comment:before{border:10px solid transparent;border-top:10px solid #EEB422;content: "";position: absolute;left:28px;top: 28px;}
    #comment:after{content: "....";position: absolute;color: #fff;font-size: 26px;top: -10px;left: 2px;}
    #like{width: 50px;height: 30px;margin:20px;border-radius: 55%;transform:rotate(55deg);-webkit-transform:rotate(55deg);position:relative;display: inline-block;background: #EEB422;}
    #like:before{width:50px;height:30px;border-radius: 55%;transform:rotate(-110deg);-webkit-transform:rotate(-110deg);background:#EEB422;content: "";position: absolute;left:8px;top: -12px;}
    #search{width: 20px;height: 20px;border:4px solid #EEB422;border-radius:50%;margin:20px;position:relative;display: inline-block;top: -5px;left: -5px;}
    #search:before{width:20px;height:5px;background:#EEB422;transform:rotate(45deg);-webkit-transform:rotate(45deg);content: "";position: absolute;left:15px;top: 22px;}
    #home{width: 30px;height: 30px;background:#EEB422;margin:20px;position:relative;display: inline-block;top: 5px;}
    #home:before{width:6px;height:12px;background:#fff;content: "";position: absolute;left:12px;top: 20px;}
    #home:after{border:25px solid transparent;border-bottom:20px solid #EEB422;content: "";position: absolute;top: -38px;left:-10px;}
    #photo{width:40px;height:30px;background:#EEB422;margin:20px;position:relative;display: inline-block;top: 5px;}
    #photo:before{width:13px;height:13px;border:4px solid #fff;border-radius:50%;background:#EEB422;content: "";position: absolute;left:10px;top: 5px;}
    #photo:after{width:15px;height:10px;background:#EEB422;content: "";position: absolute;top: -7px;left:13px;}
    #photo{width:40px;height:30px;background:#EEB422;margin:20px;position:relative;display: inline-block;top: 5px;}
    #email{width:50px;height:35px;background:#EEB422;margin:20px;position:relative;display: inline-block;top: 5px;}
    #email:before{border:25px solid transparent;border-top:20px solid #fff;content: "";position: absolute;left:0px;top: 2px;}
    #email:after{border:25px solid transparent;border-top:20px solid #EEB422;content: "";position: absolute;top:0px;}
    #file{width:30px;height:45px;border:4px solid #EEB422;margin:20px;position:relative;display: inline-block;top: 5px;}
    #file:before{border:10px solid #fff;border-right:10px solid #EEB422;border-bottom:10px solid #EEB422;content: "";position: absolute;left:-4px;top: -4px;}
    #file:after{width:20px;height:5px;border-top:3px solid #EEB422;border-bottom:3px solid #EEB422;content: "";position: absolute;left: 5px;top: 25px;}
    #history{width:35px;height:35px;border:4px solid #EEB422;border-radius: 50%;margin:20px;position:relative;display: inline-block;top: 5px;}
    #history:before{width:14px;height:14px;border-bottom:4px solid #EEB422;border-left:4px solid #EEB422;content: "";position: absolute;left:14px;top: 3px;}
    #video{width:50px;height:35px;background:#EEB422;border-radius: 20%;margin:20px;position:relative;display: inline-block;top: -5px;}
    #video:before{width:6px;height:6px;border:11px solid transparent;border-right:11px solid #EEB422;content: "";position: absolute;left:35px;top: 4px;}
    #video:after{width:10px;height:10px;border:6px solid transparent;border-top:6px solid #EEB422;border-left:6px solid #EEB422;transform:rotate(45deg);-webkit-transform:rotate(45deg);content: "";position: absolute;left:13px;top: 35px;}
    #tags{width:50px;height:25px;background:#EEB422;border-radius: 35% 0% 0% 35%;transform:rotate(45deg);-webkit-transform:rotate(45deg);margin:20px;margin-left:35px;position:relative;display: inline-block;top: -5px;}
    #tags:before{width:10px;height:10px;border-radius:50%;background:#fff;content: "";position: absolute;left:7px;top: 7px;}
    #phone{width:50px;height:50px;border-left:6px solid #EEB422;border-radius:20%;transform:rotate(-30deg);-webkit-transform:rotate(-30deg);margin:20px;margin-right:0px;position:relative;display: inline-block;top: -5px;}
    #phone:before{width:15px;height:15px;background:#EEB422;border-radius: 20%;content: "";position: absolute;left:-2px;top: 1px;}
    #phone:after{width:15px;height:15px;background:#EEB422;border-radius: 20%;content: "";position: absolute;left:-3px;top: 34px;}
    #profile{width: 40px;height:15px;background:#EEB422;border-radius: 45% 45% 0 0;margin:20px;position:relative;display: inline-block;top: 0px;}
    #profile:before{width: 20px;height:22px;background:#EEB422;border-radius:40%;content: "";position: absolute;left: 10px;top: -22px;}
</style>
<body>
    <div id="wraper">
        <div id="power"></div>
        <div id="play"></div>
        <div id="pause"></div>
        <div id="stop"></div>
        <div id="comment"></div>
        <div id="like"></div>
        <div id="search"></div>
        <div id="home"></div>
        <div id="photo"></div>
        <div id="email"></div>
        <div id="file"></div>
        <div id="history"></div>
        <div id="video"></div>
        <div id="tags"></div>
        <div id="phone"></div>
        <div id="profile"></div>
    </div>
</body>
</html>
效果:

9.模拟float:center的效果
float没有center这个取值,但是可以通过伪类来模拟实现。
这个效果实现很有意思,左右通过::before float各自留出一半图片的位置,再把图片绝对定位上去。
<!DOCTYPE html>
<html>
<head>
    <meta charset='UTF-8'>
    <title>Float Both</title>
    <style>
    * {
        margin: 0;
        padding: 0;
    }
    body {
        font: 14px/1.8 Georgia, serif;
    }
        #page-wrap { width: 60%; margin: 40px auto; position: relative; }
        #logo { position: absolute; top: 0; left: 50%; margin-left: -125px; }
        #l, #r { width: 49%; }
        #l { float: left; }
        #r { float: right; }
        #l:before, #r:before { content: ""; width: 125px; height: 250px; }
        #l:before { float: right; }
        #r:before { float: left; }
    </style>
</head>
<body>
    <div id="page-wrap">
        <img src="img/cat.jpg" id="logo">
        <div id="l">
            <p>
                Pellentesque habitant morbi tristique senectus et netus et malesuada fames ac turpis egestas. Vestibulum tortor quam, feugiat vitae, ultricies eget, tempor sit amet, ante. Donec eu libero sit amet quam egestas semper. Aenean ultricies mi vitae est. Mauris placerat eleifend leo. Quisque sit amet est et sapien ullamcorper pharetra. Vestibulum erat wisi, condimentum sed, commodo vitae, ornare sit amet, wisi. Aenean fermentum, elit eget tincidunt condimentum, eros ipsum rutrum orci, sagittis tempus lacus enim ac dui. Donec non enim in turpis pulvinar facilisis. Ut felis. Praesent dapibus, neque id cursus faucibus, tortor neque egestas augue, eu vulputate magna eros eu erat. Aliquam erat volutpat. Nam dui mi, tincidunt quis, accumsan porttitor, facilisis luctus, metus
            </p>
        </div>
        <div id="r">
            <p>
                Pellentesque habitant morbi tristique senectus et netus et malesuada fames ac turpis egestas. Vestibulum tortor quam, feugiat vitae, ultricies eget, tempor sit amet, ante. Donec eu libero sit amet quam egestas semper. Aenean ultricies mi vitae est. Mauris placerat eleifend leo. Quisque sit amet est et sapien ullamcorper pharetra. Vestibulum erat wisi, condimentum sed, commodo vitae, ornare sit amet, wisi. Aenean fermentum, elit eget tincidunt condimentum, eros ipsum rutrum orci, sagittis tempus lacus enim ac dui. Donec non enim in turpis pulvinar facilisis. Ut felis. Praesent dapibus, neque id cursus faucibus, tortor neque egestas augue, eu vulputate magna eros eu erat. Aliquam erat volutpat. Nam dui mi, tincidunt quis, accumsan porttitor, facilisis luctus, metus
            </p>
        </div>
    </div>
</body>
</html>
效果:


