C# WPF中使用SqLite-net数据库
在研究安卓手机与pc电脑使用数据线进行数据传输的过程中(为啥这么二,因为甲方人员不允许使用互联网,就算是内部的局域网wifi都不可以),涉及到了WPF操作安卓常用数据库SqlLite的操作,记录一下艰辛的历程。直接使用sqLite官方的dll进行二次开发,首先在官网中SqLite官网中下载sqlite-netFx20-setup-x86-2005-1.0.111.0.exe (我用的是这个,看你的环境具体选择),然后点击安装。
安装完成后,在你的WPF应用中添加对System.Data.SQLite.dll的引用,这个dll所在位置,就是在你安装的目录bin文件夹下,我的目录是在 D:\Program Files\System.Data.SQLite\2005\bin 下,然后再引用中找到这个应用,设置他的属性复制本地为true。导出手机端app的testDb.db文件,这个数据库中只有一个表,叫做usermodel,具体的字段如下图所示,在程序内新建一个实体,UserEntity对应这个表。

接下来我们开始创建这个db文件的连接,读取数据库中的内容。
            SQLiteConnection cn = null;
            List<UserEntity> userEntities = new List<UserEntity>();
            try
            {
                string path = strPCFilePath + "\\" + dbName;
                //创建一个sqllite连接
                cn = new SQLiteConnection("data source=" + path);
                if (cn.State != System.Data.ConnectionState.Open)
                {
                    cn.Open();
                    SQLiteCommand cmd = cn.CreateCommand();
                    cmd.CommandText = "select * from usermodel";

                    SQLiteDataReader reader = cmd.ExecuteReader();

                    while (reader.Read())
                    {
                        UserEntity entity = new UserEntity();
                        for (int i = 0; i < reader.FieldCount; i++)
                        {
                            switch (i)
                            {
                                case 0:
                                    entity.Id = int.Parse(reader[i].ToString());
                                    break;
                                case 1:
                                    entity.Email = reader[i] as string;
                                    break;
                                case 2:
                                    entity.Password = reader[i] as string;
                                    break;
                                case 3:
                                    entity.Username = reader[i] as string;
                                    break;

                            }
                        }
                        userEntities.Add(entity);
                    }
                    reader.Close();
                }

            }
            catch (Exception ex)
            {
                m_log.Error("MainWindow->analysisData()" + ex.Message);
            }
            finally
            {
                if (cn != null)
                    cn.Close();
            }
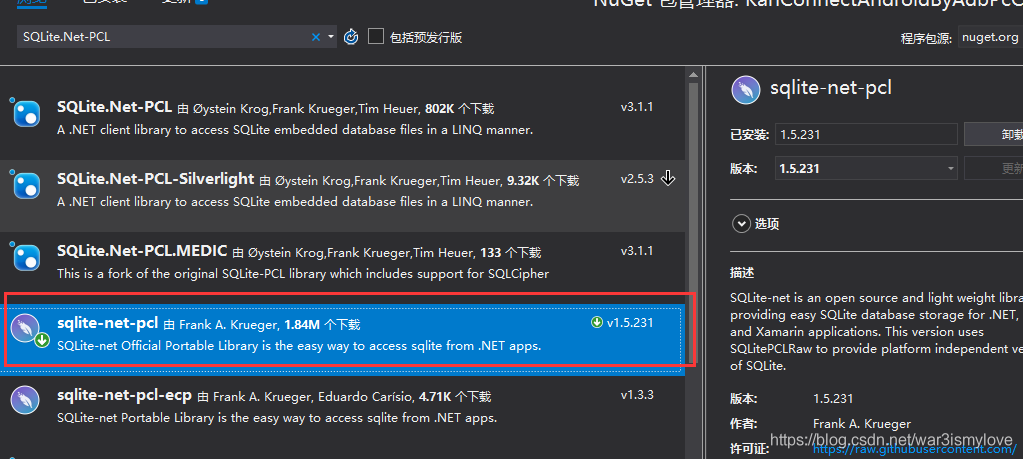
注:在链接数据库中出现了‘无法加载DLL‘SQLite.Interop.dll’’的错误,首先先将这个SQLite.Interop.dll拷贝到你的输出目录下,然后打开你WPF项目的属性,在Build页签下,去掉 首选32位 的勾选框。使用SQLite.Net-PCL ORM框架进行数据库操作,在你的NuGet查找SQLite.Net-PCL,选择sqlite-net-pcl然后安装,如下图所示
安装完成后,新建数据库实体,这里是UserModel,
    [Table("usermodel")]
    public class UserModel
    {
        [PrimaryKey, AutoIncrement]

        public int Id { get; set; }

        public string Email { get; set; }

        public string Password { get; set; }

        public string Username { get; set; }
    }
然后创建一个数据库连接,继承自SQLiteConnection类
    public class AndroidDb : SQLiteConnection
    {
        //定义属性,便于外部访问数据表
        public TableQuery<UserModel> Users { get { return this.Table<UserModel>(); } }

       //这个path就是db文件所在位置
        public AndroidDb(string dbPath) : base(dbPath)
        {
            //创建数据表
            CreateTable<UserModel>();
        }
    }
接下来使用就非常简单了,增删改的代码如下,都是直接操作对象
            string path = strPCFilePath + "\\" + dbName;//数据库所在路径
            //使用SQLite.Net-PCL访问数据库
            using (var db = new AndroidDb(path))
            {
                //db.Users.Intersect
                //db.Update
                //db.Users.Delete
                List<UserModel> users = db.Users.Where(m => true).ToList();

                string s = "";
            }


【推荐】国内首个AI IDE,深度理解中文开发场景,立即下载体验Trae
【推荐】编程新体验,更懂你的AI,立即体验豆包MarsCode编程助手
【推荐】抖音旗下AI助手豆包,你的智能百科全书,全免费不限次数
【推荐】轻量又高性能的 SSH 工具 IShell:AI 加持,快人一步
· 被坑几百块钱后,我竟然真的恢复了删除的微信聊天记录!
· 没有Manus邀请码?试试免邀请码的MGX或者开源的OpenManus吧
· 【自荐】一款简洁、开源的在线白板工具 Drawnix
· 园子的第一款AI主题卫衣上架——"HELLO! HOW CAN I ASSIST YOU TODAY
· Docker 太简单,K8s 太复杂?w7panel 让容器管理更轻松!