Django中的Swagger文档库--drf-spectacular
在用django开发后端接口的时候,通常会面临写接口文档的问题,尤其项目大了之后,写文档就更加头疼了,如果能够在写完代码后,自动生成接口文档,那该多好啊
所以,咱们这里要介绍一个比较厉害的库 drf-spectacular
这个库能够自动生成OpenApi 3.0 的接口文档,并给出目前比较流行的swagger UI的界面
这个库主要实现了3个目标
- 从DRF中提取更多的schema信息
- 提供灵活性,使schema在现实世界中可用(不仅仅是示例)
- 生成一个与最流行的客户端生成器配合良好的schema
官网
https://drf-spectacular.readthedocs.io/en/latest/
环境
| python版本 | django版本 | DRF版本 | drf-spectacular版本 |
|---|---|---|---|
| 3.10.4 | 3.2.23 | 3.14.0 | 0.27.1 |
安装
pip install drf-spectacular
Django项目中的配置
settings.py 文件中的配置
注册app
INSTALLED_APPS = [
    # ALL YOUR APPS
    'drf_spectacular',
]
将 AutoSchema 注册到 DRF 中
REST_FRAMEWORK = {
    # YOUR SETTINGS
    'DEFAULT_SCHEMA_CLASS': 'drf_spectacular.openapi.AutoSchema',
}
修改一些默认配置
SPECTACULAR_SETTINGS = {
    'TITLE': '平台的API',
    'DESCRIPTION': '这是项目的API文档',
    'VERSION': '3.0.0',
    'SERVE_INCLUDE_SCHEMA': False,
    'SCHEMA_PATH_PREFIX': None,
    # 或者如果有统一的前缀,可以设置成
    # 'SCHEMA_PATH_PREFIX': '^/api/',
    "SWAGGER_UI_SETTINGS": {
        "deepLinking": True,
        "persistAuthorization": True,
        "displayOperationId": True,
    },
    # 修改图标
    "SWAGGER_UI_FAVICON_HREF": "https://xxxxx/xxxx/xxx/20231102152526.png",
}
添加路由
在项目主目录的url中添加
from django.contrib import admin
from django.urls import path, include
from rest_framework_simplejwt.views import (
    TokenRefreshView,
)

urlpatterns = [
    # YOUR PATTERNS
    path('doc/schema/', SpectacularAPIView.as_view(), name='schema'), # schema的配置文件的路由,下面两个ui也是根据这个配置文件来生成的
    path('doc/swagger/', SpectacularSwaggerView.as_view(url_name='schema'), name='swagger-ui'), # swagger-ui的路由
    path('doc/redoc/', SpectacularRedocView.as_view(url_name='schema'), name='redoc'), # redoc的路由
]
测试
按照上面的配置,就已经可以正常获取接口文档页面了
第一个schema配置文件的文档
访问 http://127.0.0.1:8000/doc/schema/
可以得到下面的yaml配置文件
openapi: 3.0.3
info:
  title: Todo API
  version: 3.0.0
  description: 这是项目的API文档
paths:
  /todo/:
    get:
      operationId: todo_list
      parameters:
      - in: query
        name: done
        schema:
          type: boolean
      tags:
      - todo
      security:
      - cookieAuth: []
      - basicAuth: []
      - {}
      responses:
        '200':
          content:
            application/json:
              schema:
                type: array
                items:
                  $ref: '#/components/schemas/Todo'
          description: ''
    post:
      operationId: todo_create
      tags:
      - todo
      requestBody:
        content:
          application/json:
            schema:
              $ref: '#/components/schemas/Todo'
          application/x-www-form-urlencoded:
            schema:
              $ref: '#/components/schemas/Todo'
          multipart/form-data:
            schema:
              $ref: '#/components/schemas/Todo'
        required: true
      security:
      - cookieAuth: []
      - basicAuth: []
      - {}
      responses:
        '201':
          content:
            application/json:
              schema:
                $ref: '#/components/schemas/Todo'
          description: ''
  /todo/{id}/:
    get:
      operationId: todo_retrieve
      parameters:
      - in: path
        name: id
        schema:
          type: integer
        description: A unique integer value identifying this 待办项.
        required: true
      tags:
      - todo
      security:
      - cookieAuth: []
      - basicAuth: []
      - {}
      responses:
        '200':
          content:
            application/json:
              schema:
                $ref: '#/components/schemas/Todo'
          description: ''
    put:
      operationId: todo_update
      parameters:
      - in: path
        name: id
        schema:
          type: integer
        description: A unique integer value identifying this 待办项.
        required: true
      tags:
      - todo
      requestBody:
        content:
          application/json:
            schema:
              $ref: '#/components/schemas/Todo'
          application/x-www-form-urlencoded:
            schema:
              $ref: '#/components/schemas/Todo'
          multipart/form-data:
            schema:
              $ref: '#/components/schemas/Todo'
        required: true
      security:
      - cookieAuth: []
      - basicAuth: []
      - {}
      responses:
        '200':
          content:
            application/json:
              schema:
                $ref: '#/components/schemas/Todo'
          description: ''
    patch:
      operationId: todo_partial_update
      parameters:
      - in: path
        name: id
        schema:
          type: integer
        description: A unique integer value identifying this 待办项.
        required: true
      tags:
      - todo
      requestBody:
        content:
          application/json:
            schema:
              $ref: '#/components/schemas/PatchedTodo'
          application/x-www-form-urlencoded:
            schema:
              $ref: '#/components/schemas/PatchedTodo'
          multipart/form-data:
            schema:
              $ref: '#/components/schemas/PatchedTodo'
      security:
      - cookieAuth: []
      - basicAuth: []
      - {}
      responses:
        '200':
          content:
            application/json:
              schema:
                $ref: '#/components/schemas/Todo'
          description: ''
    delete:
      operationId: todo_destroy
      parameters:
      - in: path
        name: id
        schema:
          type: integer
        description: A unique integer value identifying this 待办项.
        required: true
      tags:
      - todo
      security:
      - cookieAuth: []
      - basicAuth: []
      - {}
      responses:
        '204':
          description: No response body
components:
  schemas:
    PatchedTodo:
      type: object
      properties:
        id:
          type: integer
          readOnly: true
        content:
          type: string
          title: 待办内容
          maxLength: 200
        done:
          type: boolean
          title: 是否完成
    Todo:
      type: object
      properties:
        id:
          type: integer
          readOnly: true
        content:
          type: string
          title: 待办内容
          maxLength: 200
        done:
          type: boolean
          title: 是否完成
      required:
      - content
      - id
  securitySchemes:
    basicAuth:
      type: http
      scheme: basic
    cookieAuth:
      type: apiKey
      in: cookie
      name: sessionid
访问第二个 swagger UI 的页面
访问 http://127.0.0.1:8000/doc/swagger/

里面的各个接口也都是可以在本页面进行测试的
访问第三个 redoc 的页面
访问 http://127.0.0.1:8000/doc/redoc/

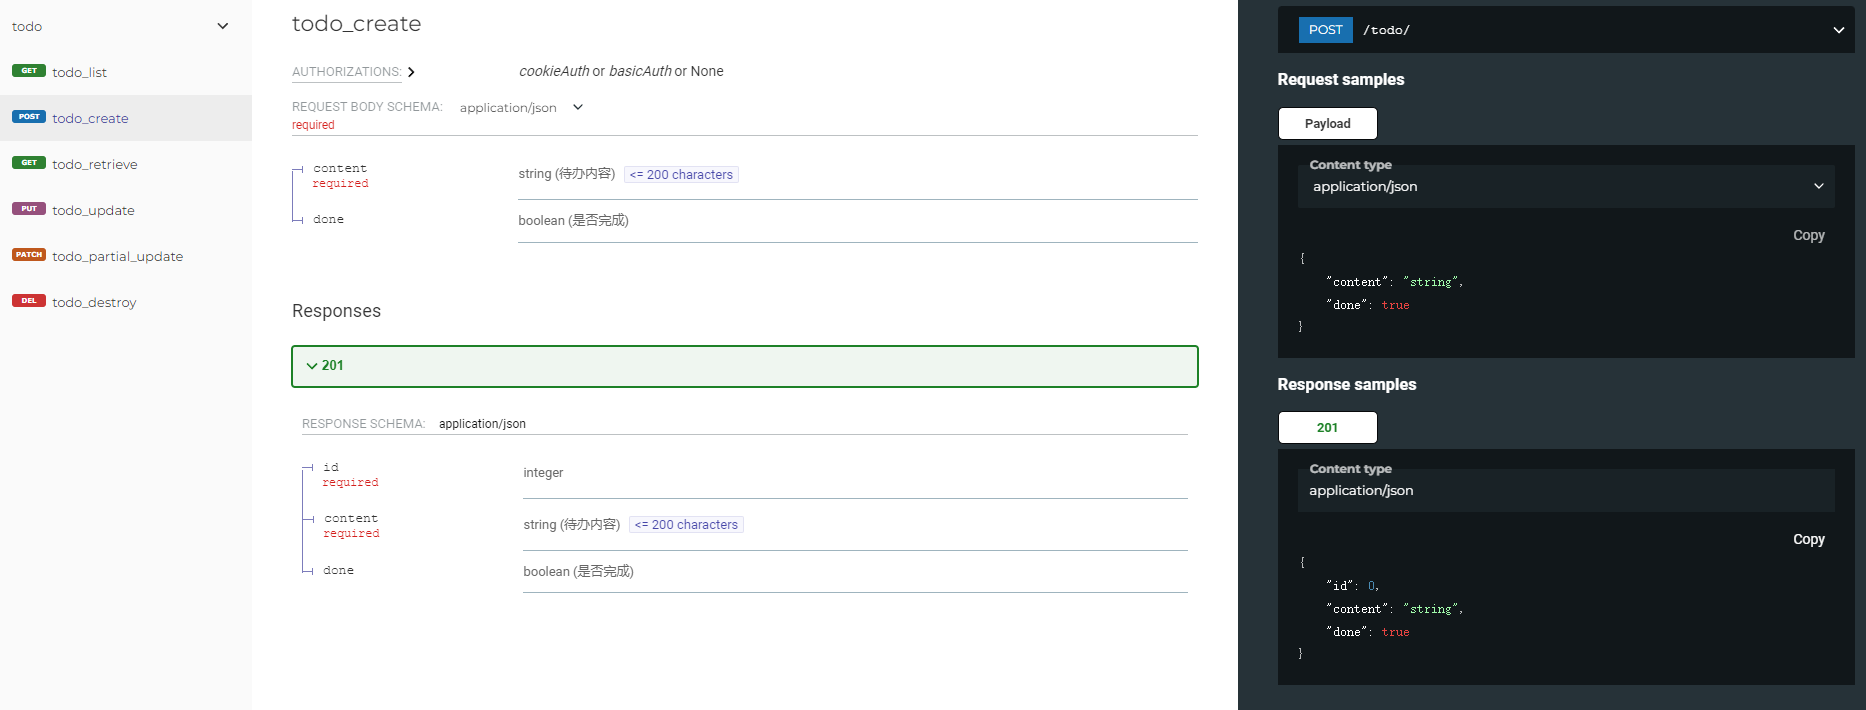
该页面相对于 swagger UI 的页面的缺陷可能是无法测试,只能查看,无法测试
自定义界面各项信息
修改备注
一般自动生成的页面是这样的
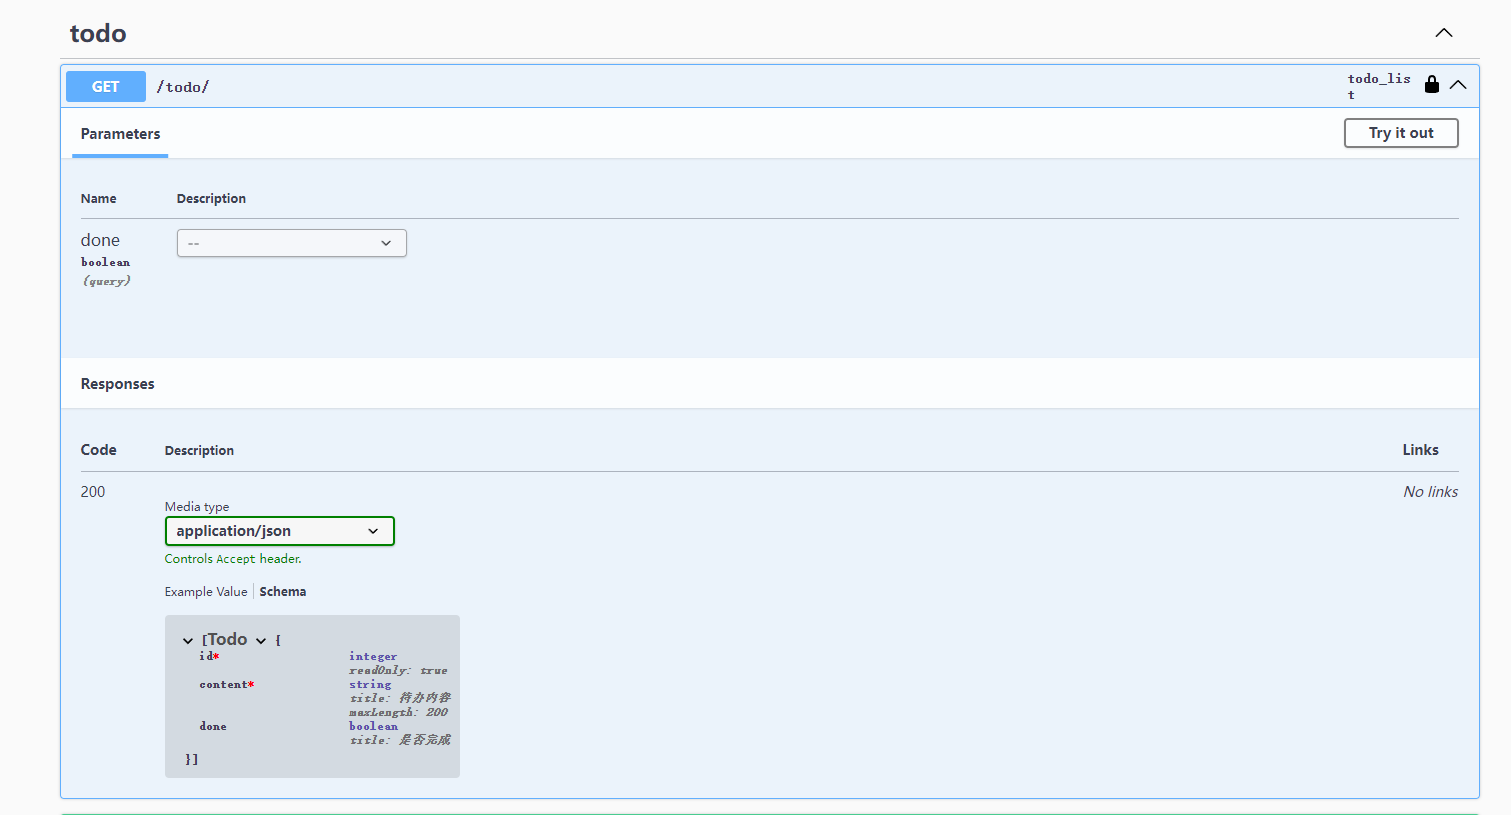
就没有任何的备注描述
当在序列化器上添加注释时
from rest_framework import serializers
from .models import Todo


class TodoSerializer(serializers.ModelSerializer):
    """序列化器中的注释"""
    class Meta:
        model = Todo
        fields = '__all__'
页面的变化

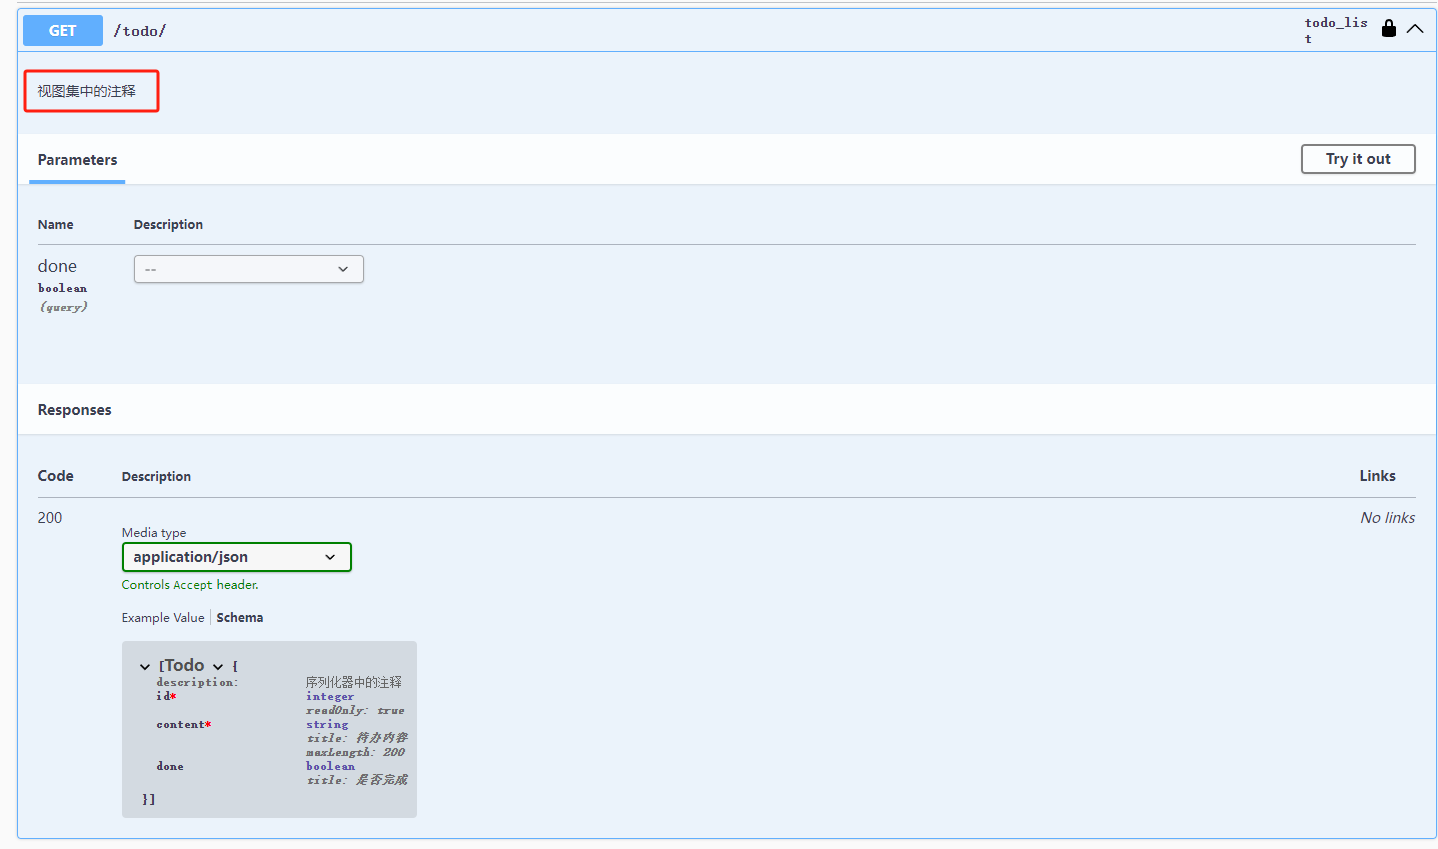
当在视图集上添加注释
from rest_framework.viewsets import ModelViewSet
from .models import Todo
from .serializers import TodoSerializer


class TodoViewSet(ModelViewSet):
    """视图集中的注释"""
    queryset = Todo.objects.all()
    serializer_class = TodoSerializer
页面的变化
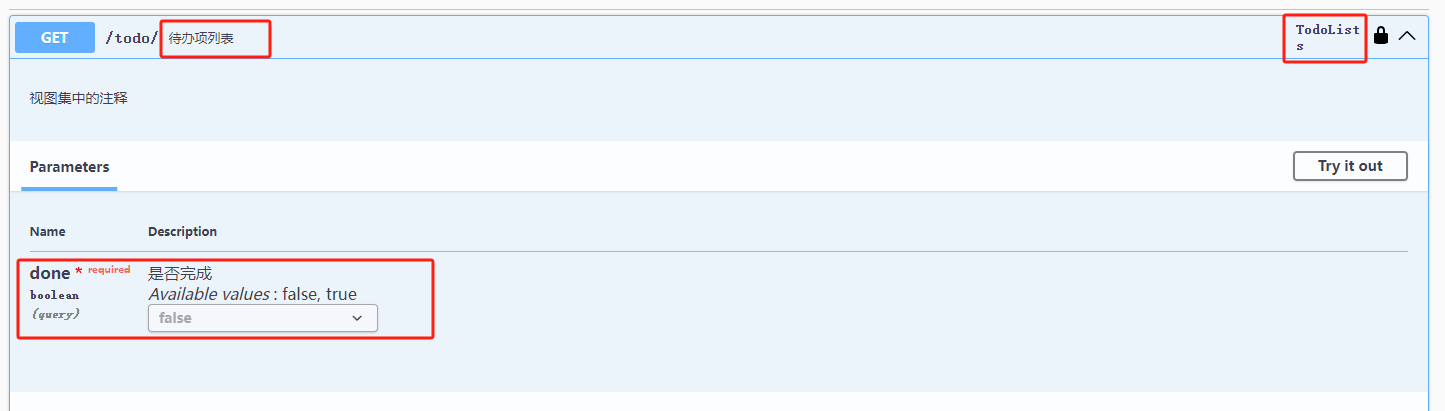
修改参数部分
当我们希望在接口页面能够详细的显示需要的参数信息的时候,就需要在对应的视图函数上做一定的修改
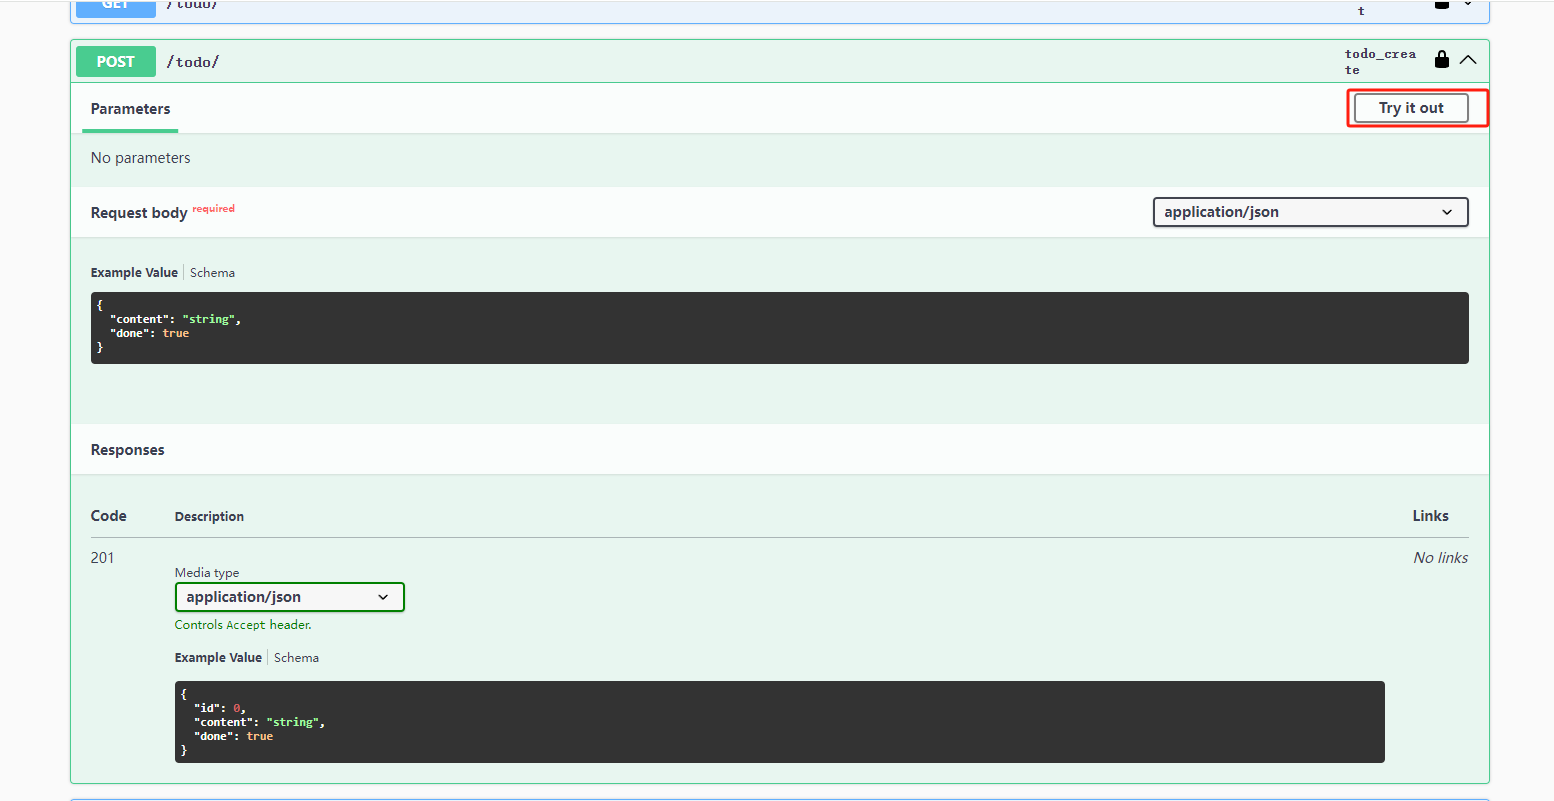
修改前

可以看到,右上角的接口名称是自动生成的,虽然也具有一定的辨识性,但是有的时候还是需要自定义
然后参数部分也没有任何注释信息
这个时候就需要用到一个装饰器 extend_schema
这个装饰器就可以修改接口上的信息
from rest_framework.viewsets import ModelViewSet
from .models import Todo
from .serializers import TodoSerializer
from django_filters.rest_framework import DjangoFilterBackend
from drf_spectacular.utils import extend_schema, OpenApiParameter
from drf_spectacular.types import OpenApiTypes


class TodoViewSet(ModelViewSet):
    """视图集中的注释"""
    queryset = Todo.objects.all()
    serializer_class = TodoSerializer

    filter_backends = [
        DjangoFilterBackend,
    ]
    filterset_fields = [
        "done"
    ]

    @extend_schema(
        operation_id = "TodoLists", # 设置右上角的名称,需要唯一性
        summary = "待办项列表",  # 接口上的备注
        # 执行序列化器
        responses = TodoSerializer(many = True),
        # 对参数的修改
        parameters = [
            # 这是其中一个参数
            OpenApiParameter(
                # 参数的名称是done
                name = "done",
                # 对参数的备注
                description = "是否完成",
                # 指定参数的类型
                type = OpenApiTypes.BOOL,
                # 指定必须给
                required = True,
                # 指定枚举项
                enum = [True, False],
            )
        ])
    # 因为原来是视图集中自动生成的视图函数,如果希望修改,就需要重写,这里直接甩给父类处理
    def list(self, request, *args, **kwargs):
        return super().list(request, *args, **kwargs)
修改后的页面
修改响应部分
当我们希望自定义响应部分的时候
修改前
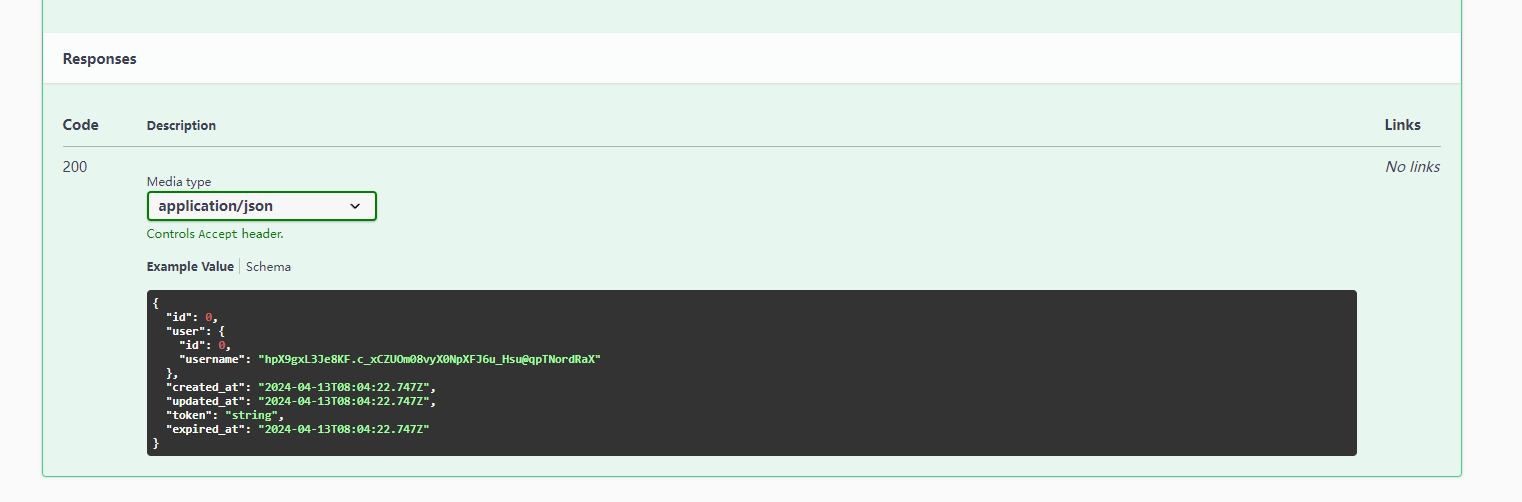
因为视图集的原因,会自动设置200的状态码以及根据视图集设置的序列化器设置的返回数据
当我们有的自定义接口,不需要这些东西的时候,可以做一定的设置
@extend_schema(
        operation_id='Logout',
        summary='用户登出',
        request=None,
        responses={
            204: None
        }
)
修改后

当然,这里的None也可以修改成字符串或者字典
修改标签部分
当我们希望能够自定义一个视图集的名称的时候,可以修改标签
修改前
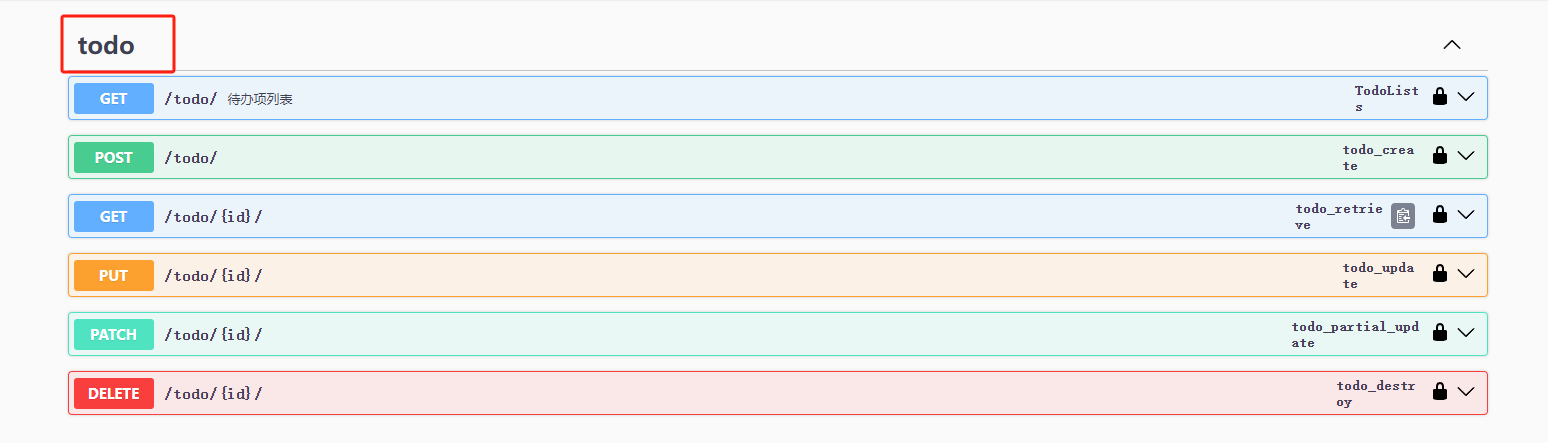
就是小写的模型名称
修改
from rest_framework.viewsets import ModelViewSet
from .models import Todo
from .serializers import TodoSerializer
from drf_spectacular.utils import extend_schema
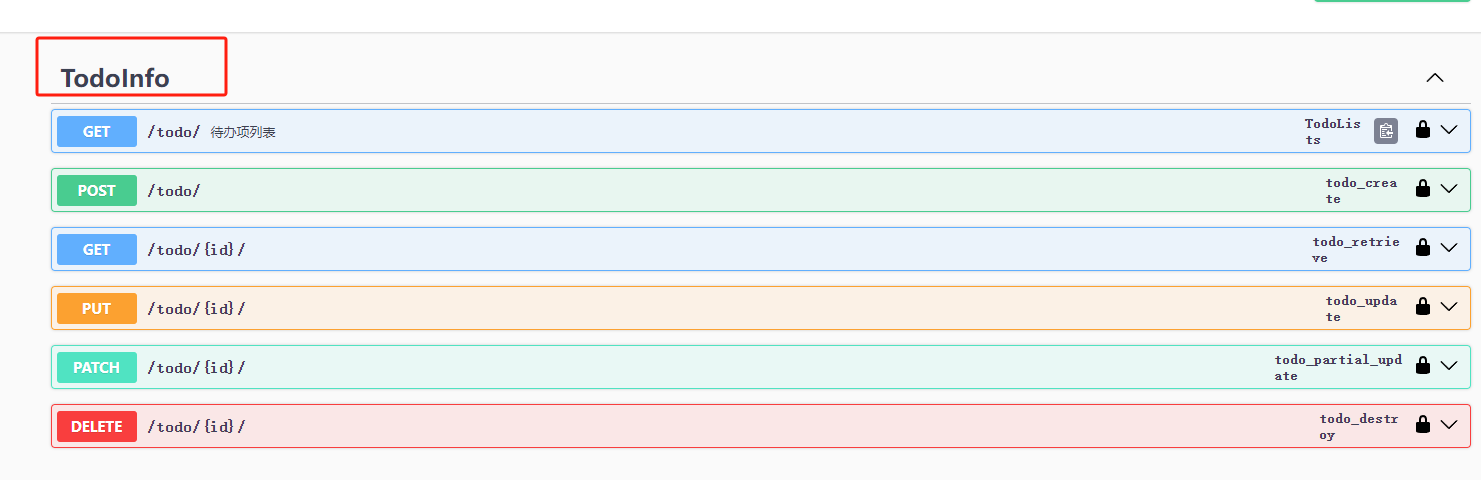
# 在这里添加一个标签
@extend_schema(tags = ["TodoInfo"])
class TodoViewSet(ModelViewSet):
"""视图集中的注释"""
queryset = Todo.objects.all()
serializer_class = TodoSerializer
修改后的效果
extend_schema 装饰器的介绍
源码函数签名
导入 from drf_spectacular.utils import extend_schema
def extend_schema(
        operation_id: Optional[str] = None,
        parameters: Optional[Sequence[Union[OpenApiParameter, _SerializerType]]] = None,
        request: Any = empty,
        responses: Any = empty,
        auth: Optional[Sequence[str]] = None,
        description: Optional[_StrOrPromise] = None,
        summary: Optional[_StrOrPromise] = None,
        deprecated: Optional[bool] = None,
        tags: Optional[Sequence[str]] = None,
        filters: Optional[bool] = None,
        exclude: Optional[bool] = None,
        operation: Optional[_SchemaType] = None,
        methods: Optional[Sequence[str]] = None,
        versions: Optional[Sequence[str]] = None,
        examples: Optional[Sequence[OpenApiExample]] = None,
        extensions: Optional[Dict[str, Any]] = None,
        callbacks: Optional[Sequence[OpenApiCallback]] = None,
        external_docs: Optional[Union[Dict[str, str], str]] = None,
) -> Callable[[F], F]:
参数解释
这个装饰器主要用于修改view在文档中的定义,参数意义如下:
-
operation_id:一个唯一标识ID,如果前端是使用这个接口文档生成的代码,那么这个参数将非常重要 -
parameters:添加到列表中的附加或替换参数去自动发现字段。 -
responses:修改序列化器。需要各种各样的可单独使用或组合使用的输入(有以下7种)- Serializer类 比如:
Serializer - 序列化实例,比如:
Serializer(many=True) - OpenApiTypes的基本类型或者实例 比如:
OpenApiTypes.BOOL - OpenApiResponse类 例子见下面的备注
- PolymorphicProxySerializer类
- 1个字典,以状态码作为键, 以上其中一项作为值(是最常用的,格式
{200, None}) - 1个字典,以状态码作为键,以media_type作为值 例子见下面的备注
- Serializer类 比如:
-
request:替换序列化,接受各种输入- Serializer 类或者实例
- OpenApiTypes基本类型或者实例
- PolymorphicProxySerializer类
- 1个字典,以media_type作为键,以上其中一项作为值
-
auth:用auth方法的显式列表替换发现的auth -
description:替换发现的文档字符串 -
summary:一个可选的短的总结描述 -
deprecated:将操作标记为已弃用 -
tags:覆盖默认标记列表 -
exclude:设置为True以从schema中排除操作 -
operation:手动覆盖自动发现将生成的内容。你必须提供一个兼容OpenAPI3的字典,该字典可以直接翻译成YAML。 -
methods:检查extend_schema中特殊的方法,默认匹配所有 -
versions:检查extend_schema中特殊的API版本,默认匹配所有 -
example:将请求/响应示例附加到操作中 -
extensions:规范扩展
备注:
OpenApiResponse类
OpenApiResponse 就是用来封装一个具体的 HTTP 响应预期,包括其状态码(status code)、响应体的内容类型(content type)以及响应体所遵循的 JSON Schema 或其他数据模型。
例如:from drf_spectacular.utils import extend_schema, OpenApiResponse error_response = OpenApiResponse( description="An error occurred", content={"application/json": {"schema": ErrorSchema}}, status_code=status.HTTP_400_BAD_REQUEST, ) @extend_schema(responses={200: ItemSchema(), **{status.HTTP_400_BAD_REQUEST: error_response}}) def my_view(request): ...上面的 “以状态码作为键,以media_type作为值” 的形式
{
   200: {"description": "成功", "content": {"application/json": {"schema": MySuccessResponseSchema}}},
   400: {"description": "错误请求", "content": {"application/json": {"schema": MyErrorResponseSchema}}},
})
其中的media_type 就是指的类似 "application/json"
例子
from drf_spectacular.utils import extend_schema

class LoginView(GenericAPIView):
    ......

    @extend_schema(
        tags=['Common'],
        summary='Login',
        description='登录接口',
        responses={200: str, 401: str}
    )
    def post(self, request: Request):
        pass


class RegisterView(GenericAPIView):
    ......

    @extend_schema(
        tags=['Common'],
        summary='Register',
        description='注册接口',
        responses={201: UserInfoSerializer, 400: str}
    )
    def post(self, request: Request):
        pass

class TodoViewSet(ModelViewSet):
    ......

    @extend_schema(
        operation_id = "TodoLists", # 设置右上角的名称,需要唯一性
        summary = "待办项列表",  # 接口上的备注
        # 执行序列化器
        responses = TodoSerializer(many = True),
        # 对参数的修改
        parameters = [
            # 这是其中一个参数
            OpenApiParameter(
                # 参数的名称是done
                name = "done",
                # 对参数的备注
                description = "是否完成",
                # 指定参数的类型
                type = OpenApiTypes.BOOL,
                # 指定必须给
                required = True,
                # 指定枚举项
                enum = [True, False],
            )
        ])
    def list(self, request, *args, **kwargs):
        pass
自定义认证方式
在项目中我们使用了JWT作为登录认证,而 drf-spectacular 只对 Session 、Basic 、Token 做了适配
rest_framework.authentication.SessionAuthentication
rest_framework.authentication.BasicAuthentication
rest_framework.authentication.TokenAuthentication
这个我们在 drf-spectacular/authentication.py 文件中可以看到,这个的作用就是在文档中显示什么样认证页面
默认页面
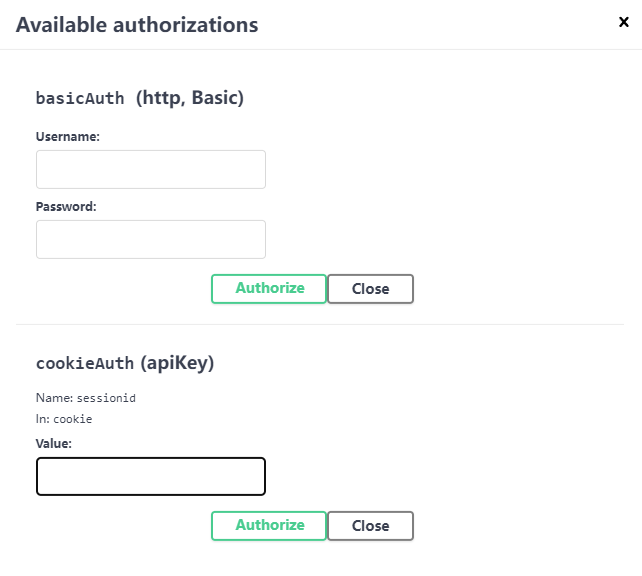
对于认证页面的显示,主要是根据 settings.py 配置中的
REST_FRAMEWORK = {
    'DEFAULT_AUTHENTICATION_CLASSES': [
        'rest_framework.authentication.BasicAuthentication',
        'utils.auth.authentication.JwtAuthentication'
    ],
    ......
}
如果 drf-spectacular 可以识别 DEFAULT_AUTHENTICATION_CLASSES 下的认证方式,就会在文档登录页面上显示对应的认证方式,这里我们有自定义的认证方式,如果需要显示,要做一下适配:
from drf_spectacular.extensions import OpenApiAuthenticationExtension
from drf_spectacular.plumbing import build_bearer_security_scheme_object


class JWTTokenScheme(OpenApiAuthenticationExtension):
    target_class = 'utils.auth.authentication.JwtAuthentication'
    name = 'JwtTokenAuth'
    match_subclasses = True
    priority = 1

    def get_security_definition(self, auto_schema):
        return build_bearer_security_scheme_object(
            header_name='Authorization',
            token_prefix=self.target.keyword,
            bearer_format='JWT'
        )
        # 或者直接写字典
        return {
            'type'        : 'http',
            'scheme'      : 'bearer',
            "bearerFormat": 'JWT'
        }
简单解释一下,首先一定要继承自 OpenApiAuthenticationExtension
然后target_class中要写我们在 DEFAULT_AUTHENTICATION_CLASSES 中配置的认证路径
就是上面settings.py中的配置
REST_FRAMEWORK = {
    'DEFAULT_AUTHENTICATION_CLASSES': [
        'rest_framework.authentication.BasicAuthentication',
        'utils.auth.authentication.JwtAuthentication'
    ],
    ......
}
要为哪个认证器添加到文档中,就写哪个路径,例如这里的 'utils.auth.authentication.JwtAuthentication'
然后重写 get_security_definition(self, auto_schema) 函数,返回一个字典对象,字典的键可以在 https://spec.openapis.org/oas/v3.0.3#fixed-fields-22 找到

get_security_definition(self, auto_schema)方法的返回值
- Basic Authentication Sample类型
{ "type": "http", "scheme": "basic" } - API Key Sample类型
{ "type": "apiKey", "name": "api_key", "in": "header" } - JWT Bearer Sample类型
{ "type": "http", "scheme": "bearer", "bearerFormat": "JWT", } - Implicit OAuth2 Sample类型
{
  "type": "oauth2",
  "flows": {
    "implicit": {
      "authorizationUrl": "https://example.com/api/oauth/dialog",
      "scopes": {
        "write:pets": "modify pets in your account",
        "read:pets": "read your pets"
      }
    }
  }
}
然后再看登录认证页面

因为我们在 DEFAULT_AUTHENTICATION_CLASSES 中配置了两种认证方式,因此页面就会显示两种认证方式
本文来自博客园,作者:厚礼蝎,转载请注明原文链接:https://www.cnblogs.com/guangdelw/p/18054429

 浙公网安备 33010602011771号