通过HAProxy的ACL规则实现智能负载均衡
由于HAProxy可以工作在七层模型下, 因此,要实现HAProxy的强大功能,一定要使用强大灵活的ACL规则,通过ACL规则可以实现基于HAProxy的智能负载均衡系统。
HAProxy通过ACL规则完成两种主要的功能,分别是:
-
通过设置的ACL规则检查客户端请求是否合法。
如果符合ACL规则要求,那么就将放行,反正,如果不符合规则,则直接中断请求。
-
符合ACL规则要求的请求将被提交到后端的backend服务器集群,进而实现基于ACL规则的负载均衡。
HAProxy中的ACL规则经常使用在frontend段中。
使用格式如下:
acl 自定义的acl名称 acl方法 -i [匹配的路径或文件]
其中:
-
acl:是一个关键字,表示定义ACL规则的开始。后面需要跟上自定义的ACL名称 。 -
acl方法:这个字段用来定义实现ACL的方法,HAProxy定义了很多ACL方法经常使用的方法有:
- hdr_reg(host) 通过正则表达式来匹配域名或者主机名
- hdr_dom(host) 不支持正则表达式的匹配域名或者主机名
- hdr_beg(host) 以主机名或域名开头的符合匹配
- url_sub 匹配请求的url中包含某些字符串
- url_dir 匹配请求的url中存在哪些字符串作为部分地址路径
- path_beg 匹配请求的路径开头
- path_end 匹配请求的路径结尾
- 等等
-
-i:表示忽略大小写,后面需要跟上匹配的路径或文件或正则表达式。
与ACL规则一起使用的HAProxy参数还有use_backend
use_backend后面需要跟上一个backend实例名,表示在满足ACL规则后去请求哪个backend实例,与use_backend对应的还有default_backend参数,它表示在没有满足ACL条件的时候默认使用哪个后端backend。
下面列举几个常见的ACL规则例子:
#规则名是www_policy   以'www.z.cn'开头或者以'z.cn'开头的域名请求就可以匹配上这条
acl www_policy		hdr_reg(host)	-i	^(www.z.cn|z.cn)
#规则名是bbs_policy   以'bbs.z.cn'结尾的域名请求就可以匹配上这条
acl bbs_policy		hdr_dom(host)	-i	bbs.z.cn
#规则名是url_policy   url中包含了'buy_sid='字符串就可以匹配上这条
acl url_policy		url_sub			-i	buy_sid=

#如果匹配上了,就转到对应的backend中
use_backend 		server_www 	if 	www_policy
use_backend 		server_app 	if 	url_policy
use_backend 		server_bbs 	if 	bbs_policy

#如果都没匹配到就转到server_cache这个backend中
default_backend 	server_cache
再看下面这个例子:
#规则名是url_static  请求路径中以".gif"、".png"、".jpg"、".css"、".js"结尾就可以匹配上这条
acl url_static  	path_end		-i		.gif .png .jpg .css .js
#规则名是host_www    以'www'开头的域名请求就可以匹配上这条
acl host_www    	hdr_beg(host)	-i		www
#规则名是host_static    以"img."、"video."、"download."、"ftp."开头的域名请求就可以匹配上这条
acl host_static 	hdr_beg(host)	-i 		img. video. download. ftp.

#当用户的请求同时满足host_static规则与url_static规则,或同时满足host_www和url_static规则时,那么会将用户请求直接发往名为static的后端backend
use_backend static		if host_static || host_www url_static
#如果满足host_www,就会将用户请求直接发往名为www的后端backend
use_backend www    	if host_www
#如果以上都不满足,就将请求发送到server_cache的后端backend
default_backend 		server_cache
if A || B C
先或,再与
可以解构为if (A与C)或(B与C)
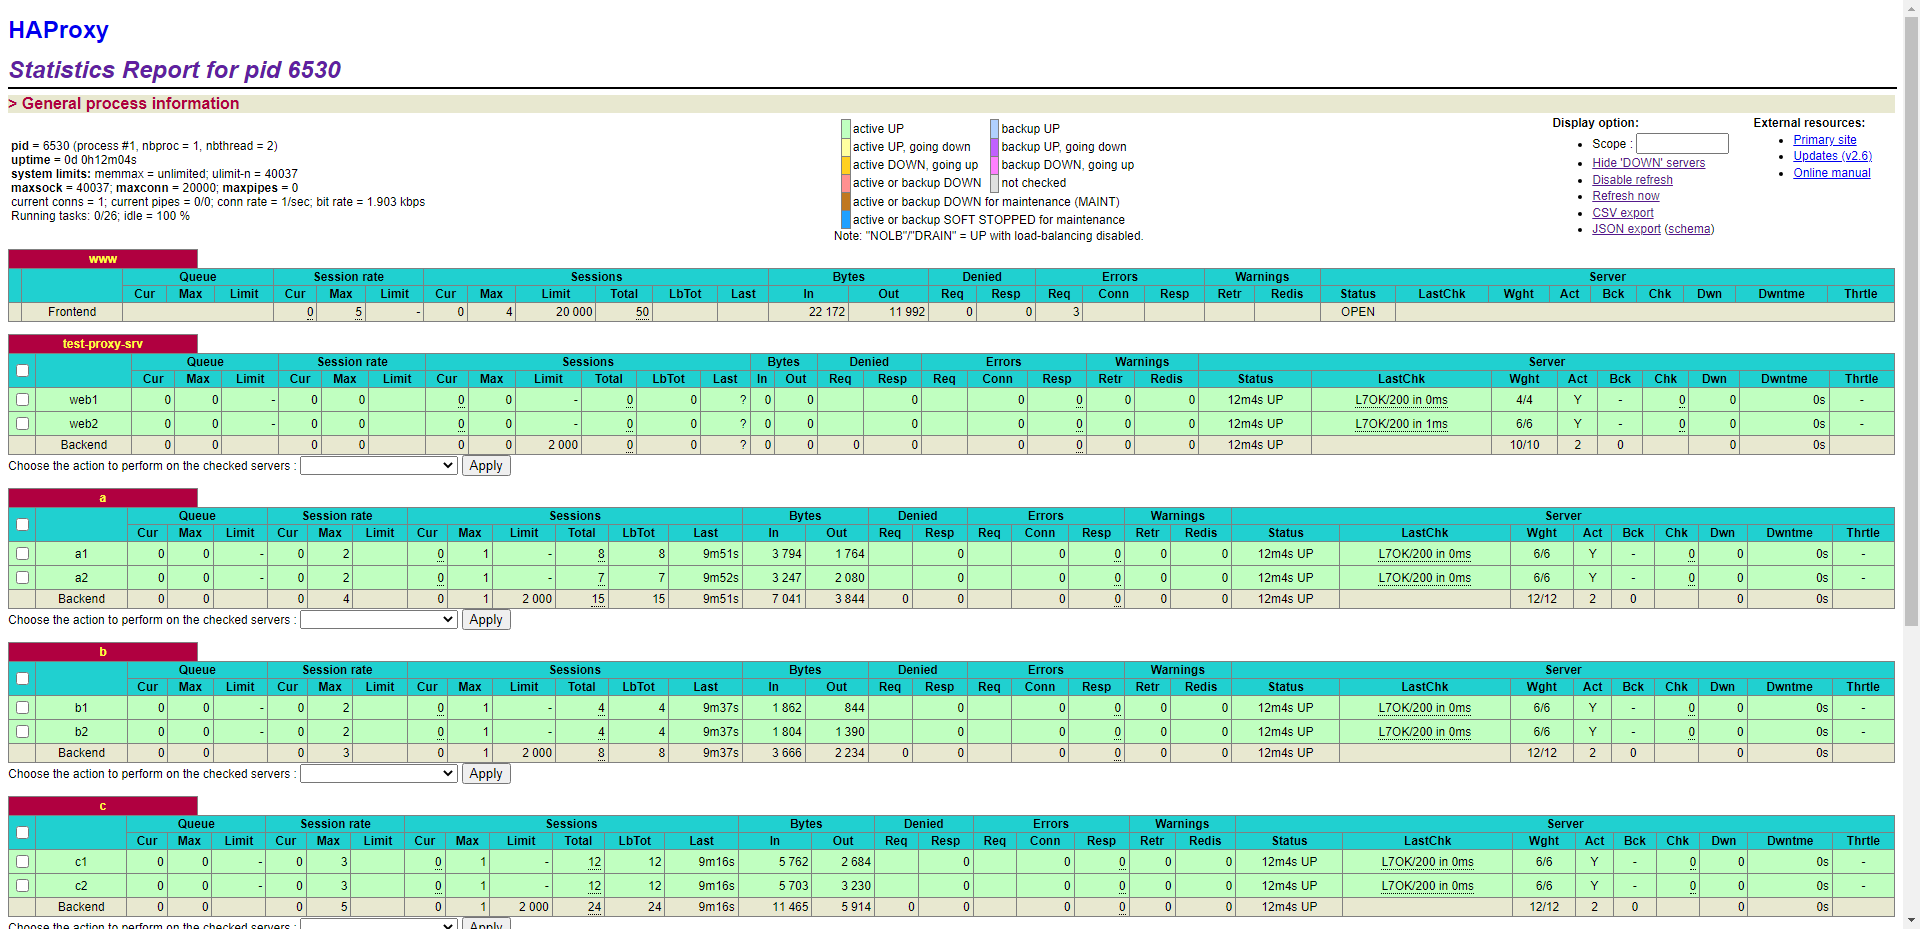
案例架构

这里只操作两台主机,在两台主机上分别配置三个虚拟主机
haproxy服务器的配置
$ cat conf/haproxy.cfg
global
	maxconn		20000
	log			127.0.0.1 local0 info
	user		nobody
	group		nobody
	chroot		/usr/local/haproxy
	daemon
	pidfile		/usr/local/haproxy/logs/haproxy.pid
defaults
	mode			http
	retries			3
	timeout	connect	10s
	timeout	client	20s
	timeout	server	30s
	timeout	check	5s
frontend www
	bind			*:80
	mode			http
	log				global
	option			httplog
	option			forwardfor
	option			httpclose
	option			dontlognull
	#新建了3个规则,分别是匹配到不同的域名,访问不同的backend
	acl	a	hdr_beg(host)	www.zb.com
	acl	b	hdr_beg(host)	static.zb.com
	acl	c	hdr_beg(host)	video.zb.com
	use_backend	a	if	a
	use_backend	b	if	b
	use_backend	c	if	c
	default_backend test-proxy-srv


backend test-proxy-srv
	mode            http
	option		redispatch
	option		abortonclose
	balance		roundrobin
	cookie		SERVERID
	option	httpchk	HEAD	/index.html
	server	web1	10.0.0.6:80	cookie	server1	weight	4	check	inter	2000	rise	2	fall	3
	server	web2	10.0.0.7:8000	cookie	server2	weight	6	check	inter	2000	rise	2	fall	3
	timeout connect 5s
	timeout server  5s
	retries         2

#下面是3个backend,利用不同的端口,当作不同的主机
backend a
	mode            http
	option		redispatch
	option		abortonclose
	balance		roundrobin
	cookie		SERVERID
	option	httpchk	HEAD	/index.html
	server	a1	10.0.0.6:81	cookie	server1	weight	6	check	inter	2000	rise	2	fall	3
	server	a2	10.0.0.7:81	cookie	server2	weight	6	check	inter	2000	rise	2	fall	3
backend b
	mode            http
	option		redispatch
	option		abortonclose
	balance		roundrobin
	cookie		SERVERID
	option	httpchk	HEAD	/index.html
	server	b1	10.0.0.6:82	cookie	server1	weight	6	check	inter	2000	rise	2	fall	3
	server	b2	10.0.0.7:82	cookie	server2	weight	6	check	inter	2000	rise	2	fall	3
backend c
	mode            http
	option		redispatch
	option		abortonclose
	balance		roundrobin
	cookie		SERVERID
	option	httpchk	HEAD	/index.html
	server	c1	10.0.0.6:83	cookie	server1	weight	6	check	inter	2000	rise	2	fall	3
	server	c2	10.0.0.7:83	cookie	server2	weight	6	check	inter	2000	rise	2	fall	3
listen	stats
	bind	0.0.0.0:9188
	mode	http
	log	127.0.0.1	local0	err
	stats	refresh	30s
	stats	uri	/status
	stats	realm	hahahahaha
	stats	auth	admin:admin
	stats	hide-version
	stats	admin	if	TRUE
后端真实的nginx服务器配置虚拟主机
$ cat /etc/nginx/nginx.conf

user nginx;
worker_processes auto;
error_log /var/log/nginx/error.log;
pid /run/nginx.pid;

include /usr/share/nginx/modules/*.conf;

events {
    worker_connections 1024;
}

http {
    log_format  main  '$remote_addr - $remote_user [$time_local] $http_x_forwarded_for "$request" '
                      '$status $body_bytes_sent "$http_referer" '
                      '"$http_user_agent" "$http_x_forwarded_for"';

    access_log  /var/log/nginx/access.log  main;

    sendfile            on;
    tcp_nopush          on;
    tcp_nodelay         on;
    keepalive_timeout   65;
    types_hash_max_size 4096;

    include             /etc/nginx/mime.types;
    default_type        application/octet-stream;
    include /etc/nginx/conf.d/*.conf;

    server {
        listen       80;
        listen       [::]:80;
        server_name  _;
        root         /usr/share/nginx/html;

        # Load configuration files for the default server block.
        include /etc/nginx/default.d/*.conf;

        error_page 404 /404.html;
        location = /404.html {
        }

        error_page 500 502 503 504 /50x.html;
        location = /50x.html {
        }
    }
#以下是新建的虚拟主机
server {
         listen       81;
         server_name  _;
         charset utf-8;
         location / {
     	index index.html index.htm;
     	root /data/a;
     	}}
server {
         listen       82;
         server_name  _;
         charset utf-8;
         location / {
     	index index.html index.htm;
     	root /data/b;
     	}}
server {
         listen       83;
         server_name  _;
         charset utf-8;
         location / {
     	index index.html index.htm;
     	root /data/c;
     	}}
}
分别新建不同的主页
10.0.0.6主机
$ mkdir -p /data/{a,b,c}
$ echo "10.0.0.6----->a" > /data/a/index.html
$ echo "10.0.0.6----->b" > /data/b/index.html
$ echo "10.0.0.6----->c" > /data/c/index.html

#测试重启服务
$ nginx -t
nginx: the configuration file /etc/nginx/nginx.conf syntax is ok
nginx: configuration file /etc/nginx/nginx.conf test is successful
$ systemctl restart nginx.service
10.0.0.7主机
$ mkdir -p /data/{a,b,c}
$ echo "10.0.0.7----->a" > /data/a/index.html
$ echo "10.0.0.7----->b" > /data/b/index.html
$ echo "10.0.0.7----->c" > /data/c/index.html

#测试重启服务
$ nginx -t
nginx: the configuration file /etc/nginx/nginx.conf syntax is ok
nginx: configuration file /etc/nginx/nginx.conf test is successful
$ systemctl restart nginx.service
访问web页面

添加本地dns解析
修改配置文件C:\Windows\System32\drivers\etc\hosts
10.0.0.5	www.zb.com
10.0.0.5	static.zb.com
10.0.0.5	video.zb.com
最后通过这三个域名进行访问验证!
本文来自博客园,作者:厚礼蝎,转载请注明原文链接:https://www.cnblogs.com/guangdelw/p/17143472.html


【推荐】国内首个AI IDE,深度理解中文开发场景,立即下载体验Trae
【推荐】编程新体验,更懂你的AI,立即体验豆包MarsCode编程助手
【推荐】抖音旗下AI助手豆包,你的智能百科全书,全免费不限次数
【推荐】轻量又高性能的 SSH 工具 IShell:AI 加持,快人一步
· 无需6万激活码!GitHub神秘组织3小时极速复刻Manus,手把手教你使用OpenManus搭建本
· C#/.NET/.NET Core优秀项目和框架2025年2月简报
· Manus爆火,是硬核还是营销?
· 终于写完轮子一部分:tcp代理 了,记录一下
· 【杭电多校比赛记录】2025“钉耙编程”中国大学生算法设计春季联赛(1)