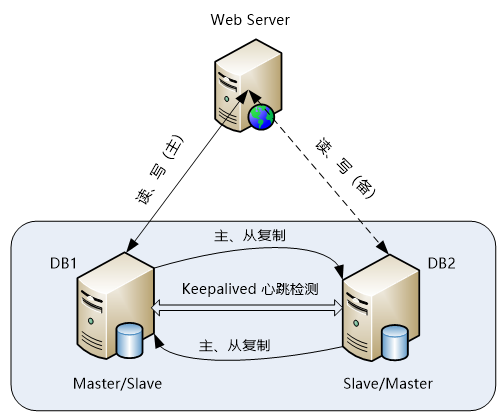
基于KeepAlived的MySQL主主互备模式的高可用
架构图
主要设计思路是通过MySQL Replication技术将两台MySQL Server互相将对方作为自己的Master,自己又同时作为对方的Slave来进行复制。
这样就实现了高可用构架中的数据同步功能,同时,将采用KeepAlived来实现Mysql的自动failover。
在这个构架中,虽然两台MySQL Server互为主从,但同一时刻只有一个MySQL Server可读写,另一个MySQL Server只能进行读操作,这样可保证数据的一致性。
配置
MySQL主从复制的配置还是比较简单的,仅仅需要修改MySQL配置文件即可,这里要配置的是主主互备模式,但配置过程和一主一从结构是完全一样的,配置环境如下所示
| 主机名 | 系统版本 | mysql版本 | 主机IP | mysql VIP |
|---|---|---|---|---|
| DB1(Master) | centos7.9 | 5.7.38 | 10.0.0.5 | 10.0.0.100 |
| DB2(Slave) | centos7.9 | 5.7.38 | 10.0.0.6 | 10.0.0.100 |
修改MySQL配置文件
在默认情况下MySQL的配置文件是/etc/my.cnf
首先修改DB1主机的配置文件,在/etc/my.cnf文件中的[mysqld]段添加如下内容:
#设置server id
server-id = 1
#开启log-bin 并设置文件名以mysql-bin开头
log-bin=mysql-bin
#开启relay-log 并设置文件以mysql-relay-bin开头
relay-log = mysql-relay-bin
#不备份mysql下的表 不备份test库的表 不备份information_schema库下的表
replicate-wild-ignore-table=mysql.%
replicate-wild-ignore-table=test.%
replicate-wild-ignore-table=information_schema.%
然后修改DB2主机的配置文件
在/etc/my.cnf文件中的[mysqld]段添加如下内容:
server-id = 2
log-bin=mysql-bin
relay-log = mysql-relay-bin
replicate-wild-ignore-table=mysql.%
replicate-wild-ignore-table=test.%
replicate-wild-ignore-table=information_schema.%
其中:
-
server-id是节点标识,主、从节点不能相同,必须全局唯一。 -
log-bin表示开启MySQL的binlog日志功能。“mysql-bin”表示日志文件的命名格式,会生成文件名为mysql-bin.000001、mysql-bin.000002等的日志文件。 -
relay-log用来定义relay-log日志文件的命名格式。 -
replicate-wild-ignore-table是个复制过滤选项,可以过滤掉不需要复制的数据库或表,例如mysql.%表示不复制mysql库下的所有对象,其他依此类推。与此对应的是replicate_wild_do_table选项,用来指定需要复制的数据库或表。这里需要注意的是,不要在主库上使用binlog-do-db或binlog-ignore-db选项,也不要在从库上使用replicate-do-db或replicate-ignore-db选项,因为这样可能产生跨库更新失败的问题。
推荐在从库上使用replicate_wild_do_table和replicate-wild-ignore-table两个选项来解决复制过滤问题。
手动同步数据库
如果DB1上已经有mysql数据,那么在执行主主互备之前,需要将DB1和DB2上两个mysql的数据保持同步
首先在DB1上备份mysql数据,执行如下SQL语句:
---上锁
mysql>FLUSH TABLES WITH READ LOCK;
Query OK, 0 rows affected (0.00 sec)
不要退出这个终端,否则这个锁就失效了。在不退出终端的情况下,再开启一个终端直接打包压缩数据文件或使用mysqldump工具来导出数据。
这里通过打包mysql文件来完成数据的备份,先要关闭mysql服务
操作过程如下:
#DB1
$ systemctl stop mysqld
$ cd /var/lib/
$ tar zcf mysql.tar.gz mysql
$ scp mysql.tar.gz  root@10.0.0.6:/var/lib/
将数据传输到DB2后,依次重启DB1和DB2上面的mysql。
#DB2
$ cd /var/lib/
$ tar xf mysql.tar.gz
$ rm -rf mysql.tar.gz
$ rm -rf mysql/anto.cnf#一定要删除,不然会报错
创建复制用户并授权
首先在DB1的mysql库中创建复制用户
--创建专门用来备份的用户
grant replication slave on *.* to 'user1'@'%' identified by '111111';
Query OK, 0 rows affected, 1 warning (0.01 sec)

--查看主的状态,记住file的名字和Position的数值,用来给从连接的
mysql> show master status;
+------------------+----------+--------------+------------------+-------------------+
| File             | Position | Binlog_Do_DB | Binlog_Ignore_DB | Executed_Gtid_Set |
+------------------+----------+--------------+------------------+-------------------+
| mysql-bin.000001 |      438 |              |                  |                   |
+------------------+----------+--------------+------------------+-------------------+
1 row in set (0.00 sec)
然后在DB2的mysql库中将DB1设为自己的主服务器:
mysql> change master to master_host='10.0.0.5',master_user='user1',master_password='111111',master_log_file='mysql-bin.000001',master_log_pos=438;
Query OK, 0 rows affected, 2 warnings (0.01 sec)
这里需要注意master_log_file和master_log_pos两个选项,这两个选项的值刚好是在DB1上通过SQL语句show master status查询到的结果。
接着就可以在DB2上启动slave服务了,可执行如下SQL命令:
mysql> start slave;
在DB2上查看slave的运行状态
mysql> show slave status\G
*************************** 1. row ***************************
               Slave_IO_State: Waiting for master to send event
                  Master_Host: 10.0.0.5
                  Master_User: user1
                  Master_Port: 3306
                Connect_Retry: 60
              Master_Log_File: mysql-bin.000001
          Read_Master_Log_Pos: 438
               Relay_Log_File: mysql-relay-bin.000003
                Relay_Log_Pos: 320
        Relay_Master_Log_File: mysql-bin.000001
             Slave_IO_Running: Yes
            Slave_SQL_Running: Yes
              Replicate_Do_DB:
          Replicate_Ignore_DB:
           Replicate_Do_Table:
       Replicate_Ignore_Table:
      Replicate_Wild_Do_Table:
  Replicate_Wild_Ignore_Table: mysql.%,information_schema.%,performance_schema.%,sys.%
                   Last_Errno: 0
                   Last_Error:
                 Skip_Counter: 0
          Exec_Master_Log_Pos: 438
              Relay_Log_Space: 693
              Until_Condition: None
               Until_Log_File:
                Until_Log_Pos: 0
           Master_SSL_Allowed: No
           Master_SSL_CA_File:
           Master_SSL_CA_Path:
              Master_SSL_Cert:
            Master_SSL_Cipher:
               Master_SSL_Key:
        Seconds_Behind_Master: 0
Master_SSL_Verify_Server_Cert: No
                Last_IO_Errno: 0
                Last_IO_Error:
               Last_SQL_Errno: 0
               Last_SQL_Error:
  Replicate_Ignore_Server_Ids:
             Master_Server_Id: 1
                  Master_UUID: 80d0525c-c9db-11ec-9d1d-000c29f242e7
             Master_Info_File: /var/lib/mysql/master.info
                    SQL_Delay: 0
          SQL_Remaining_Delay: NULL
      Slave_SQL_Running_State: Slave has read all relay log; waiting for more updates
           Master_Retry_Count: 86400
                  Master_Bind:
      Last_IO_Error_Timestamp:
     Last_SQL_Error_Timestamp:
               Master_SSL_Crl:
           Master_SSL_Crlpath:
           Retrieved_Gtid_Set:
            Executed_Gtid_Set:
                Auto_Position: 0
         Replicate_Rewrite_DB:
                 Channel_Name:
           Master_TLS_Version:
1 row in set (0.00 sec)
如果看出Slave_IO_Running和Slave_SQL_Running都是Yes状态,表明DB2上复制服务运行正常
到这里位置,从DB1到DB2的mysql主从复制已经完成了
接下来开始配置从DB2到DB1的mysql主从复制,这个配置过程与上面的完全一样。
DB2上的操作
新建用户
mysql> grant replication slave on *.* to 'user1'@'%' identified by '111111';
Query OK, 0 rows affected, 1 warning (0.00 sec)

mysql> show master status;
+------------------+----------+--------------+------------------+-------------------+
| File             | Position | Binlog_Do_DB | Binlog_Ignore_DB | Executed_Gtid_Set |
+------------------+----------+--------------+------------------+-------------------+
| mysql-bin.000001 |      438 |              |                  |                   |
+------------------+----------+--------------+------------------+-------------------+
1 row in set (0.00 sec)
DB1上的操作
设置DB2为自己的主服务器
mysql> change master to master_host='10.0.0.6',master_user='user1',master_password='111111',master_log_file='mysql-bin.000001',master_log_pos=438;
Query OK, 0 rows affected, 2 warnings (0.01 sec)

mysql> start slave;
Query OK, 0 rows affected (0.01 sec)

mysql> show slave status\G
*************************** 1. row ***************************
               Slave_IO_State: Waiting for master to send event
                  Master_Host: 10.0.0.6
                  Master_User: user1
                  Master_Port: 3306
                Connect_Retry: 60
              Master_Log_File: mysql-bin.000001
          Read_Master_Log_Pos: 438
               Relay_Log_File: mysql-relay-bin.000002
                Relay_Log_Pos: 320
        Relay_Master_Log_File: mysql-bin.000001
             Slave_IO_Running: Yes
            Slave_SQL_Running: Yes
              Replicate_Do_DB:
          Replicate_Ignore_DB:
           Replicate_Do_Table:
       Replicate_Ignore_Table:
      Replicate_Wild_Do_Table:
  Replicate_Wild_Ignore_Table: mysql.%,information_schema.%,performance_schema.%,sys.%
                   Last_Errno: 0
                   Last_Error:
                 Skip_Counter: 0
          Exec_Master_Log_Pos: 438
              Relay_Log_Space: 527
              Until_Condition: None
               Until_Log_File:
                Until_Log_Pos: 0
           Master_SSL_Allowed: No
           Master_SSL_CA_File:
           Master_SSL_CA_Path:
              Master_SSL_Cert:
            Master_SSL_Cipher:
               Master_SSL_Key:
        Seconds_Behind_Master: 0
Master_SSL_Verify_Server_Cert: No
                Last_IO_Errno: 0
                Last_IO_Error:
               Last_SQL_Errno: 0
               Last_SQL_Error:
  Replicate_Ignore_Server_Ids:
             Master_Server_Id: 2
                  Master_UUID: b6eb894e-ca0e-11ec-b7d4-000c2913b75a
             Master_Info_File: /var/lib/mysql/master.info
                    SQL_Delay: 0
          SQL_Remaining_Delay: NULL
      Slave_SQL_Running_State: Slave has read all relay log; waiting for more updates
           Master_Retry_Count: 86400
                  Master_Bind:
      Last_IO_Error_Timestamp:
     Last_SQL_Error_Timestamp:
               Master_SSL_Crl:
           Master_SSL_Crlpath:
           Retrieved_Gtid_Set:
            Executed_Gtid_Set:
                Auto_Position: 0
         Replicate_Rewrite_DB:
                 Channel_Name:
           Master_TLS_Version:
1 row in set (0.00 sec)
如果看出Slave_IO_Running和Slave_SQL_Running都是Yes状态,表明DB1上复制服务运行正常。
至此,mysql双主模式的主从复制已经配置完毕了。
配置KeepAlived实现MySQL双主高可用
在进行高可用配置之前,首先需要在DB1和DB2服务器上安装KeepAlived软件。
下载
https://www.keepalived.org/download.html
KeepAlived的安装和配置
安装过程如下:
$ cd /data/
#解压
$ tar xf keepalived-2.2.7.tar.gz
$ cd keepalived-2.2.7/
#安装依赖并且编译安装
$ yum install -y gcc gcc-c++ wget popt-devel openssl openssl-devel && yum install -y libnl libnl-devel libnl3 libnl3-devel && yum install -y  libnfnetlink-devel && ./configure --sysconf=/etc && make -j 2 && make install

#解压脚本
$ cd /data/
$ unzip check_slave.zip
#放在keepalived配置文件目录下
$ mv check_slave.pl /etc/keepalived/
安装完成
配置阶段
先以DB1(10.0.0.5)作为主
配置DB1
$ cd /etc/keepalived/
$ cp keepalived.conf.sample keepalived.conf
$ vim keepalived.conf
global_defs {
   router_id LVS_DEVEL #设置router id,两边一样,可以是任意字符串
}
vrrp_script check_mysql {
    script "/etc/keepalived/check_slave.pl 127.0.0.1" #设置脚本,用来监测Slave_IO_Running和Slave_SQL_Running
    interval 2  #循环时间
    }
vrrp_instance VI_1 {
    state BACKUP #双主必须都是backup
    interface ens37 #设置网口
    virtual_router_id 51 #设置虚拟roter id 同一个集群的必须保持一致,同时必须保证唯一性
    priority 100 #设置优先级 越大越优先,而DB1是最开始的主,所以优先级设置大一些
    advert_int 2 #循环检测时间
    nopreempt #不抢占,就是当主挂了又起来了,不会重新抢占,只有等当时的主挂了才会切换 这个只有主 配置

    authentication {
        auth_type PASS  #这两个是验证用的,必须两边保持一致
        auth_pass 1111
    }
    track_script {
    check_mysql  #这里引用前面定的检测脚本
    }
    virtual_ipaddress {
        192.168.200.10/24 dev ens37 #设置漂移ip,绑定再ens37上
    }
}
配置DB2
$ cd /etc/keepalived/
$ cp keepalived.conf.sample keepalived.conf
$ vim keepalived.conf
global_defs {
   router_id LVS_DEVEL #同样的router id
}
vrrp_script check_mysql {
    script "/etc/keepalived/check_slave.pl 127.0.0.1"  #同样的检测脚本
    interval 2
    }
vrrp_instance VI_1 {
    state BACKUP #也要设置成backup
    interface ens37 #绑定端口,根据实际情况绑定
    virtual_router_id 51 #保持一致的router id
    priority 50 #设置优先级,由于是从,所以优先级设置低一点
    advert_int 2

    authentication {
        auth_type PASS
        auth_pass 1111
    }
    track_script {
    check_mysql
    }
    virtual_ipaddress {
        192.168.200.10/24 dev ens37 #同样设置漂移ip
    }
}
修改检测脚本
$ vim /etc/keepalived/check_slave.pl
#!/usr/bin/perl -w
use DBI;
use DBD::mysql;

# CONFIG VARIABLES
$SBM = 120;
$db = "mysql";
$host = $ARGV[0];
$port = 3306;
$user = "root";
$pw = "111111";
# SQL query
$query = "show slave status";
$dbh = DBI->connect("DBI:mysql:$db:$host:$port", $user, $pw, { RaiseError => 0,PrintError => 0 });
if (!defined($dbh)) {
    exit 1;
}
$sqlQuery = $dbh->prepare($query);
$sqlQuery->execute;
$Slave_IO_Running =  "";
$Slave_SQL_Running = "";
$Seconds_Behind_Master = "";
while (my $ref = $sqlQuery->fetchrow_hashref()) {
    $Slave_IO_Running = $ref->{'Slave_IO_Running'};
    $Slave_SQL_Running = $ref->{'Slave_SQL_Running'};
    $Seconds_Behind_Master = $ref->{'Seconds_Behind_Master'};
}
$sqlQuery->finish;
$dbh->disconnect();
if ( $Slave_IO_Running eq "No" || $Slave_SQL_Running eq "No" ) {
    exit 1;
} else {
    if ( $Seconds_Behind_Master > $SBM ) {
        exit 1;
    } else {
        exit 0;
    }
}


#增加执行权限
$chmod +x /etc/keepalived/check_slave.pl
要先保证check_slave.pl可以正常运行,测试方法如下:
$ /etc/keepalived/check_slave.pl  127.0.0.1
$ echo $?
0
注意:执行check_slave.pl脚本时,可能出现如下错误:
Can't locate DBI.pm in @INC
此时只需安装下面perl软件包即可:
yum -y install perl-DBD-MySQL
启动keepalived
DB1启动
systemctl start keepalived.service
查看日志
$ cat /var/log/messages | grep Keepalived
May  3 17:09:11 Centos7 Keepalived[10468]: Starting Keepalived v2.2.7 (01/16,2022)
May  3 17:09:11 Centos7 Keepalived[10468]: Running on Linux 3.10.0-1160.62.1.el7.x86_64 #1 SMP Tue Apr 5 16:57:59 UTC 2022 (built for Linux 3.10.0)
May  3 17:09:11 Centos7 Keepalived[10468]: Command line: '/usr/local/sbin/keepalived' '-D'
May  3 17:09:11 Centos7 Keepalived[10468]: Opening file '/etc/keepalived/keepalived.conf'.
May  3 17:09:11 Centos7 Keepalived[10468]: Configuration file /etc/keepalived/keepalived.conf
May  3 17:09:11 Centos7 Keepalived[10469]: NOTICE: setting config option max_auto_priority should result in better keepalived performance
May  3 17:09:11 Centos7 Keepalived[10469]: Starting VRRP child process, pid=10470
May  3 17:09:11 Centos7 Keepalived_vrrp[10470]: Registering Kernel netlink reflector
May  3 17:09:11 Centos7 Keepalived_vrrp[10470]: Registering Kernel netlink command channel
May  3 17:09:11 Centos7 Keepalived_vrrp[10470]: Script user 'keepalived_script' does not exist
May  3 17:09:11 Centos7 Keepalived_vrrp[10470]: SECURITY VIOLATION - scripts are being executed but script_security not enabled.
May  3 17:09:11 Centos7 Keepalived_vrrp[10470]: Assigned address 192.168.200.151 for interface ens37
May  3 17:09:11 Centos7 Keepalived_vrrp[10470]: Assigned address fe80::5f84:16a0:af0d:8ca9 for interface ens37
May  3 17:09:11 Centos7 Keepalived_vrrp[10470]: Registering gratuitous ARP shared channel
May  3 17:09:11 Centos7 Keepalived_vrrp[10470]: (VI_1) removing VIPs.
May  3 17:09:11 Centos7 Keepalived[10469]: Startup complete
May  3 17:09:11 Centos7 Keepalived_vrrp[10470]: VRRP sockpool: [ifindex(  3), family(IPv4), proto(112), fd(12,13) multicast, address(224.0.0.18)]
May  3 17:09:11 Centos7 Keepalived_vrrp[10470]: VRRP_Script(check_mysql) succeeded
May  3 17:09:11 Centos7 Keepalived_vrrp[10470]: (VI_1) Entering BACKUP STATE
May  3 17:09:17 Centos7 Keepalived_vrrp[10470]: (VI_1) Receive advertisement timeout
May  3 17:09:17 Centos7 Keepalived_vrrp[10470]: (VI_1) Entering MASTER STATE
May  3 17:09:17 Centos7 Keepalived_vrrp[10470]: (VI_1) setting VIPs.
May  3 17:09:17 Centos7 Keepalived_vrrp[10470]: (VI_1) Sending/queueing gratuitous ARPs on ens37 for 192.168.200.10
May  3 17:09:17 Centos7 Keepalived_vrrp[10470]: Sending gratuitous ARP on ens37 for 192.168.200.10
May  3 17:09:17 Centos7 Keepalived_vrrp[10470]: Sending gratuitous ARP on ens37 for 192.168.200.10
May  3 17:09:17 Centos7 Keepalived_vrrp[10470]: Sending gratuitous ARP on ens37 for 192.168.200.10
May  3 17:09:17 Centos7 Keepalived_vrrp[10470]: Sending gratuitous ARP on ens37 for 192.168.200.10
May  3 17:09:17 Centos7 Keepalived_vrrp[10470]: Sending gratuitous ARP on ens37 for 192.168.200.10
May  3 17:09:22 Centos7 Keepalived_vrrp[10470]: (VI_1) Sending/queueing gratuitous ARPs on ens37 for 192.168.200.10
May  3 17:09:22 Centos7 Keepalived_vrrp[10470]: Sending gratuitous ARP on ens37 for 192.168.200.10
May  3 17:09:22 Centos7 Keepalived_vrrp[10470]: Sending gratuitous ARP on ens37 for 192.168.200.10
May  3 17:09:22 Centos7 Keepalived_vrrp[10470]: Sending gratuitous ARP on ens37 for 192.168.200.10
May  3 17:09:22 Centos7 Keepalived_vrrp[10470]: Sending gratuitous ARP on ens37 for 192.168.200.10
May  3 17:09:22 Centos7 Keepalived_vrrp[10470]: Sending gratuitous ARP on ens37 for 192.168.200.10
DB2启动
systemctl start keepalived.service
查看相关日志
$ cat  /var/log/messages | grep Keepalived
May  3 17:10:03 Centos7 Keepalived[28795]: Starting Keepalived v2.2.7 (01/16,2022)
May  3 17:10:03 Centos7 Keepalived[28795]: Running on Linux 3.10.0-1160.62.1.el7.x86_64 #1 SMP Tue Apr 5 16:57:59 UTC 2022 (built for Linux 3.10.0)
May  3 17:10:03 Centos7 Keepalived[28795]: Command line: '/usr/local/sbin/keepalived' '-D'
May  3 17:10:03 Centos7 Keepalived[28795]: Opening file '/etc/keepalived/keepalived.conf'.
May  3 17:10:03 Centos7 Keepalived[28795]: Configuration file /etc/keepalived/keepalived.conf
May  3 17:10:03 Centos7 Keepalived[28796]: NOTICE: setting config option max_auto_priority should result in better keepalived performance
May  3 17:10:03 Centos7 Keepalived[28796]: Starting VRRP child process, pid=28797
May  3 17:10:03 Centos7 Keepalived_vrrp[28797]: Registering Kernel netlink reflector
May  3 17:10:03 Centos7 Keepalived_vrrp[28797]: Registering Kernel netlink command channel
May  3 17:10:03 Centos7 Keepalived_vrrp[28797]: Script user 'keepalived_script' does not exist
May  3 17:10:03 Centos7 Keepalived_vrrp[28797]: SECURITY VIOLATION - scripts are being executed but script_security not enabled.
May  3 17:10:03 Centos7 Keepalived_vrrp[28797]: Assigned address 192.168.200.135 for interface ens37
May  3 17:10:03 Centos7 Keepalived_vrrp[28797]: Assigned address fe80::b309:376:b06:2be0 for interface ens37
May  3 17:10:03 Centos7 Keepalived_vrrp[28797]: Warning - script check_mysql is not used
May  3 17:10:03 Centos7 Keepalived_vrrp[28797]: Registering gratuitous ARP shared channel
May  3 17:10:03 Centos7 Keepalived_vrrp[28797]: (VI_1) removing VIPs.
May  3 17:10:03 Centos7 Keepalived_vrrp[28797]: (VI_1) Entering BACKUP STATE (init)
May  3 17:10:03 Centos7 Keepalived_vrrp[28797]: VRRP sockpool: [ifindex(  3), family(IPv4), proto(112), fd(12,13) multicast, address(224.0.0.18)]
May  3 17:10:03 Centos7 Keepalived[28796]: Startup complete
查看DB1网络配置
$ ip a show dev ens37
3: ens37: <BROADCAST,MULTICAST,UP,LOWER_UP> mtu 1500 qdisc pfifo_fast state UP group default qlen 1000
    link/ether 00:0c:29:f2:42:f1 brd ff:ff:ff:ff:ff:ff
    inet 192.168.200.151/24 brd 192.168.200.255 scope global noprefixroute dynamic ens37
       valid_lft 71027sec preferred_lft 71027sec
    inet 192.168.200.10/24 scope global secondary ens37
       valid_lft forever preferred_lft forever
    inet6 fe80::5f84:16a0:af0d:8ca9/64 scope link noprefixroute
       valid_lft forever preferred_lft forever
可以看到,漂移ip已经完成了绑定
测试切换
可以通过在客户机上连接,然后查看主机名来判断是否切换
DB1的主机名是CentOS7.9-0.5
DB2的主机名是CentOS7.9-0.6
--通过这个sql语句来查询主机名
mysql> show variables like '%hostname%';
+---------------+---------------+
| Variable_name | Value         |
+---------------+---------------+
| hostname      | Centos7.9-0.5 |
+---------------+---------------+
1 row in set
通过制造故障,来测试是否切换
本文来自博客园,作者:厚礼蝎,转载请注明原文链接:https://www.cnblogs.com/guangdelw/p/17009346.html


【推荐】国内首个AI IDE,深度理解中文开发场景,立即下载体验Trae
【推荐】编程新体验,更懂你的AI,立即体验豆包MarsCode编程助手
【推荐】抖音旗下AI助手豆包,你的智能百科全书,全免费不限次数
【推荐】轻量又高性能的 SSH 工具 IShell:AI 加持,快人一步
· winform 绘制太阳,地球,月球 运作规律
· 超详细:普通电脑也行Windows部署deepseek R1训练数据并当服务器共享给他人
· TypeScript + Deepseek 打造卜卦网站:技术与玄学的结合
· AI 智能体引爆开源社区「GitHub 热点速览」
· 写一个简单的SQL生成工具