nginx基础介绍及配置
目录
一.nginx介绍
Nginx 是一个高性能的可靠的HTTP和反向代理web服务器,并且开源,代码模块化,技术也成熟。
- 开源:可以直接获取源代码
- 高性能:支持高并发
- 可靠:服务稳定可靠
- 代码模块少:易读,便于二次开发
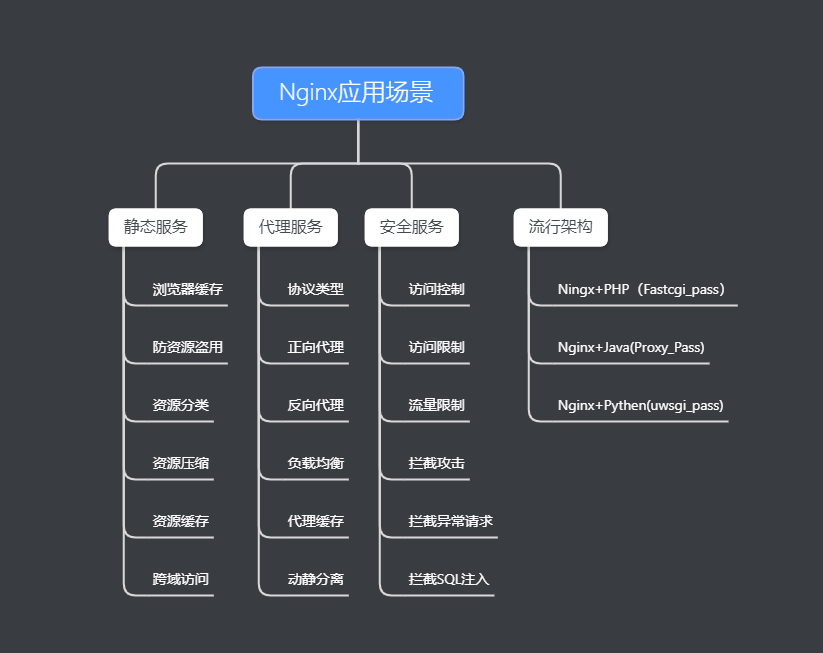
1.nginx应用场景

静态服务器(不调用数据库,页面不变化)
-
nginx
-
apache
-
IIS
-
lighttpd
-
tengine
-
openresty-nginx
动态服务器(需要调用数据库,可以调用动态请求)
- tomcat
- resin
- php
- weblogic
- jboss
2.nginx的安装(官方)
nginx官网>download>stable and mainline>CentOS安装方法
#2.虚拟机yum仓库里创建nginx.repo
[root@web01 ~]# vim /etc/yum.repos.d/nginx.repo
[nginx-stable]
name=nginx stable repo
baseurl=http://nginx.org/packages/centos/$releasever/$basearch/
gpgcheck=1
enabled=1
gpgkey=https://nginx.org/keys/nginx_signing.key
module_hotfixes=true

#3.使用yum 安装nginx,默认会先走官方的(会比较慢)
[root@web01 ~]# yum install -y nginx

#4.安装成功

#5.查看nginx版本
[root@web01 ~]# nginx -v
nginx version: nginx/1.18.0

#6.启动nginx服务
[root@web01 nginx]# systemctl start nginx

#7.加入开机启动
[root@web01 nginx]# systemctl enable  nginx
3.nginx相关文件
#1.nginx 主配置文件
-rw-r--r-- 1 root root 779 May 14 12:06 /etc/nginx/nginx.conf
-rw-r--r-- 1 root root 488 May 14 15:18 /etc/nginx/conf.d/default.conf    #默认网站配置文件

#2.nginx代理文件
-rw-r--r-- 1 root root 1007 Apr 21 23:07 /etc/nginx/fastcgi_params    #PHP
-rw-r--r-- 1 root root  636 Apr 21 23:07 /etc/nginx/scgi_params       #AJAX前后分离
-rw-r--r-- 1 root root  664 Apr 21 23:07 /etc/nginx/uwsgi_params      #Pythen

#3.字符编码文件
-rw-r--r-- 1 root root 2837 Apr 21 23:07 /etc/nginx/koi-utf
-rw-r--r-- 1 root root 3610 Apr 21 23:07 /etc/nginx/win-utf
-rw-r--r-- 1 root root 2223 Apr 21 23:07 /etc/nginx/koi-win

#4.浏览器支持的直接打开文件格式
-rw-r--r-- 1 root root 5231 Apr 21 23:07 /etc/nginx/mime.types        #支持里面定义的格式

#5.nginx相关命令文件
-rwxr-xr-x 1 root root 1342640 Apr 21 23:07 /usr/sbin/nginx           #nginx命令行管理终端工具
-rwxr-xr-x 1 root root 1461544 Apr 21 23:07 /usr/sbin/nginx-debug     #nginx命令行与终端调试工具

#6.日志相关文件
-rw-r--r-- 1 root root 351 May 14 11:58 /etc/logrotate.d/nginx        #nginx默认的日志切割
-rw-r----- 1 nginx adm 5937 May 14 18:02 /var/log/nginx/access.log    #nginx的访问日志
-rw-r----- 1 nginx adm 5661 May 14 18:02 /var/log/nginx/error.log     #nginx的错误日志
4.nginx配置文件
可以分成三个模块:
- 核心模块
- 事件驱动模块
- HTTP模块
[root@web01 nginx]# vim /etc/nginx/nginx.conf

############### 核心模块 ################
user  nginx;           #启动用户
worker_processes  1;   #工作进程数 1

error_log  /var/log/nginx/error.log warn;     #错误日志路径和级别
pid        /var/run/nginx.pid;                #pid文件的路径

############## 事件驱动模块 ###############
events {
    worker_connections  1024;            #每个worker进程允许连接数 1024
}


############## HTTP模块 ###############
http {
    include       /etc/nginx/mime.types;        #包含   mime.types文件
    default_type  application/octet-stream;     #默认需要下载的类型

    log_format  main  '$remote_addr - $remote_user [$time_local] "$request" '     #日志的格式
                      '$status $body_bytes_sent "$http_referer" '
                      '"$http_user_agent" "$http_x_forwarded_for"';

    access_log  /var/log/nginx/access.log  main;       #日志的路径和格式

    sendfile        on;       #高效传输文件(和下面搭配使用)
    #tcp_nopush     on;

    keepalive_timeout  65;    #长连接超时时间

    #gzip  on;                #开启gzip压缩

    include /etc/nginx/conf.d/*.conf;    #包含路径下所有.conf结尾的文件
}
二.写一个nginx文件
[root@web02 ~]# vim /etc/nginx/conf.d/default.conf
这是nginx给的一个默认的conf配置,可以看看,自己写的话就删除它,否则会报警告说80端口冲突
1.写一个nginx.conf文件
[root@web02 ~]# vim /etc/nginx/conf.d/test.conf
server {
        listen 80;
        server_name localhost;  #localhost 本机IP, 要是使用www.xxx.com  则要在本地host解析
        root  /code;            #在/code目录下,只有一个页面就不用写location
        index index.html;        #找index.html文件
    }

#检查配置有没有错
[root@web02 ~]# nginx -t
nginx: the configuration file /etc/nginx/nginx.conf syntax is ok
nginx: configuration file /etc/nginx/nginx.conf test is successful

#打开nginx,如果已经打开了则重载nginx
[root@web02 ~]# systemctl start nginx       #开启
[root@web02 ~]# systemctl reload nginx      #重载
2.创建nginx文件的家目录(/code)
[root@web02 ~]# mkdir /code


[root@web02 ~]# vim /code/index.html
<font color="red">Hello world</font>
3.网页测试


