1.Windows下安装RabbitMQ的步骤详解+图解(erlang+RabbitMQ)
2.SpringBoot集成RabbitMQ参考文章
1.RabbitMQ介绍
RabbitMQ是实现AMQP(高级消息队列协议)的消息中间件的一种,最初起源于金融系统,用于在分布式系统中存储转发消息,在易用性、扩展性、高可用性等方面表现不俗。RabbitMQ主要是为了实现系统之间的双向解耦而实现的。当生产者大量产生数据时,消费者无法快速消费,那么需要一个中间层。保存这个数据。
AMQP,即Advanced Message Queuing Protocol,高级消息队列协议,是应用层协议的一个开放标准,为面向消息的中间件设计。消息中间件主要用于组件之间的解耦,消息的发送者无需知道消息使用者的存在,反之亦然。AMQP的主要特征是面向消息、队列、路由(包括点对点和发布/订阅)、可靠性、安全。
RabbitMQ是一个开源的AMQP实现,服务器端用Erlang语言编写,支持多种客户端,如:Python、Ruby、.NET、Java、JMS、C、PHP、ActionScript、XMPP、STOMP等,支持AJAX。用于在分布式系统中存储转发消息,在易用性、扩展性、高可用性等方面表现不俗。
2.AmqpTemplate,RabbitTemplate
Spring AMQP提供了一个发送和接收消息的操作模板类AmqpTemplate。 AmqpTemplate它定义包含了发送和接收消息等的一些基本的操作功能。RabbitTemplate是AmqpTemplate的一个实现。
RabbitTemplate支持消息的确认与返回,为了返回消息,RabbitTemplate 需要设置mandatory 属性为true,并且CachingConnectionFactory 的publisherReturns属性也需要设置为true。返回的消息会根据它注册的RabbitTemplate.ReturnCallback setReturnCallback 回调发送到给客户端,
一个RabbitTemplate仅能支持一个ReturnCallback 。
为了确认Confirms消息, CachingConnectionFactory 的publisherConfirms 属性也需要设置为true,确认的消息会根据它注册的RabbitTemplate.ConfirmCallback setConfirmCallback回调发送到给客户端。一个RabbitTemplate也仅能支持一个ConfirmCallback.
3.SpringBoot集成RabbitMQ
pom
-
xml version="1.0" encoding="UTF-8"
-
<project xmlns="http://maven.apache.org/POM/4.0.0" xmlns:xsi="http://www.w3.org/2001/XMLSchema-instance"
-
xsi:schemaLocation="http://maven.apache.org/POM/4.0.0 http://maven.apache.org/xsd/maven-4.0.0.xsd">
-
<modelVersion>4.0.0</modelVersion>
-
-
<groupId>com.example</groupId>
-
<artifactId>demo</artifactId>
-
<version>0.0.1-SNAPSHOT</version>
-
<packaging>jar</packaging>
-
-
<name>rabbitMQ</name>
-
<description>Demo project for Spring Boot</description>
-
-
<parent>
-
<groupId>org.springframework.boot</groupId>
-
<artifactId>spring-boot-starter-parent</artifactId>
-
<version>2.0.2.RELEASE</version>
-
<relativePath/> <!-- lookup parent from repository -->
-
</parent>
-
-
<properties>
-
<project.build.sourceEncoding>UTF-8</project.build.sourceEncoding>
-
<project.reporting.outputEncoding>UTF-8</project.reporting.outputEncoding>
-
<java.version>1.8</java.version>
-
</properties>
-
-
<dependencies>
-
<dependency>
-
<groupId>org.springframework.boot</groupId>
-
<artifactId>spring-boot-starter-amqp</artifactId>
-
</dependency>
-
-
<dependency>
-
<groupId>org.springframework.boot</groupId>
-
<artifactId>spring-boot-starter-web</artifactId>
-
</dependency>
-
-
<dependency>
-
<groupId>org.springframework.boot</groupId>
-
<artifactId>spring-boot-starter-test</artifactId>
-
<scope>test</scope>
-
</dependency>
-
</dependencies>
-
-
<build>
-
<plugins>
-
<plugin>
-
<groupId>org.springframework.boot</groupId>
-
<artifactId>spring-boot-maven-plugin</artifactId>
-
</plugin>
-
</plugins>
-
</build>
-
-
-
</project>
自动配置信息 这里我开启ACK消息确认
-
server.port=8083
-
#服务器配置
-
spring.application.name=rabbitmq-hello-sending
-
#rabbitmq连接参数
-
spring.rabbitmq.host=localhost
-
spring.rabbitmq.port=5672
-
spring.rabbitmq.username=linpeng
-
spring.rabbitmq.password=123456
-
# 开启发送确认
-
spring.rabbitmq.publisher-confirms=true
-
# 开启发送失败退回
-
spring.rabbitmq.publisher-returns=true
-
# 开启ACK
-
spring.rabbitmq.listener.direct.acknowledge-mode=manual
-
spring.rabbitmq.listener.simple.acknowledge-mode=manual
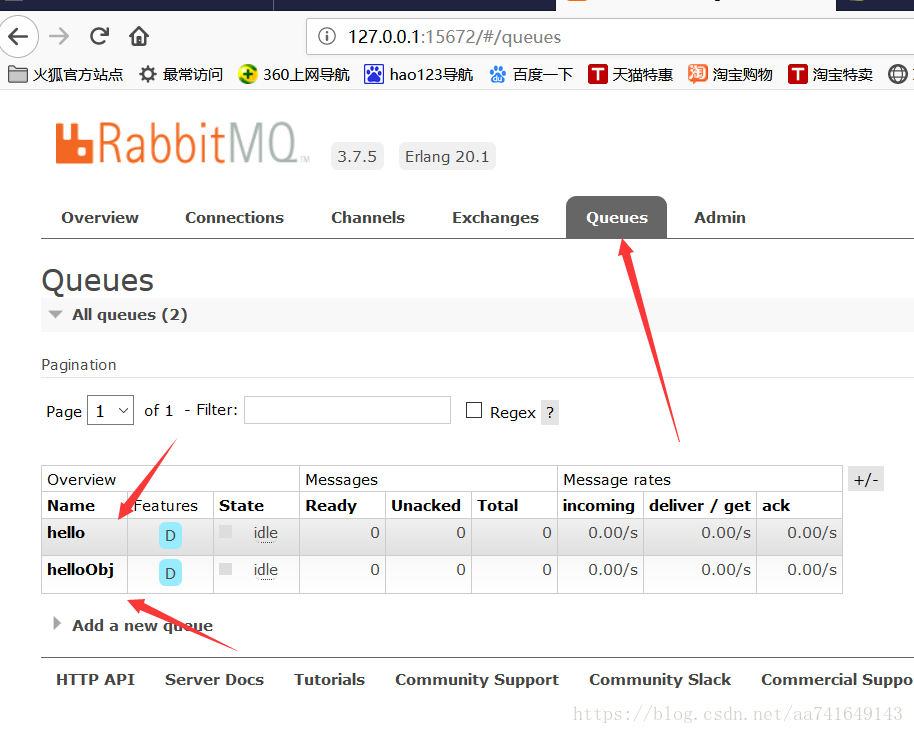
创建消息队列 队列名:hello 和 helloObj
-
package com.example.demo;
-
-
import com.rabbitmq.client.Channel;
-
import org.springframework.amqp.core.*;
-
import org.springframework.amqp.rabbit.connection.CachingConnectionFactory;
-
import org.springframework.amqp.rabbit.connection.ConnectionFactory;
-
import org.springframework.amqp.rabbit.core.ChannelAwareMessageListener;
-
import org.springframework.amqp.rabbit.listener.SimpleMessageListenerContainer;
-
import org.springframework.context.annotation.Bean;
-
import org.springframework.context.annotation.Configuration;
-
-
@Configuration
-
public class RabbitConfig {
-
-
@Bean
-
public Queue QueueA() {
-
return new Queue("hello");
-
}
-
-
@Bean
-
public Queue QueueB() {
-
return new Queue("helloObj");
-
}
-
-
/**
-
* Fanout 就是我们熟悉的广播模式或者订阅模式,给Fanout交换机发送消息,绑定了这个交换机的所有队列都收到这个消息。
-
* @return
-
*/
-
@Bean
-
FanoutExchange fanoutExchange() {
-
return new FanoutExchange("ABExchange");
-
}
-
-
-
@Bean
-
Binding bindingExchangeA(Queue QueueA, FanoutExchange fanoutExchange) {
-
return BindingBuilder.bind(QueueA).to(fanoutExchange);
-
}
-
-
@Bean
-
Binding bindingExchangeB(Queue QueueB, FanoutExchange fanoutExchange) {
-
return BindingBuilder.bind(QueueB).to(fanoutExchange);
-
}
-
}
消息发送者 Sender 使用 RabbitTemplate 不采用 AmqpTemplate
-
package com.example.demo;
-
-
import org.springframework.amqp.core.AmqpTemplate;
-
import org.springframework.amqp.core.Message;
-
import org.springframework.amqp.rabbit.core.RabbitTemplate;
-
import org.springframework.amqp.rabbit.support.CorrelationData;
-
import org.springframework.beans.factory.annotation.Autowired;
-
import org.springframework.stereotype.Component;
-
import org.springframework.stereotype.Service;
-
-
import java.util.Date;
-
//RabbitTemplate.ConfirmCallback
-
-
public class HelloSender implements RabbitTemplate.ReturnCallback {
-
-
-
// private AmqpTemplate rabbitTemplate;
-
private RabbitTemplate rabbitTemplate;
-
public void send() {
-
String context = "你好现在是 " + new Date() +"";
-
System.out.println("HelloSender发送内容 : " + context);
-
// this.rabbitTemplate.setConfirmCallback(this);
-
this.rabbitTemplate.setReturnCallback(this);
-
this.rabbitTemplate.setConfirmCallback((correlationData, ack, cause) -> {
-
if (!ack) {
-
System.out.println("HelloSender消息发送失败" + cause + correlationData.toString());
-
} else {
-
System.out.println("HelloSender 消息发送成功 ");
-
}
-
});
-
this.rabbitTemplate.convertAndSend("hello", context);
-
}
-
-
public void sendObj() {
-
MessageObj obj = new MessageObj();
-
obj.setACK(false);
-
obj.setId(123);
-
obj.setName("zhangsan");
-
obj.setValue("data");
-
System.out.println("发送 : " + obj);
-
this.rabbitTemplate.convertAndSend("helloObj", obj);
-
}
-
-
-
public void returnedMessage(Message message, int i, String s, String s1, String s2) {
-
System.out.println("sender return success" + message.toString()+"==="+i+"==="+s1+"==="+s2);
-
}
-
-
// @Override
-
// public void confirm(CorrelationData correlationData, boolean b, String s) {
-
// System.out.println("sender success");
-
// }
-
-
}
消息接受者 Receiver 注解方式接受消息
-
package com.example.demo;
-
-
import com.rabbitmq.client.Channel;
-
import org.springframework.amqp.core.Message;
-
import org.springframework.amqp.core.Queue;
-
import org.springframework.amqp.rabbit.annotation.RabbitHandler;
-
import org.springframework.amqp.rabbit.annotation.RabbitListener;
-
import org.springframework.amqp.rabbit.annotation.RabbitListenerConfigurer;
-
import org.springframework.amqp.rabbit.core.ChannelAwareMessageListener;
-
import org.springframework.amqp.rabbit.listener.RabbitListenerEndpointRegistrar;
-
import org.springframework.amqp.support.AmqpHeaders;
-
import org.springframework.beans.factory.annotation.Configurable;
-
import org.springframework.context.annotation.Bean;
-
import org.springframework.messaging.handler.annotation.Headers;
-
import org.springframework.stereotype.Component;
-
-
import java.io.IOException;
-
import java.util.Date;
-
import java.util.Map;
-
-
@Component
-
@RabbitListener(queues = "hello")
-
public class HelloReceiver {
-
-
@RabbitHandler
-
public void process(String hello,Channel channel, Message message) throws IOException {
-
System.out.println("HelloReceiver收到 : " + hello +"收到时间"+new Date());
-
try {
-
//告诉服务器收到这条消息 已经被我消费了 可以在队列删掉 这样以后就不会再发了 否则消息服务器以为这条消息没处理掉 后续还会在发
-
channel.basicAck(message.getMessageProperties().getDeliveryTag(),false);
-
System.out.println("receiver success");
-
} catch (IOException e) {
-
e.printStackTrace();
-
//丢弃这条消息
-
//channel.basicNack(message.getMessageProperties().getDeliveryTag(), false,false);
-
System.out.println("receiver fail");
-
}
-
-
}
-
}
备注:我们用注解的方式来接受消息 就不要用 自己创建对象实现ChannelAwareMessageListener的方式来接受消息 这种方式还要去全局里面配置 麻烦,直接用@RabbitListener(queues = "hello")最简单
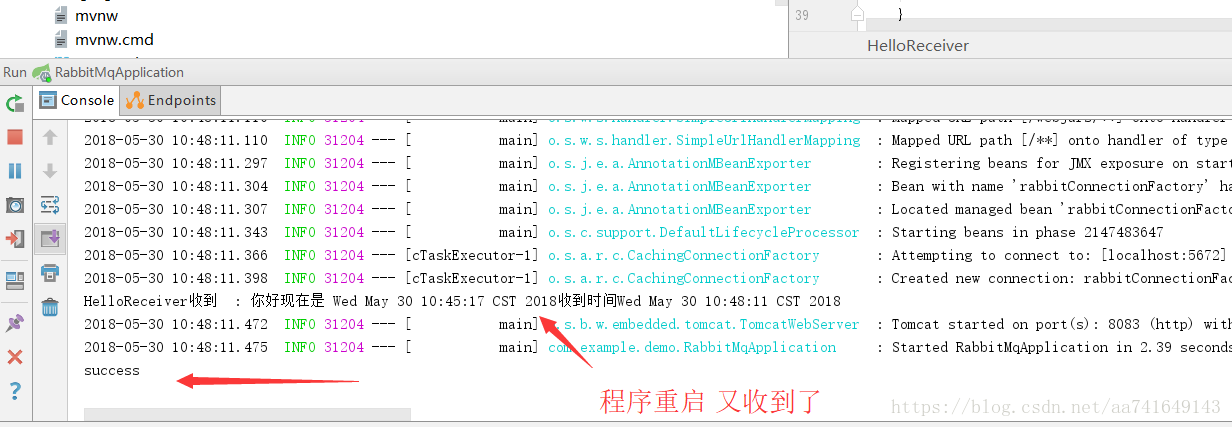
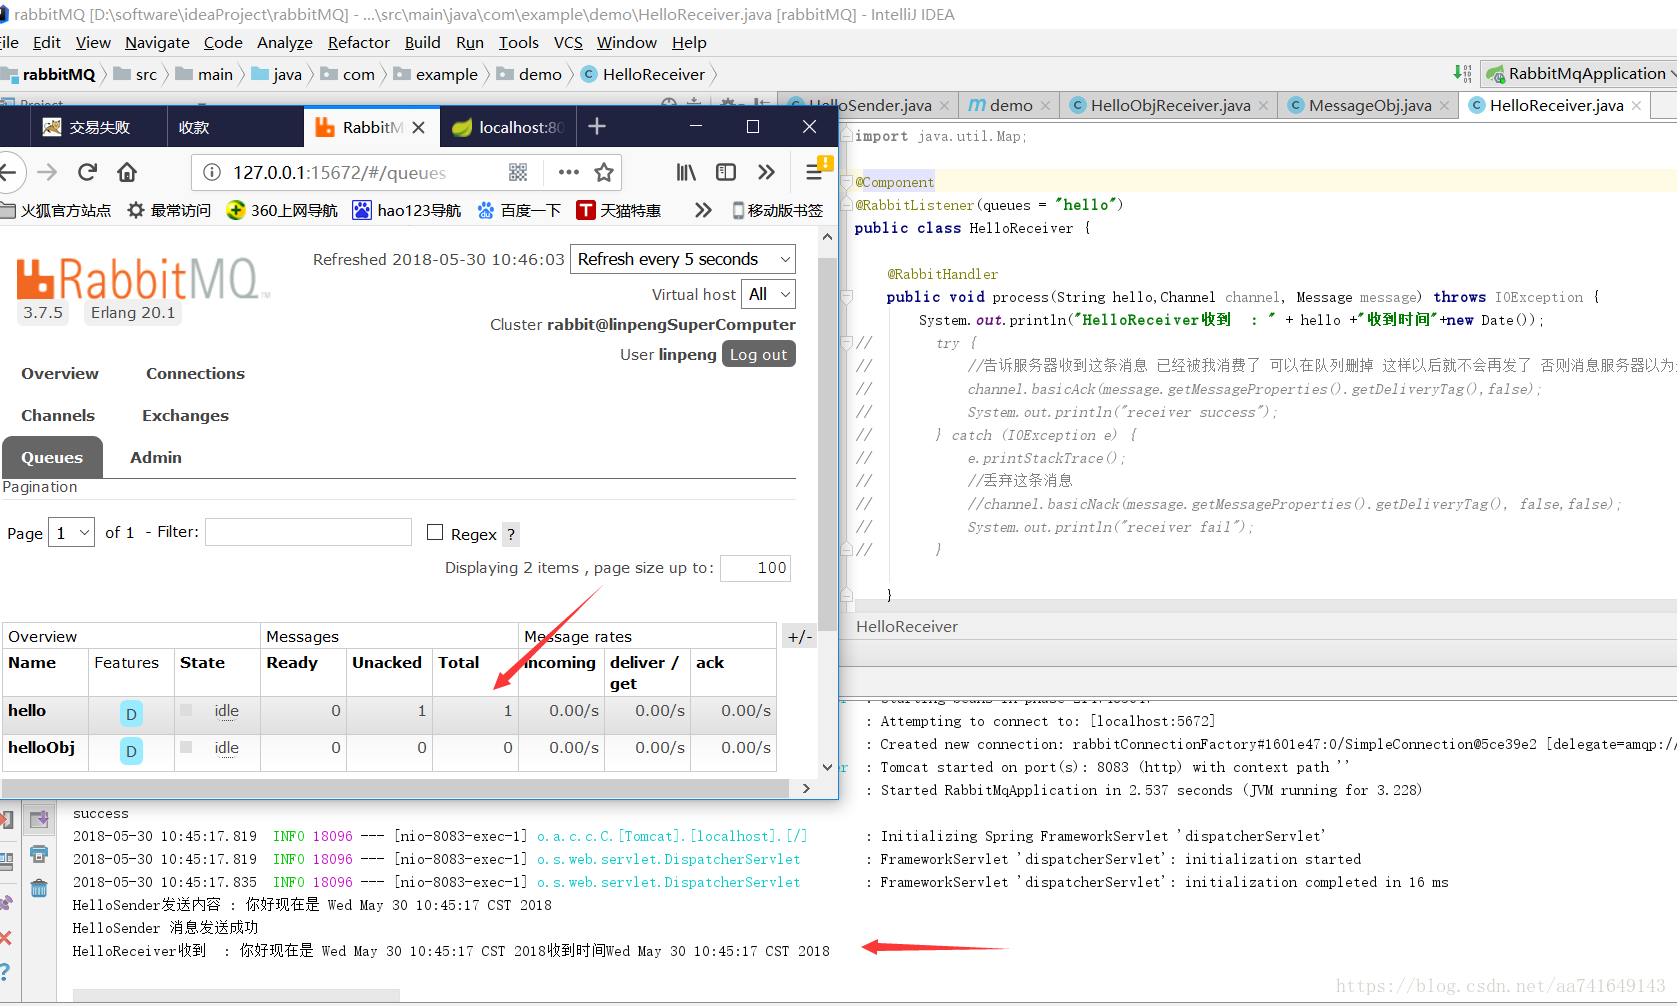
消息确认 因为我在属性配置文件里面开启了ACK确认 所以如果代码没有执行ACK确认 你在RabbitMQ的后台会看到消息会一直留在队列里面未消费掉 只要程序一启动开始接受该队列消息的时候 又会收到
channel.basicAck(message.getMessageProperties().getDeliveryTag(),false);//消息的标识,false只确认当前一个消息收到,true确认所有consumer获得的消息
channel.basicAck(message.getMessageProperties().getDeliveryTag(), false);
//ack返回false,并重新回到队列,api里面解释得很清楚
channel.basicNack(message.getMessageProperties().getDeliveryTag(), false, true);
//拒绝消息
channel.basicReject(message.getMessageProperties().getDeliveryTag(), true);
TestController测试
-
-
private HelloSender helloSender;
-
-
/**
-
* 单生产者-单个消费者
-
*/
-
("/test")
-
public void hello() throws Exception {
-
helloSender.send();
-
}
RabbitMQ后台 两个队列
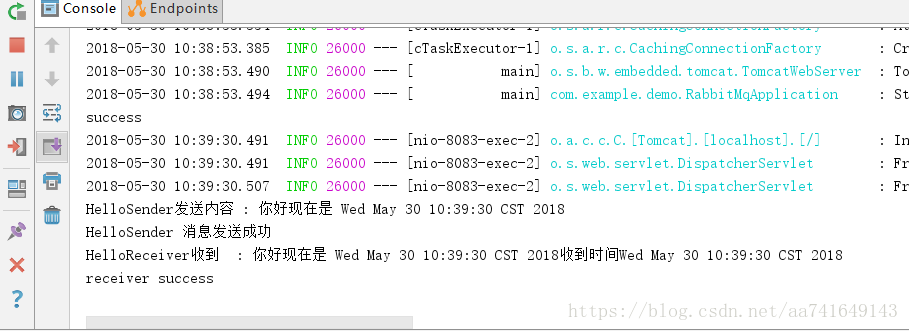
发送消息
ACK场景测试
我们把HelloReceiver的ACK确认代码注释掉 那消息就算程序收到了 但是未确认ACK导致消息服务器以为他是未成功消费的 后续还会再发
重启程序