


由于SpringBoot已经整合了WebSocket,使用起来非常方便。这篇博客的前提是已经搭建好SpringBoot项目,如果没有搭建好,请参考http://blog.csdn.net/u010889616/article/details/79561808这篇文章。
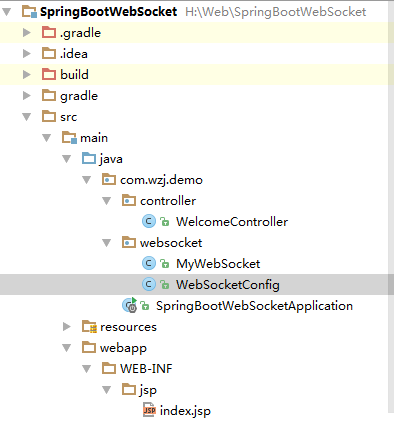
项目结构如下:
gradle添加依赖
-
// https://mvnrepository.com/artifact/org.springframework.boot/spring-boot-starter-websocket
-
compile group: 'org.springframework.boot', name: 'spring-boot-starter-websocket', version: '2.0.0.RELEASE'
(1)开启WebSocket服务。
新建WebSocketConfig.java类,添加@Configuration注解
-
package com.wzj.demo.websocket;
-
-
import org.springframework.context.annotation.Bean;
-
import org.springframework.context.annotation.Configuration;
-
import org.springframework.web.socket.server.standard.ServerEndpointExporter;
-
-
/**
-
* Created by wzj on 2018/3/14.
-
*/
-
@Configuration
-
public class WebSocketConfig
-
{
-
@Bean
-
public ServerEndpointExporter serverEndpointExporter()
-
{
-
return new ServerEndpointExporter();
-
}
-
}
使用@ServerEndpoint注解来配置/websocket站点,来让前端访问,每一个函数都有注释。
-
package com.wzj.demo.websocket;
-
-
import org.springframework.stereotype.Component;
-
-
import javax.websocket.OnClose;
-
import javax.websocket.OnMessage;
-
import javax.websocket.OnOpen;
-
import javax.websocket.Session;
-
import javax.websocket.server.ServerEndpoint;
-
import java.io.IOException;
-
import java.util.List;
-
import java.util.concurrent.CopyOnWriteArrayList;
-
-
/**
-
* Created by wzj on 2018/3/14.
-
*/
-
(value = "/websocket")
-
-
public class MyWebSocket
-
{
-
/**
-
* 在线人数
-
*/
-
public static int onlineNumber = 0;
-
-
/**
-
* 所有的对象
-
*/
-
public static List<MyWebSocket> webSockets = new CopyOnWriteArrayList<MyWebSocket>();
-
-
/**
-
* 会话
-
*/
-
private Session session;
-
-
/**
-
* 建立连接
-
*
-
* @param session
-
*/
-
-
public void onOpen(Session session)
-
{
-
onlineNumber++;
-
webSockets.add(this);
-
-
this.session = session;
-
-
System.out.println("有新连接加入! 当前在线人数" + onlineNumber);
-
}
-
-
/**
-
* 连接关闭
-
*/
-
-
public void onClose()
-
{
-
onlineNumber--;
-
webSockets.remove(this);
-
System.out.println("有连接关闭! 当前在线人数" + onlineNumber);
-
}
-
-
/**
-
* 收到客户端的消息
-
*
-
* @param message 消息
-
* @param session 会话
-
*/
-
-
public void onMessage(String message, Session session)
-
{
-
System.out.println("来自客户端消息:" + message);
-
-
sendMessage("欢迎连接");
-
}
-
-
/**
-
* 发送消息
-
*
-
* @param message 消息
-
*/
-
public void sendMessage(String message)
-
{
-
try
-
{
-
session.getBasicRemote().sendText(message);
-
}
-
catch (IOException e)
-
{
-
e.printStackTrace();
-
}
-
}
-
}
(3)在webapp/WEB-INF/jsp目录,新建index.jsp文件
webSocket = new WebSocket("ws://localhost:8080/websocket"); //连接本地后台的/websocket服务
webSocket有三个响应事件onopen(服务连通)、onmesage(收到消息)、onclose(连接被关闭)
-
<%--
-
Created by IntelliJ IDEA.
-
User: wzj
-
Date: 2016/10/8
-
Time: 21:24
-
To change this template use File | Settings | File Templates.
-
--%>
-
<%@ page contentType="text/html;charset=UTF-8" language="java" %>
-
<html>
-
<head>
-
<title>Index</title>
-
</head>
-
<body>
-
-
<div>你好</div>
-
<div id="message"></div>
-
-
<canvas id="canvas" style="border: 1px solid red;"></canvas>
-
</body>
-
</html>
-
<script>
-
-
var webSocket;
-
if (window.WebSocket)
-
{
-
webSocket = new WebSocket("ws://localhost:8080/websocket");
-
-
//连通之后的回调事件
-
webSocket.onopen = function()
-
{
-
webSocket.send("发送数据");
-
};
-
-
//接收后台服务端的消息
-
webSocket.onmessage = function (evt)
-
{
-
var received_msg = evt.data;
-
alert("数据已接收:" + received_msg);
-
};
-
-
//连接关闭的回调事件
-
webSocket.onclose = function()
-
{
-
alert("连接已关闭...");
-
};
-
-
}
-
-
</script>
-
(4)在Controller配置url,来访问index.jsp页面
-
package com.wzj.demo.controller;
-
-
import org.springframework.web.bind.annotation.RequestMapping;
-
import org.springframework.web.bind.annotation.ResponseBody;
-
import org.springframework.web.bind.annotation.RestController;
-
import org.springframework.web.servlet.ModelAndView;
-
-
/**
-
* Created by wzj on 2018/3/14.
-
*/
-
-
public class WelcomeController
-
{
-
/**
-
* 首页
-
* @return 测试
-
*/
-
-
-
public String welcome()
-
{
-
return "Hello World";
-
}
-
-
-
public ModelAndView index(ModelAndView view)
-
{
-
//设置jsp名字
-
view.setViewName("index");
-
-
//传递数据
-
view.addObject("name","张三");
-
-
return view;
-
}
-
}
(5)测试
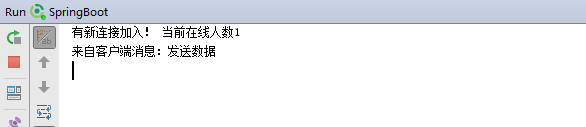
启动SpingBoot,在浏览器输入http://127.0.0.1:8080/index,就会发现日志中打印出,有客户端连接,并收到消息。
在浏览器端也收到消息

Demo Github地址: https://github.com/HelloKittyNII/SpringBoot/tree/master/SpringBootDemo
