曹工说Spring Boot源码(17)-- Spring从xml文件里到底得到了什么(aop:config完整解析【中】)
写在前面的话
相关背景及资源:
曹工说Spring Boot源码(1)-- Bean Definition到底是什么,附spring思维导图分享
曹工说Spring Boot源码(2)-- Bean Definition到底是什么,咱们对着接口,逐个方法讲解
曹工说Spring Boot源码(3)-- 手动注册Bean Definition不比游戏好玩吗,我们来试一下
曹工说Spring Boot源码(4)-- 我是怎么自定义ApplicationContext,从json文件读取bean definition的?
曹工说Spring Boot源码(5)-- 怎么从properties文件读取bean
曹工说Spring Boot源码(6)-- Spring怎么从xml文件里解析bean的
曹工说Spring Boot源码(7)-- Spring解析xml文件,到底从中得到了什么(上)
曹工说Spring Boot源码(8)-- Spring解析xml文件,到底从中得到了什么(util命名空间)
曹工说Spring Boot源码(9)-- Spring解析xml文件,到底从中得到了什么(context命名空间上)
曹工说Spring Boot源码(10)-- Spring解析xml文件,到底从中得到了什么(context:annotation-config 解析)
曹工说Spring Boot源码(11)-- context:component-scan,你真的会用吗(这次来说说它的奇技淫巧)
曹工说Spring Boot源码(12)-- Spring解析xml文件,到底从中得到了什么(context:component-scan完整解析)
曹工说Spring Boot源码(13)-- AspectJ的运行时织入(Load-Time-Weaving),基本内容是讲清楚了(附源码)
曹工说Spring Boot源码(14)-- AspectJ的Load-Time-Weaving的两种实现方式细细讲解,以及怎么和Spring Instrumentation集成
曹工说Spring Boot源码(15)-- Spring从xml文件里到底得到了什么(context:load-time-weaver 完整解析)
曹工说Spring Boot源码(16)-- Spring从xml文件里到底得到了什么(aop:config完整解析【上】)
工程结构图:

概要
本篇是接着上一篇讲的,为了避免不必要的重复,请大家先看下前一篇。
曹工说Spring Boot源码(16)-- Spring从xml文件里到底得到了什么(aop:config完整解析【上】)
本篇主要讲一个主题,解析xml后,获取到了哪些bean definition。
解析xml,获取业务相关的切点、切面等bean definition
为了讲述方便,这里贴一下spring要解析的xml:
<!--目标对象-->
<bean id="performer" class="foo.Performer"/>

<!--切面-->
<bean id="performAspect" class="foo.PerformAspect"/>

<!--配置切入点-->
<aop:config>
    <aop:pointcut id="mypointcut" expression="execution(public * foo.Perform.sing(..))"/>
    <aop:aspect id="myAspect" ref="performAspect">
        <aop:after method="afterPerform" pointcut-ref="mypointcut"/>
    </aop:aspect>
</aop:config>
前面两个业务bean,没啥说的,一个是target对象,一个是切面对象。核心的解析主要是aop:config,在spring里,解析该元素的代码在:
public class AopNamespaceHandler extends NamespaceHandlerSupport {

   public void init() {
      // In 2.0 XSD as well as in 2.1 XSD.
      registerBeanDefinitionParser("config", new ConfigBeanDefinitionParser());
      registerBeanDefinitionParser("aspectj-autoproxy", new AspectJAutoProxyBeanDefinitionParser());
      registerBeanDefinitionDecorator("scoped-proxy", new ScopedProxyBeanDefinitionDecorator());

      // Only in 2.0 XSD: moved to context namespace as of 2.1   这个已经移到context命名空间了
      registerBeanDefinitionParser("spring-configured", new SpringConfiguredBeanDefinitionParser());
   }

}
aop命名空间里,一共4个元素,其中一个"spring-configured"移到了context命名空间了,所以剩三个。这三个元素,对应的解析类,在上面的init方法中一目了然。其中,aop:config对应的解析类,为ConfigBeanDefinitionParser。
在下面的parse方法中,参数element即为当前解析到的aop:config,首先,创建了一个用于代理创建的bean definition;然后获取本元素的子元素,子元素可能是 aop:pointcut,aop:aspect,aop:advisor,然后对其进行相应的处理。
public BeanDefinition parse(Element element, ParserContext parserContext) {
   // 配置代理创建bean definition,是一个beanPostProcessor类型的bean definition
   configureAutoProxyCreator(parserContext, element);

   // 获取aop元素下的子元素
   List<Element> childElts = DomUtils.getChildElements(element);
   for (Element elt: childElts) {
      String localName = parserContext.getDelegate().getLocalName(elt);
      // 如果元素名等于pointcut,则走下面
      if (POINTCUT.equals(localName)) {
         parsePointcut(elt, parserContext);
      }
      // 如果元素名等于 advisor,则走下面
      else if (ADVISOR.equals(localName)) {
         parseAdvisor(elt, parserContext);
      }
      // 如果元素名等于 aspect,则走下面
      else if (ASPECT.equals(localName)) {
         parseAspect(elt, parserContext);
      }
   }

   return null;
}
为了讲解清晰,我们先讲解几个子元素的解析过程。
aop:pointcut解析
#org.springframework.aop.config.ConfigBeanDefinitionParser#parsePointcut
private AbstractBeanDefinition parsePointcut(Element pointcutElement, ParserContext parserContext) {
   //获取id和expression属性
   String id = pointcutElement.getAttribute(ID);
   String expression = pointcutElement.getAttribute(EXPRESSION);

   // 1. 根据expression,创建bean definition
   AbstractBeanDefinition pointcutDefinition = createPointcutDefinition(expression);;

   // 2. 向ioc容器,注册bean definition,注册的操作是由下面的registerBeanDefinition调用完成
   String pointcutBeanName = id;
   if (StringUtils.hasText(pointcutBeanName)) {
   		parserContext.getRegistry().registerBeanDefinition(pointcutBeanName, pointcutDefinition);
   }
   else {
   		pointcutBeanName = parserContext.getReaderContext().registerWithGeneratedName(pointcutDefinition);
   }


   return pointcutDefinition;
}
上面的代码,主要有2个步骤,生成bean definition和向BeanDefinitionRegistry(一般beanFactory实现了该接口)注册该bean definition。
生成beanDefinition的代码,主要在以下方法:
protected AbstractBeanDefinition createPointcutDefinition(String expression) {
   RootBeanDefinition beanDefinition = new RootBeanDefinition(AspectJExpressionPointcut.class);
   beanDefinition.setScope(BeanDefinition.SCOPE_PROTOTYPE);
   beanDefinition.setSynthetic(true);
   beanDefinition.getPropertyValues().add(EXPRESSION, expression);
   return beanDefinition;
}
大家可以看到,这里new了一个RootBeanDefinition,这是一个BeanDefinition接口的实现,框架内部的bean的beandefinition,一般都是这个类型。这里可以看到,这个bean definition的class类型为AspectJExpressionPointcut,scope为prototype,而且通过以下代码,设置了一个属性值。
beanDefinition.getPropertyValues().add(EXPRESSION, expression);
propertValues这个属性,大家可以理解为xml时代,像下面这样配置属性:
<bean class="foo.TestPropertiesVO">
    <property name="name" value="abc"/>
</bean>
其实也不能说是“像”,因为spring解析上面这个xml,就会使用beanDefinition.getPropertyValues().add(EXPRESSION, expression)这样的代码来解析。
ok,切点解析,我们就是得到了一个AspectJExpressionPointcut类型的bean definition。
aop:aspect解析
# org.springframework.aop.config.ConfigBeanDefinitionParser#parseAspect
# 去掉了部分无关代码
private void parseAspect(Element aspectElement, ParserContext parserContext) {
   String aspectId = aspectElement.getAttribute(ID);
   String aspectName = aspectElement.getAttribute(REF);

    List<BeanDefinition> beanDefinitions = new ArrayList<BeanDefinition>();
    List<BeanReference> beanReferences = new ArrayList<BeanReference>();

    NodeList nodeList = aspectElement.getChildNodes();
    boolean adviceFoundAlready = false;
    //遍历子元素
    for (int i = 0; i < nodeList.getLength(); i++) {
        Node node = nodeList.item(i);
        if (isAdviceNode(node, parserContext)) {
            if (!adviceFoundAlready) {
                adviceFoundAlready = true;
                // 这里其实是要把<aop:aspect ref="performAspect"> 这一句里面的ref引用的切面存起来
                beanReferences.add(new RuntimeBeanReference(aspectName));
            }
            // 解析每一个子元素,获取一个bean definition。这里的子元素就是<aop:before> <aop:after>等
            AbstractBeanDefinition advisorDefinition = parseAdvice(
                aspectName, i, aspectElement, (Element) node, parserContext, beanDefinitions, beanReferences);
            beanDefinitions.add(advisorDefinition);
        }
    }
}
上面这段代码,有3点要说明的。
-
这里通过
String aspectName = aspectElement.getAttribute(REF);获取了通知bean的bean name,也就是<aop:aspect ref="performAspect">这里面的那个performAspect。这个东西,后面会用; -
aspectElement.getChildNodes();获取了子元素,当前是<aop:aspect ref="performAspect">,那么子元素就是<aop:before>,<aop:after>这些。每次遍历,都会生成一个AbstractBeanDefinition advisorDefinition,也就是说,每次遍历都会生成一个bean definition。 -
具体的
<aop:after>代码如下:private AbstractBeanDefinition parseAdvice( String aspectName, int order, Element aspectElement, Element adviceElement, ParserContext parserContext, List<BeanDefinition> beanDefinitions, List<BeanReference> beanReferences) { // 1.创建bean definition,类型为 MethodLocatingFactoryBean;会交给第三步使用 RootBeanDefinition methodDefinition = new RootBeanDefinition(MethodLocatingFactoryBean.class); methodDefinition.getPropertyValues().add("targetBeanName", aspectName); methodDefinition.getPropertyValues().add("methodName", adviceElement.getAttribute("method")); methodDefinition.setSynthetic(true); // 2.创建bean definition,类型为SimpleBeanFactoryAwareAspectInstanceFactory;会交给第三步使用 RootBeanDefinition aspectFactoryDef = new RootBeanDefinition(SimpleBeanFactoryAwareAspectInstanceFactory.class); aspectFactoryDef.getPropertyValues().add("aspectBeanName", aspectName); aspectFactoryDef.setSynthetic(true); // 3.创建aop:after对应的类型的bean definition;如果是aop:before,这里的类型不一样 AbstractBeanDefinition adviceDef = createAdviceDefinition( adviceElement, parserContext, aspectName, order, methodDefinition, aspectFactoryDef, beanDefinitions, beanReferences); // 4. 创建bean definition,类型为 AspectJPointcutAdvisor RootBeanDefinition advisorDefinition = new RootBeanDefinition(AspectJPointcutAdvisor.class); advisorDefinition.setSource(parserContext.extractSource(adviceElement)); advisorDefinition.getConstructorArgumentValues().addGenericArgumentValue(adviceDef); if (aspectElement.hasAttribute(ORDER_PROPERTY)) { advisorDefinition.getPropertyValues().add( ORDER_PROPERTY, aspectElement.getAttribute(ORDER_PROPERTY)); } // 5. 注册第四步创建的AspectJPointcutAdvisor类型的bean definition parserContext.getReaderContext().registerWithGeneratedName(advisorDefinition); return advisorDefinition; }有人看到上面一坨,不要慌,其实不难。第一步和第二步,创建了2个bean definition,都是给第三步服务的。第三步,我这里给大家说,根据不同的子元素,bean definition的class是不一样的,大家直接看以下代码:
org.springframework.aop.config.ConfigBeanDefinitionParser#getAdviceClass
private Class getAdviceClass(Element adviceElement, ParserContext parserContext) {
   String elementName = parserContext.getDelegate().getLocalName(adviceElement);
   if (BEFORE.equals(elementName)) {
      return AspectJMethodBeforeAdvice.class;
   }
   else if (AFTER.equals(elementName)) {
      return AspectJAfterAdvice.class;
   }
   else if (AFTER_RETURNING_ELEMENT.equals(elementName)) {
      return AspectJAfterReturningAdvice.class;
   }
   else if (AFTER_THROWING_ELEMENT.equals(elementName)) {
      return AspectJAfterThrowingAdvice.class;
   }
   else if (AROUND.equals(elementName)) {
      return AspectJAroundAdvice.class;
   }
   else {
      throw new IllegalArgumentException("Unknown advice kind [" + elementName + "].");
   }
}
因为我们这里是
aop:after,所以我们这里的bean 类型为AspectJAfterAdvice。我们进一步,看看AspectJAfterAdvice这个类的代码:
public class AspectJAfterAdvice extends AbstractAspectJAdvice implements MethodInterceptor, AfterAdvice {

   public AspectJAfterAdvice(
         Method aspectJBeforeAdviceMethod, AspectJExpressionPointcut pointcut, AspectInstanceFactory aif) {

      super(aspectJBeforeAdviceMethod, pointcut, aif);
   }
   ...
}
可以看到,这个class,只有一个构造函数,需要三个参数。我们仔细看看,其实前面的第一步和第二步,创建的bean definition,就是给这个构造函数服务的。
AspectJAfterAdvice构造函数参数 解析代码中创建的bean definition Method aspectJBeforeAdviceMethod 步骤1,类型为MethodLocatingFactoryBean。其实现了接口 FactoryBean<Method>,通过ioc容器,获取factorybean,直接就能获取到其生产的对象,这里这个工厂,生产的对象,就是Method类型的AspectJExpressionPointcut pointcut 步骤3,todo AspectInstanceFactory aif 步骤2,类型为SimpleBeanFactoryAwareAspectInstanceFactory,其实现了AspectInstanceFactory接口 大家看了这个表格,应该清楚了不少,其中第二个参数还没讲到,我们跳转到步骤3的具体实现中:
private AbstractBeanDefinition createAdviceDefinition(
      Element adviceElement, ParserContext parserContext, String aspectName, int order,
      RootBeanDefinition methodDef, RootBeanDefinition aspectFactoryDef,
      List<BeanDefinition> beanDefinitions, List<BeanReference> beanReferences) {
   // 这里的getAdviceClass,就是根据元素类型,获取不同的bean class类型
   RootBeanDefinition adviceDefinition = new RootBeanDefinition(getAdviceClass(adviceElement, parserContext));
   // 设置aspectName属性,来源于<aop:aspect ref="performAspect">
   adviceDefinition.getPropertyValues().add(ASPECT_NAME_PROPERTY, aspectName);
   // 设置本 bean definition的类的构造参数,我们这里,即AspectJAfterAdvice的构造函数参数
   ConstructorArgumentValues cav = adviceDefinition.getConstructorArgumentValues();
   cav.addIndexedArgumentValue(0, methodDef);

   Object pointcut = parsePointcutProperty(adviceElement, parserContext);
   RuntimeBeanReference pointcutRef = new RuntimeBeanReference((String) pointcut);
   cav.addIndexedArgumentValue(1, pointcutRef);
   beanReferences.add(pointcutRef);


   cav.addIndexedArgumentValue(2, aspectFactoryDef);

   return adviceDefinition;
}
我想了下,拿图说话吧:
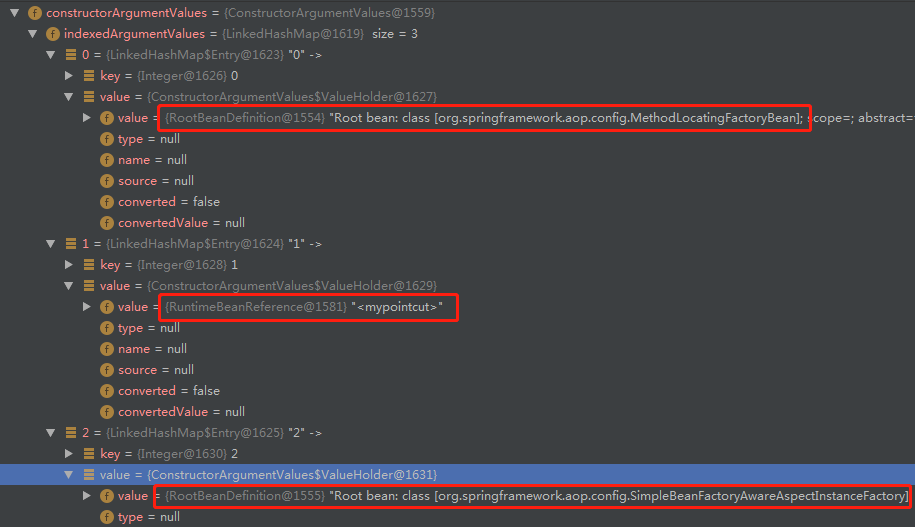
这个AspectJAfterAdvice的bean definition中的构造函数参数这块,就接收上面图里的3个参数,其中参数1和3,都是RootBeanDefinition;参数2,为针对bean的引用。
前面讲了,怎么去构造AspectJAfterAdvice这种bean definition了,但还有一段没讲:
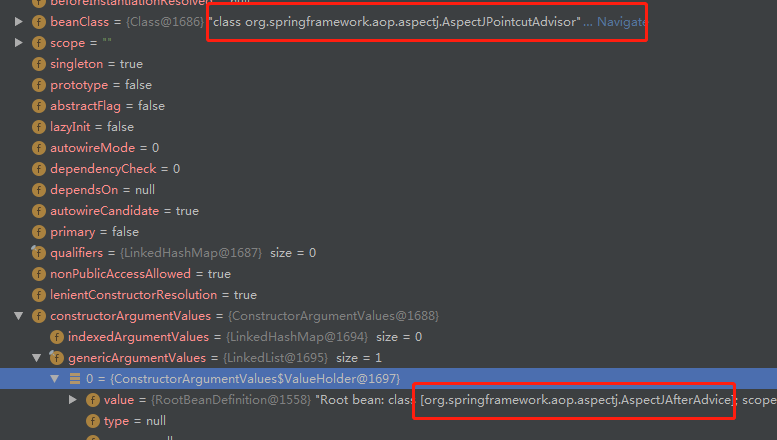
	  // 4. 创建bean definition,类型为 AspectJPointcutAdvisor
      RootBeanDefinition advisorDefinition = new RootBeanDefinition(AspectJPointcutAdvisor.class);
      advisorDefinition.setSource(parserContext.extractSource(adviceElement));
      advisorDefinition.getConstructorArgumentValues().addGenericArgumentValue(adviceDef);
      if (aspectElement.hasAttribute(ORDER_PROPERTY)) {
         advisorDefinition.getPropertyValues().add(
               ORDER_PROPERTY, aspectElement.getAttribute(ORDER_PROPERTY));
      }

      // 5. 注册第四步创建的AspectJPointcutAdvisor类型的bean definition
      parserContext.getReaderContext().registerWithGeneratedName(advisorDefinition);

      return advisorDefinition;
}
这里其实就是利用前面拿到的AspectJAfterAdvice,去构造这里第四步的AspectJPointcutAdvisor类型的bean definition。大家直接看看如下代码:
public AspectJPointcutAdvisor(AbstractAspectJAdvice advice) {
    Assert.notNull(advice, "Advice must not be null");
    this.advice = advice;
    this.pointcut = advice.buildSafePointcut();
}
所以,就是说,第四步的bean definition,在构造这个bean的时候,因为没有无参构造函数,而只有这个带一个AbstractAspectJAdvice类型参数的构造函数。
具体的,大家看下面的图,更容易理解。
然后,这个最外层的AspectJPointcutAdvisor的bean definition,被注册到ioc容器;而值得一提的是,其他的几个bean definition,并没有被注册到ioc容器。
汇总一下,目前为止,解析下面这段xml,我们的收获如下:
<aop:config>
        <aop:pointcut id="pointcut" expression="execution(public * foo.Perform.sing(..))"/>
        <aop:aspect ref="performAspect">
            <aop:before method="beforePerform" pointcut-ref="pointcut"/>
            <aop:after method="afterPerform" pointcut-ref="pointcut"/>
        </aop:aspect>
    </aop:config>
收获:
-
切点对应的bean definition,1个
{ "abstract": false, "autowireCandidate": true, "autowireMode": 0, "beanClass": "org.springframework.aop.aspectj.AspectJExpressionPointcut", "beanClassName": "org.springframework.aop.aspectj.AspectJExpressionPointcut", "constructorArgumentValues": { "argumentCount": 0, "empty": true, "genericArgumentValues": [], "indexedArgumentValues": {} }, "dependencyCheck": 0, "enforceDestroyMethod": true, "enforceInitMethod": true, "lazyInit": false, "primary": false, "propertyValues": { "converted": false, "empty": false, "propertyValueList": [ { "converted": false, "name": "expression", "optional": false, "value": "execution(public * foo.Perform.sing(..))" } ] }, "prototype": true, "qualifiers": [], "resolvedAutowireMode": 0, "role": 0, "scope": "prototype", "singleton": false, "synthetic": true, "targetType": "org.springframework.aop.aspectj.AspectJExpressionPointcut" } -
aop:aspect 对应的bean definition,1个,类型为:AspectJPointcutAdvisor
其内部的构造函数参数,持有了一个内部的,类型为AspectJAfterAdvice的bean definition,这个其实是一个内部bean definition了。而这个内部bean definition的构造函数中,还持有了3个其他的参数,2个bean definition,1个为bean 引用。大家可以看下面的json,比较长,我已经删了一些无关属性了。
{
  "abstract": false,
  "autowireCandidate": true,
  "autowireMode": 0,
  "beanClass": "org.springframework.aop.aspectj.AspectJPointcutAdvisor",
  "beanClassName": "org.springframework.aop.aspectj.AspectJPointcutAdvisor",
  "constructorArgumentValues": {
    "argumentCount": 1,
    "empty": false,
    "genericArgumentValues": [
      {
        "converted": false,
        "value": {
          "abstract": false,
          "autowireCandidate": true,
          "autowireMode": 0,
           // 看这里
          "beanClass": "org.springframework.aop.aspectj.AspectJAfterAdvice",
          "beanClassName": "org.springframework.aop.aspectj.AspectJAfterAdvice",
          "constructorArgumentValues": {
            "argumentCount": 3,
            "empty": false,
            "genericArgumentValues": [],
             // 再看这里,3个构造函数参数
            "indexedArgumentValues": {
              "0": {
                "converted": false,
                "value": {
                  "abstract": false,
                  "autowireCandidate": true,
                  "autowireMode": 0,
                  "beanClass": "org.springframework.aop.config.MethodLocatingFactoryBean",
                  "beanClassName": "org.springframework.aop.config.MethodLocatingFactoryBean",
                  "constructorArgumentValues": {
                    "argumentCount": 0,
                    "empty": true,
                    "genericArgumentValues": [],
                    "indexedArgumentValues": {}
                  },
                  "nonPublicAccessAllowed": true,
                  "primary": false,
                  "propertyValues": {
                    "converted": false,
                    "empty": false,
                    "propertyValueList": [
                      {
                        "converted": false,
                        "name": "targetBeanName",
                        "optional": false,
                        "value": "performAspect"
                      },
                      {
                        "converted": false,
                        "name": "methodName",
                        "optional": false,
                        "value": "afterPerform"
                      }
                    ]
                  },
                  "prototype": false,
                  "qualifiers": [],
                  "resolvedAutowireMode": 0,
                  "role": 0,
                  "scope": "",
                  "singleton": true,
                  "synthetic": true
                }
              },
              "1": {
                "converted": false,
                "value": {
                  "beanName": "mypointcut",
                  "toParent": false
                }
              },
              "2": {
                "converted": false,
                "value": {
                  "abstract": false,
                  "autowireCandidate": true,
                  "autowireMode": 0,
                  "beanClass": "org.springframework.aop.config.SimpleBeanFactoryAwareAspectInstanceFactory",
                  "beanClassName": "org.springframework.aop.config.SimpleBeanFactoryAwareAspectInstanceFactory",
                  "constructorArgumentValues": {
                    "argumentCount": 0,
                    "empty": true,
                    "genericArgumentValues": [],
                    "indexedArgumentValues": {}
                  },
                  "dependencyCheck": 0,
                  "enforceDestroyMethod": true,
                  "enforceInitMethod": true,
                  "lazyInit": false,
                  "lenientConstructorResolution": true,
                  "methodOverrides": {
                    "empty": true,
                    "overrides": []
                  },
                  "nonPublicAccessAllowed": true,
                  "primary": false,
                  "propertyValues": {
                    "converted": false,
                    "empty": false,
                    "propertyValueList": [
                      {
                        "converted": false,
                        "name": "aspectBeanName",
                        "optional": false,
                        "value": "performAspect"
                      }
                    ]
                  },
                }
              }
            }
          },
          "nonPublicAccessAllowed": true,
          "propertyValues": {
            "converted": false,
            "empty": false,
            "propertyValueList": [
              {
                "converted": false,
                "name": "aspectName",
                "optional": false,
                "value": "performAspect"
              },
              {
                "converted": false,
                "name": "declarationOrder",
                "optional": false,
                "value": 1
              }
            ]
          },
          "prototype": false,
          "singleton": true,
          "synthetic": false
        }
      }
    ],
    "indexedArgumentValues": {}
  },
  "lazyInit": false,
  "primary": false,
  "propertyValues": {
    "converted": false,
    "empty": true,
    "propertyValueList": []
  },
  "targetType": "org.springframework.aop.aspectj.AspectJPointcutAdvisor"
}
所以,到目前为止,我们收获了2个最外层的,注册到了ioc容器的bean definition,是可以直接getBean的那种。
至于其余的那几个构造函数相关的bean definition,其实都是在ioc容器里不存在的,如果去getBean,会失败。
比如,我们改造了main方法如下:
public static void main(String[] args) {
    ClassPathXmlApplicationContext ctx = new ClassPathXmlApplicationContext(
            "context-namespace-test-aop.xml");
	// 这里去获取前面那个AspectJAfterAdvice bean definition
    AspectJAfterAdvice bean = ctx.getBean(AspectJAfterAdvice.class);

    Perform performer = (Perform) ctx.getBean(Perform.class);
    performer.sing();
}
结果,报错了,NoSuchBeanDefinitionException:
Exception in thread "main" org.springframework.beans.factory.NoSuchBeanDefinitionException: No qualifying bean of type [org.springframework.aop.aspectj.AspectJAfterAdvice] is defined
	at org.springframework.beans.factory.support.DefaultListableBeanFactory.getBean(DefaultListableBeanFactory.java:296)
	at org.springframework.context.support.AbstractApplicationContext.getBean(AbstractApplicationContext.java:1196)
	at foo.Main.main(Main.java:21)
换成下面这个,也一样:
ctx.getBean(SimpleBeanFactoryAwareAspectInstanceFactory.class);
Exception in thread "main" org.springframework.beans.factory.NoSuchBeanDefinitionException: No qualifying bean of type [org.springframework.aop.config.SimpleBeanFactoryAwareAspectInstanceFactory] is defined
	at org.springframework.beans.factory.support.DefaultListableBeanFactory.getBean(DefaultListableBeanFactory.java:296)
	at org.springframework.context.support.AbstractApplicationContext.getBean(AbstractApplicationContext.java:1196)
	at foo.Main.main(Main.java:22)
经过这么一实验,想必大家也能一定程度,理解内部bean了。
解析xml,获取框架支撑型bean definition
前面一段解析,虽然费时费力,但是还没完成全部的解析工作,拿到的都是些业务bean definition,比如在什么地方切,切面逻辑在哪,等等,但是,这个切面要怎么生效,还没搞清楚。大家可以往前翻,翻到开头的解析处,可以看到下面这段:
	public BeanDefinition parse(Element element, ParserContext parserContext) {
		CompositeComponentDefinition compositeDef =
				new CompositeComponentDefinition(element.getTagName(), parserContext.extractSource(element));
		parserContext.pushContainingComponent(compositeDef);
		// 配置代理创建bean definition,是一个beanPostProcessor类型的bean definition
		configureAutoProxyCreator(parserContext, element);

        ...
    }
其中,configureAutoProxyCreator这句,就是画龙点睛的最后一笔。其经过简单的跳转后,会调用:
public static BeanDefinition registerAspectJAutoProxyCreatorIfNecessary(BeanDefinitionRegistry registry, Object source) {
   return registerOrEscalateApcAsRequired(AspectJAwareAdvisorAutoProxyCreator.class, registry, source);
}
这一句,会注册一个bean class类型为AspectJAwareAdvisorAutoProxyCreator的bean definition,到ioc容器。
这个AspectJAwareAdvisorAutoProxyCreator类比较特别,
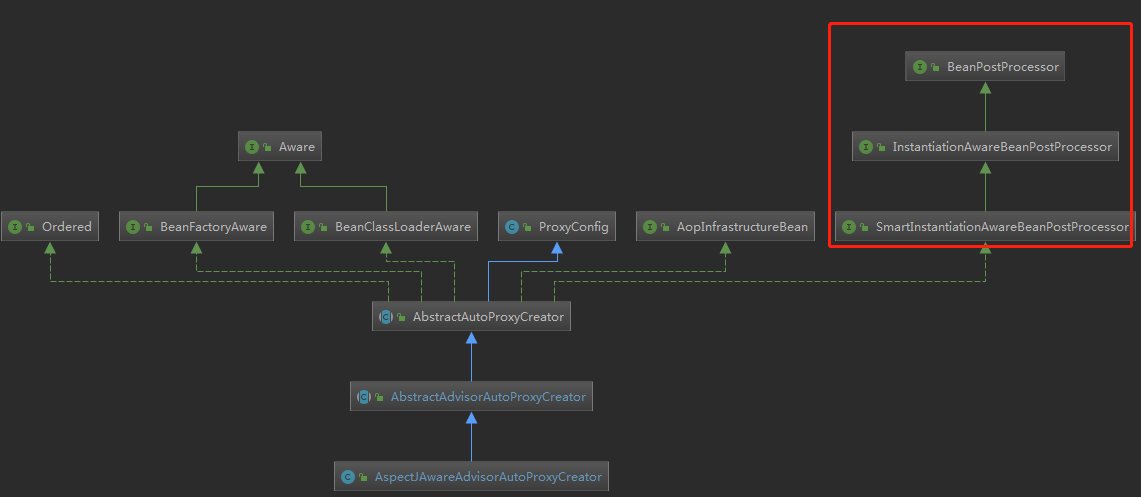
上图可知,其实现了 BeanPostProcessor接口,可以在bean的初始化前后进行一些处理,比如什么处理呢?比如狸猫换太子,将真正的bean换成动态代理后的bean。
总结
写到这里,感觉内容已经有点过于长了,也不方便大家理解吸收。具体的,这个AspectJAwareAdvisorAutoProxyCreator,作为BeanPostProcessor,如何去创建代理,我们放到下一节好好说。
同时,也会看看,在获取AspectJPointcutAdvisor这个bean的时候,有什么特别之处。

 浙公网安备 33010602011771号