曹工说Spring Boot源码(10)-- Spring解析xml文件,到底从中得到了什么(context:annotation-config 解析)
写在前面的话
相关背景及资源:
曹工说Spring Boot源码(1)-- Bean Definition到底是什么,附spring思维导图分享
曹工说Spring Boot源码(2)-- Bean Definition到底是什么,咱们对着接口,逐个方法讲解
曹工说Spring Boot源码(3)-- 手动注册Bean Definition不比游戏好玩吗,我们来试一下
曹工说Spring Boot源码(4)-- 我是怎么自定义ApplicationContext,从json文件读取bean definition的?
曹工说Spring Boot源码(5)-- 怎么从properties文件读取bean
曹工说Spring Boot源码(6)-- Spring怎么从xml文件里解析bean的
曹工说Spring Boot源码(7)-- Spring解析xml文件,到底从中得到了什么(上)
曹工说Spring Boot源码(8)-- Spring解析xml文件,到底从中得到了什么(util命名空间)
曹工说Spring Boot源码(9)-- Spring解析xml文件,到底从中得到了什么(context命名空间上)
工程结构图:

概要
本篇已经是spring源码第10篇了,为了让新同学也能知道我在讲什么,所以有些东西必须得重复一下。
先给大家看看spring支持的xml配置,我列了个表格如下:
| namespace | element |
|---|---|
| util | constant、property-path、list、set、map、properties |
| context | property-placeholder、property-override、annotation-config、component-scan、load-time-weaver、spring-configured、mbean-export、mbean-server |
| beans | import、bean、alias |
| task | annotation-driven、scheduler、scheduled-tasks、executor |
| cache | advice、annotation-driven |
| aop | config、scoped-proxy、aspectj-autoproxy |
我题目的意思是,spring在解析每个不同的xml元素时,其实是有共性的。所有这些元素的解析器,都实现了BeanDefinitionParser。这个接口只有一个方法,作用就是解析元素时,根据元素的配置,来收集beanDefinition,正所谓:条条大道通罗马,各种xml配置元素,各种注解配置,就是那些大道,罗马是什么?
就是beanDefinition。
从第一篇到现在,已经第10篇了,我们还在讲bean definition,其实就是因为,只有深刻地理解了它,后面才能更方便地理解spring boot,理解configuration注解,理解enable,理解自动装配。
前面我们讲了util命名空间,spring从中主要获得了几个工厂bean类型的beanDefinition;也讲了context命名空间的context:property-override、context:property-placeholder,这两个呢,主要是获得了beanFactoryPostProcessor这样的有特殊技能的bean的beandefinition。
以上呢,注意,都是beanDefinition,不是bean。拿java举例,前者是class,后者是instance。
本讲,继续context命名空间。
context:annotation-config
说明
该元素相当重要,xml时代,基本是必不可少。我专门找了个几年前的项目,以下是截图:

但是,为什么要配置这个?估计很多人到现在也是一脸懵逼,包括之前的我;配置了之后,有什么用?还是一脸懵逼;再问你,为啥spring boot时代不需要配置这个了呢?
想必,面试这么随便问两下,很多人也答不上吧,这讲我们就来讲讲它。
先看看xsd里的说明:
Activates various annotations to be detected in bean classes: Spring's @Required and@Autowired, as well as JSR 250's @PostConstruct, @PreDestroy and @Resource (if available),JAX-WS's @WebServiceRef (if available), EJB3's @EJB (if available), and JPA's@PersistenceContext and @PersistenceUnit (if available). Alternatively, you maychoose to activate the individual BeanPostProcessors for those annotations.Note: This tag does not activate processing of Spring's @Transactional or EJB3's@TransactionAttribute annotation. Consider the use of the tx:annotation-driventag for that purpose.
我用我刚过线的六级水平翻译一下:
使bean class中的多种注解可以被识别:
Spring提供的@Required、@Autowired;
JSR 250提供的@PostConstruct, @PreDestroy,@Resource
JAX-WS 提供的@WebServiceRef
EJB3 提供的 @EJB
JPA 提供的@PersistenceContext and @PersistenceUnit
另外,你也可以选择激活单独的对应这些注解的BeanPostProcessors。
注意,这个注解不能激活 @Transactional的注解的识别,如果要识别这个,请使用 tx:annotation-driven
反正呢,如果你项目里要用这一堆注解,肯定得有对应的代码来解析这些注解吧,那是什么代码来解析呢?
细心的同学可能看到了,就是BeanPostProcessor。这个注解呢,其实就是注册一堆的BeanPostProcessor。
用法
我们在xml中配置了2个类:
<?xml version="1.0" encoding="UTF-8"?>
<beans xmlns="http://www.springframework.org/schema/beans"
       xmlns:xsi="http://www.w3.org/2001/XMLSchema-instance"
       xmlns:context="http://www.springframework.org/schema/context"
       xsi:schemaLocation="http://www.springframework.org/schema/beans
        http://www.springframework.org/schema/beans/spring-beans.xsd
                http://www.springframework.org/schema/context
                 http://www.springframework.org/schema/context/spring-context.xsd">

    <bean class="org.springframework.contextnamespace.TestService"></bean>

    <bean class="org.springframework.contextnamespace.TestController"></bean>
</beans>
@Controller
@Data
public class TestController {
    @Autowired
    private TestService testService;

}
@Service
class TestService {
}
测试代码:
package org.springframework.contextnamespace;


@Slf4j
public class MainClassForTestAnnotationConfig {

    public static void main(String[] args) {
        ClassPathXmlApplicationContext context = new ClassPathXmlApplicationContext(
                new String[]{"classpath:context-namespace-test-annotation-config.xml"},false);
        context.refresh();

        Map<String, Object> map = context.getDefaultListableBeanFactory().getAllSingletonObjectMap();
        log.info("singletons:{}", JSONObject.toJSONString(map));

        List<BeanDefinition> list =
                context.getBeanFactory().getBeanDefinitionList();
        MyFastJson.printJsonStringForBeanDefinitionList(list);

        Object testService = context.getBean(TestService.class);
        System.out.println("testService bean:" + testService);

        Object bean = context.getBean(TestController.class);
        System.out.println("testController bean:" + bean);

    }
}
测试程序很简单,就是getBean来获取两个service,大家觉得注入会成功吗?
我们看答案吧:
testService bean:org.springframework.contextnamespace.TestService@236e3f4e
testController bean:TestController(testService=null)
可以看到,没注入,说明我们配置了@autowired,但是没生效。
怎么才能注入呢?很简单啊。在xml中配置如下元素即可:
<context:annotation-config></context:annotation-config>
这次再看测试代码的输出:

这次可以看到,已经注入了。
等价用法
<?xml version="1.0" encoding="UTF-8"?>
<beans xmlns="http://www.springframework.org/schema/beans"
       xmlns:xsi="http://www.w3.org/2001/XMLSchema-instance"
       xmlns:context="http://www.springframework.org/schema/context"
       xsi:schemaLocation="http://www.springframework.org/schema/beans
        http://www.springframework.org/schema/beans/spring-beans.xsd
                http://www.springframework.org/schema/context
                 http://www.springframework.org/schema/context/spring-context.xsd">
    //注释之,使用<bean>声明一个AutowiredAnnotationBeanPostProcessor
    <!--<context:annotation-config></context:annotation-config>-->
    <bean class="org.springframework.beans.factory.annotation.AutowiredAnnotationBeanPostProcessor"/>

    <bean class="org.springframework.contextnamespace.TestService"></bean>

    <bean class="org.springframework.contextnamespace.TestController"></bean>
</beans>
测试: 
元素解析
从ContextNamespaceHandler,我们可以找到该元素的解析类:
public void init() {
    ...
	registerBeanDefinitionParser("annotation-config", new AnnotationConfigBeanDefinitionParser());
    ...
}
这个类很简单,所以这里直接一览全局:
public class AnnotationConfigBeanDefinitionParser implements BeanDefinitionParser {

   public BeanDefinition parse(Element element, ParserContext parserContext) {
      Object source = parserContext.extractSource(element);

	  // 这里,把支持的注解的解析代码全部注册到beanFactory
      // Obtain bean definitions for all relevant BeanPostProcessors.
      Set<BeanDefinitionHolder> processorDefinitions =
            AnnotationConfigUtils.registerAnnotationConfigProcessors(parserContext.getRegistry(), source);
	  //检查有没有嵌套元素啥的,不用管
      // Register component for the surrounding <context:annotation-config> element.
      CompositeComponentDefinition compDefinition = new CompositeComponentDefinition(element.getTagName(), source);
      parserContext.pushContainingComponent(compDefinition);

      // Nest the concrete beans in the surrounding component.
      for (BeanDefinitionHolder processorDefinition : processorDefinitions) {
         parserContext.registerComponent(new BeanComponentDefinition(processorDefinition));
      }

      // Finally register the composite component.
      parserContext.popAndRegisterContainingComponent();

      return null;
   }

}
这个解析类,独具一格,类层次也很简单,直接就实现了BeanDefinitionParser,不想前面那些类的层次那么复杂。这个类的重点方法是在:
AnnotationConfigUtils.registerAnnotationConfigProcessors(parserContext.getRegistry(), source);
这局呢,里面会注册各种注解的解析代码(一些beanPostProcessor)到beanFactory。
public static Set<BeanDefinitionHolder> registerAnnotationConfigProcessors(
			BeanDefinitionRegistry registry, Object source) {

		Set<BeanDefinitionHolder> beanDefs = new LinkedHashSet<BeanDefinitionHolder>(4);
		// 用于支持Configuration注解,注册了一个beanDefinition,其类别为BeanPostProcessor,具体bean class为 ConfigurationClassPostProcessor
		if (!registry.containsBeanDefinition(CONFIGURATION_ANNOTATION_PROCESSOR_BEAN_NAME)) {
			RootBeanDefinition def = new RootBeanDefinition(ConfigurationClassPostProcessor.class);
			def.setSource(source);
			beanDefs.add(registerPostProcessor(registry, def, CONFIGURATION_ANNOTATION_PROCESSOR_BEAN_NAME));
		}

    		// 用于支持Autowired注解,注册了一个beanDefinition,其类别为 BeanFactoryPostProcessor,具体bean class为 AutowiredAnnotationBeanPostProcessor
		if (!registry.containsBeanDefinition(AUTOWIRED_ANNOTATION_PROCESSOR_BEAN_NAME)) {
			RootBeanDefinition def = new RootBeanDefinition(AutowiredAnnotationBeanPostProcessor.class);
			def.setSource(source);
			beanDefs.add(registerPostProcessor(registry, def, AUTOWIRED_ANNOTATION_PROCESSOR_BEAN_NAME));
		}
    		// 用于支持Required注解,注册了一个beanDefinition,其类别为BeanPostProcessor,具体bean class为 RequiredAnnotationBeanPostProcessor
		if (!registry.containsBeanDefinition(REQUIRED_ANNOTATION_PROCESSOR_BEAN_NAME)) {
			RootBeanDefinition def = new RootBeanDefinition(RequiredAnnotationBeanPostProcessor.class);
			def.setSource(source);
			beanDefs.add(registerPostProcessor(registry, def, REQUIRED_ANNOTATION_PROCESSOR_BEAN_NAME));
		}
    		// 用于支持JSR-250注解,注册了一个beanDefinition,其类别为BeanPostProcessor,具体bean class为 CommonAnnotationBeanPostProcessor
		// Check for JSR-250 support, and if present add the CommonAnnotationBeanPostProcessor.
		if (jsr250Present && !registry.containsBeanDefinition(COMMON_ANNOTATION_PROCESSOR_BEAN_NAME)) {
			RootBeanDefinition def = new RootBeanDefinition(CommonAnnotationBeanPostProcessor.class);
			def.setSource(source);
			beanDefs.add(registerPostProcessor(registry, def, COMMON_ANNOTATION_PROCESSOR_BEAN_NAME));
		}

		// Check for JPA support, and if present add the PersistenceAnnotationBeanPostProcessor.
		if (jpaPresent && !registry.containsBeanDefinition(PERSISTENCE_ANNOTATION_PROCESSOR_BEAN_NAME)) {
            ...支持jpa的相关代码
        }

		return beanDefs;
	}
汇总一下,就是:
| 支持解析的注解 | beanDefinition中class的类别 | beanClass |
|---|---|---|
| Configuration | BeanFactoryPostProcessor | ConfigurationClassPostProcessor |
| Autowired | BeanPostProcessor | AutowiredAnnotationBeanPostProcessor |
| Required | BeanPostProcessor | RequiredAnnotationBeanPostProcessor |
| PostConstruct/PreDestroy/ Resource/EJB/WebServiceRef |
BeanPostProcessor | CommonAnnotationBeanPostProcessor |
我们下面再简单地列举一下,这几个beanClass的继承结构:


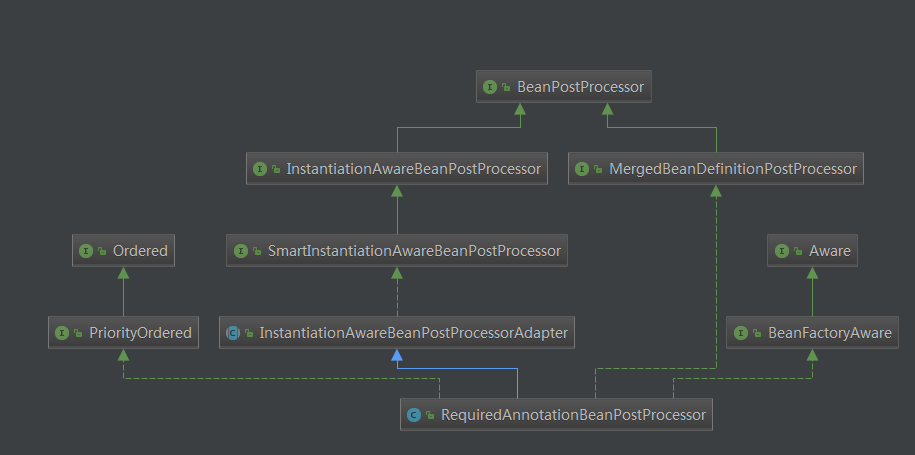
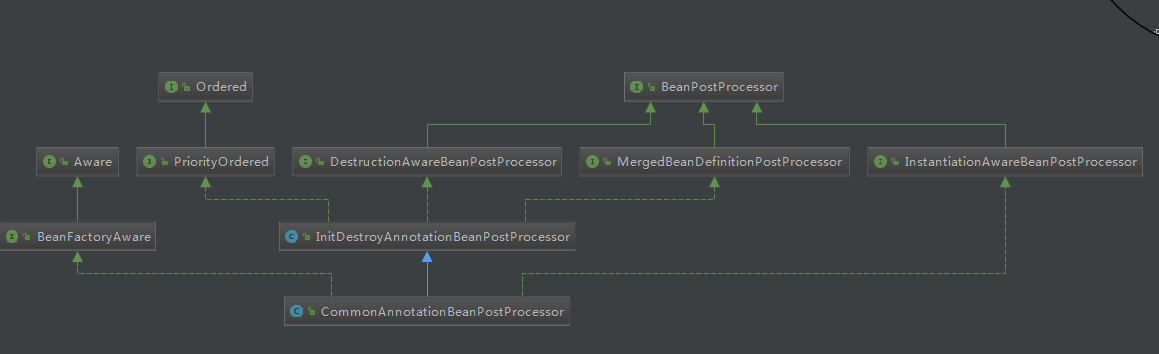
AutowiredAnnotationBeanPostProcessor简单分析
我们在前面的例子中,进行了以下注入:
@Controller
@Data
public class TestController {
    @Autowired
    private TestService testService;


}
大家可以想象下,这个“TestService testService字段,需要注入”,这个元数据会存储在哪?
BeanDefinition?我们看看呢:
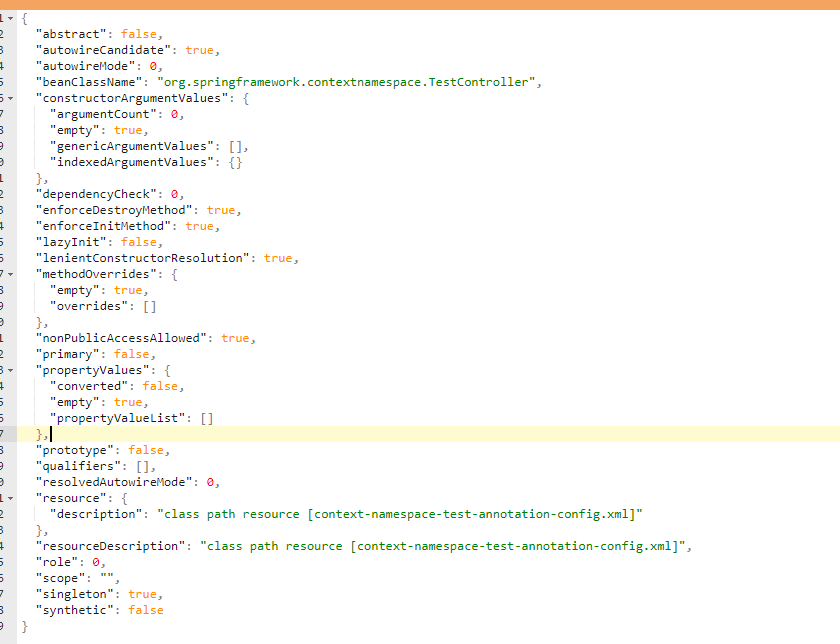
这个图,就是我用json输出的TestController的beanDefinition,这里面并没有出现TestService的声影。
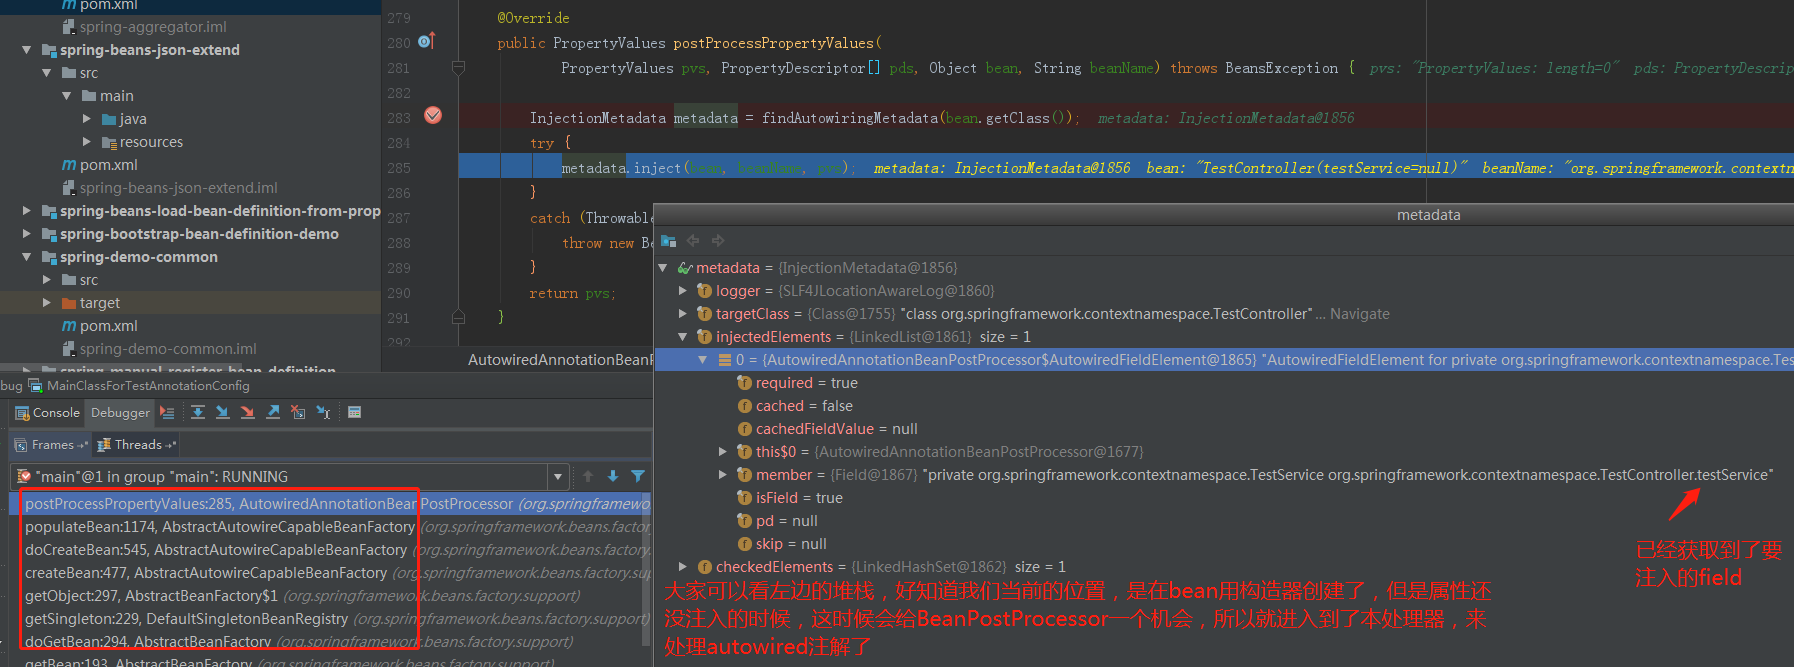
我来告诉大家,这个数据,实际是在getBean的时候,由AutowiredAnnotationBeanPostProcessor来获取的,具体的堆栈,大家可以看看:

具体的方法就是在下边的buildAutowiringMetadata:
private InjectionMetadata findAutowiringMetadata(Class<?> clazz) {
   // Quick check on the concurrent map first, with minimal locking.
   InjectionMetadata metadata = this.injectionMetadataCache.get(clazz);
   if (metadata == null) {
      synchronized (this.injectionMetadataCache) {
         metadata = this.injectionMetadataCache.get(clazz);
         if (metadata == null) {
            // 这里啊,去寻找要自动注入的数据
            metadata = buildAutowiringMetadata(clazz);
            this.injectionMetadataCache.put(clazz, metadata);
         }
      }
   }
   return metadata;
}
我们可以再跟一步,进入到这个方法,可以看到,这里面反射遍历了这个class的field、method
private InjectionMetadata buildAutowiringMetadata(Class<?> clazz) {
   LinkedList<InjectionMetadata.InjectedElement> elements = new LinkedList<InjectionMetadata.InjectedElement>();
   Class<?> targetClass = clazz;

   do {
      LinkedList<InjectionMetadata.InjectedElement> currElements = new LinkedList<InjectionMetadata.InjectedElement>();
      //遍历field,看看是不是注解了@Autowired
      for (Field field : targetClass.getDeclaredFields()) {
         //查找field上的@Autowired
         Annotation annotation = findAutowiredAnnotation(field);
         if (annotation != null) {
            if (Modifier.isStatic(field.getModifiers())) {
               if (logger.isWarnEnabled()) {
                  logger.warn("Autowired annotation is not supported on static fields: " + field);
               }
               continue;
            }
            boolean required = determineRequiredStatus(annotation);
            currElements.add(new AutowiredFieldElement(field, required));
         }
      }
      //遍历方法
      for (Method method : targetClass.getDeclaredMethods()) {
         Method bridgedMethod = BridgeMethodResolver.findBridgedMethod(method);
         // 查看method上的@autowired注解
         Annotation annotation = BridgeMethodResolver.isVisibilityBridgeMethodPair(method, bridgedMethod) ?
               findAutowiredAnnotation(bridgedMethod) : findAutowiredAnnotation(method);
         if (annotation != null && method.equals(ClassUtils.getMostSpecificMethod(method, clazz))) {
            if (Modifier.isStatic(method.getModifiers())) {
               if (logger.isWarnEnabled()) {
                  logger.warn("Autowired annotation is not supported on static methods: " + method);
               }
               continue;
            }
            if (method.getParameterTypes().length == 0) {
               if (logger.isWarnEnabled()) {
                  logger.warn("Autowired annotation should be used on methods with actual parameters: " + method);
               }
            }
            boolean required = determineRequiredStatus(annotation);
            PropertyDescriptor pd = BeanUtils.findPropertyForMethod(method);
            currElements.add(new AutowiredMethodElement(method, required, pd));
         }
      }
      elements.addAll(0, currElements);
      targetClass = targetClass.getSuperclass();
   }
   while (targetClass != null && targetClass != Object.class);

   return new InjectionMetadata(clazz, elements);
}
ok,前面的分析,让我们知道了,autowired相关的元数据是怎么被查找到的,下边,我们看看,是怎么实现注入的,下边这个方法呢,就是在bean创建完了,但是属性还没设置时,框架去调用BeanPostProcessor时,导致AutowiredAnnotationBeanPostProcessor的下面方法被调用的。
// 这个方法依然在AutowiredAnnotationBeanPostProcessor里面
@Override
public PropertyValues postProcessPropertyValues(
      PropertyValues pvs, PropertyDescriptor[] pds, Object bean, String beanName) throws BeansException {

   InjectionMetadata metadata = findAutowiringMetadata(bean.getClass());
   try {
      metadata.inject(bean, beanName, pvs);
   }
   catch (Throwable ex) {
      throw new BeanCreationException(beanName, "Injection of autowired dependencies failed", ex);
   }
   return pvs;
}
这个方法里,就是检查有没有需要注入的。如有,调用下面方法:
public void inject(Object target, String beanName, PropertyValues pvs) throws Throwable {
   Collection<InjectedElement> elementsToIterate =
         (this.checkedElements != null ? this.checkedElements : this.injectedElements);
   if (!elementsToIterate.isEmpty()) {
      boolean debug = logger.isDebugEnabled();
      for (InjectedElement element : elementsToIterate) {
         if (debug) {
            logger.debug("Processing injected method of bean '" + beanName + "': " + element);
         }
         //实现注入,其实就是给field赋值
         element.inject(target, beanName, pvs);
      }
   }
}
// 给field设置值
@Override
   protected void inject(Object bean, String beanName, PropertyValues pvs) throws Throwable {
      Field field = (Field) this.member;
      try {
         Object value;
         if (this.cached) {
            value = resolvedCachedArgument(beanName, this.cachedFieldValue);
         }
         else {
            DependencyDescriptor descriptor = new DependencyDescriptor(field, this.required);
            Set<String> autowiredBeanNames = new LinkedHashSet<String>(1);
            TypeConverter typeConverter = beanFactory.getTypeConverter();
            // 这里从beanFactory去找能满足要求的bean
            value = beanFactory.resolveDependency(descriptor, beanName, autowiredBeanNames, typeConverter);
            synchronized (this) {
               if (!this.cached) {
                  if (value != null || this.required) {
                     this.cachedFieldValue = descriptor;
                     //把bean之间的依赖关系,存起来
                     registerDependentBeans(beanName, autowiredBeanNames);
                     if (autowiredBeanNames.size() == 1) {
                        String autowiredBeanName = autowiredBeanNames.iterator().next();
                        if (beanFactory.containsBean(autowiredBeanName)) {
                           if (beanFactory.isTypeMatch(autowiredBeanName, field.getType())) {
                              this.cachedFieldValue = new RuntimeBeanReference(autowiredBeanName);
                           }
                        }
                     }
                  }
                  else {
                     this.cachedFieldValue = null;
                  }
                  this.cached = true;
               }
            }
         }
         if (value != null) {
            // 这里就是设置field的value的地方了
            ReflectionUtils.makeAccessible(field);
            field.set(bean, value);
         }
      }
      catch (Throwable ex) {
         throw new BeanCreationException("Could not autowire field: " + field, ex);
      }
   }
}
总结
这节就分析这么多吧,通过context:annotation-config这个元素,我们获得了什么呢?
1个beanFactoryPostProcessor,多个beanPostProcessor。
我们还分析了autowired的实现,其他的几个注解,除了@configuration外,都比较类似,就不讲了。
@configuration呢,也会放到后面再讲,这是个重头。
如果有帮助,大家点个赞哈。

 浙公网安备 33010602011771号