曹工说Spring Boot源码(7)-- Spring解析xml文件,到底从中得到了什么(上)
写在前面的话
相关背景及资源:
曹工说Spring Boot源码(1)-- Bean Definition到底是什么,附spring思维导图分享
曹工说Spring Boot源码(2)-- Bean Definition到底是什么,咱们对着接口,逐个方法讲解
曹工说Spring Boot源码(3)-- 手动注册Bean Definition不比游戏好玩吗,我们来试一下
曹工说Spring Boot源码(4)-- 我是怎么自定义ApplicationContext,从json文件读取bean definition的?
曹工说Spring Boot源码(5)-- 怎么从properties文件读取bean
曹工说Spring Boot源码(6)-- Spring怎么从xml文件里解析bean的
工程结构图:

概要
大家看到这个标题,不知道心里有答案了没?大家再想想,xml文件里都有什么呢?
这么一想,spring的xml文件里,内容真的很多,估计很多元素你也没配置过,尤其是这两年新出来的程序员,估计都在吐槽了,现在不都是注解了吗,谁还用xml?但其实,不管是xml,还是注解,都是配置信息,只是不同的表现形式而已,看过我前面几讲的同学,应该知道,我们用json、properties文件写过bean的配置信息。
所以,具体形式不重要,xml和注解只是最常用的两种表达方式罢了,我们这次就以xml为例来讲解。
xml中,其实还是很有条理的,各种元素,都按照namespace分得明明白白的,我列了个表格如下:
| namespace | element |
|---|---|
| util | constant、property-path、list、set、map、properties |
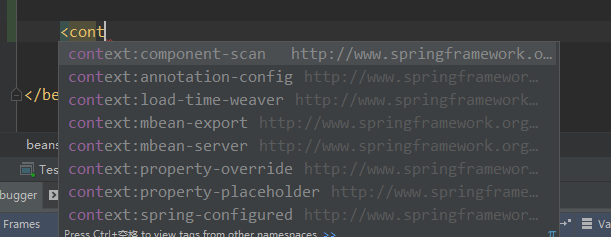
| context | property-placeholder、property-override、annotation-config、component-scan、load-time-weaver、spring-configured、mbean-export、mbean-server |
| beans | import、bean、alias |
| task | annotation-driven、scheduler、scheduled-tasks、executor |
| cache | advice、annotation-driven |
| aop | config、scoped-proxy、aspectj-autoproxy |
大家看到了吗,spring其实对xml的支持才是最全面的,注解有的,xml基本都有。作为一个工作了6年的码农,我发现好多元素我都没配置过,更别说熟悉其内在原理了。但是呢,我们还是不能忘记了今天的标题,这么多元素,难道没有什么共性吗?spring解析这些元素,到底都是怎么实现的呢,且不说这些元素怎么生效,读了东西总需要地方存起来吧,那,是怎么存放的呢?
我们会挑选一些元素来讲解。我们本讲,先讲解spring采用的xml解析方式;再从util这个namespace开始,挑了constant这个元素进行深入讲解。
spring中所采用的xml解析方式
上一讲,我们讲了,spring是怎么解析xml元素的,我今天想办法从spring源码里,把它用来解析xml的主干代码提取了一下,基本就是下面这样的,比如针对如下xml文件,我们打算遍历一遍:
test-xml-read.xml:
<?xml version="1.0" encoding="UTF-8"?>
<f:table xmlns:f="http://www.w3school.com.cn/furniture"
		 xmlns:t="http://www.w3school.com.cn/t">
	<f:name>African Coffee Table</f:name>
	<f:width>80</f:width>
	<f:length>120</f:length>

	<t:abc></t:abc>
</f:table>
那么,spring里的代码骨架,大概如下:
package org.springframework.bootstrap.sample;

import lombok.extern.slf4j.Slf4j;
import org.w3c.dom.Document;
import org.w3c.dom.Element;
import org.w3c.dom.Node;
import org.w3c.dom.NodeList;
import org.xml.sax.*;

import javax.xml.parsers.DocumentBuilder;
import javax.xml.parsers.DocumentBuilderFactory;
import javax.xml.parsers.ParserConfigurationException;
import java.io.IOException;
import java.io.InputStream;
import java.net.URL;

@Slf4j
public class XmlSimpleUse {

    public static void main(String[] args) {
        //读取xml文件
        URL url = Thread.currentThread().getContextClassLoader()
                .getResource("test-xml-read.xml");
        InputStream inputStream = url.openStream();
        //将流转变为InputSource,在后续xml解析使用
        InputSource inputSource = new InputSource(inputStream);
        DocumentBuilderFactory factory = createDocumentBuilderFactory();

        DocumentBuilder docBuilder = factory.newDocumentBuilder();
        // 可选,设置实体解析器,其实就是:你可以自定义去哪里加载xsd/dtd文件
        docBuilder.setEntityResolver(new EntityResolver() {
            @Override
            public InputSource resolveEntity(String publicId, String systemId) throws SAXException, IOException {
                return null;
            }
        });
        // 设置回调处理器,当解析出现错误时,(比如xsd里指定了不能出现a元素,然后xml里出现了a元素)
        docBuilder.setErrorHandler(null);
        //解析xml文件,获取到Document,代表了整个文件
        Document document = docBuilder.parse(inputSource);
        // 获取根元素
        Element root = document.getDocumentElement();
        log.info("root is {}",root);

        //获取根元素下的每个child元素
        NodeList nodeList = root.getChildNodes();
        for (int i = 0; i < nodeList.getLength(); i++) {
            Node node = nodeList.item(i);
            if (node instanceof Element) {
                Element ele = (Element) node;
                log.info("ele:{}",ele);
            }
        }
    }

    protected static DocumentBuilderFactory createDocumentBuilderFactory() {

        DocumentBuilderFactory factory = DocumentBuilderFactory.newInstance();
        factory.setValidating(true);
        // Enforce namespace aware for XSD...
        factory.setNamespaceAware(true);

        return factory;
    }
}
输出如下:
21:38:19.638 [main] INFO  o.s.bootstrap.sample.XmlSimpleUse - root is [f:table: null]
21:38:19.653 [main] INFO  o.s.bootstrap.sample.XmlSimpleUse - ele:[f:name: null]
21:38:19.653 [main] INFO  o.s.bootstrap.sample.XmlSimpleUse - ele:[f:width: null]
21:38:19.653 [main] INFO  o.s.bootstrap.sample.XmlSimpleUse - ele:[f:length: null]
21:38:19.654 [main] INFO  o.s.bootstrap.sample.XmlSimpleUse - ele:[t:abc: null]
大家可以看上面的demo代码,没有依赖任何spring的类,基本还原了spring解析xml时的大体过程,在spring中多出来的细节部分,主要有两处:
自定义entityResolver
docBuilder.setEntityResolver,这个部分,我们上面是默认实现。
大家看我们前面的xml,有一定了解的同学可能知道,前面定义了两个namespace,语法一般是下面这样的:
xmlns:namespace-prefix="namespaceURI"
所以,我们这边的两个namespace,前缀分别是f、t,内容分别是:
http://www.w3school.com.cn/furniture、http://www.w3school.com.cn/t
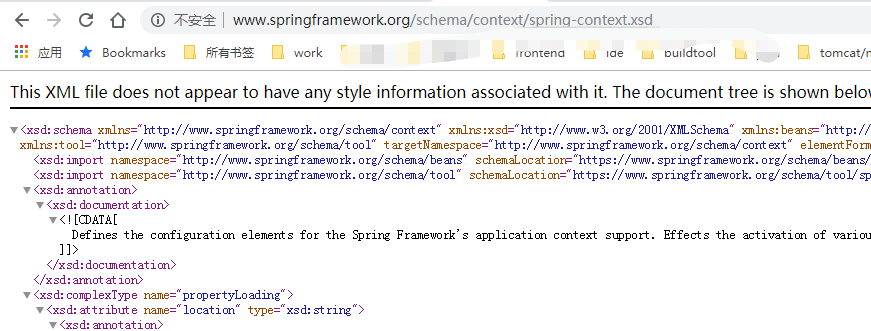
但是,我们一般xml文件是有格式要求的,比如spring里,比如
那,这个约束是在哪里呢?在namespaceURI 对应的dtd/xsd等文件中。

像上面截图这样,就是:
这一句,定义一个命名空间
xmlns:context="http://www.springframework.org/schema/context"

xsi:schemaLocation="http://www.springframework.org/schema/beans http://www.springframework.org/schema/beans/spring-beans.xsd
// 下面这个,你要当成key/value来理解,key就是:http://www.springframework.org/schema/context,
    //value,就是对应的xsd文件
				http://www.springframework.org/schema/context http://www.springframework.org/schema/context/spring-context.xsd"
有了上面的基础知识,再来说那个接口:
public interface EntityResolver {

	// 一般传入的systemId即为后边这样的:http://www.springframework.org/schema/context/spring-context.xsd
    public abstract InputSource resolveEntity (String publicId,
                                               String systemId)
        throws SAXException, IOException;

}
这个接口呢,就是让我们自定义一个方法,来解析外部xml实体,一般传入的参数如下:
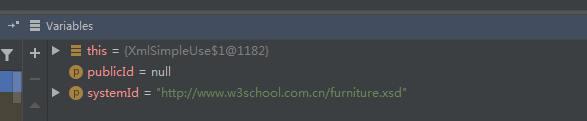
即,publicId为null,systemId为xsd的uri,这个uri一般是可以通过网络获取的,比如:
http://www.springframework.org/schema/context/spring-context.xsd
但是,spring是自定义了自己的entityResolver,实现类为:org.springframework.beans.factory.xml.ResourceEntityResolver。
这个类,会在本地寻找对应的xsd文件,主要逻辑就是去查找classpath下的META-INF/spring.schemas,我们可以看看spring-beans包内的该文件:
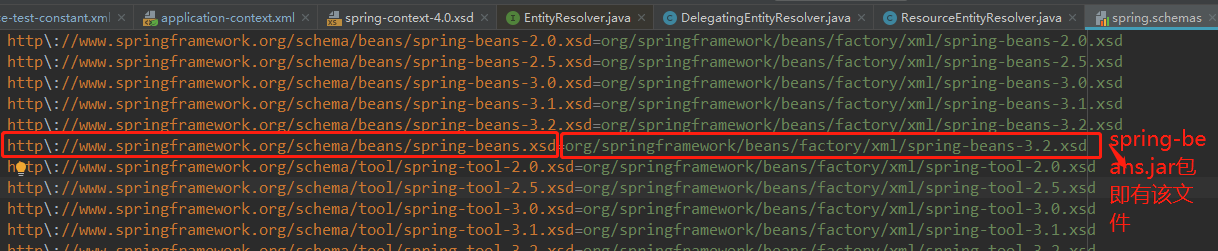
spring为什么要自定义EntityResolver呢,spring为啥要在本地找呢,原因是:
如果不自定义,jdk的dom解析类,就会直接使用http://www.springframework.org/schema/context/spring-context.xsd这个东西,去作为URL,建立socket网络连接来获取。而部分环境,比如生产环境,基本是外网隔离的,你这时候是没办法去下载这个xsd文件的,岂不是就没法校验xml文件的语法、格式了吗?
所以,spring要将这个外部的xsd引用,转为在classpath下的查找。
自定义元素解析逻辑
这部分,大家再看下之前的骨架代码:
Document document = docBuilder.parse(inputSource);
        Element root = document.getDocumentElement();
        log.info("root is {}",root);
        NodeList nodeList = root.getChildNodes();
        for (int i = 0; i < nodeList.getLength(); i++) {
            Node node = nodeList.item(i);
            //遍历每个元素,我们这里只是简单输出
            if (node instanceof Element) {
                Element ele = (Element) node;
                log.info("ele:{}",ele);

            }
        }
骨架代码里,遍历每个元素,在spring里,遍历到每个ele时,要去判断对应的namespace,如果是默认的,交给xxx处理;如果不是默认的,要根据namespace找到对应的namespacehandler,具体大家可以看看上一节:
曹工说Spring Boot源码(6)-- Spring怎么从xml文件里解析bean的
我们在前面说了,本讲只先挑一个元素来讲解,即util:constant 。
util-constant元素详解
用法
<?xml version="1.0" encoding="UTF-8"?>
<beans xmlns="http://www.springframework.org/schema/beans"
	xmlns:xsi="http://www.w3.org/2001/XMLSchema-instance"
    xmlns:util="http://www.springframework.org/schema/util"
	xsi:schemaLocation="http://www.springframework.org/schema/beans http://www.springframework.org/schema/beans/spring-beans.xsd
                http://www.springframework.org/schema/util  http://www.springframework.org/schema/util/spring-util.xsd">

    <util:constant id="chin.age" static-field=
            "java.sql.Connection.TRANSACTION_SERIALIZABLE"/>

</beans>
以上,即定义了一个常量bean,这个bean的值,就是static-field中指定的,这里是java.sql.Connection#TRANSACTION_SERIALIZABLE,值为8。
/**
     * A constant indicating that
     * dirty reads, non-repeatable reads and phantom reads are prevented.
     * This level includes the prohibitions in
     * <code>TRANSACTION_REPEATABLE_READ</code> and further prohibits the
     * situation where one transaction reads all rows that satisfy
     * a <code>WHERE</code> condition, a second transaction inserts a row that
     * satisfies that <code>WHERE</code> condition, and the first transaction
     * rereads for the same condition, retrieving the additional
     * "phantom" row in the second read.
     */
    int TRANSACTION_SERIALIZABLE     = 8;
我们的测试代码如下:
package org.springframework.utilnamespace;

import com.alibaba.fastjson.JSONObject;
import lombok.extern.slf4j.Slf4j;
import org.springframework.beans.factory.config.BeanDefinition;
import org.springframework.context.support.ClassPathXmlApplicationContext;
import org.springframework.util.MyFastJson;

import java.util.List;
import java.util.Map;

@Slf4j
public class TestConstant {
    public static void main(String[] args) {
        ClassPathXmlApplicationContext context = new ClassPathXmlApplicationContext(new String[]{"classpath:util-namespace-test-constant.xml"},false);
        context.refresh();

        Map<String, Object> map = context.getDefaultListableBeanFactory().getAllSingletonObjectMap();
        log.info("singletons:{}", JSONObject.toJSONString(map));

        List<BeanDefinition> list =
                context.getBeanFactory().getBeanDefinitionList();
        MyFastJson.printJsonStringForBeanDefinitionList(list);

//        Object bean = context.getBean("chin.age");
//        System.out.println("bean:" + bean);

    }
}
注意,这里,我们没有调用getBean等方法,我们只是简单地,采用json输出了其bean definition,输出如下:
{
		"abstract":false,
		"autowireCandidate":true,
		"autowireMode":0,
    	// bean的class,好像是个factory,不是个int啊,我们那个bean,按理说,是int类型的
		"beanClass":"org.springframework.beans.factory.config.FieldRetrievingFactoryBean",
		"beanClassName":"org.springframework.beans.factory.config.FieldRetrievingFactoryBean",
		"constructorArgumentValues":{
			"argumentCount":0,
			"empty":true,
			"genericArgumentValues":[],
			"indexedArgumentValues":{}
		},
		"dependencyCheck":0,
		"enforceDestroyMethod":true,
		"enforceInitMethod":true,
		"lazyInit":false,
		"lenientConstructorResolution":true,
		"methodOverrides":{
			"empty":true,
			"overrides":[]
		},
		"nonPublicAccessAllowed":true,
		"primary":false,
		"propertyValues":{
			"converted":false,
			"empty":false,
             // 这个是我们给这个常量bean设置的值,被放在了property
			"propertyValueList":[
				{
					"converted":false,
					"name":"staticField",
					"optional":false,
					"value":"java.sql.Connection.TRANSACTION_SERIALIZABLE"
				}
			]
		},
		"prototype":false,
		"qualifiers":[],
		"resolvedAutowireMode":0,
		"role":0,
		"scope":"",
		"singleton":true,
		"synthetic":false
	}
我们放开前面注释的两行代码:
        Object bean = context.getBean("chin.age");
        System.out.println("bean:" + bean);
output:
bean:8
有些同学估计有点蒙了,不要慌,这里简单说下结论,因为util:constant被解析为了一个工厂bean,这个在上面json里也看到了,类型为:org.springframework.beans.factory.config.FieldRetrievingFactoryBean。
当我们去getBean的时候,spring发现其为factory bean,就会调用这个工厂bean的工厂方法,去生产。
所以,这里呢,bean是谁?是那个工厂org.springframework.beans.factory.config.FieldRetrievingFactoryBean,而不是这个工厂的产品:数字8。
具体的解析过程
根据namespaceUri获得对应的namespaceHandler
从之前的骨架入手,spring里也有类似的代码:
	DefaultBeanDefinitionDocumentReader#parseBeanDefinitions
	// 这个方法,里面可以看到通过root得到了children,然后对children遍历
	protected void parseBeanDefinitions(Element root, BeanDefinitionParserDelegate delegate) {
		if (delegate.isDefaultNamespace(root)) {
			NodeList nl = root.getChildNodes();
			for (int i = 0; i < nl.getLength(); i++) {
				Node node = nl.item(i);
				if (node instanceof Element) {
					Element ele = (Element) node;
					if (delegate.isDefaultNamespace(ele)) {
						parseDefaultElement(ele, delegate);
					}
					else {
						// 这里,如果是<util:constant>,因为不是默认命名空间,所以走这里。
						delegate.parseCustomElement(ele);
					}
				}
			}
		}
		else {
			delegate.parseCustomElement(root);
		}
	}
进入BeanDefinitionParserDelegate#parseCustomElement(org.w3c.dom.Element):
	public BeanDefinition parseCustomElement(Element ele) {
		return parseCustomElement(ele, null);
	}
public BeanDefinition parseCustomElement(Element ele, BeanDefinition containingBd) {
   String namespaceUri = getNamespaceURI(ele);
   //这里,通过namespaceUri,查找对应的handler,我们这里,会得到:org.springframework.beans.factory.xml.UtilNamespaceHandler
   NamespaceHandler handler = this.readerContext.getNamespaceHandlerResolver().resolve(namespaceUri);
   if (handler == null) {
      error("Unable to locate Spring NamespaceHandler for XML schema namespace [" + namespaceUri + "]", ele);
      return null;
   }
   // 调用org.springframework.beans.factory.xml.UtilNamespaceHandler,解析constant元素
   return handler.parse(ele, new ParserContext(this.readerContext, this, containingBd));
}
NamespaceHandler概览
好了,我们看看这个UtilNamespaceHandler:
public class UtilNamespaceHandler extends NamespaceHandlerSupport {


	public void init() {
		registerBeanDefinitionParser("constant", new ConstantBeanDefinitionParser());
		registerBeanDefinitionParser("property-path", new PropertyPathBeanDefinitionParser());
		registerBeanDefinitionParser("list", new ListBeanDefinitionParser());
		registerBeanDefinitionParser("set", new SetBeanDefinitionParser());
		registerBeanDefinitionParser("map", new MapBeanDefinitionParser());
		registerBeanDefinitionParser("properties", new PropertiesBeanDefinitionParser());
	}


	private static class ConstantBeanDefinitionParser extends AbstractSimpleBeanDefinitionParser {

		@Override
		protected Class getBeanClass(Element element) {
			return FieldRetrievingFactoryBean.class;
		}

		@Override
		protected String resolveId(Element element, AbstractBeanDefinition definition, ParserContext parserContext) {
			String id = super.resolveId(element, definition, parserContext);
			if (!StringUtils.hasText(id)) {
				id = element.getAttribute("static-field");
			}
			return id;
		}
	}
    ...省略
}
这里,很明显,UtilNamespaceHandler定义了每个元素,该由什么类来处理。
namespaceHandler如何找到指定元素的parser
我们还是接着前面的代码handler.parse(Element element, ParserContext parserContext)往下看,是不是这样吧:
父类 NamespaceHandlerSupport#parse
public BeanDefinition parse(Element element, ParserContext parserContext) {
		//这里,继续调用了本类的另一个方法来获取Parser
		return findParserForElement(element, parserContext).parse(element, parserContext);
}

// 这里就是上面调用的方法,来获取Parser
private BeanDefinitionParser findParserForElement(Element element, ParserContext parserContext) {
		String localName = parserContext.getDelegate().getLocalName(element);
		// 这里的parser是一个map,map的元素就是来自于子类的init方法
		BeanDefinitionParser parser = this.parsers.get(localName);
		if (parser == null) {
			parserContext.getReaderContext().fatal(
					"Cannot locate BeanDefinitionParser for element [" + localName + "]", element);
		}
		return parser;
	}
这两个方法是在父类中实现的,整体来说,NamespaceHandlerSupport中维护了一个map,里面保存本namespace下,具体的元素及其对应的parser。
	/**
	 * Stores the {@link BeanDefinitionParser} implementations keyed by the
	 * local name of the {@link Element Elements} they handle.
	 */
	private final Map<String, BeanDefinitionParser> parsers =
			new HashMap<String, BeanDefinitionParser>();
我们看看,这个parser是什么时候存了东西进去的吧?通过find usage,发现如下方法会进行put操作:
NamespaceHandlerSupport#registerBeanDefinitionParser
protected final void registerBeanDefinitionParser(String elementName, BeanDefinitionParser parser) {
   this.parsers.put(elementName, parser);
}
这个方法还比较熟悉,因为在前面出现过了:
public class UtilNamespaceHandler extends NamespaceHandlerSupport {

   private static final String SCOPE_ATTRIBUTE = "scope";

   // 这个init方法,就是在之前通过namespaceUri来获取对应的handler时,初始化的
   @override
   public void init() {
      registerBeanDefinitionParser("constant", new ConstantBeanDefinitionParser());
      registerBeanDefinitionParser("property-path", new PropertyPathBeanDefinitionParser());
      registerBeanDefinitionParser("list", new ListBeanDefinitionParser());
      registerBeanDefinitionParser("set", new SetBeanDefinitionParser());
      registerBeanDefinitionParser("map", new MapBeanDefinitionParser());
      registerBeanDefinitionParser("properties", new PropertiesBeanDefinitionParser());
   }
parser实现类概述
通过上一节的讲解,我们知道了UtilNamespaceHandler下的元素,及其对应的Parser。我们看看其类图(图小,可在单独tab查看):

我们先通过其实现的接口,来了解其核心功能:
package org.springframework.beans.factory.xml;

import org.w3c.dom.Element;

import org.springframework.beans.factory.config.BeanDefinition;

/**
 * 该接口主要被DefaultBeanDefinitionDocumentReader使用,来处理顶级的,非默认命名空间下的的顶级元素(直接在<beans></beans>下)
 * Interface used by the {@link DefaultBeanDefinitionDocumentReader} to handle custom,
 * top-level (directly under {@code <beans/>}) tags.
 *
 * 实现类可以自由地通过该元素中的元数据,来转换为任意多个BeanDefinition。(比如<context:component-scan></>)
 * <p>Implementations are free to turn the metadata in the custom tag into as many
 * {@link BeanDefinition BeanDefinitions} as required.
 *
 * Dom解析器,通过元素所在的命名空间,找到对应的NamespaceHandler,再从NamespaceHandler中找到对应的BeanDefinitionParser
 * <p>The parser locates a {@link BeanDefinitionParser} from the associated
 * {@link NamespaceHandler} for the namespace in which the custom tag resides.
 *
 * @author Rob Harrop
 * @since 2.0
 * @see NamespaceHandler
 * @see AbstractBeanDefinitionParser
 */
public interface BeanDefinitionParser {

	/**
	 * 解析指定的element,注册其返回的BeanDefinition到BeanDefinitionRegistry
	 * (使用参数ParserContext#getRegistry()得到BeanDefinitionRegistry)
	 */
	BeanDefinition parse(Element element, ParserContext parserContext);

}
大家发现接口的意义了吗,虽然前面的类,很复杂,但我们通过接口,可以马上知道其核心功能。在这里,就是解析元素,获得BeanDefinition。
其实,到这里,基本可以回答,标题所提出的问题了,Spring解析xml,得到了什么?
从这个接口,可以知道,得到了BeanDefinition!
UtilNamespaceHandler.ConstantBeanDefinitionParser
我们具体看看util:constant解析过程,这个类没有直接实现parse方法,是在其父类实现的:
AbstractBeanDefinitionParser#parse
public final BeanDefinition parse(Element element, ParserContext parserContext) {
   // 这个方法就是个骨架,用了模板方法设计模式,
   // 1:调用另一个方法,获取BeanDefinition
   AbstractBeanDefinition definition = parseInternal(element, parserContext);
   if (definition != null && !parserContext.isNested()) {
   		// 2:获得id
         String id = resolveId(element, definition, parserContext);
         // 3:获得别名
         String name = element.getAttribute(NAME_ATTRIBUTE);
         String[] aliases = StringUtils.trimArrayElements(StringUtils.commaDelimitedListToStringArray(name));
         // 4:将beanDefinition的id、别名、definition等放进一个holder类
         BeanDefinitionHolder holder = new BeanDefinitionHolder(definition, id, aliases);
         // 5:通过parserContext,得到BeanDefinitionRegistry,注册本bean进去
         registerBeanDefinition(holder, parserContext.getRegistry());
         if (shouldFireEvents()) {
            BeanComponentDefinition componentDefinition = new BeanComponentDefinition(holder);
            postProcessComponentDefinition(componentDefinition);
            parserContext.registerComponent(componentDefinition);
         }
   }
   return definition;
}
我们上面,第一步的注释那里,说用了模板设计模式,因为这个parseInternal是个抽象方法:
protected abstract AbstractBeanDefinition parseInternal(Element element, ParserContext parserContext);
具体的实现,还在子类,鉴于这个类的层次有点深,我们再看看类图:

这个parseInternal就在``AbstractSingleBeanDefinitionParser`:
// 这个方法也足够简单,就是构造一个BeanDefinition,用了builder设计模式。
protected final AbstractBeanDefinition parseInternal(Element element, ParserContext parserContext) {

		BeanDefinitionBuilder builder = BeanDefinitionBuilder.genericBeanDefinition();
		String parentName = getParentName(element);
    	// ConstantBeanDefinitionParser覆盖了这个方法
		Class<?> beanClass = getBeanClass(element);
		if (beanClass != null) {
			builder.getRawBeanDefinition().setBeanClass(beanClass);
		}
		else {
			String beanClassName = getBeanClassName(element);
			if (beanClassName != null) {
				builder.getRawBeanDefinition().setBeanClassName(beanClassName);
			}
		}
		builder.getRawBeanDefinition().setSource(parserContext.extractSource(element));
		if (parserContext.isDefaultLazyInit()) {
			// Default-lazy-init applies to custom bean definitions as well.
			builder.setLazyInit(true);
		}
    	// 子类.AbstractSimpleBeanDefinitionParser重写了这个方法
		doParse(element, parserContext, builder);
		return builder.getBeanDefinition();
	}
这里的getBeanClass,在ConstantBeanDefinitionParser被重写了,返回了一个工厂类class:
private static class ConstantBeanDefinitionParser extends AbstractSimpleBeanDefinitionParser {

		@Override
		protected Class getBeanClass(Element element) {
			return FieldRetrievingFactoryBean.class;
		}
		...
}
而doParse,也在ConstantBeanDefinitionParser的父类中AbstractSimpleBeanDefinitionParser进行了重写:
protected void doParse(Element element, ParserContext parserContext, BeanDefinitionBuilder builder) {
		NamedNodeMap attributes = element.getAttributes();
   		// 这里,获取element下的属性
		for (int x = 0; x < attributes.getLength(); x++) {
			Attr attribute = (Attr) attributes.item(x);
			if (isEligibleAttribute(attribute, parserContext)) {
				String propertyName = extractPropertyName(attribute.getLocalName());
                 // 通过attribute.getValue()获取属性值,propertyName为属性名,加入到BeanDefinition
				builder.addPropertyValue(propertyName, attribute.getValue());
			}
		}
		postProcess(builder, element);
	}
回头看看我们的xml:
<util:constant id="chin.age" static-field=
        "java.sql.Connection.TRANSACTION_SERIALIZABLE"/>
再看看我们debug时,此时的beanDefinition:
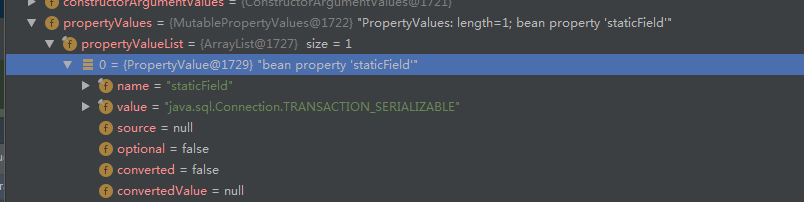
这里,获取了beanDefinition后,就是进入到本小节开始的地方,去进行beanDefinition的注册了。
总的来说,util:constant的解析,得到了一个BeanDefinition,其class类型为:
public class FieldRetrievingFactoryBean
		implements FactoryBean<Object>, BeanNameAware, BeanClassLoaderAware, InitializingBean
这就是一个工厂bean。工厂bean在后续怎么被使用的,留待下一篇。
总结
本篇源码在:
https://gitee.com/ckl111/spring-boot-first-version-learn/tree/master/all-demo-in-spring-learning/spring-xml-demo/src/main/java/org/springframework/utilnamespace中的TestConstant.java
xml的解析demo在:
我发现,一个东西,自己看懂可能还行,相对容易点,但是要把这个东西写出来,却是一个大工程。。。看似简单的元素解析,你要把它讲清楚,还真的要点篇幅,哈哈,所以,这也是为什么本篇比较长的原因。
总的来说,再次回答标题,spring到底得到了什么,得到了beanDefinition,本篇里,只得到了一个beanDefinition,还是工厂类型的;后面,我们会看到其他多种多样的元素解析方式。
ok,就到这里,如果大家觉得有帮助,记得点赞。

 浙公网安备 33010602011771号