SharePoint【Ribbon系列】-- 04.在Ribbon中添加新Group(针对用户自定义Tab)
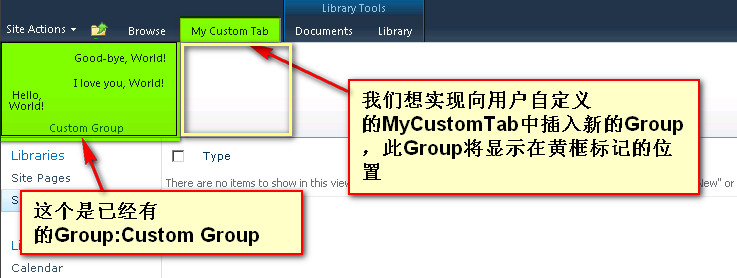
知道如何取得正确的Location,我们就可以来进一步操作我们的自定义Ribbon对象了。这里,我们将偿试向我们在前面创建的My Custom Tab中添加一个新的Group: Custom Img Group,这个Group位于已有的Group(Custom Group)之后。
下面 直接进入操作步骤
一、创建 SharePoint 项目
要添加新选项卡,应首先创建一个空白 SharePoint 项目。如下:
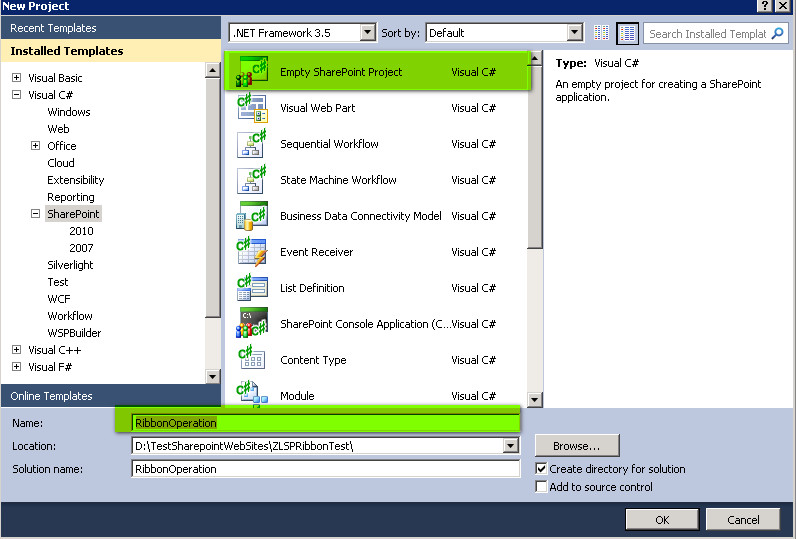
把此方案设置成Farm解决方案
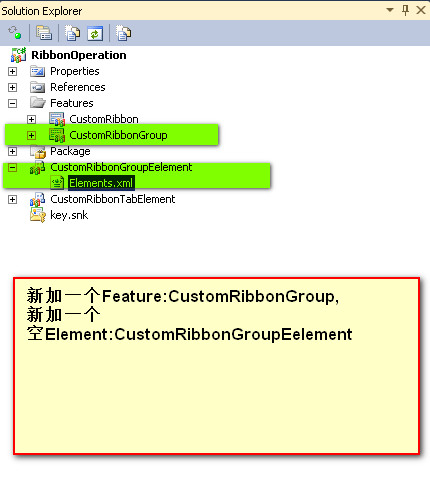
然后在此项目中分别加入新的Feature与新的空白Element如下图
二、使用自定义操作中的功能区 XML 定义功能区自定义项
方法是 打开 CustomRibbonGroupEelement下的Elements.xml 文件,其内容如下:

<Elements xmlns="http://schemas.microsoft.com/sharepoint/">
<CustomAction
Id="Ribbon.CustomTabExample.CutomImgGroup"
Location="CommandUI.Ribbon"
RegistrationId="101"
RegistrationType="List">
<CommandUIExtension>
<CommandUIDefinitions>
<CommandUIDefinition
Location="Ribbon.CustomTabExample.Groups._children">
<Group
Id="Ribbon.CustomTabExample.CutomImgGroup"
Sequence="62"
Description="Custom Img Group"
Title="Custom Img Group"
Command="CustomTabExample.EnableCustomGroup"
Template="Ribbon.Templates.CustomTemplateExampleImg">
<Controls Id="Ribbon.CustomTabExample.CutomImgGroup.Controls" >
<Button
Id="Ribbon.CustomTabExample.CutomImgGroup.CustomImgGroupHello"
Command="CustomTabExample.CustomImgGroupHelloWorld"
LabelText="Hello,Img Group World"
Description="Says Hello,Img World!"
TemplateAlias="cust5"
Sequence="25" />
<Button
Id="Ribbon.CustomTabExample.CutomImgGroup.CustomImgGroupGoodbye"
Command="CustomTabExample.CustomImgGroupGoodbyeWorld"
LabelText="Good-bye, Img Group World"
Description="SaysGood-bye, Img World!"
TemplateAlias="cust6"
Sequence="35" />
</Controls>
</Group>
</CommandUIDefinition>
<CommandUIDefinition Location="Ribbon.CustomTabExample.Scaling._children">
<MaxSize
Id="Ribbon.CustomTabExample.Scaling.CutomImgGroup.MaxSize"
Sequence="15"
GroupId="Ribbon.CustomTabExample.CutomImgGroup"
Size="OneLargeTwoMediumImg" />
</CommandUIDefinition>
<CommandUIDefinition Location="Ribbon.Templates._children">
<GroupTemplate Id="Ribbon.Templates.CustomTemplateExampleImg">
<Layout
Title="OneLargeTwoMediumImg"
LayoutTitle="OneLargeTwoMediumImg">
<Section Alignment="Top" Type="OneRow">
<Row>
<ControlRef DisplayMode="Large" TemplateAlias="cust4" />
</Row>
</Section>
<Section Alignment="Top" Type="TwoRow">
<Row>
<ControlRef DisplayMode="Medium" TemplateAlias="cust5" />
</Row>
<Row>
<ControlRef DisplayMode="Medium" TemplateAlias="cust6" />
</Row>
</Section>
</Layout>
</GroupTemplate>
</CommandUIDefinition>
</CommandUIDefinitions>
<CommandUIHandlers>
<CommandUIHandler Command="CustomTabExample.EnableCustomGroup"
CommandAction="javascript:return true;" />
<CommandUIHandler
Command="CustomTabExample.CustomImgGroupHelloWorld"
CommandAction="javascript:alert('Hello, Imag Group world!');" />
<CommandUIHandler
Command="CustomTabExample.CustomImgGroupGoodbyeWorld"
CommandAction="javascript:alert('Good-bye, Img Group world!');" />
</CommandUIHandlers>
</CommandUIExtension>
</CustomAction>
</Elements>
下面对其内容作如下说明:
首先我们要用上一篇介绍的确定Location的方法找到我们需要添加的Group应该添加在Ribbon的哪个位置。
本例我们确定的位置就是Ribbon.CustomTabExample (格式是: [Ribbon].[Tab].[你要添加的Group的名字]),我们把它命名为CutomImgGroup,所以此新的Group的ID就成了Ribbon.CustomTabExample.CutomImgGroup。如下面代码
Id="Ribbon.CustomTabExample.CutomImgGroup"
Location="CommandUI.Ribbon"
RegistrationId="101"
RegistrationType="List">
<CommandUIExtension>
<CommandUIDefinitions>
<CommandUIDefinition
Location="Ribbon.CustomTabExample.Groups._children">
<Group
从面上的代码我们还应该知道,由于我们确定的位置是Ribbon.CustomTabExample这个Tab ,我们要在这个Tab下添加新的Group,而这个新增的Group是这个Tab的Groups中的一个成员,所以,对于这个新增Group的正确的Location表达格式是:[Ribbon].[目标Tab].Groups._children。这样,我们就可以把我们新增的Group添加到正确的位置。
但这样还不够,我们还需要正确的显示它,对于Ribbon元素的显示,需要注意的一是显示时机,二是显示方式。
对于显示时机,可以从上面的RegistrationID与RegistrationType等等属性的设置来影响,这里的设置当然要与已经存在的用户自定义的Tab的设置保持一致,如果不同步就不会看到你新增的Group,即使它存在的位置就在这个Tab中。
Id="Ribbon.CustomTabExample.CutomImgGroup"
Sequence="62"
Description="Custom Img Group"
Title="Custom Img Group"
Command="EnableCustomImgGroup"
Template="Ribbon.Templates.CustomTemplateExampleImg">
<Controls Id="Ribbon.CustomTabExample.CutomImgGroup.Controls" >
接下来我们定义了需要添加的Group,这里需要注意的是Template属性,我们知道,Sharepoint Ribbon的任何Group都必须与某个GroupTemplate进行绑定,我们这里针对新添加的Group需要创建一个新的GroupTemplate: Ribbon.Templates.CustomTemplateExampleImg并将它与我们新增的Group进行绑定。下面就是我们创建的新的GroupTemplate代码
<GroupTemplate Id="Ribbon.Templates.CustomTemplateExampleImg">
<Layout
Title="OneLargeTwoMediumImg"
LayoutTitle="OneLargeTwoMediumImg">
<Section Alignment="Top" Type="OneRow">
<Row>
<ControlRef DisplayMode="Large" TemplateAlias="cust4" />
</Row>
</Section>
<Section Alignment="Top" Type="TwoRow">
<Row>
<ControlRef DisplayMode="Medium" TemplateAlias="cust5" />
</Row>
<Row>
<ControlRef DisplayMode="Medium" TemplateAlias="cust6" />
</Row>
</Section>
</Layout>
</GroupTemplate>
</CommandUIDefinition>
上面的代码需要注意的是 Location: Location="Ribbon.Templates._children",这是GroupTemplate存在的位置。我们新增的Group将会到此位置去找它引用的GroupTemplate。
创建并 设置了Group引用的GroupTemplate,我们还需要把Group内的Controls与这个Template的相关设置关联起来,代码如下:
<Button
Id="Ribbon.CustomTabExample.CutomImgGroup.CustomImgGroupHello"
Command="CustomTabExample.CustomImgGroupHelloWorld"
LabelText="Hello,Img Group World"
Description="Says Hello,Img World!"
TemplateAlias="cust5"
Sequence="25" />
<Button
Id="Ribbon.CustomTabExample.CutomImgGroup.CustomImgGroupGoodbye"
Command="CustomTabExample.CustomImgGroupGoodbyeWorld"
LabelText="Good-bye, Img Group World"
Description="SaysGood-bye, Img World!"
TemplateAlias="cust6"
Sequence="35" />
</Controls>
从代码中可以看到,我们创建了两个Button,它们通过TemplateAlias与GroupTemplate中设置的Section内容相关联。
如果此时你部署了你的NewGroup,你会发现你可以看到它出现在了正确的位置,但你看不到你在其中创建的Controls。这是因为我们还没有创建针对这个Group的新的Scaling与MaxSize特性。所以你需要添加下面的代码
<MaxSize
Id="Ribbon.CustomTabExample.Scaling.CutomImgGroup.MaxSize"
Sequence="15"
GroupId="Ribbon.CustomTabExample.CutomImgGroup"
Size="OneLargeTwoMediumImg" />
</CommandUIDefinition>
此代码创建了一个新的Scaling设置,并通过Location="Ribbon.CustomTabExample.Scaling._children"确定了此Scaling属于Ribbon.CustomTabExample这个Tab的组成。然后又通过 GroupId="Ribbon.CustomTabExample.CutomImgGroup"把它与我们新创建的Group关联了起来。
接下来的就是创建相关的Command项并与我们的Controls关联,这个就不用多说了。至此,我们就完成了新的用户自定义Group的创建与添加。
三、部署自定义Group项
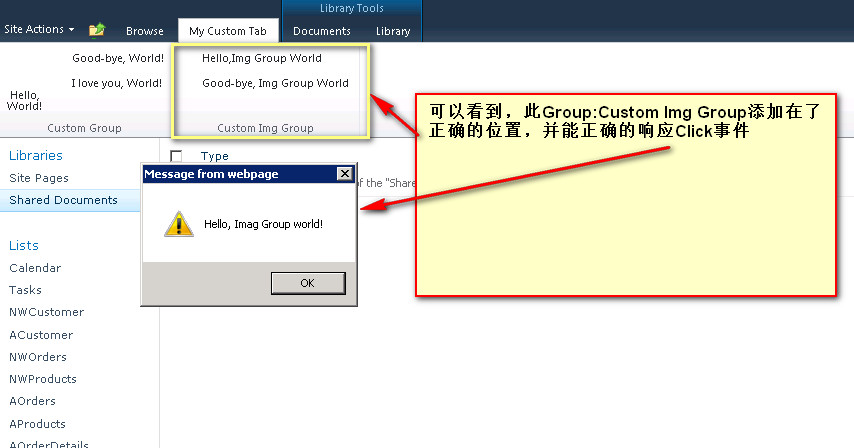
按 F5。Visual Studio 2010 中的 SharePoint 开发工具将自动构建和部署功能。
转到网站或子网站中的文档库。
单击“My Custom Tab”选项卡,查看“自定义组”,然后单击“Hello, Img World”、“Good-bye, Img World”按钮。