动手实现深度学习(12): 卷积层的实现与优化(img2col)
9.1 卷积层的运算
传送门: https://www.cnblogs.com/greentomlee/p/12314064.html
github: Leezhen2014: https://github.com/Leezhen2014/python_deep_learning
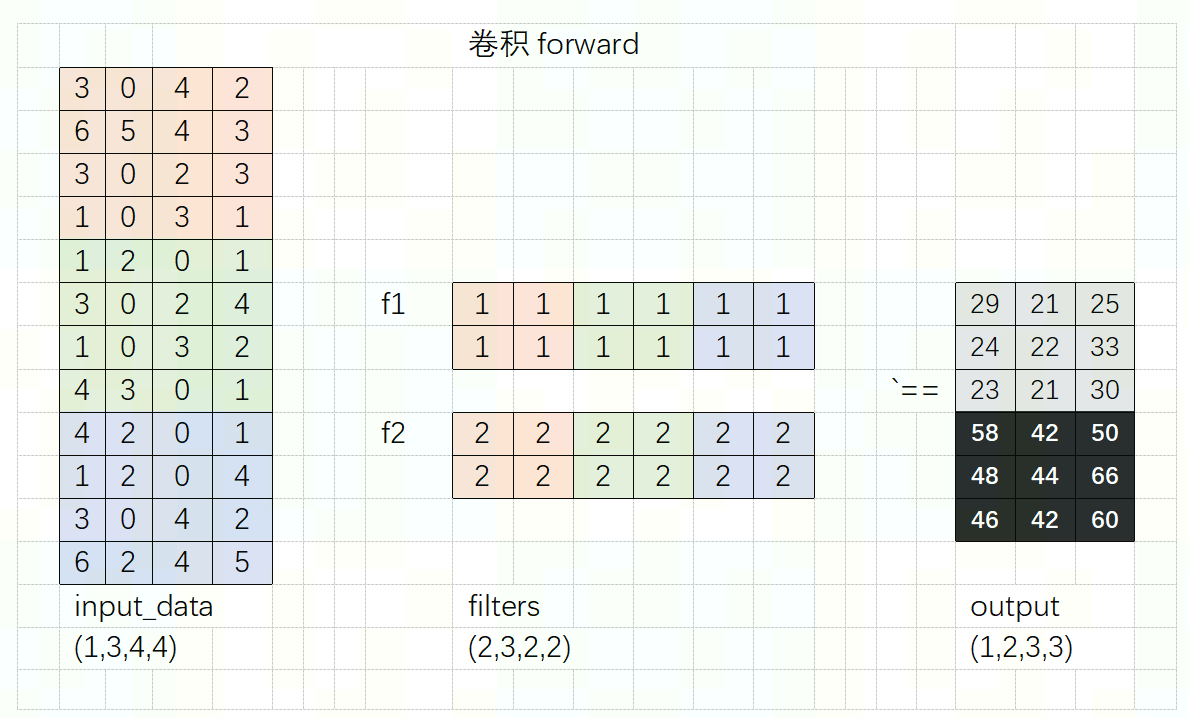
卷积的forward
卷积的计算过程网上的资料已经做够好了,没必要自己再写一遍。只把资料搬运到这里:
https://www.zhihu.com/question/43609045
https://blog.csdn.net/weixin_44106928/article/details/103079668
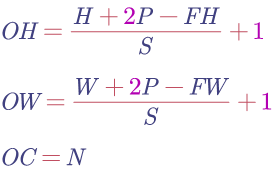
这里总结一下有padding\stride的卷积操作:
假设,输入大小为(H,W,C),fileter大小为(FH,FW,C)*N ; padding=P, stride=S,卷积后的形状为(OH,OW,OC)
  1 def forward(self, x):
  2     '''
  3     使用im2col 将输入的x 转换成2D矩阵
  4     然后 y= w*x+b 以矩阵的形式完成
  5     最后返回y
  6     :param x: x为4D tensor, 输入数据
  7     :return: out=w*x+b
  8     '''
  9     FN, C, FH, FW = self.W.shape
 10     N, C, H, W = x.shape
 11     out_h = 1 + int((H + 2 * self.pad - FH) / self.stride)
 12     out_w = 1 + int((W + 2 * self.pad - FW) / self.stride)
 13
 14     col = im2col(x, FH, FW, self.stride, self.pad)
 15     col_W = self.W.reshape(FN, -1).T
 16     print("col.shape=%s"%str(col.shape))
 17     print("col_W.shape=%s"%str(col_W.shape))
 18
 19     out = np.dot(col, col_W)
 20     print("out.shape=%s"%str(out.shape))
 21     out=out+ self.b
 22     out = out.reshape(N, out_h, out_w, -1).transpose(0, 3, 1, 2)
 23
 24     self.x = x
 25     self.col = col
 26     self.col_W = col_W
 27
 28     return out
 29
卷积的backward
概念介绍: https://zhuanlan.zhihu.com/p/33802329
卷积的backward是对卷积的求导。
代码实现如下:
  1 def backward(self, dout):
  2     '''
  3     反馈过程中也需要将2D 矩阵转换为4D tensor
  4     :param dout: 梯度差
  5     :return:
  6     '''
  7     FN, C, FH, FW = self.W.shape
  8     dout = dout.transpose(0, 2, 3, 1).reshape(-1, FN) # NCHW
  9
 10     self.db = np.sum(dout, axis=0)# NHWC , 求和
 11     self.dW = np.dot(self.col.T, dout) # 点乘w
 12     self.dW = self.dW.transpose(1, 0).reshape(FN, C, FH, FW)
 13
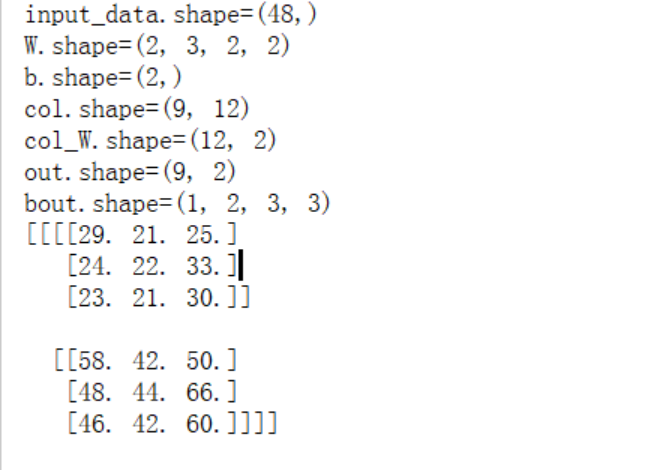
 14     dcol = np.dot(dout, self.col_W.T)
 15     dx = col2im(dcol, self.x.shape, FH, FW, self.stride, self.pad)
 16
 17     return dx
9.2 引入im2col 概念
再讲卷积的实现之前,首先抛出一个问题:如果按照上述的卷积方式计算,是否会影响性能?
答案是肯定会受影响的。
因此,我们需要向优化一下conv的计算方式.
按照“以空间换时间”的思想,我们可以做一些优化,使得在conv和pool的时候运算速度加快。
首先,我们知道Numpy对大型矩阵的运算是有做优化的,这个特点我们应该好好利用;
其次,我们知道Numpy在做多个嵌套的for循环的时候,O(n)会很大;应该避免做多个for循环;
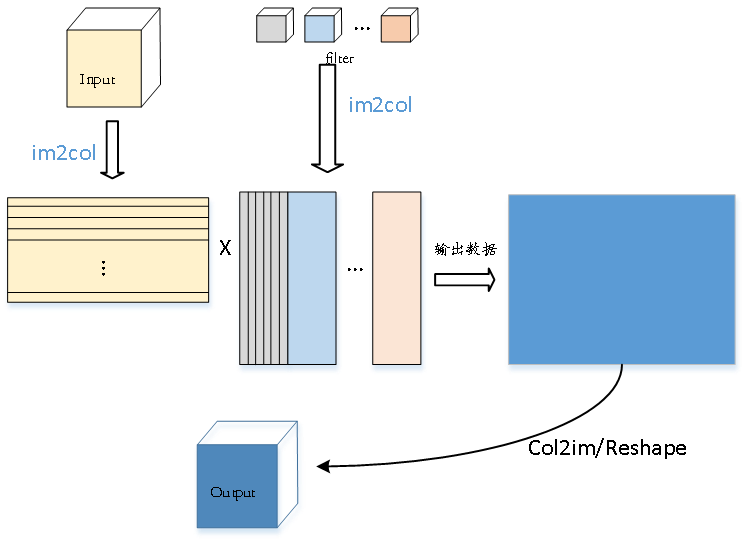
因此,要是将4D的卷积运算转换成2D的矩阵乘法就会好很多;filter也可以变成2D的数组;
Im2col便是将4D数据转换成2D矩阵的函数。
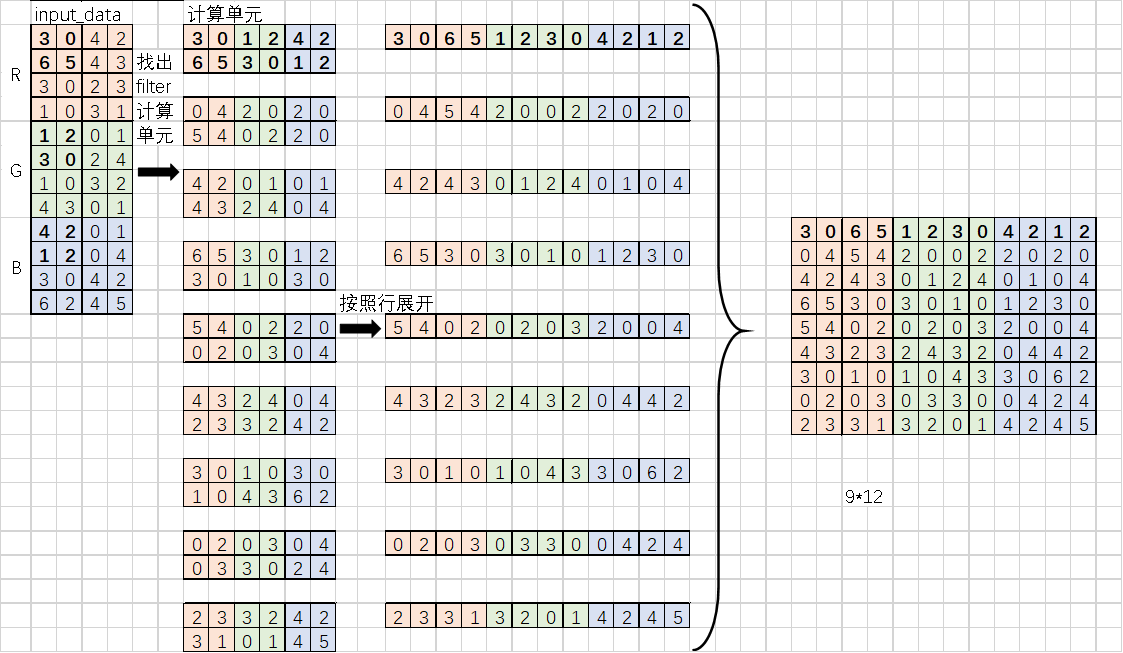
该函数大致的思路是:filter按照行列展开成一个2D矩阵即可,input_data按照计算的单元重新组合。因此需要写一个函数将图像转换成2D矩阵,该函数可以将图像展开成适合与滤波去做乘法的矩阵。
展开和计算的流程如下:
9.3 单元测试im2col
对filter计算有影响的因素有input_data,filter_h,filter_w,stride, padding;im2col会应该根据以上的因因素展开input_data,展开后的input_data一定是比之前要大的;
我们可以尝试计算一下input_data展开后的数据形状:
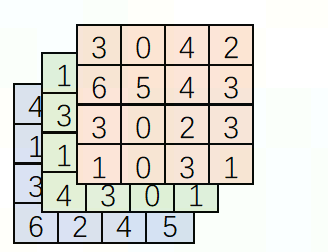
假设,输入数据为4*4*3大小的tensor; filter有两个为2*(2*2*3),filter_h=2,filter_w=2,stride=1, padding=0;这里可以计算出展开以后的大小:
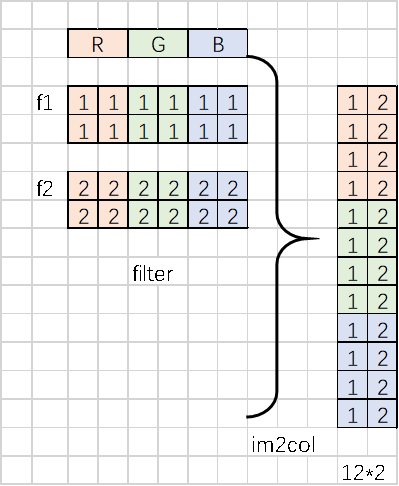
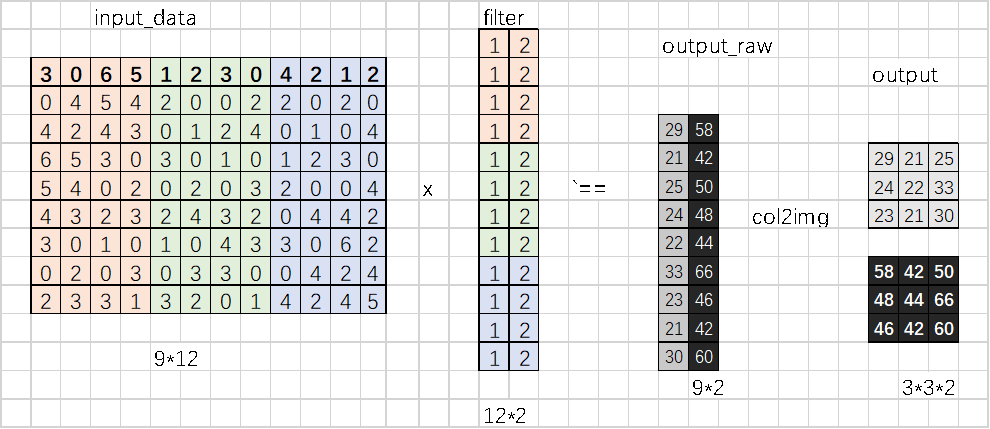
Filter为有两个,分别为f1和f2; shape=(2*2*3), 按照行展开成2D的矩阵以后如下图所示:
Input_data为4*4*3的tensor,如下图所示:
Input_data首先会找出filter对应的计算单元,这些还是需要padding\stride\filter_w\filter_h相关,找出计算的单元以后,按照行展开。最后得到的数据便是im2col的结果:
Input_data和filter这样展开以后,卷积计算就可以按照矩阵乘法的方式计算,避免了重复的for循环。如下图所示,黑色和灰色区域是计算的结果。不必担心矩阵过大是否会影响计算速度,Numpy对大规模矩阵乘法内部有优化加速,这样展开以后恰恰也能充分的利用numpy的特性。
Im2col的实现:
  1 def im2col(input_data, filter_h, filter_w, stride=1, pad=0):
  2     '''
  3
  4     :param input_data: 输入数据由4维数组组成(N,C,H,W)
  5     :param filter_h:   filer的高
  6     :param filter_w:   filter的宽
  7     :param stride:     stride
  8     :param pad:        padding
  9     :return:           2D矩阵
 10     '''
 11     # 计算输出的大小
 12     N, C, H, W = input_data.shape
 13     out_h = (H + 2*pad - filter_h)//stride + 1
 14     out_w = (W + 2*pad - filter_w)//stride + 1
 15     # padding
 16     img = np.pad(input_data, [(0,0), (0,0), (pad, pad), (pad, pad)], 'constant')
 17     col = np.zeros((N, C, filter_h, filter_w, out_h, out_w))
 18     # 计算单元
 19     for y in range(filter_h):
 20         y_max = y + stride*out_h
 21         for x in range(filter_w):
 22             x_max = x + stride*out_w
 23             col[:, :, y, x, :, :] = img[:, :, y:y_max:stride, x:x_max:stride]
 24     # 重新排列
 25     col = col.transpose(0, 4, 5, 1, 2, 3).reshape(N*out_h*out_w, -1)
 26     return col
测试代码:
  1 # -*- coding: utf-8 -*-
  2 # @File  : test_im2col.py
  3 # @Author: lizhen
  4 # @Date  : 2020/2/14
  5 # @Desc  : 测试im2col
  6 import numpy as np
  7
  8 from src.common.util import im2col,col2im
  9
 10 if __name__ == '__main__':
 11     raw_data = [3, 0, 4, 2,
 12                 6, 5, 4, 3,
 13                 3, 0, 2, 3,
 14                 1, 0, 3, 1,
 15
 16                 1, 2, 0, 1,
 17                 3, 0, 2, 4,
 18                 1, 0, 3, 2,
 19                 4, 3, 0, 1,
 20
 21                 4, 2, 0, 1,
 22                 1, 2, 0, 4,
 23                 3, 0, 4, 2,
 24                 6, 2, 4, 5
 25     ]
 26
 27     input_data = np.array(raw_data)
 28     input_data = input_data.reshape(1,3,4,4)
 29     print(input_data.shape)
 30     col1 = im2col(input_data=input_data,filter_h=2,filter_w=2,stride=1,pad=0)#input_data, filter_h, filter_w, stride=1, pad=0
 31     print(col1)
 32
========输出:可以发现和上面的绘图的结果是一致的 =====
(1, 3, 4, 4)
[[3. 0. 6. 5. 1. 2. 3. 0. 4. 2. 1. 2.]
[0. 4. 5. 4. 2. 0. 0. 2. 2. 0. 2. 0.]
[4. 2. 4. 3. 0. 1. 2. 4. 0. 1. 0. 4.]
[6. 5. 3. 0. 3. 0. 1. 0. 1. 2. 3. 0.]
[5. 4. 0. 2. 0. 2. 0. 3. 2. 0. 0. 4.]
[4. 3. 2. 3. 2. 4. 3. 2. 0. 4. 4. 2.]
[3. 0. 1. 0. 1. 0. 4. 3. 3. 0. 6. 2.]
[0. 2. 0. 3. 0. 3. 3. 0. 0. 4. 2. 4.]
[2. 3. 3. 1. 3. 2. 0. 1. 4. 2. 4. 5.]]
9.3 卷积操作的实现
卷积操作也需要实现forward和backward函数。
Forward函数中用到了9.1\9.2的im2col
  1 class Convolution:
  2     def __init__(self, W, b, stride=1, pad=0):
  3         '''
  4         conv的构造函数
  5         :param W: 2D矩阵
  6         :param b:
  7         :param stride:
  8         :param pad:
  9         '''
 10         self.W = W
 11         self.b = b
 12         self.stride = stride
 13         self.pad = pad
 14
 15         # 中间结果(backward的时候使用)
 16         self.x = None
 17         self.col = None
 18         self.col_W = None
 19
 20         # 权重的梯度/偏置的梯度
 21         self.dW = None
 22         self.db = None
 23
 24     def forward(self, x):
 25         '''
 26         使用im2col 将输入的x 转换成2D矩阵
 27         然后 y= w*x+b 以矩阵的形式完成
 28         最后返回y
 29         :param x: x为4D tensor, 输入数据
 30         :return: out=w*x+b
 31         '''
 32         FN, C, FH, FW = self.W.shape
 33         N, C, H, W = x.shape
 34         out_h = 1 + int((H + 2 * self.pad - FH) / self.stride)
 35         out_w = 1 + int((W + 2 * self.pad - FW) / self.stride)
 36
 37         col = im2col(x, FH, FW, self.stride, self.pad)
 38         col_W = self.W.reshape(FN, -1).T
 39
 40         out = np.dot(col, col_W) + self.b
 41         out = out.reshape(N, out_h, out_w, -1).transpose(0, 3, 1, 2)
 42
 43         self.x = x
 44         self.col = col
 45         self.col_W = col_W
 46
 47         return out
 48
 49     def backward(self, dout):
 50         '''
 51         反馈过程中也需要将2D 矩阵转换为4D tensor
 52         :param dout: 梯度差
 53         :return:
 54         '''
 55         FN, C, FH, FW = self.W.shape
 56         dout = dout.transpose(0, 2, 3, 1).reshape(-1, FN)
 57
 58         self.db = np.sum(dout, axis=0)
 59         self.dW = np.dot(self.col.T, dout)
 60         self.dW = self.dW.transpose(1, 0).reshape(FN, C, FH, FW)
 61
 62         dcol = np.dot(dout, self.col_W.T)
 63         dx = col2im(dcol, self.x.shape, FH, FW, self.stride, self.pad)
 64
 65         return dx
 66
9.4单元测试卷积操作
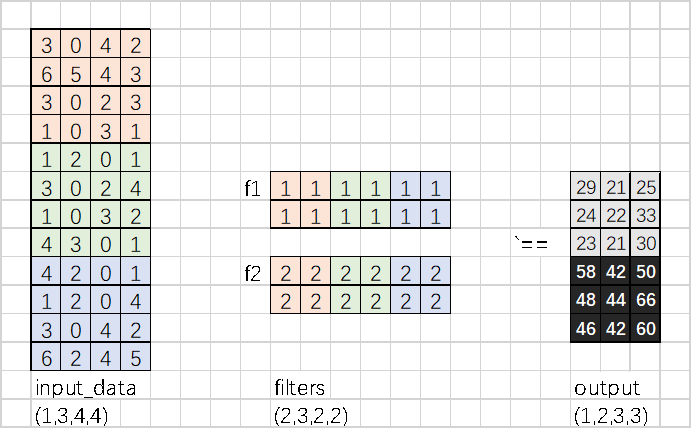
输入:input_data\filters
输出:output
测试代码:
  1   2 # -*- coding: utf-8 -*-
  3 # @File  : test_im2col.py
  4 # @Author: lizhen
  5 # @Date  : 2020/2/14
  6 # @Desc  : 测试im2col
  7 import numpy as np
  8
  9 from src.common.util import im2col,col2im
 10 from src.common.layers import Convolution
 11
 12
 13 if __name__ == '__main__':
 14     raw_data = [3, 0, 4, 2,
 15                 6, 5, 4, 3,
 16                 3, 0, 2, 3,
 17                 1, 0, 3, 1,
 18
 19                 1, 2, 0, 1,
 20                 3, 0, 2, 4,
 21                 1, 0, 3, 2,
 22                 4, 3, 0, 1,
 23
 24                 4, 2, 0, 1,
 25                 1, 2, 0, 4,
 26                 3, 0, 4, 2,
 27                 6, 2, 4, 5
 28     ]
 29
 30     raw_filter=[
 31         1,    1,    1,    1,    1,    1,
 32         1,    1,    1,    1,    1,    1,
 33         2,    2,    2,    2,    2,   2,
 34         2,    2,    2,    2,    2,   2,
 35
 36     ]
 37
 38
 39
 40     input_data = np.array(raw_data)
 41     filter_data = np.array(raw_filter)
 42
 43     x = input_data.reshape(1,3,4,4)# NCHW
 44     W = filter_data.reshape(2,3,2,2) # NHWC
 45     b = np.zeros(2)
 46     # b = b.reshape((2,1))
 47     # col1 = im2col(input_data=x,filter_h=2,filter_w=2,stride=1,pad=0)#input_data, filter_h, filter_w, stride=1, pad=0
 48     # print(col1)
 49
 50     print("input_data.shape=%s"%str(input_data.shape))
 51     print("W.shape=%s"%str(W.shape))
 52     print("b.shape=%s"%str(b.shape))
 53     conv = Convolution(W,b) # def __init__(self, W, b, stride=1, pad=0)
 54     out = conv.forward(x)
 55     print("bout.shape=%s"%str(out.shape))
 56     print(out)
Conv的输出结果,与上图的结果一致。


