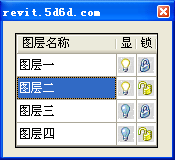
DataGridView结合ImageList实现图像列
实现类似AutoCAD或者PhotoShop中图层的效果。
层名称,层状态,锁定,显示。如图:


总结一下DataGridView的小技巧:
1.代码添加列,次序是由右至左,即越先添加的列,越靠右。
2.代码添加行,先添加行数,再往行里加数据。
dataGridView1.Rows.Add(3);
dataGridView1.Rows[0].Cells[0].Value = "图层一";
3.图片列的使用DataGridViewImageColumn
4.去掉行标题
dataGridView1.RowHeadersVisible = false;
5.ListView也可以实现同样的效果,但是界面很不好控制。
ListBox可以编辑但是无法添加图像列。
C# WinForm控件ListBox点选可编辑(附源码)
代码:
代码:
using System;
using System.Collections.Generic;
using System.ComponentModel;
using System.Data;
using System.Drawing;
using System.Linq;
using System.Text;
using System.Windows.Forms;
namespace WinDataGridView
{
public partial class Form1 : Form
{
public Form1()
{
InitializeComponent();
}
private void BindData()
{
//去掉行标题
dataGridView1.RowHeadersVisible = false;
//图片列,列的添加是由右至左
//是否锁定
DataGridViewImageColumn colLock = new DataGridViewImageColumn();
colLock.Name = "layerLock";
colLock.HeaderText = "锁";
colLock.Width = 20;
dataGridView1.Columns.Insert(0, colLock);
//是否显示
DataGridViewImageColumn colShow = new DataGridViewImageColumn();
colShow.Name = "layerShow";
colShow.HeaderText = "显";
colShow.Width = 20;
dataGridView1.Columns.Insert(0, colShow);
//编辑框列
DataGridViewTextBoxColumn colTxt = new DataGridViewTextBoxColumn();
colTxt.Name = "layerName";
colTxt.HeaderText = "图层名称";
dataGridView1.Columns.Insert(0, colTxt);
//添加行数据
dataGridView1.Rows.Add(3);
this.dataGridView1.Rows[0].Cells[0].Value = "图层一";
this.dataGridView1.Rows[0].Cells[1].Value = imageList1.Images[0];
this.dataGridView1.Rows[0].Cells[2].Value = imageList1.Images[2];
this.dataGridView1.Rows[1].Cells[0].Value = "图层二";
this.dataGridView1.Rows[1].Cells[1].Value = imageList1.Images[0];
this.dataGridView1.Rows[1].Cells[2].Value = imageList1.Images[3];
this.dataGridView1.Rows[2].Cells[0].Value = "图层三";
this.dataGridView1.Rows[2].Cells[1].Value = imageList1.Images[1];
this.dataGridView1.Rows[2].Cells[2].Value = imageList1.Images[2];
this.dataGridView1.Rows[3].Cells[0].Value = "图层四";
this.dataGridView1.Rows[3].Cells[1].Value = imageList1.Images[1];
this.dataGridView1.Rows[3].Cells[2].Value = imageList1.Images[3];
}
private void Form1_Load(object sender, EventArgs e)
{
BindData();
}
}
}
我这个博客废弃不用了,今天想寻找外链的时候,突然想到这个博客权重很高。
有需要免费外链的,留言即可,我准备把这个博客变成免费的友情链接站点。


