
#安装依赖及ss5
yum -y install gcc openldap-devel pam-devel openssl-devel
wget https://nchc.dl.sourceforge.net/project/ss5/ss5/3.8.9-8/ss5-3.8.9-8.tar.gz
tar -xf ss5-3.8.9-8.tar.gz
cd ss5-3.8.9/
./configure && make && make install
//修改配置文件
vim /etc/opt/ss5/ss5.conf
auth 0.0.0.0/0 – -
改为
auth 0.0.0.0/0 – u
permit – 0.0.0.0/0 – 0.0.0.0/0 – – – – -
改成为
permit u 0.0.0.0/0 – 0.0.0.0/0 – – – – -
//修改默认端口
vim /etc/sysconfig/ss5
//在/etc/sysconfig/ss5这个文件中,添加下面这一行命令,-b后面的参数代表监听的ip地址和端口号
SS5_OPTS=" -u root -b 0.0.0.0:8080"
//添加账户和密码
vim /etc/opt/ss5/ss5.passwd
##用户 密码
user 123456
//添加开机启动
chmod u+x /etc/rc.d/init.d/ss5
chkconfig --add ss5 //可选
chkconfig ss5 on //可选
service ss5 start
//sockets5启动
sh /etc/rc.d/init.d/ss5 start
doneting ss5...
//查看软件启动状态
netstat -lntp | grep ss5
tcp 0 0 0.0.0.0:1080 0.0.0.0:* LISTEN 14262/ss5
curl myip.ipip.net --socks5 test:test@118.89.106.69:1080
查看服务进程,或者通过netstat查看服务进程没有显示,可以看看服务状态:service ss5 status,如果显示
[root@C20220506139283 ss5]# service ss5 status
/etc/init.d/ss5: line 18: [: =: unary operator expected
● ss5.service - SYSV: This script takes care of starting and stopping ss5
   Loaded: loaded (/etc/rc.d/init.d/ss5; bad; vendor preset: disabled)
   Active: active (exited) since Mon 2023-02-20 14:19:04 CST; 9min ago
     Docs: man:systemd-sysv-generator(8)
  Process: 1692 ExecStop=/etc/rc.d/init.d/ss5 stop (code=exited, status=0/SUCCESS)
  Process: 1705 ExecStart=/etc/rc.d/init.d/ss5 start (code=exited, status=0/SUCCESS)
发现不能创建pid文件,原因是父级目录没有创建好,创建一下即可:mkdir /var/run/ss5/
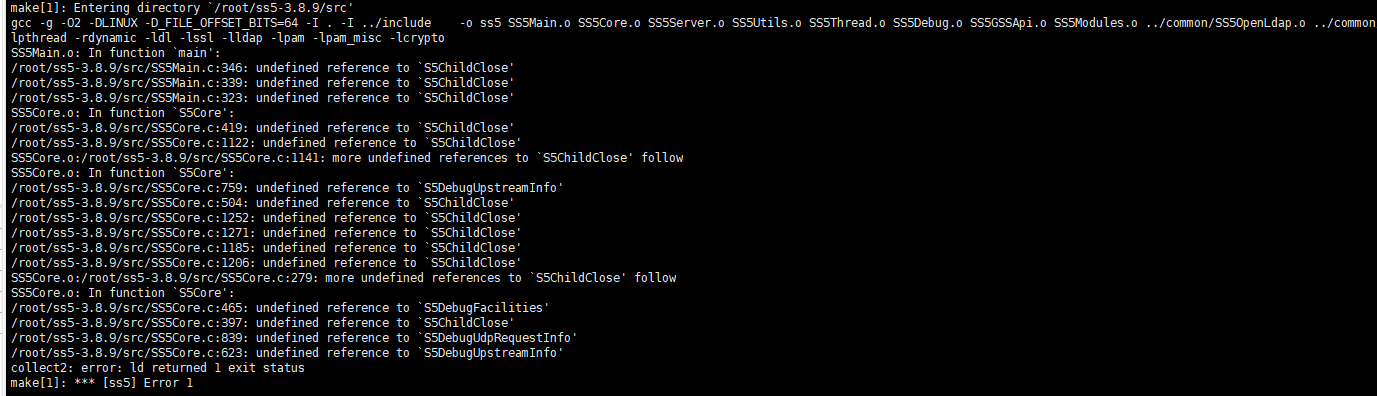
编译中可能出现下面错误,可能是gcc版本问题,我出错的版本是:
[root@xuan ss5-3.8.9]# gcc -v
Using built-in specs.
COLLECT_GCC=gcc
COLLECT_LTO_WRAPPER=/opt/rh/devtoolset-8/root/usr/libexec/gcc/x86_64-redhat-linux/8/lto-wrapper
Target: x86_64-redhat-linux
Configured with: ../configure --enable-bootstrap --enable-languages=c,c++,fortran,lto --prefix=/opt/rh/devtoolset-8/root/usr --mandir=/opt/rh/devtoolset-8/root/usr/share/man --infodir=/opt/rh/devtoolset-8/root/usr/share/info --with-bugurl=http://bugzilla.redhat.com/bugzilla --enable-shared --enable-threads=posix --enable-checking=release --enable-multilib --with-system-zlib --enable-__cxa_atexit --disable-libunwind-exceptions --enable-gnu-unique-object --enable-linker-build-id --with-gcc-major-version-only --with-linker-hash-style=gnu --with-default-libstdcxx-abi=gcc4-compatible --enable-plugin --enable-initfini-array --with-isl=/builddir/build/BUILD/gcc-8.3.1-20190311/obj-x86_64-redhat-linux/isl-install --disable-libmpx --enable-gnu-indirect-function --with-tune=generic --with-arch_32=x86-64 --build=x86_64-redhat-linux
Thread model: posix
gcc version 8.3.1 20190311 (Red Hat 8.3.1-3) (GCC)
换了一台其它版本的就编译 成功了:
[root@C20220506139283 ~]# gcc -v
Using built-in specs.
COLLECT_GCC=gcc
COLLECT_LTO_WRAPPER=/usr/libexec/gcc/x86_64-redhat-linux/4.8.5/lto-wrapper
Target: x86_64-redhat-linux
Configured with: ../configure --prefix=/usr --mandir=/usr/share/man --infodir=/usr/share/info --with-bugurl=http://bugzilla.redhat.com/bugzilla --enable-bootstrap --enable-shared --enable-threads=posix --enable-checking=release --with-system-zlib --enable-__cxa_atexit --disable-libunwind-exceptions --enable-gnu-unique-object --enable-linker-build-id --with-linker-hash-style=gnu --enable-languages=c,c++,objc,obj-c++,java,fortran,ada,go,lto --enable-plugin --enable-initfini-array --disable-libgcj --with-isl=/builddir/build/BUILD/gcc-4.8.5-20150702/obj-x86_64-redhat-linux/isl-install --with-cloog=/builddir/build/BUILD/gcc-4.8.5-20150702/obj-x86_64-redhat-linux/cloog-install --enable-gnu-indirect-function --with-tune=generic --with-arch_32=x86-64 --build=x86_64-redhat-linux
Thread model: posix
gcc version 4.8.5 20150623 (Red Hat 4.8.5-44) (GCC)
转载:http://t.zoukankan.com/linyouyi-p-10414366.html

 浙公网安备 33010602011771号