
React , TypeScript, CSS Module , Less , Antd 遇到的坑
序
因为React 本身的脚手架自身在webpack中已经做了对CSS Module 的配置,因最近遇到了很多坑,所以从头整理了一遍
使用版本
"react": "^16.13.1",
"antd": "^4.4.0",
"typescript": "~3.7.2",
"webpack": "4.42.0",
"less": "^3.11.3",
"less-loader": "5.0.0",
一. 安装和初始化---React and TypeScript
使用 yarn 创建 cra-template-typescript 项目。
$ yarn create react-app antd-demo-ts --template typescript
如果你使用的是 npm(接下来我们都会用 yarn 作为例子,如果你习惯用 npm 也没问题)。
$ npx create-react-app antd-demo-ts --typescript
然后我们进入项目并启动。
$ cd antd-demo-ts
$ yarn start
二. CSS Module的使用
1.在src目录下新建 css/index.module.css 文件
.red{
  color: red;
}
2. 打开APP.tsx 文件新增以下代码
import React from 'react';
import styles from './css/index.module.css'

function App() {
  return (
    <div className="App">
      <header className="App-header">
        <img src={logo} className="App-logo" alt="logo" />

        <div className={styles.red}>哈哈啊哈</div>

      </header>
    </div>
  );
}

export default App;
3. 你会发现style代码可以通过Js方式来使用,棒棒的
4. 因为React脚手架自身支持.css, .Scss, .Sass 文件做了配置,所以如果有用scss的小伙伴可以直接使用scss,如想使用less,可查看后面
5. 在src目录下新建 css/index.module.scss 文件,App.tsx 中引用,发现报错以下,提示需要安装Sass文件
/src/css/index.module.scss (./node_modules/css-loader/dist/cjs.js??ref--6-oneOf-6-1!./node_modules/postcss-loader/src??postcss!./node_modules/resolve-url-loader??ref--6-oneOf-6-3!./node_modules/sass-loader/dist/cjs.js??ref--6-oneOf-6-4!./src/css/index.module.scss)
To import Sass files, you first need to install node-sass.
Run `npm install node-sass` or `yarn add node-sass` inside your workspace.
Require stack:
5. 安装Sass和node-sass
`npm install node-sass` or `yarn add node-sass`
三. Less的使用----打开隐藏的webpack配置文件
1. 查看webpack内部配置
npm run eject
2. 如果发现报错以下信息,表示你需要上传到git上面后再进行eject操作
This git repository has untracked files or uncommitted changes:

.CFUserTextEncoding
.DS_Store
.***-NG/
.***/
.Trash/
.android/
.ant-devtool.json
.anyproxy/
.bash_history
.bash_profile
.bash_sessions/
.cocoapods/
.config/
.fancy/
.gitconfig
.kaitian/
.lesshst
.local/
.mysql_history
.node-gyp/
.npm/
.npminstall_tarball/
.nvm/
.putty/
.rncache/
.sh_history
.ssh/
.taro/
.taro2/
.v8flags.7.0.276.38-node.19.e8d369a76bd6a0858b87990e6b1a3cfd.json
.viminfo
.vscode-react-native/
.vscode/
.vue-cli-ui/
.vuerc
.vuxrc/
.wallaby/
.yarnrc
Applications/
Desktop/
Documents/
Downloads/
Library/
Logs/
Movies/
Music/
Pictures/
Public/
UI/
WeChatProjects/
gulpfile.js
"iCloud \344\272\221\347\233\230\357\274\210\345\275\222\346\241\243\357\274\211/"
image/
mysql/
workSpace/
"\344\277\241\346\201\257\350\265\204\346\226\231/"
"\345\216\237\345\236\213/"
"\351\241\271\347\233\256\346\226\207\344\273\266/"

Remove untracked files, stash or commit any changes, and try again.
npm ERR! code ELIFECYCLE
npm ERR! errno 1
npm ERR! react-demo@0.1.0 eject: `react-scripts eject`
npm ERR! Exit status 1
npm ERR!
npm ERR! Failed at the react-demo@0.1.0 eject script.
npm ERR! This is probably not a problem with npm. There is likely additional logging output above.

npm ERR! A complete log of this run can be found in:
3. 在webpack中可以看到,webpack中已经配置了 CSS, SCSS, SASS 的Module,后续无需自己配置,
4. 如果你想使用Less还需要自己去配置,以下是Less的操作步骤
四. 安装 Less 和 Less-loader
使用 yarn
$ yarn add less less-loader
或者使用 npm
$ cnpm i less less-loader
五. webpack中配置Less
1. 在第二步的时候我们已经打开了config中webpack的配置,打开 config 文件夹,修改 webpack.config.js
2. 搜索 cssRegex ,找到后添加两行代码
const cssRegex = /\.css$/;
const cssModuleRegex = /\.module\.css$/;
const sassRegex = /\.(scss|sass)$/;
const sassModuleRegex = /\.module\.(scss|sass)$/;
const lessRegex = /\.less$/;
const lessModuleRegex = /\.module\.less$/;
3.修改 getStyleLoaders 函数,添加代码
// common function to get style loaders
  const getStyleLoaders = (cssOptions, lessOptions, preProcessor) => {
    const loaders = [
      isEnvDevelopment && require.resolve('style-loader'),
      isEnvProduction && {
        loader: MiniCssExtractPlugin.loader,
        options: shouldUseRelativeAssetPaths ? { publicPath: '../../' } : {},
      },
      {
        loader: require.resolve('css-loader'),
        options: cssOptions,
      },
      {
        loader: require.resolve('less-loader'),
        options: lessOptions,
      },
      {
        // Options for PostCSS as we reference these options twice
        // Adds vendor prefixing based on your specified browser support in
        // package.json
        loader: require.resolve('postcss-loader'),
4. 搜索 cssRegex ,在 css 配置下添加 less 配置
{
              test: cssRegex,
              exclude: cssModuleRegex,
              use: getStyleLoaders({
                importLoaders: 1,
                sourceMap: isEnvProduction && shouldUseSourceMap,
              }),
              // Don't consider CSS imports dead code even if the
              // containing package claims to have no side effects.
              // Remove this when webpack adds a warning or an error for this.
              // See https://github.com/webpack/webpack/issues/6571
              sideEffects: true,
            },
            // Adds support for CSS Modules (https://github.com/css-modules/css-modules)
            // using the extension .module.css
            {
              test: cssModuleRegex,
              use: getStyleLoaders({
                importLoaders: 1,
                sourceMap: isEnvProduction && shouldUseSourceMap,
                modules: true,
                getLocalIdent: getCSSModuleLocalIdent,
              }),
            },
            {
              test: lessRegex,
              exclude: lessModuleRegex,
              use: getStyleLoaders(
                {
                  importLoaders: 1,
                  sourceMap: isEnvProduction
                    ? shouldUseSourceMap
                    : isEnvDevelopment,
                },
                'less-loader'
              ),
              sideEffects: true,
            },
            {
              test: lessModuleRegex,
              use: getStyleLoaders(
                {
                  importLoaders: 1,
                  sourceMap: isEnvProduction
                    ? shouldUseSourceMap
                    : isEnvDevelopment,
                  modules:{
                      getLocalIdent: getCSSModuleLocalIdent,
           },
                },
                'less-loader'
              ),
            },
5. 保存后,重新启动项目
6. 在src目录下新建 css/index.module.less 文件
.red{
  color: yellow;
}
7. App.tsx 修改
import React from 'react';
import logo from './logo.svg';
import styles from './css/index.module.less'

function App() {
  return (
    <div className="App">
      <header className="App-header">
        <img src={logo} className="App-logo" alt="logo" />

        <div className={styles.red}>哈哈啊哈</div>

      </header>
    </div>
  );
}

export default App;
8. 提示:index.module.less 找不到模块
解决:修改 src/react-app-env.d.ts 文件,新增一下代码,到底部
declare module '*.module.less' {
  const classes: { readonly [key: string]: string };
  export default classes;
}
9. 坑又来了, 提示使用less-loader与API模式不匹配的options对象初始化的Loader更少。
ValidationError: Invalid options object. Less Loader has been initialized using an options object that does not match the API schema.
 - options has an unknown property 'less-loader'. These properties are valid:
   object { lessOptions?, prependData?, appendData?, sourceMap?, implementation? }
10. 查看以下package.json文件, 目前less 3.11版本与less-loader 6.1版本不匹配,需要将less-loader降到5.0版本才可以
"less": "^3.11.3",
"less-loader": "^6.1.3",
11. less-loader 降版本
// 删除less-loader// 安装5.0版本
yarn remove less-loader
yarn add less-loader@5.0.0
12. 发现Less成功使用。
六. 引入Antd
1. 安装antd
$ yarn add antd
2. App.tsx 使用
import React from 'react';
import logo from './logo.svg';
import './App.css';
import styles from './css/index.module.less'
import { Button } from 'antd';

function App() {
  return (
    <div className="App">
      <header className="App-header">
        <img src={logo} className="App-logo" alt="logo" />
        <p>
          Edit <code>src/App.tsx</code> and save to reload.
        </p>
        <div className={styles.red}>哈哈哈哈哈</div>
        <Button type="primary">Button</Button>
      </header>
    </div>
  );
}

export default App;
3.修改 src/App.css,在文件顶部引入 antd 的样式。
@import '~antd/dist/antd.css';
4. 查看浏览器,发现使用antd组件,报错了
index.js:1 Warning: findDOMNode is deprecated in StrictMode. findDOMNode was passed an instance of Wave which is inside StrictMode. Instead, add a ref directly to the element you want to reference. Learn more about using refs safely here: https://fb.me/react-strict-mode-find-node
    in button (created by Button)
    in Wave (created by Button)
    in Button (at App.tsx:17)
    in header (at App.tsx:11)
    in div (at App.tsx:10)
    in App (at src/index.tsx:9)
    in StrictMode (at src/index.tsx:8)
5. 原来是把严格模式加入了版本改动中,详细信息可查看下面
6. 找到index.tsx 默认是严格模式,删除<React.StrictMode>标签,关闭严格模式,警告消除了

七. antd按需加载
第一种方法按需加载antd react-app-rewired
1. 此时我们需要对 create-react-app 的默认配置进行自定义,这里我们使用 react-app-rewired (一个对 create-react-app 进行自定义配置的社区解决方案)。
引入 react-app-rewired 并修改 package.json 里的启动配置。由于新的 react-app-rewired@2.x 版本的关系,你还需要安装 customize-cra。
`cnpm i react-app-rewired customize-cra` or `yarn add react-app-rewired customize-cra`
2. packjson.js代码:
"scripts": {
    "start": "react-app-rewired start",
    "build": "react-app-rewired build",
    "test": "react-app-rewired test",
  },
3. 坑又来了,原因是没有找到 react-scripts
Error: Cannot find module 'react-scripts/package.json'
Require stack:
4. 安装 react-scripts
`cnpm i react-scripts` or `yarn add react-scripts`
5. 重启,又报错了,原因是我们需要新建一个 config-overrides文件配置antd的设置
Cannot find module '/Users/****/workSpace/antd-demo-ts/config-overrides'
6.在项目根目录创建一个 config-overrides.js 用于修改默认配置。
const { override, fixBabelImports, addLessLoader } = require('customize-cra');
module.exports = override(
    fixBabelImports('import', {
        libraryName: 'antd',
        libraryDirectory: 'es',
        style: true,
    }),
    addLessLoader({
        javascriptEnabled: true,
        modifyVars: { '@primary-color': 'red' },
    }),
);
7. 又报错了,原因是没有找到 babel-plugin-import 模版
Error: Cannot find module 'babel-plugin-import' from '/Users/***/workSpace/antd-demo-ts'
    at Array.map (<anonymous>)
8. 安装 babel-plugin-import
`cnpm -s install babel-plugin-import` or `yarn add babel-plugin-import`
9. 重启,第一种方法成功
10. 没有生效?
注意样式必须加载 less 格式,一个常见的问题就是引入了多份样式,less 的样式被 css 的样式覆盖了。
-
如果你在使用 babel-plugin-import 的
style配置来引入样式,需要将配置值从'css'改为true,这样会引入 less 文件。 -
如果你是通过
'antd/dist/antd.css'引入样式的,改为antd/dist/antd.less。
第二种方法 antd 按需加载
请将第一种方式忽略
1. 首先确认以下,是否完成了上面的第三步骤,webpack隐藏文件的显示
2. 查看 pageson.js 种是否已安装 babel-plugin-import,如没有安装请安装
`cnpm -s install babel-plugin-import` or `yarn add babel-plugin-import`
3. 需先完成 第四步,第五步
4. 修改webpack里面找到babel-loader,因为babel-plugin-import是通过babel的添加一下蓝色代码:
          oneOf: [
            // "url" loader works like "file" loader except that it embeds assets
            // smaller than specified limit in bytes as data URLs to avoid requests.
            // A missing `test` is equivalent to a match.
            {
              test: [/\.bmp$/, /\.gif$/, /\.jpe?g$/, /\.png$/],
              loader: require.resolve('url-loader'),
              options: {
                limit: imageInlineSizeLimit,
                name: 'static/media/[name].[hash:8].[ext]',
              },
            },
            // Process application JS with Babel.
            // The preset includes JSX, Flow, TypeScript, and some ESnext features.
            {
              test: /\.(js|mjs|jsx|ts|tsx)$/,
              include: paths.appSrc,
              loader: require.resolve('babel-loader'),
              options: {
                customize: require.resolve(
                  'babel-preset-react-app/webpack-overrides'
                ),

                plugins: [
                  [
                    require.resolve('babel-plugin-named-asset-import'),
                    {
                      loaderMap: {
                        svg: {
                          ReactComponent:
                            '@svgr/webpack?-svgo,+titleProp,+ref![path]',
                        },
                      },
                    },
                  ],
                  [
                    require.resolve('babel-plugin-import'),// 导入 import 插件
                    {
                      libraryName: 'antd',   //暴露antd
                      style: 'css'
                    }
                  ],
                ],
                // This is a feature of `babel-loader` for webpack (not Babel itself).
                // It enables caching results in ./node_modules/.cache/babel-loader/
                // directory for faster rebuilds.
                cacheDirectory: true,
                // See #6846 for context on why cacheCompression is disabled
                cacheCompression: false,
                compact: isEnvProduction,
              },
            },
4. 主题配置
如果要更改antd主题颜色的话,下面这个style属性值就不能是"css"了。必须改成true,原因是因为值是css时按需加载时加载的就是antd编译后之后的css文件,要更改主题颜色是要更改less变量的,而true标识直接加载antd的less文件
                plugins: [
                  [
                    require.resolve('babel-plugin-named-asset-import'),
                    {
                      loaderMap: {
                        svg: {
                          ReactComponent:
                            '@svgr/webpack?-svgo,+titleProp,+ref![path]',
                        },
                      },
                    },
                  ],
                  [
                    require.resolve('babel-plugin-import'),// 导入 import 插件
                    {
                      libraryName: 'antd',   //暴露antd
                      style: true
                    }
                  ],
                ],
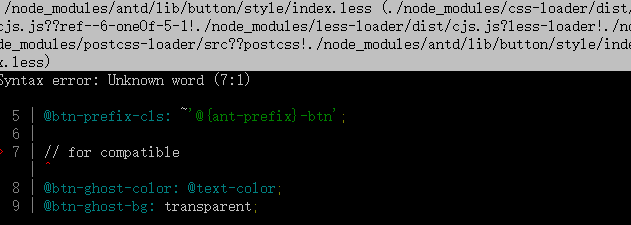
5.坑来了,当你设为true时,你会发编译失败,页面中antd组件也会没有样式了,命令行抛出如下异常:
这是因为你还没配置less-loader的配置项,在之前我复制修改的那个地方只是引入使用了less-loader,并没有添加配置项,导致他就会出现这个异常,那么如何配置这个主题。
6. 删除以下代码

7. 在下面这个地方,去掉灰色框代码,新增蓝色部分代码
if (preProcessor) {
      let loader = {
        loader: require.resolve(preProcessor),
        options: {
          sourceMap: isEnvProduction && shouldUseSourceMap,
        },
      }
      if (preProcessor === 'less-loader') {
        loader.options.modifyVars = {
          'primary-color': '#000000',
          'link-color': '#1DA57A',
          'border-radius-base': '2px',
        }
        loader.options.javascriptEnabled = true
      }
      loaders.push(loader);


    loaders.push(
        {
          loader: require.resolve('resolve-url-loader'),
          options: {
            sourceMap: isEnvProduction && shouldUseSourceMap,
          },
        },
        {
          loader: require.resolve(preProcessor),
          options: {
            sourceMap: true,
          },
        }
      );
    }
8.重启,完成。

 浙公网安备 33010602011771号