
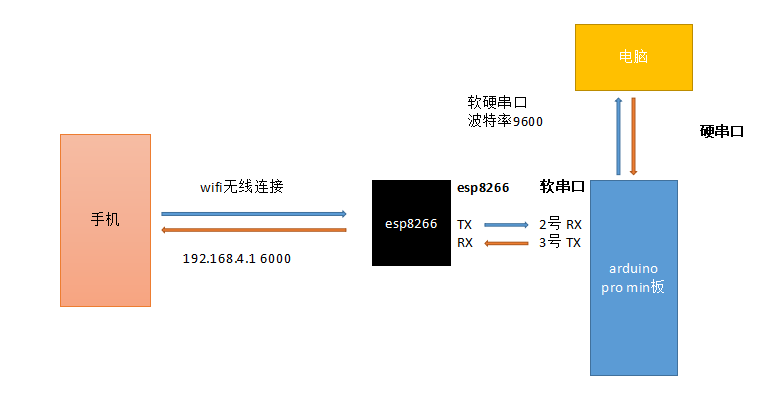
esp8266(1) 手机+Arduino+esp8266通信
ESP8266 Android与Arduino通信
功能描述:
1 Arduino上电,它通过软串口(Arduino的 2号和3号脚)发送命令,配置espson8266为 AP模式,wifi名 DDD 密码 123456
通过硬串口向电脑打印调试信息,以及espson8266收到指令后发出的信息。
2 等待Esp8266初始化成功,Arduino不断监听软和硬串口
- 监听电脑从硬串口发来的命令,转发给软串口让Esp8266通过WIFI发送出去。
- 电脑向硬串口发送命令没什么格式,但是通过串口命令让esp8266向wifi发命令,特定格式
-
AT+CIPSEND=0,15 // 申请向第0 个TCP链接,发送15个字符
//收到OK,出现 > 输入要发的 15个字符
OK
>
Recv 15 bytesSEND OK
3 手机连接wifi,打开调试软件,输入地址 192.168.4.1,端口 6000 ,发送命令,格式随意。反之接收来自电脑发来的命令。
手机端 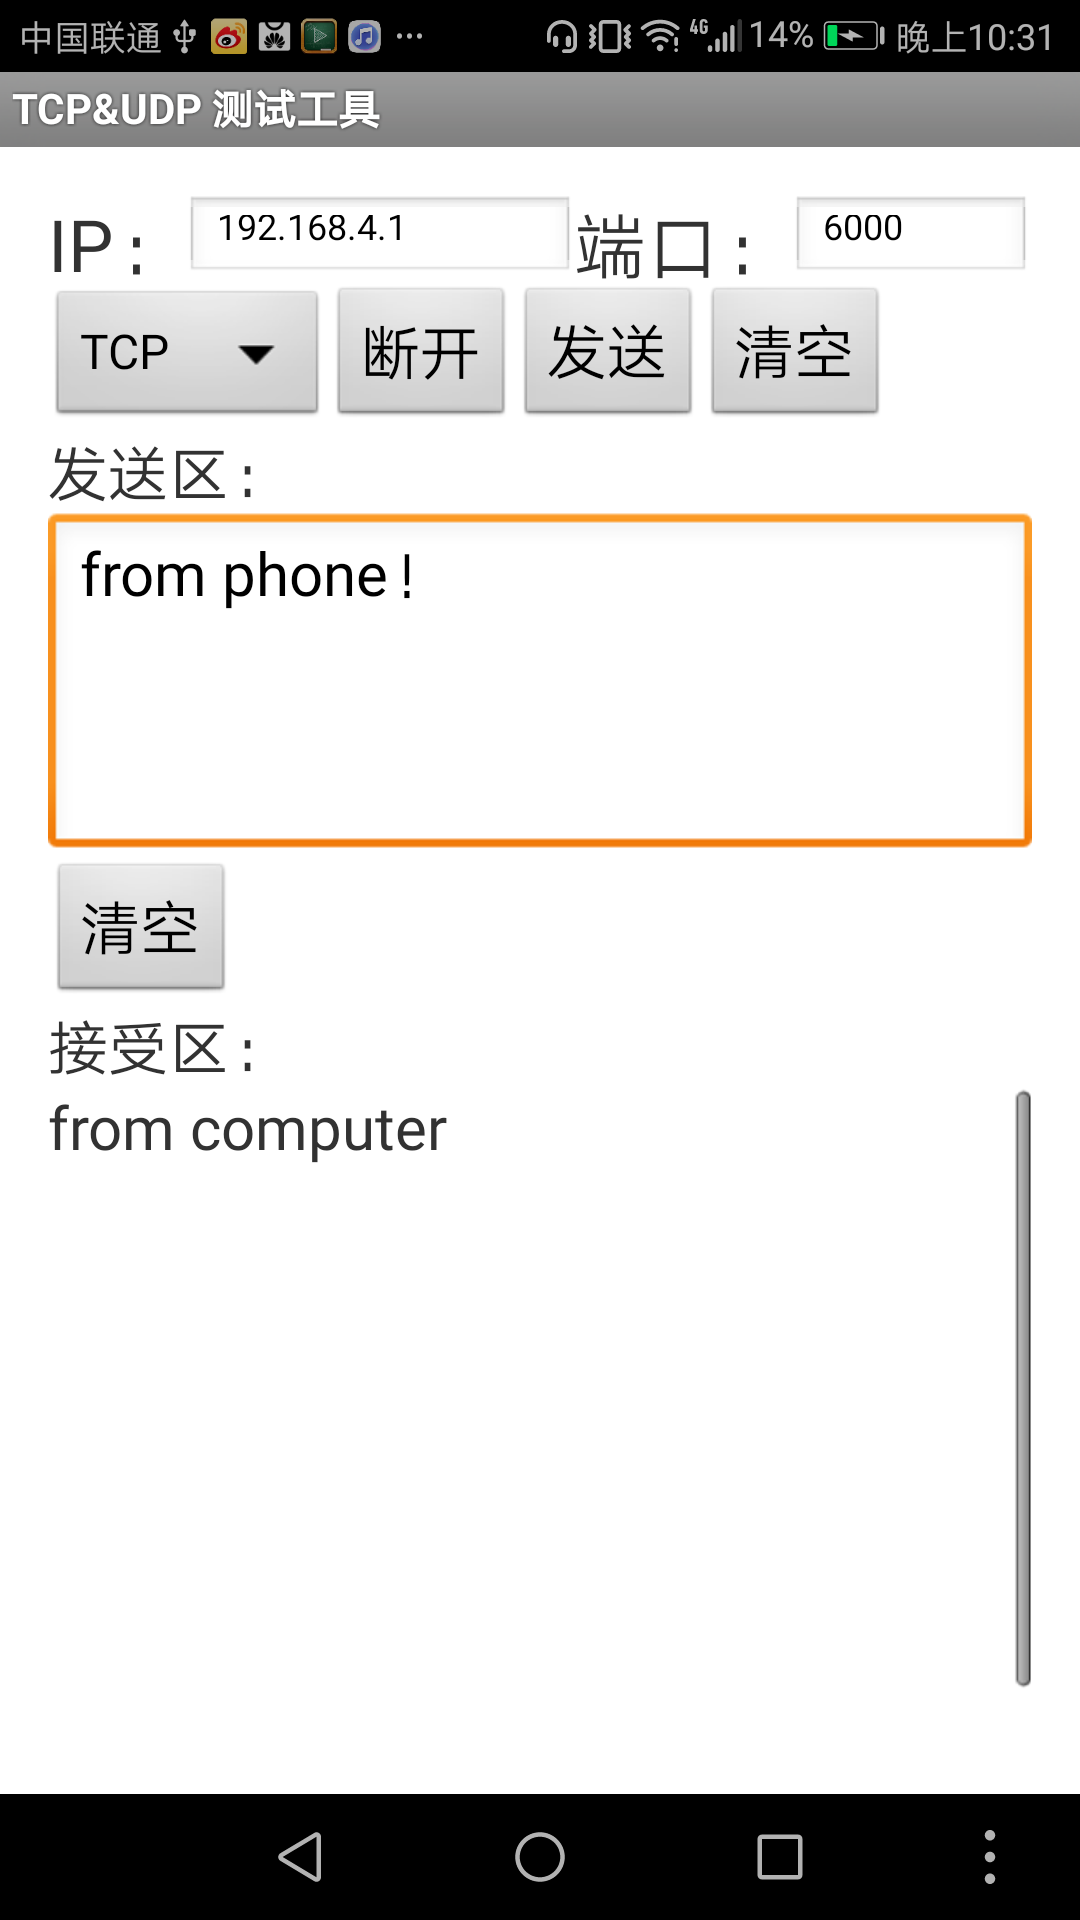 电脑端
电脑端 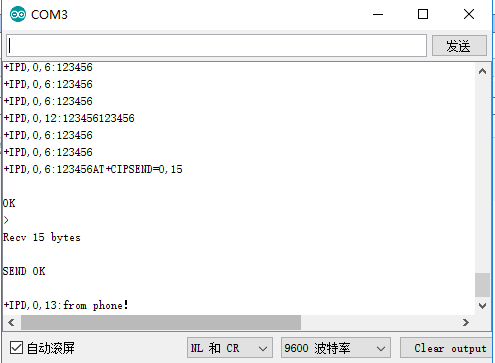
特别说明:
1 arduino软串口读取ESP8266命令,出现乱码,只要重新设置下其波特率。AT+UART=9600,8,1,0,0
2 我目前使用的IDE,虽然程序里设置串口波特率是 9600,但是,实际运行只有,4800. 所以,需要设置为9600*2=19200. 更换IDE可能会解决这个问题。
- 但是IDE串口调试设置为9600就是9600
3 esp8266从串口收到数据格式结尾应该添加 “\r\n” 样例;
- sendCommand("AT+CWMODE=2\r\n",2000,DEBUG);
- String s="AT+CWSAP=\"DDD\",\"12345678\",11,0\r\n";
sendCommand(s,2000,DEBUG);
4 为何做这个实验。 其实单独手机连接WIFI直接就通信了,为何中间加一个arduino单片机? 浪费成本和中转的复杂性?
因为,我目前不想费精力使用esp8266的专用SDK开发这个单片机,时间和精力成本不值得。
我目前需要的功能,用Arduino当控制板,esp8266低成本的wifi转发命令,这样把开发又转回arduino,
目前针对 esp8266使用arduino ide 开发的 esp-12f板,已经出现,我已经购买,正在路上,以后可以直接使用arduino ide开发esp8266。
http://blog.csdn.net/gnf_cc/article/details/53667312
ARuino程序烧录:
#include <SoftwareSerial.h>

#define DEBUG true

SoftwareSerial esp8266(2,3); // make RX Arduino line is pin 2, make TX Arduino line is pin 3.
                             // This means that you need to connect the TX line from the esp to the Arduino's pin 2
                             // and the RX line from the esp to the Arduino's pin 3
void setup()
{
  Serial.begin(19200);
  esp8266.begin(19200); // your esp's baud rate might be different

  sendCommand("AT+CWMODE=2\r\n",2000,DEBUG); // reset module
 // delay(20000);
 String s="AT+CWSAP=\"DDD\",\"12345678\",11,0\r\n";
 sendCommand(s,2000,DEBUG);// reset module
    Serial.println("1");
 // delay(30000);
  sendCommand("AT+RST\r\n",2000,DEBUG); // reset module
  delay(3000);
  sendCommand("AT+CIPMUX=1\r\n",1000,DEBUG); // configure for multiple connections
//   delay(20000);
  sendCommand("AT+CIPSERVER=1,6000\r\n",1000,DEBUG); // turn on server on port 80
  Serial.println("Server Ready");
}

void loop() { // run over and over
  if (esp8266.available()) {
    Serial.write(esp8266.read());
  }
   if (Serial.available()) {
    esp8266.write(Serial.read());
  }
}
String sendCommand(String command, const int timeout, boolean debug)
{
    String response = "";

    esp8266.print(command); // send the read character to the esp8266

    long int time = millis();

    while( (time+timeout) > millis())
    {
      while(esp8266.available())
      {

        // The esp has data so display its output to the serial window
        char c = esp8266.read(); // read the next character.
        response+=c;
      }
    }

    if(debug)
    {
      Serial.print(response);
    }

    return response;
}

 浙公网安备 33010602011771号