


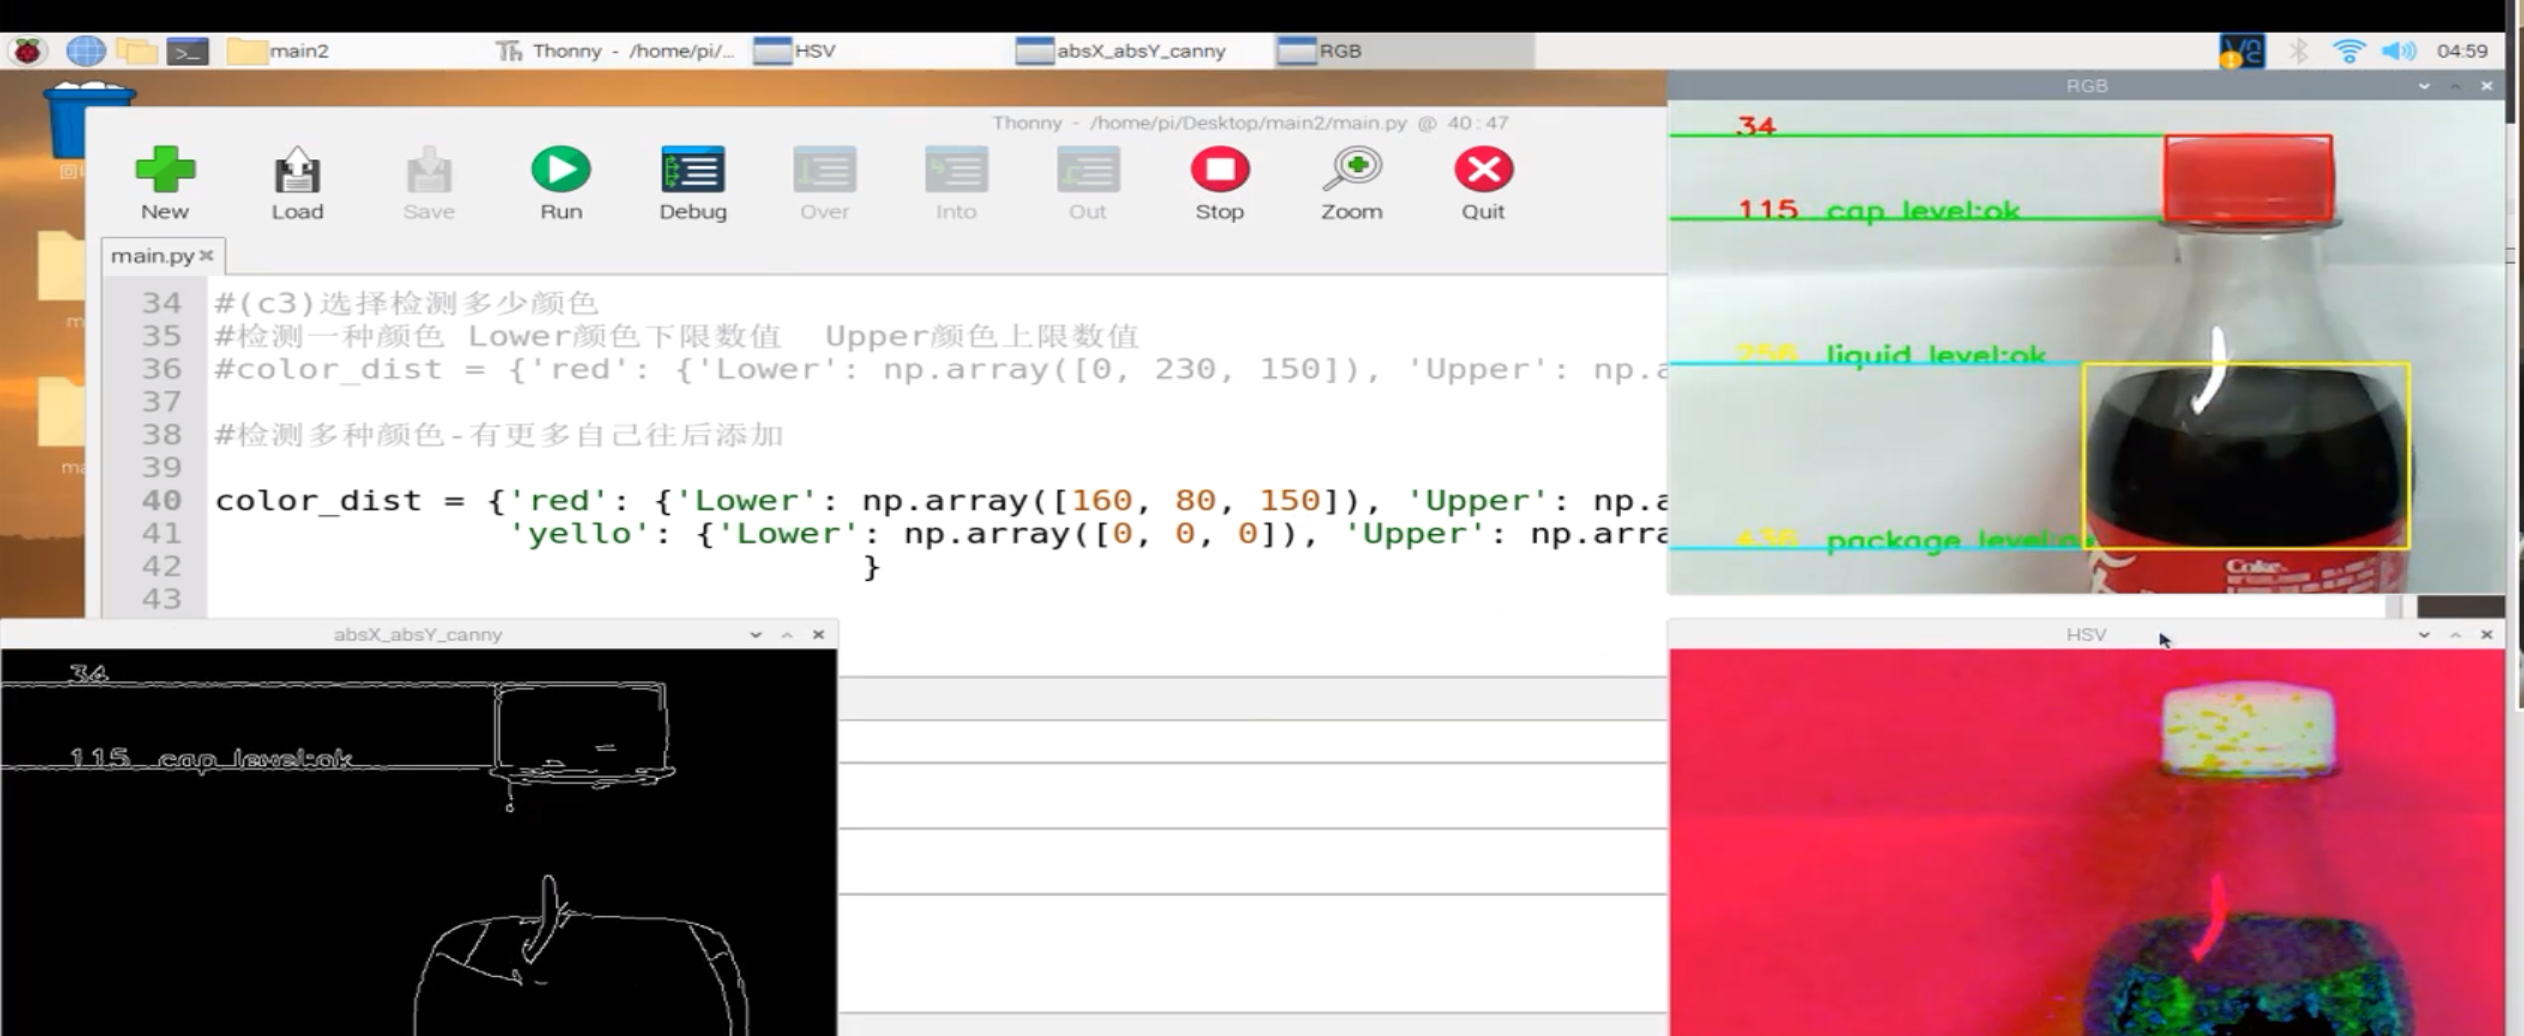
1 2 3 4 5 6 7 8 9 10 11 12 13 14 15 16 17 18 19 20 21 22 23 24 25 26 27 28 29 30 31 32 33 34 35 36 37 38 39 40 41 42 43 44 45 46 47 48 49 50 51 52 53 54 55 56 57 58 59 60 61 62 63 64 65 66 67 68 69 70 71 72 73 74 75 76 77 78 79 80 81 82 83 84 85 86 87 88 89 90 91 92 93 94 95 96 97 98 99 100 101 102 103 104 105 106 107 108 109 110 111 112 113 114 115 116 117 118 119 120 121 122 123 124 125 126 127 128 129 130 131 132 133 134 135 136 137 138 139 140 141 142 143 144 145 146 147 148 149 150 151 152 153 154 155 156 157 158 159 160 161 162 163 164 165 166 167 168 169 170 171 172 173 174 175 176 177 178 179 180 181 182 183 184 185 186 187 188 189 190 191 192 193 194 195 196 197 198 199 200 201 202 203 204 205 206 207 208 209 210 211 212 213 214 215 216 217 218 219 220 221 222 223 224 225 226 227 228 229 230 231 232 233 234 235 236 237 238 239 240 241 242 243 244 245 246 247 248 249 250 251 252 253 254 255 256 257 258 259 260 261 262 263 264 265 266 267 268 269 270 271 272 273 274 275 276 277 278 279 280 281 282 283 284 285 286 287 288 289 290 291 292 293 294 295 296 297 298 299 300 301 302 303 304 305 306 307 308 309 310 311 312 313 314 315 316 317 318 319 320 321 322 323 324 325 326 327 328 329 330 331 332 333 334 335 336 337 338 339 340 341 342 343 344 345 346 347 348 349 350 351 352 353 354 355 356 357 358 359 360 361 362 363 364 365 366 367 368 369 370 371 372 373 374 375 376 377 378 379 380 381 382 383 384 385 386 387 388 389 390 391 392 393 394 395 396 397 398 399 400 401 402 403 404 405 406 407 408 409 410 411 412 413 414 | import cv2import numpy as npthresh_gaizi=117thresh_gaizi_range=3thresh_yemian=257thresh_yemian_range=3thresh_baozhuang=436thresh_baozhuang_range=3value_gaizi=0value_yemian=0value_baozhuang=0#对比1#mask_img=mask_hsv #使用预先标定的颜色抠图#对比2#mask_img=dst #使用Sobel融合后的检测抠图#对比3#mask_img=edge_output #使用Canny边缘检测算法的检测抠图mask_use=1 # 1-hsv 2-canny 3-canny#(c1)是否窗口打印消息-调试使用但是会降低检测速度debug_print=0 #调试阶段1 正式使用追求速度0#选择检测形状detect_what=0#1圆 0矩形 #(c2)选择是否出现标定颜色界面detect_biaoding=1# 每次换一个光照环境 给1 鼠标点击颜色区域矫正颜色数值,获取范围填写在color_dist的最大最小中 #(c3)选择检测多少颜色#检测一种颜色 Lower颜色下限数值 Upper颜色上限数值#color_dist = {'red': {'Lower': np.array([0, 230, 150]), 'Upper': np.array([10, 255, 190])},} #检测多种颜色-有更多自己往后添加color_dist = {'red': {'Lower': np.array([160, 80, 150]), 'Upper': np.array([190, 210, 220])}, 'yello': {'Lower': np.array([0, 0, 0]), 'Upper': np.array([170, 160, 80])} } hsvshow=0 #鼠标点击函数def getposHsv(event,x,y,flags,param): if event==cv2.EVENT_LBUTTONDOWN: print("HSV is",hsvshow[y,x]) def getColorBox(shareData,shareLock): cap = cv2.VideoCapture(0) #cv2.namedWindow('imageHSV', 1) if mask_use==1 and detect_biaoding==1: cv2.namedWindow('HSV', 1) cv2.setMouseCallback("HSV",getposHsv)#鼠标函数 while cap.isOpened(): ret, frame = cap.read() if frame is not None: gs_frame = cv2.GaussianBlur(frame, (5, 5), 0) # 高斯模糊 hsv = cv2.cvtColor(gs_frame, cv2.COLOR_BGR2HSV) # 转化成HSV图像 global hsvshow hsvshow=hsv erode_hsv = cv2.erode(hsv, None, iterations=2) # 腐蚀 粗的变细 global color_dist if mask_use==1: #color_dist=color_dist pass else: color_dist = {'red': {'Lower': np.array([0, 190, 140]), 'Upper': np.array([10, 255, 255])} } for nowcoloe in color_dist: #使用纯颜色抠图 global mask_hsv if mask_use==1: mask_hsv = cv2.inRange(erode_hsv, color_dist[nowcoloe]['Lower'], color_dist[nowcoloe]['Upper']) # 灰度图像 gray = cv2.cvtColor(frame, cv2.COLOR_BGR2GRAY) # 高斯模糊,降低噪声 blurred = cv2.GaussianBlur(gray, (3, 3), 0) # 图像梯度 #对比1 横向检测 xgrad = cv2.Sobel(blurred, cv2.CV_16SC1, 1, 0) absX = cv2.convertScaleAbs(xgrad) # 转回uint8 #对比2 纵向检测 ygrad = cv2.Sobel(blurred, cv2.CV_16SC1, 0, 1) absY = cv2.convertScaleAbs(ygrad) #对比3 横+纵检测 dst = cv2.addWeighted(absX,0.5,absY,0.5,0) #cv2.imshow("absX", absX) #cv2.imshow("absY", absY) #cv2.imshow("absX_absY", dst) edge_output = cv2.Canny(xgrad, ygrad, 50, 150) cv2.imshow("absX_absY_canny", edge_output) #img = cv2.GaussianBlur(mask_hsv,(3,3),0) #canny = cv2.Canny(img, 50, 150) #下面检测用那个放开那个 默认是1 mask_img=frame if mask_use==1: #对比1 mask_img=mask_hsv #使用预先标定的颜色抠图erode_hsv elif mask_use==2: #对比2 mask_img=dst #使用Sobel融合后的检测抠图 elif mask_use==3: #对比3 mask_img=edge_output #使用Canny边缘检测算法的检测抠图 #print(colorshow) cnts = cv2.findContours(mask_img.copy(), cv2.RETR_EXTERNAL, cv2.CHAIN_APPROX_SIMPLE)[-2] draw_color=(255,255,255) if nowcoloe=="red": draw_color=(0,0,255) elif nowcoloe=="yello": draw_color=(0,255,255) elif nowcoloe=="green": draw_color=(0,255,0) image=frame if cnts: cnt = max(cnts, key=cv2.contourArea) c=cnt #函数可以计算面积,也可以使用矩 M[‘m00’] area=cv2.contourArea(c) #if area<1000:#踢出小边界 #continue perimeter = cv2.arcLength(c,True) #计算周长 #hull = cv2.convexHull(cnt) #凸包 #最大边界矩形(包围盒) draw_rec=0 if draw_rec: x,y,w,h = cv2.boundingRect(c) image = cv2.rectangle(image,(x,y),(x+w,y+h),(0,255,255),2) #旋转矩形 draw_rec_ro=0 if draw_rec_ro : rect = cv2.minAreaRect(c) box = cv2.boxPoints(rect) box = np.int0(box) cv2.drawContours(image,[box],0,(255,0,255),2) #最小外接圆 draw_yuan=0 if draw_yuan: (x,y),radius = cv2.minEnclosingCircle(c) center = (int(x),int(y)) radius = int(radius) img = cv2.circle(image,center,radius,(0,255,0),2) # 计算每一个轮廓的中心点 M = cv2.moments(c)#计算图像的矩,并返回一个字典 根据这些矩的值可以得到重心 M["m00"]=M["m00"]+0.001 #避免除以0 cX = int((M["m10"] / M["m00"])) cY = int((M["m01"] / M["m00"])) #print("面积",area,"周长",perimeter,'最小外接圆',radius,'轮廓的中心点',(cX,cY)) #检测圆形 if detect_what==1: #用圆拟合目标 (x, y), radius = cv2.minEnclosingCircle(cnt) with shareLock: shareData[1]=int(x) shareData[2]=int(y) shareData[3]=int(radius) if debug_print==1: print("r",radius) #画圆函数 radius 半径 int(x), int(y) 位置 cv2.circle(image, (int(x), int(y)), int(radius), draw_color, 2) pass #检测矩形 else: # # 获取最小外接矩阵,中心点坐标,宽高,旋转角度 rect = cv2.minAreaRect(cnt) ## 获取矩形四个顶点,浮点型 box = cv2.boxPoints(rect) # 取整 box = np.int0(box) # 获取四个顶点坐标 left_point_x = np.min(box[:, 0]) right_point_x = np.max(box[:, 0]) top_point_y = np.min(box[:, 1]) bottom_point_y = np.max(box[:, 1]) left_point_y = box[:, 1][np.where(box[:, 0] == left_point_x)][0] right_point_y = box[:, 1][np.where(box[:, 0] == right_point_x)][0] top_point_x = box[:, 0][np.where(box[:, 1] == top_point_y)][0] bottom_point_x = box[:, 0][np.where(box[:, 1] == bottom_point_y)][0] if nowcoloe=="red": #print("red",box[2][0],box[2][1]) value_gaizi=bottom_point_y #value_yemian=0 #value_baozhuang=0 if value_gaizi>= (thresh_gaizi-thresh_gaizi_range) and value_gaizi<= (thresh_gaizi+thresh_gaizi_range): cv2.putText(image, str("cap level:ok"), (120,bottom_point_y), cv2.FONT_HERSHEY_SIMPLEX, 0.8, (0, 255, 0), 2) else: cv2.putText(image, str("cap level:error"), (120,bottom_point_y), cv2.FONT_HERSHEY_SIMPLEX, 0.8, (0, 0, 255), 2) cv2.putText(image, str(top_point_y), (50,top_point_y), cv2.FONT_HERSHEY_SIMPLEX, 0.8, (0, 0, 255), 2) cv2.putText(image, str(bottom_point_y), (50,bottom_point_y), cv2.FONT_HERSHEY_SIMPLEX, 0.8, (0, 0, 255), 2) pt1=(0,top_point_y) pt2=(left_point_x,top_point_y) cv2.line(image, pt1, pt2, color=(0,255,0), thickness=2) pt1=(0,bottom_point_y) pt2=(left_point_x,bottom_point_y) cv2.line(image, pt1, pt2, color=(0,255,0), thickness=2) elif nowcoloe=="yello": #value_gaizi=bottom_point_y value_yemian=top_point_y value_baozhuang=bottom_point_y if value_yemian>= (thresh_yemian-thresh_yemian_range) and value_yemian<= (thresh_yemian+thresh_yemian_range): cv2.putText(image, str("liquid level:ok"), (120,top_point_y), cv2.FONT_HERSHEY_SIMPLEX, 0.8, (0, 255, 0), 2) else: cv2.putText(image, str("liquid level:error"), (120,top_point_y), cv2.FONT_HERSHEY_SIMPLEX, 0.8, (0, 0, 255), 2) if value_baozhuang>= (thresh_baozhuang-thresh_baozhuang_range) and value_baozhuang<= (thresh_baozhuang+thresh_baozhuang_range): cv2.putText(image, str("package level:ok"), (120,bottom_point_y), cv2.FONT_HERSHEY_SIMPLEX, 0.8, (0, 255, 0), 2) else: cv2.putText(image, str("package level:error"), (120,bottom_point_y), cv2.FONT_HERSHEY_SIMPLEX, 0.8, (0, 0, 255), 2) #print("yello",box[0][0],box[0][1]) cv2.putText(image, str(top_point_y), (50,top_point_y), cv2.FONT_HERSHEY_SIMPLEX, 0.8, (0, 255, 255), 2) cv2.putText(image, str(bottom_point_y), (50,bottom_point_y), cv2.FONT_HERSHEY_SIMPLEX, 0.8, (0, 255, 255), 2) pt1=(0,top_point_y) pt2=(left_point_x,top_point_y) cv2.line(image, pt1, pt2, color=(255,255,0), thickness=2) pt1=(0,bottom_point_y) pt2=(left_point_x,bottom_point_y) cv2.line(image, pt1, pt2, color=(255,255,0), thickness=2) #print(box) with shareLock: shareData[1]=box[0][0]#右上角h shareData[2]=box[0][1]#右上角w shareData[3]=box[2][0]#左下角h shareData[4]=box[2][1]#左下角w #print(rect) if debug_print==1: #print("h",box[0][0]-box[2][0],"w",box[0][1]-box[2][1]) h=abs(box[2][0]-box[0][0]) w=abs(box[2][1]-box[0][1]) #周长 zhouchang=(h+w)*2 txt = "Length:"+str(zhouchang)+" w:"+str(w)+" h:"+str(h) cv2.putText(image, txt, (50,50), cv2.FONT_HERSHEY_SIMPLEX, 0.8, (0, 0, 255), 2) #颜色 colorshow=(color_dist[nowcoloe]['Lower']+color_dist[nowcoloe]['Upper'])/2 txt = "Color-R G B:"+str(colorshow) cv2.putText(image, txt, (50,100), cv2.FONT_HERSHEY_SIMPLEX, 0.8, (0, 255, 255), 2) #坐标点 x=int((box[0][0]+box[2][0])/2) y=int((box[0][1]+box[2][1])/2) txt = "Position-x:"+str(x)+" y:"+str(y) cv2.putText(image, txt, (50,150), cv2.FONT_HERSHEY_SIMPLEX, 0.8, (255, 0, 255), 2) txt ="w:"+str(w)+" h:"+str(h) cv2.putText(image, txt, (50,200), cv2.FONT_HERSHEY_SIMPLEX, 0.8, (0, 255, 255), 2) if rect[1][0]<90 and rect[1][1]<90: #剔除掉像素小于90×90的框 排除干扰 pass else: cv2.drawContours(image, [np.int0(box)], -1, draw_color, 2) #为了加快速度 检测进程连窗口都可以不显示,图像送给给主线程序来显示 cv2.imshow("RGB",image) key=cv2.waitKey(1) if key == ord('q') or key == ord('Q'): shareData[5]=0 break if mask_use==1 and detect_biaoding==1: cv2.imshow("HSV",hsv) key=cv2.waitKey(1) if key == ord('q') or key == ord('Q'): break #单独测试代码from multiprocessing import Process,Managerif __name__ == '__main__': #进程共享内存 manager=Manager() shareData=manager.dict()#共享数据 shareLock=manager.Lock() #进程数据锁 #根据检测的形状 数据含义不同 shareData[1]=0# 圆-x 矩形-左上角h shareData[2]=0# 圆-y 矩形-左上角w shareData[3]=0# 圆-r 矩形-右下角h shareData[4]=0# 圆-无 矩形-右下角w shareData[8]=0 #wegiht shareData[9]=1# 控制标志 控制检测进程关闭 #开启进程1 p1=Process(target=getColorBox,args=(shareData,shareLock)) #必须加,号 p1.deamon=True #伴随主进程关闭而关闭 p1.start() #主进程不断获取进程1返回的结果 while 1: if shareData[9]==0:#串口按退出 break #print(shareData[1],shareData[2],shareData[3],shareData[4]) |
分类:
6_1_DIY项目集合


【推荐】国内首个AI IDE,深度理解中文开发场景,立即下载体验Trae
【推荐】编程新体验,更懂你的AI,立即体验豆包MarsCode编程助手
【推荐】抖音旗下AI助手豆包,你的智能百科全书,全免费不限次数
【推荐】轻量又高性能的 SSH 工具 IShell:AI 加持,快人一步
· 开源Multi-agent AI智能体框架aevatar.ai,欢迎大家贡献代码
· Manus重磅发布:全球首款通用AI代理技术深度解析与实战指南
· 被坑几百块钱后,我竟然真的恢复了删除的微信聊天记录!
· 没有Manus邀请码?试试免邀请码的MGX或者开源的OpenManus吧
· 园子的第一款AI主题卫衣上架——"HELLO! HOW CAN I ASSIST YOU TODAY
2023-04-13 (8-2-2)gps 综合样例 ESP单独采集GPS+自写协议解析gps+转化onenet地图格式
2022-04-13 论文编写工具使用(1-1)Overleaf 在线协作式 LaTeX 编辑器
2022-04-13 python使用opencv画矩形框保存xml
2020-04-13 Arduino使用红外模块
2019-04-13 微信连wifi认证
2018-04-13 爱心灯三 微信小程序