

脱离网页化python 没有可视化
代码没有加入可视化图
需要的化参考
https://www.cnblogs.com/gooutlook/p/17729064.html

无可视化版本
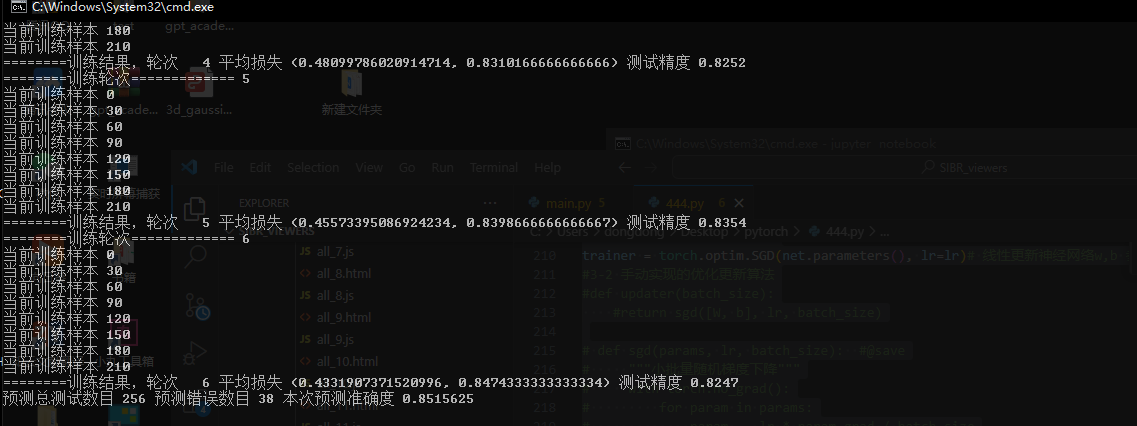
1 2 3 4 5 6 7 8 9 10 11 12 13 14 15 16 17 18 19 20 21 22 23 24 25 26 27 28 29 30 31 32 33 34 35 36 37 38 39 40 41 42 43 44 45 46 47 48 49 50 51 52 53 54 55 56 57 58 59 60 61 62 63 64 65 66 67 68 69 70 71 72 73 74 75 76 77 78 79 80 81 82 83 84 85 86 87 88 89 90 91 92 93 94 95 96 97 98 99 100 101 102 103 104 105 106 107 108 109 110 111 112 113 114 115 116 117 118 119 120 121 122 123 124 125 126 127 128 129 130 131 132 133 134 135 136 137 138 139 140 141 142 143 144 145 146 147 148 149 150 151 152 153 154 155 156 157 158 159 160 161 162 163 164 165 166 167 168 169 170 171 172 173 174 175 176 177 178 179 180 181 182 183 184 185 186 187 188 189 190 191 192 193 194 195 196 197 198 199 200 201 202 203 204 205 206 207 208 209 210 211 212 213 214 215 216 217 218 219 220 221 222 223 224 225 226 227 228 229 230 231 232 233 234 235 236 237 238 239 240 241 242 243 244 245 246 247 248 249 250 251 252 253 254 255 256 257 258 259 260 | #%matplotlib inlineimport torchimport torchvisionfrom torch.utils import datafrom torchvision import transformsfrom d2l import torch as d2l# 通过ToTensor实例将图像数据从PIL类型变换成32位浮点数格式,# 并除以255使得所有像素的数值均在0~1之间# trans = transforms.ToTensor()# mnist_train = torchvision.datasets.FashionMNIST(# root="./data", train=True, transform=trans, download=True)# mnist_test = torchvision.datasets.FashionMNIST(# root="./data", train=False, transform=trans, download=True)# print(len(mnist_train), len(mnist_test))# def show_images(imgs, num_rows, num_cols, titles=None, scale=1.5): #@save# """绘制图像列表"""# figsize = (num_cols * scale, num_rows * scale)# _, axes = d2l.plt.subplots(num_rows, num_cols, figsize=figsize)# axes = axes.flatten()# for i, (ax, img) in enumerate(zip(axes, imgs)):# if torch.is_tensor(img):# # 图片张量# ax.imshow(img.numpy())# else:# # PIL图片# ax.imshow(img)# ax.axes.get_xaxis().set_visible(False)# ax.axes.get_yaxis().set_visible(False)# if titles:# ax.set_title(titles[i])# return axes# X, y = next(iter(data.DataLoader(mnist_train, batch_size=18)))# show_images(X.reshape(18, 28, 28), 2, 9, titles=(y))import sys#获取线程输目def get_dataloader_workers(): #@save """在非Windows的平台上,使用4个进程来读取数据""" return 0 if sys.platform.startswith('win') else 4#下载数据def load_data_fashion_mnist(batch_size, resize=None): #@save """下载Fashion-MNIST数据集,然后将其加载到内存中""" trans = [transforms.ToTensor()] if resize: trans.insert(0, transforms.Resize(resize)) trans = transforms.Compose(trans) mnist_train = torchvision.datasets.FashionMNIST( root="./data", train=True, transform=trans, download=True) mnist_test = torchvision.datasets.FashionMNIST( root="./data", train=False, transform=trans, download=True) return (data.DataLoader(mnist_train, batch_size, shuffle=True, num_workers=get_dataloader_workers()), data.DataLoader(mnist_test, batch_size, shuffle=False, num_workers=get_dataloader_workers()))# train_iter, test_iter = load_data_fashion_mnist(32, resize=64)# for X, y in train_iter:# print(X.shape, X.dtype, y.shape, y.dtype)# break# 精度评估0 保存每个训练样本的结果class Accumulator: #@save """在n个变量上累加""" def __init__(self, n): self.data = [0.0] * n def add(self, *args): self.data = [a + float(b) for a, b in zip(self.data, args)] def reset(self): self.data = [0.0] * len(self.data) def __getitem__(self, idx): return self.data[idx]# 精度评估1 具体计算函数def accuracy(y_hat, y): #@save """计算预测正确的数量""" if len(y_hat.shape) > 1 and y_hat.shape[1] > 1: y_hat = y_hat.argmax(axis=1) cmp = y_hat.type(y.dtype) == y return float(cmp.type(y.dtype).sum())# 精度评估2 总评估def evaluate_accuracy(net, data_iter): #@save """计算在指定数据集上模型的精度""" if isinstance(net, torch.nn.Module): net.eval() # 将模型设置为评估模式 metric = Accumulator(2) # 正确预测数、预测总数 with torch.no_grad(): for X, y in data_iter: metric.add(accuracy(net(X), y), y.numel()) return metric[0] / metric[1]# 单次训练函数def train_epoch_ch3(net, train_iter, loss, updater): #@save """训练模型一个迭代周期(定义见第3章)""" # 将模型设置为训练模式 if isinstance(net, torch.nn.Module): net.train() # 训练损失总和、训练准确度总和、样本数 metric = Accumulator(3) i=0 for X, y in train_iter: if i%30==0:print("当前训练样本",i) i=i+1 # 计算梯度并更新参数 y_hat = net(X) l = loss(y_hat, y) if isinstance(updater, torch.optim.Optimizer): # 使用PyTorch内置的优化器和损失函数 updater.zero_grad() l.mean().backward() updater.step() else: # 使用定制的优化器和损失函数 l.sum().backward() updater(X.shape[0]) metric.add(float(l.sum()), accuracy(y_hat, y), y.numel()) # 返回训练损失和训练精度 return metric[0] / metric[2], metric[1] / metric[2]#总训练def train_ch3(net, train_iter, test_iter, loss, num_epochs, updater): #@save """训练模型(定义见第3章)""" #animator = Animator(xlabel='epoch', xlim=[1, num_epochs], ylim=[0.3, 0.9], #legend=['train loss', 'train acc', 'test acc']) for epoch in range(num_epochs): print("========训练轮次=============",epoch+1) train_metrics = train_epoch_ch3(net, train_iter, loss, updater) test_acc = evaluate_accuracy(net, test_iter) print("========训练结果,轮次 ",epoch+1,"平均损失",train_metrics,"测试精度",test_acc) #animator.add(epoch + 1, train_metrics + (test_acc,)) train_loss, train_acc = train_metrics #在表达式条件为 false 的时候触发异常。 # assert train_loss < 0.5, train_loss # assert train_acc <= 1 and train_acc > 0.7, train_acc # assert test_acc <= 1 and test_acc > 0.7, test_acc#####################################import torchfrom torch import nnfrom d2l import torch as d2l# 1 系统API模型# 1-0 PyTorch不会隐式地调整输入的形状。因此,我们在线性层前定义了展平层(flatten),来调整网络输入的形状# 1-1 线性求解器 Linear y=w*x+b# 1-2 网络层数 2层 784*256 256*10# 1-3 层与层之间的激活函数 ReLU()net = nn.Sequential(nn.Flatten(), nn.Linear(784, 256), nn.ReLU(), nn.Linear(256, 10))'''手动初始化参数W1 = nn.Parameter(torch.randn( num_inputs, num_hiddens, requires_grad=True) * 0.01)b1 = nn.Parameter(torch.zeros(num_hiddens, requires_grad=True))W2 = nn.Parameter(torch.randn( num_hiddens, num_outputs, requires_grad=True) * 0.01)b2 = nn.Parameter(torch.zeros(num_outputs, requires_grad=True))params = [W1, b1, W2, b2]'''# 手动实现的单层模型# def net(X):# return softmax(torch.matmul(X.reshape((-1, W.shape[0])), W) + b)# 手动实现的多层模型# def net(X):# X = X.reshape((-1, num_inputs))# H = relu(X@W1 + b1) # 这里“@”代表矩阵乘法# return (H@W2 + b2)# 手动ReLU激活函数# def relu(X):# a = torch.zeros_like(X)# return torch.max(X, a)# 0 初始化网络参数 def init_weights(m): if type(m) == nn.Linear: nn.init.normal_(m.weight, std=0.01) # 以均值0和标准差0.01随机初始化权重# 0 初始化网络参数 net.apply(init_weights);# 2 损失函数batch_size, lr, num_epochs = 256, 0.1, 6 # 每次参与训练的总样本数目 更新步长 训练总批次#2-1系统api损失函数# (1)模型的输出减去最大 避免无穷大但是 引入 减去后具有较大的负值 (2)送入计算交叉熵损失 (3)结果会取它们的对数 避免减去后的赋负值e之后可能会四舍五入为零loss = nn.CrossEntropyLoss(reduction='none')# 损失函数 softmax和交叉熵损失 计算#2-2手动定义的损失函数--交叉熵# def cross_entropy(y_hat, y):# return - torch.log(y_hat[range(len(y_hat)), y])#2-2手动定义的损失函数--均方损失# def squared_loss(y_hat, y): #@save# """均方损失"""# return (y_hat - y.reshape(y_hat.shape)) ** 2 / 2#3跟新函数#3-1 系统自带的优化更新算法trainer = torch.optim.SGD(net.parameters(), lr=lr)# 线性更新神经网络w,b 参数 w= w - lr*w.grad b = b - lr*b.grad(梯度)#3-2 手动实现的优化更新算法#def updater(batch_size): #return sgd([W, b], lr, batch_size)# def sgd(params, lr, batch_size): #@save# """小批量随机梯度下降"""# with torch.no_grad():# for param in params:# param -= lr * param.grad / batch_size# param.grad.zero_()# 4训练# 4-1 加载数据train_iter, test_iter = load_data_fashion_mnist(batch_size)# 4-2 训练过程train_ch3(net, train_iter, test_iter, loss, num_epochs, trainer)# 5预测结果def predict_ch3(net, test_iter, n=6): #@save """预测标签(定义见第3章)""" for X, y in test_iter: break trues = d2l.get_fashion_mnist_labels(y) preds = d2l.get_fashion_mnist_labels(net(X).argmax(axis=1)) error_num=0 allTest_num=len(trues) for i in range(0,len(trues)): if trues[i]!=preds[i]: print("真实标签",trues[i],"预测标签",preds[i]) error_num=error_num+1 result_=1-error_num/allTest_num print("预测总测试数目",allTest_num,"预测错误数目",error_num,"本次预测准确度",result_) # 训练1次 256个样本/次 0.77 # 训练3次 256个样本/次 0.82 # 训练6次 256个样本/次 0.85 #titles = [true +'\n' + pred for true, pred in zip(trues, preds)] #d2l.show_images( #X[0:n].reshape((n, 28, 28)), 1, n, titles=titles[0:n]) predict_ch3(net, test_iter) |
带可视化版本
1添加可视化代码
1 | API_Draw.py |
https://www.cnblogs.com/gooutlook/p/17729064.html
2修改函数
1 2 3 4 5 6 7 8 9 10 11 12 13 14 15 16 17 18 19 20 21 22 23 24 25 26 27 28 29 30 31 32 33 34 35 36 37 38 | from API_Draw import *#总训练def train_ch3(net, train_iter, test_iter, loss, num_epochs, updater): #@save """训练模型(定义见第3章)""" #animator = Animator(xlabel='epoch', xlim=[1, num_epochs], ylim=[0.3, 0.9], #legend=['train loss', 'train acc', 'test acc']) #drawLine=Animator() # 调用 my_thread = MyThread("可视化训练过程") #my_thread.setDaemon(True)#伴随主进程自动关闭 my_thread.start() for epoch in range(num_epochs): print("========训练轮次=============",epoch+1) train_metrics = train_epoch_ch3(net, train_iter, loss, updater) test_acc = evaluate_accuracy(net, test_iter) print("========训练结果,轮次 ",epoch+1,"平均损失",train_metrics,"测试精度",test_acc) #animator.add(epoch + 1, train_metrics + (test_acc,)) train_loss, train_acc = train_metrics # x 训练迭代次数 train_loss_ train_acc_ test_acc_ #drawLine.add_tread(epoch,train_loss,train_acc,test_acc) my_thread.animator.add(epoch,train_loss,train_acc,test_acc) print("==================训练结束 3秒后结束 尽快截图 然后手动关闭窗口=================") time.sleep(3) my_thread.stop() #在表达式条件为 false 的时候触发异常。 # assert train_loss < 0.5, train_loss # assert train_acc <= 1 and train_acc > 0.7, train_acc # assert test_acc <= 1 and test_acc > 0.7, test_acc |
分类:
1_4pytorch


【推荐】国内首个AI IDE,深度理解中文开发场景,立即下载体验Trae
【推荐】编程新体验,更懂你的AI,立即体验豆包MarsCode编程助手
【推荐】抖音旗下AI助手豆包,你的智能百科全书,全免费不限次数
【推荐】轻量又高性能的 SSH 工具 IShell:AI 加持,快人一步
· 震惊!C++程序真的从main开始吗?99%的程序员都答错了
· 别再用vector<bool>了!Google高级工程师:这可能是STL最大的设计失误
· 单元测试从入门到精通
· 【硬核科普】Trae如何「偷看」你的代码?零基础破解AI编程运行原理
· 上周热点回顾(3.3-3.9)
2020-09-25 jetson vnc