


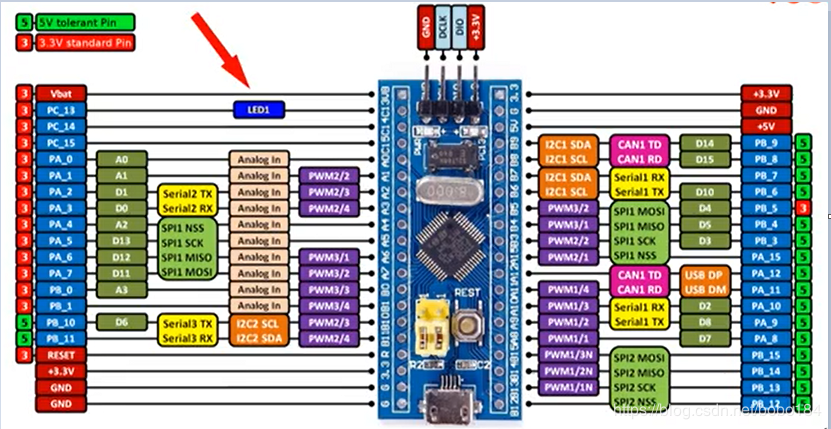
1 直接驱动
180度塑料蓝色舵机
pb11不能用
1 2 3 4 5 6 7 8 9 10 11 12 13 14 15 16 17 | #include <Servo.h> Servo myservo; // 定义Servo对象来控制 void setup() { myservo.attach(PA7); // 控制线连接数字9} void loop() { myservo.write(90); delay(3000); myservo.write(0); delay(3000); } |
2间接驱动、

2-1接线
B6 是 SCL,B7 是 SDA。
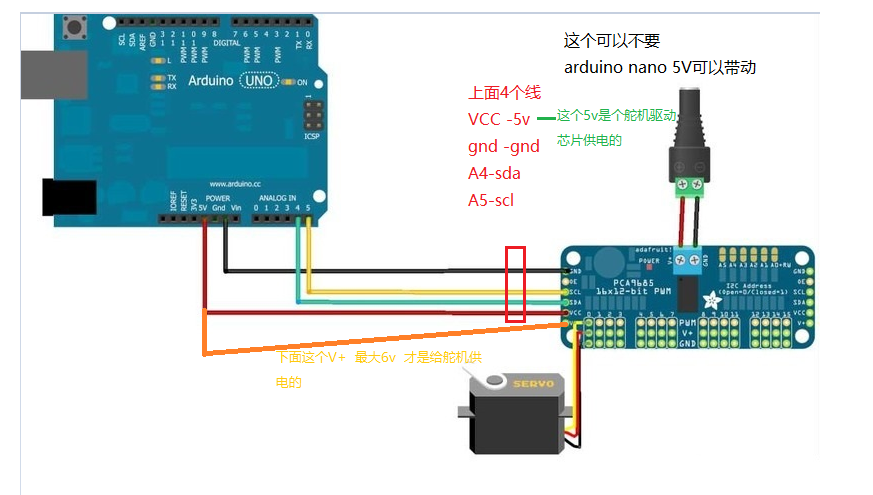
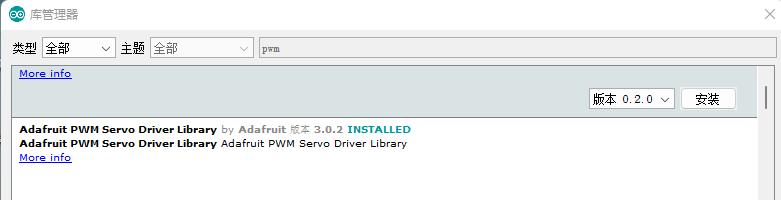
2-2 装库
Adafruit_PWMServoDriver
2-3 测试代码
1 自动扫描转动
1 2 3 4 5 6 7 8 9 10 11 12 13 14 15 16 17 18 19 20 21 22 23 24 25 26 27 28 29 30 31 32 33 34 35 36 37 38 39 40 41 42 43 44 45 46 47 48 49 50 51 52 53 54 55 56 57 58 59 60 61 62 63 64 65 66 67 68 69 | /*************************************************** This is an example for our Adafruit 16-channel PWM & Servo driver Servo test - this will drive 8 servos, one after the other on the first 8 pins of the PCA9685 Pick one up today in the adafruit shop! ------> http://www.adafruit.com/products/815 These drivers use I2C to communicate, 2 pins are required to interface. Adafruit invests time and resources providing this open source code, please support Adafruit and open-source hardware by purchasing products from Adafruit! Written by Limor Fried/Ladyada for Adafruit Industries. BSD license, all text above must be included in any redistribution ****************************************************/ #include <Wire.h>#include <Adafruit_PWMServoDriver.h> // called this way, it uses the default address 0x40Adafruit_PWMServoDriver pwm = Adafruit_PWMServoDriver();// you can also call it with a different address you want//Adafruit_PWMServoDriver pwm = Adafruit_PWMServoDriver(0x41);// you can also call it with a different address and I2C interface//Adafruit_PWMServoDriver pwm = Adafruit_PWMServoDriver(0x40, Wire); //根据您的伺服品牌,最小和最大脉冲宽度可能会有所不同 调整它#define SERVOMIN 150 // This is the 'minimum' pulse length count (out of 4096)#define SERVOMAX 600 // This is the 'maximum' pulse length count (out of 4096) #define SERVO_FREQ 50 // Analog servos run at ~50 Hz updates // our servo # counteruint8_t servonum = 0; void setup() { Serial.begin(9600); Serial.println("8 channel Servo test!"); pwm.begin();//理论上内部振荡器是25MHz,但实际上不是//非常精确。你可以调整这个数字直到//你得到了你期望的频率! pwm.setOscillatorFrequency(27000000); // The int.osc. is closer to 27MHz pwm.setPWMFreq(SERVO_FREQ); // Analog servos run at ~50 Hz updates delay(10);} void loop() { Serial.println(servonum); for (uint16_t pulselen = SERVOMIN; pulselen < SERVOMAX; pulselen++) { pwm.setPWM(servonum, 0, pulselen); } delay(500); for (uint16_t pulselen = SERVOMAX; pulselen > SERVOMIN; pulselen--) { pwm.setPWM(servonum, 0, pulselen); } delay(500); servonum++; if (servonum > 3) servonum = 0; // Testing the first 8 servo channels} |
2 串口接收测试
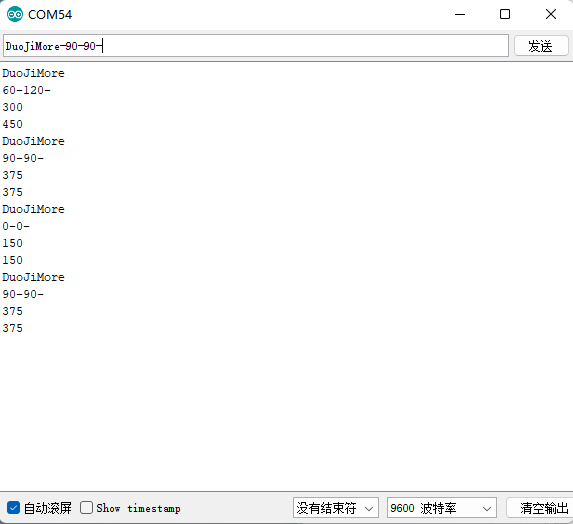
1 2 3 4 5 6 7 8 9 10 11 12 13 14 15 16 17 18 19 20 21 22 23 24 25 26 27 28 29 30 31 32 33 34 35 36 37 38 39 40 41 42 43 44 45 46 47 48 49 50 51 52 53 54 55 56 57 58 59 60 61 62 63 64 65 66 67 68 69 70 71 72 73 74 75 76 77 78 79 80 81 82 83 84 85 86 87 88 89 90 91 92 93 94 95 96 97 98 99 100 101 102 103 104 105 106 107 108 109 110 111 112 113 114 115 116 117 118 119 120 121 122 123 124 125 126 127 128 129 | //--------------------舵机初始化开始----------------- #include <Wire.h>#include <Adafruit_PWMServoDriver.h> // called this way, it uses the default address 0x40Adafruit_PWMServoDriver pwm = Adafruit_PWMServoDriver(); //根据您的伺服品牌,最小和最大脉冲宽度可能会有所不同 调整它 //底部舵机-0号口-水平旋转#define SERVOMIN1 150 //150 // 对应0度#define SERVOMAX1 600 //150 // 对应180度 //底部舵机-1号口-俯仰旋转#define SERVOMIN2 150//150 // 对应0度#define SERVOMAX2 600//600 // 对应180度 #define SERVO_FREQ 50 // Analog servos run at ~50 Hz updates int curent_d1=90;int curent_d2=90; void servo_int() { pwm.begin(); //理论上内部振荡器是25MHz,但实际上不是非常精确。你可以调整这个数字直到 //你得到了你期望的频率! pwm.setOscillatorFrequency(27000000); // The int.osc. is closer to 27MHz pwm.setPWMFreq(SERVO_FREQ); // Analog servos run at ~50 Hz updates pwm.setPWM(0, 0, int((SERVOMAX1+SERVOMIN1)/2));// 初始化90度 delay(50); pwm.setPWM(1, 0, int((SERVOMAX2+SERVOMIN2)/2));//初始化90度 delay(50); } //控制引脚号servonum的舵机// 0-180 dushu/180*(SERVOMAX-SERVOMIN)//pwm.setPWM(servonum, 0, pulselen); //--------------------舵机初始化结束----------------- String comdata = ""; /*分割字符串-获取数据类型+数据数据格式: 名字-数据(混合数据);(分号结尾)普通灯 开 NomLED-on; 关 NomLED-off;1个舵机 开 DuoJi-90;(数据范围0-180) 控制个舵机模式1 直接过去 开 DuoJiMore-90-90;(数据范围0-180) 模式2 每一度循环过去 DuoJifor-90-90; */ int speeed=20;void Fenge(String str){ int index = str.indexOf('-'); String sensor_class=str.substring(0, index); Serial.println(sensor_class); String sensor_data=str.substring(index + 1, str.length()); Serial.println(sensor_data); // DuoJiMore-90-90- DuoJiMore-0-0- if(sensor_class=="DuoJiMore"){ if (sensor_data){ int nindex = sensor_data.indexOf('-'); String data1=sensor_data.substring(0, nindex); sensor_data=sensor_data.substring(nindex + 1, sensor_data.length()); nindex = sensor_data.indexOf('-'); String data2=sensor_data.substring(0, nindex); //String data3=sensor_data.substring(nindex + 1, sensor_data.length()); //Serial.println(data1.toInt()); //Serial.println(data2.toInt()); //Serial.println(data3.toInt()); int s1=int(float(data1.toInt())/180.0*float(SERVOMAX1-SERVOMIN1))+SERVOMIN1; int s2=int(float(data2.toInt())/180.0*float(SERVOMAX2-SERVOMIN2))+SERVOMIN2; //int s3=int(data3.toInt()/180*(SERVOMAX-SERVOMIN)); Serial.println(s1); Serial.println(s2); pwm.setPWM(0, 0, s1); delay(50); pwm.setPWM(1, 0, s2); delay(50); } } } void setup() { Serial.begin(9600); while(Serial.read()>= 0){} //clear serialbuffer servo_int();//舵级初始化 } void loop() { if(Serial.available()>0){ //delay(1); comdata = Serial.readStringUntil(';'); //Serial.println(comdata); Fenge(comdata); } comdata = ""; } |
3 双舵机 液晶屏 称重机


1 2 3 4 5 6 7 8 9 10 11 12 13 14 15 16 17 18 19 20 21 22 23 24 25 26 27 28 29 30 31 32 33 34 35 36 37 38 39 40 41 42 43 44 45 46 47 48 49 50 51 52 53 54 55 56 57 58 59 60 61 62 63 64 65 66 67 68 69 70 71 72 73 74 75 76 77 78 79 80 81 82 83 84 85 86 87 88 89 90 91 92 93 94 95 96 97 98 99 100 101 102 103 104 105 106 107 108 109 110 111 112 113 114 115 116 117 118 119 120 121 122 123 124 125 126 127 128 129 130 131 132 133 134 135 136 137 138 139 140 141 142 143 144 145 146 147 148 149 150 151 152 153 154 155 156 157 158 159 160 161 162 163 164 165 166 167 168 169 170 171 172 173 174 175 176 177 178 179 180 181 182 183 184 185 186 187 188 189 190 191 192 193 194 195 196 197 198 199 200 201 202 203 204 205 206 207 208 209 210 211 212 213 214 215 216 217 218 219 220 221 222 223 224 225 226 227 228 229 230 231 232 233 234 235 236 237 238 239 240 241 242 243 244 245 246 247 248 249 250 251 252 253 254 255 256 257 258 259 260 261 262 263 264 265 266 267 268 269 270 271 272 273 274 275 276 277 278 279 280 | //--------------------舵机初始化开始-----------------#include <Wire.h> #include <Arduino.h>#include <U8g2lib.h> U8G2_SSD1306_128X64_NONAME_F_SW_I2C u8g2(U8G2_R0, /* clock=*/ PB8, /* data=*/ PB9, /* reset=*/ U8X8_PIN_NONE); int i=0;void u8g2_sendStrint(int x,int y,String &msg){ int c_length=msg.length(); if(c_length==0)c_length=20; char send_char[c_length]; //char send_char[20]="0"; strcpy(send_char, msg.c_str()); u8g2.drawStr(x,y,send_char); // 绘制字符串 }// 重力#include "HX711.h" // HX711 circuit wiringconst int LOADCELL_DOUT_PIN = PB1;const int LOADCELL_SCK_PIN = PB10; HX711 scale; #include <Adafruit_PWMServoDriver.h> // called this way, it uses the default address 0x40Adafruit_PWMServoDriver pwm = Adafruit_PWMServoDriver(); //根据您的伺服品牌,最小和最大脉冲宽度可能会有所不同 调整它 //底部舵机-0号口-水平旋转#define SERVOMIN1 100 //150 // 对应0度#define SERVOMAX1 500 //150 // 对应180度 //底部舵机-1号口-俯仰旋转#define SERVOMIN2 150//150 // 对应0度#define SERVOMAX2 600//600 // 对应180度 #define SERVO_FREQ 50 // Analog servos run at ~50 Hz updates int curent_d1=90;int curent_d2=90; void servo_int() { pwm.begin(); //理论上内部振荡器是25MHz,但实际上不是非常精确。你可以调整这个数字直到 //你得到了你期望的频率! pwm.setOscillatorFrequency(27000000); // The int.osc. is closer to 27MHz pwm.setPWMFreq(SERVO_FREQ); // Analog servos run at ~50 Hz updates pwm.setPWM(0, 0, int((SERVOMAX1+SERVOMIN1)/2));// 初始化90度 delay(50); pwm.setPWM(1, 0, int((SERVOMAX2+SERVOMIN2)/2));//初始化90度 delay(50); } //控制引脚号servonum的舵机// 0-180 dushu/180*(SERVOMAX-SERVOMIN)//pwm.setPWM(servonum, 0, pulselen); //--------------------舵机初始化结束----------------- String comdata = ""; int speeed=20;void Fenge(String str){ int index = str.indexOf('-'); String sensor_class=str.substring(0, index); // Serial.println(sensor_class); String sensor_data=str.substring(index + 1, str.length()); // Serial.println(sensor_data); // Fenge DuoJiMore-90-90-; DuoJiMore-0-0-; if(sensor_class=="DuoJiMore"){ if (sensor_data){ int nindex = sensor_data.indexOf('-'); String data1=sensor_data.substring(0, nindex); sensor_data=sensor_data.substring(nindex + 1, sensor_data.length()); nindex = sensor_data.indexOf('-'); String data2=sensor_data.substring(0, nindex); //String data3=sensor_data.substring(nindex + 1, sensor_data.length()); //Serial.println(data1.toInt()); //Serial.println(data2.toInt()); //Serial.println(data3.toInt()); int s1=int(float(data1.toInt())/180.0*float(SERVOMAX1-SERVOMIN1))+SERVOMIN1; int s2=int(float(data2.toInt())/180.0*float(SERVOMAX2-SERVOMIN2))+SERVOMIN2; //int s3=int(data3.toInt()/180*(SERVOMAX-SERVOMIN)); //Serial.println(s1); // Serial.println(s2); pwm.setPWM(0, 0, s1); delay(50); pwm.setPWM(1, 0, s2); delay(50); } } } String msg="11";void setup() { Serial.begin(9600); while(Serial.read()>= 0){} //clear serialbuffer servo_int();//舵级初始化 u8g2.begin();// 屏幕初始化 scale.begin(LOADCELL_DOUT_PIN, LOADCELL_SCK_PIN); scale.set_scale(2280.f); // this value is obtained by calibrating the scale with known weights; see the README for details scale.tare(); // reset the scale to 0}int weight=0;String weight_s="000";String class_="000";int dgree_zuoyou=0;String dgree_zuoyou_="000";void loop() { if(Serial.available()>0){ //delay(1); comdata = Serial.readStringUntil(';'); //Serial.println(comdata); //comdata="DuoJiMore-"+String(i)+"-"+String(i)+"-;"; Fenge(comdata); } weight=int(scale.get_units(10)); if(weight<2) { weight_s=String(weight); class_="0"; dgree_zuoyou=0; dgree_zuoyou_=String(dgree_zuoyou); } else if(weight<10 && weight>2 ){// 酒精 weight_s=String(weight); class_="1"; dgree_zuoyou=0; dgree_zuoyou_=String(dgree_zuoyou); } else if(weight<30 && weight>=10)// 可乐 { class_="2"; weight_s=String(weight); dgree_zuoyou=90; dgree_zuoyou_=String(dgree_zuoyou); } else if( weight>=30)// 玻璃杯满 { class_="3"; weight_s=String(weight); dgree_zuoyou=180; dgree_zuoyou_=String(dgree_zuoyou); } Serial.print("分类结果:\t"); Serial.print(class_); Serial.print("\t重量结果:\t"); Serial.print(weight_s); Serial.print("\t分类角度:\t"); Serial.println(dgree_zuoyou_); i=i+1; msg="time: "+String(i); if(i>100)i=0; u8g2.clearBuffer(); // 清除oled缓存 u8g2.setFont(u8g2_font_ncenB08_tr); // 设置字体 u8g2.drawStr(0,10,"weight: "); // 绘制字符串 u8g2_sendStrint(60,10,weight_s); // 绘制字符串 u8g2.drawStr(0,25,"class:"); // 绘制字符串 u8g2_sendStrint(60,25,class_); // 绘制字符串 u8g2.drawStr(0,35,"dgree:"); // 绘制字符串 u8g2_sendStrint(60,35,dgree_zuoyou_); // 绘制字符串 u8g2_sendStrint(0,45,msg); // 绘制字符串 u8g2.sendBuffer(); // 显示 if(weight<2) { Serial.println("没有货物,复位,分类舵机0度,倾倒舵机90度"); comdata="DuoJiMore-"+String(0)+"-90-"; Fenge(comdata); delay(2000); } else{ Serial.print("步骤1-分类舵机-分类-旋转到");Serial.println(dgree_zuoyou_); comdata="DuoJiMore-"+String(dgree_zuoyou)+"-90-"; Fenge(comdata); delay(2000); Serial.println("步骤2-倾倒舵机-倾倒-旋转到0度"); comdata="DuoJiMore-"+String(dgree_zuoyou)+"-0-"; Fenge(comdata); delay(2000); Serial.println("步骤3-倾倒舵机-回平-旋转到90度"); comdata="DuoJiMore-"+String(dgree_zuoyou)+"-90-"; Fenge(comdata); delay(2000); }} |
分类:
4_2Stm32-arduino


【推荐】国内首个AI IDE,深度理解中文开发场景,立即下载体验Trae
【推荐】编程新体验,更懂你的AI,立即体验豆包MarsCode编程助手
【推荐】抖音旗下AI助手豆包,你的智能百科全书,全免费不限次数
【推荐】轻量又高性能的 SSH 工具 IShell:AI 加持,快人一步
· TypeScript + Deepseek 打造卜卦网站:技术与玄学的结合
· 阿里巴巴 QwQ-32B真的超越了 DeepSeek R-1吗?
· 【译】Visual Studio 中新的强大生产力特性
· 10年+ .NET Coder 心语 ── 封装的思维:从隐藏、稳定开始理解其本质意义
· 【设计模式】告别冗长if-else语句:使用策略模式优化代码结构
2020-04-18 树莓派识别二维码
2020-04-18 树莓派python获取自身IP
2019-04-18 WIFI KILL神器