

nginx-安装-虚拟主机-url重写-防盗链-限速-lnmp-反向代理
✨✨安装 nginx-1.9.0.tar.gz
tar xf nginx-1.9.0.tar.gz
cd nginx-1.9.0.
依赖包: yum install -y pcre-devel zlib-devel gcc*
cd nginx-1.9.0
./configure --prefix=/usr/local/nginx (安装成功有提示一下文件路径文件名称)
 nginx path prefix: "/usr/local/nginx" #安装目录
  nginx binary file: "/usr/local/nginx/sbin/nginx"  执行文件
  nginx configuration prefix: "/usr/local/nginx/conf"  配置文件路径
  nginx configuration file: "/usr/local/nginx/conf/nginx.conf"  配置文件名称
  nginx pid file: "/usr/local/nginx/logs/nginx.pid"        pid
  nginx error log file: "/usr/local/nginx/logs/error.log"  错误日志文件
  nginx http access log file: "/usr/local/nginx/logs/access.log"    访问日志
  nginx http client request body temporary files: "client_body_temp"
  nginx http proxy temporary files: "proxy_temp"
  nginx http fastcgi temporary files: "fastcgi_temp"
  nginx http uwsgi temporary files: "uwsgi_temp"
  nginx http scgi temporary files: "scgi_temp"
make && make install
到此安装结束
启动 /usr/local/nginx/sbin/nginx
重启 /usr/local/nginx/sbin/nginx -s reload
停止 /usr/local/nginx/sbin/nginx -s stop
访问:服务器ip地址80端口 即可出现nginx欢迎界面。
✨✨基本配置 虚拟主机
/usr/local/nginx/conf 配置文件目录 nginx.conf
user  nobody;  #已那个用户启动nginx  你也可以用nginx
worker_processes  1;    #指定一个父进程 开启几个子进程 进程数尽量跟cpu核心数一致

#error_log  logs/error.log;  #错误日志
#error_log  logs/error.log  notice; #日志级别
#error_log  logs/error.log  info;

#pid        logs/nginx.pid;  #pid文件


events {    #工作模式
    worker_connections  1024;   #链接上线 一个子进程可以又多少线程 一般修改这么值 都是从小往大了修改 进程数*线程数=并发
}


http {        #设定http服务器
    include       mime.types;   #nginx包含类型文件
    default_type  application/octet-stream; #默认

    #log_format  main  '$remote_addr - $remote_user [$time_local] "$request" ' #日志的格式
    #                  '$status $body_bytes_sent "$http_referer" '
    #                  '"$http_user_agent" "$http_x_forwarded_for"';

    #access_log  logs/access.log  main;    #访问日志

    sendfile        on;      #是否调用sendfile函数 如果做下载服务器最好是off
    #tcp_nopush     on;

    #keepalive_timeout  0;
    keepalive_timeout  65;    #链接超时时间

    #gzip  on;      #是否开启压缩

    server {      #一个server 就是一个网站 写多个 就是虚拟主机
        listen       80;    #端口
        server_name  localhost;    #服务的名称

        #charset koi8-r;      #字符编码

        #access_log  logs/host.access.log  main;  #访问日志

        location / {      #默认请求 安装路径的html目录为根
            root   html;  #根
            index  index.html index.htm; #定义页面文件叫什么名字 先写谁就找谁
        }

        #error_page  404              /404.html;    #错误页面

        # redirect server error pages to the static page /50x.html
        #
        error_page   500 502 503 504  /50x.html;  #错误页面
        location = /50x.html {    #页面文件名字
            root   html;        #谁为根
        }
(1)虚拟主机
vim conf/nginx.conf
user www;
worker_processes  1;
events {
    worker_connections  1024;
}
http {
    include       mime.types;
    default_type  application/octet-stream;
    sendfile        on;
    keepalive_timeout  5;
    server {        #虚拟主机1端口80
        listen       80;
        server_name  localhost;
        location / {
            root   html;
            index  index.html index.htm;
        }
}
     server {      #虚拟主机2 端口8080
        listen       8080;
        server_name  localhost;
        location / {
            root   www;  #目录根 / 安装目录为根
            index  index.html index.htm;  #根下的www目录找文件 第一个index.html
        }
    }
}
(2) 基于不同ip虚拟主机
临时生成网卡 ifconfig ens33:0 192.168.13.149
user www;
worker_processes  1;
events {
    worker_connections  1024;
}
http {
    include       mime.types;
    default_type  application/octet-stream;
    sendfile        on;
    keepalive_timeout  5;
    server {
        listen       192.168.13.148:80;  #没什么可说的  #虚拟主机1
        server_name  localhost;
        location / {
            root   html;
            index  index.html index.htm;
        }
}
     server {
        listen       192.168.13.149:80;  #绑定一个ip就成  #虚拟主机2
        server_name  localhost;
        location / {
            root   www;
            index  index.html index.htm;
        }
    }
}
(3)基于名字的虚拟主机
修改/etc/hosts
user www;
worker_processes  1;
events {
    worker_connections  1024;
}
http {
    include       mime.types;
    default_type  application/octet-stream;
    sendfile        on;
    keepalive_timeout  5;
    server {
        listen      80;
        server_name  www.a.com;  #基于名字 虚拟主机1
        location / {
            root   html;
            index  index.html index.htm;
        }
}
     server {
        listen      80;
        server_name  www.b.com; #基于名字 虚拟主机2
        location / {
            root   www;
            index  index.html index.htm;
        }
    }
}
✨✨url重写
rewrite ^/(.*) http://www.czlun.com/$1 permanent;

说明:

rewrite为固定关键字,表示开始进行rewrite匹配规则

regex部分是 ^/(.*) ,这是一个正则表达式,匹配完整的域名和后面的路径地址

replacement部分是http://www.abc.com/$1 $1,是取自regex部分()里的内容。匹配成功后跳转到的URL。

flag部分 permanent表示永久301重定向标记,即跳转到新的 http://www.abc.com/$1 地址上
配置文件
user www;
worker_processes  1;
events {
    worker_connections  1024;
}
http {
    include       mime.types;
    default_type  application/octet-stream;
    sendfile        on;
    keepalive_timeout  5;
    server {
        listen      80;
        server_name  localhost;
        location / {
            root   html;
            index  index.html index.htm;
            rewrite ^/(.*) http://www.abc.com/$1;  #访问本机80端口时候跳转 www.abc.com
}
    }
}
✨✨防盗链
概述:
对于图片来说,A网站,如果想使用B网站的图片,可以直接写上B网站图片的链接地址,或者将B网站的图片通过右键另存为的方式下载到本地,然后在页面上使用。如果B网站不想A网站这么干了,那么B网站可以采取防盗链的措施来干这个工作,结果就是,A网站想请求所需要的资源,通过url的方式,获取的可能不是原来的图片了,出现404或者别的图片替代了。如果通过浏览器直接打开图片url,那么仍然有可能显示403,这就是防盗链。
配置文件:
user www;
worker_processes  1;
events {
    worker_connections  1024;
}
http {
    include       mime.types;
    default_type  application/octet-stream;
    sendfile        on;
    keepalive_timeout  5;
    server {
        listen      80;
        server_name  localhost;
        location / {
            root   html;
            index  index.html index.htm;
           }
        location ~* .(gif|jpe?g|png|swf|flv)$ {   #匹配这些结尾的
            valid_referers none blocked *.baidu.com;   #不带有referers字样的包  又防火强(blocked)字样的  允许百度
                        if ($invalid_referer)  {    #其余都返回403
                                return 403;
                }
        }
    }
}
✨✨限速
配置文件:
user www;
worker_processes  1;
events {
    worker_connections  1024;
}
http {
    include       mime.types;
    default_type  application/octet-stream;
    sendfile        on;
    keepalive_timeout  5;
    server {
        listen      80;
        server_name  localhost;
        location / {
            root   html;
            index  index.html index.htm;
                limit_rate 100k;      #每秒下载速度为100k
                limit_rate_after 500m;  #下载500m时,开始限速

}
    }
}
nginx只支持容量下载控制,如果想按照百分比下载,即可以安装插件,方可实现百分比下载控制。
老方式:
limit_zone vfast $binary_remote_add 10M; 定义一个叫vfast限速区域,它的总带宽为10M
limit_conn vfast 2; 限制最多链接两个
新方式:
limit_conn_zone $binary_remote_addr zone=vfast:10M; #定义一个叫vfast限速区域,它的总带宽为10M
limit_conn vfast 2; 限制最多链接两个
🦍提示:这种方式可以限制并发
配置文件:
user www;
worker_processes  1;
events {
    worker_connections  1024;
}
http {
    include       mime.types;
    default_type  application/octet-stream;
    sendfile        on;
    keepalive_timeout  5;
    limit_conn_zone $binary_remote_addr zone=vfast:10M;
    server {
        listen      80;
        server_name  localhost;
        location / {
            root   html;
            index  index.html index.htm;
                limit_rate 100k;
                limit_conn vfast 2;
                #limit_rate_after 500m;
                # rewrite ^/(.*) http://www.abc.com/$1;
}
    }
}
✨✨lnmp
概况:
在LNMP组合工作时,首先是用户通过浏览器输入域名请求Nginx Web服务,如果请求是静态资源,则由Nginx解析返回给用户;如果是动态请求(.php结尾),那么Nginx就会把它通过FastCGI接口(生产常用方法)发送给PHP引擎服务(FastCGI进程php-fpm)进行解析,如果这个动态请求要读取数据库数据,那么PHP就会继续向后请求MySQL数据库,以读取需要的数据,并最终通过Nginx服务把获取的数据返回给用户,这就是LNMP环境的基本请求顺序流程。这个请求流程是企业使用LNMP环境的常用流程。
需要安装包spawn-fcgi-1.6.3-4.3.i686.rpm
解决依赖参考:yum install php* -y yum install -y glib* -y yum install glibc.i686
[root@www run]# spawn-fcgi -a 127.0.0.1 -p 9000 -u www -g www -P /var/run/php.pid -C 5 -f /usr/bin/php-cgi
spawn-fcgi: child spawned successfully: PID: 2368
[root@www run]#
-a 监听地址 -p 端口
-u -g 已那个用户跟组启动
-P pid文件位置
-C 指定子进程数
-f 启动cgi文件的位置
这里提供一个启动脚本 php-cgi.sh 可以放在/etc/init.d/下 叫php
至此我们已经把php做成服务了 用下面脚本可以自由启动停止
#!/bin/sh
#
# php-cgi - php-fastcgi swaping via  spawn-fcgi
#
# chkconfig:   - 85 15
# description:  Run php-cgi as app server
# processname: php-cgi
# config:      /etc/sysconfig/phpfastcgi (defaults RH style)
# pidfile:     /var/run/php_cgi.pid
# Note: See how to use this script :
# http://www.cyberciti.biz/faq/rhel-fedora-install-configure-nginx-php5/
# Source function library.
. /etc/rc.d/init.d/functions

# Source networking configuration.
. /etc/sysconfig/network

# Check that networking is up.
[ "$NETWORKING" = "no" ] && exit 0

spawnfcgi="/usr/bin/spawn-fcgi"
php_cgi="/usr/bin/php-cgi"
prog=$(basename $php_cgi)
server_ip=127.0.0.1
server_port=9000
server_user=www
server_group=www
server_childs=5
pidfile="/var/run/php_cgi.pid"

# do not edit, put changes in /etc/sysconfig/phpfastcgi
[ -f /etc/sysconfig/phpfastcgi ] && . /etc/sysconfig/phpfastcgi

start() {
    [ -x $php_cgi ] || exit 1
    [ -x $spawnfcgi ] || exit 2
    echo -n $"Starting $prog: "
    daemon $spawnfcgi -a ${server_ip} -p ${server_port} -u ${server_user} -g ${server_group} -P ${pidfile} -C ${server_childs} -f ${php_cgi}
    retval=$?
    echo
    return $retval
}

stop() {
    echo -n $"Stopping $prog: "
    killproc -p ${pidfile} $prog -QUIT
    retval=$?
    echo
    [ -f ${pidfile} ] && /bin/rm -f ${pidfile}
    return $retval
}

restart(){
        stop
        sleep 2
        start
}

rh_status(){
        status -p ${pidfile} $prog
}

case "$1" in
    start)
        start;;
    stop)
        stop;;
    restart)
        restart;;
    status)
        rh_status;;
    *)
        echo $"Usage: $0 {start|stop|restart|status}"
        exit 3
esac
更改配置文件 开启php字段
配置文件:
user  www;
worker_processes  2;
events {
    worker_connections  1024;
}
http {
    include       mime.types;
    default_type  application/octet-stream;
    sendfile        on;
    keepalive_timeout  5;
    server {
        listen       80;
        server_name  localhost;
        location / {
            root   html;
            index  index.php index.html index.htm;
        }
        error_page   500 502 503 504  /50x.html;
        location = /50x.html {
            root   html;
        }
        location ~ \.php$ {    #开启字段
            root           html;
            fastcgi_pass   127.0.0.1:9000;
            fastcgi_index  index.php;
       fastcgi_param  SCRIPT_FILENAME  /usr/local/nginx/html$fastcgi_script_name; #临时文件存放的位置  产生一个临时文件 不用管 自己会回收
            include        fastcgi_params;
        }
    }

}
创建index.php 文件
[root@www html]# cat index.php
<?php
        phpinfo();
?>
能打开此页面说明功能已经添加

✨✨反向代理
一张图片解释正反代理
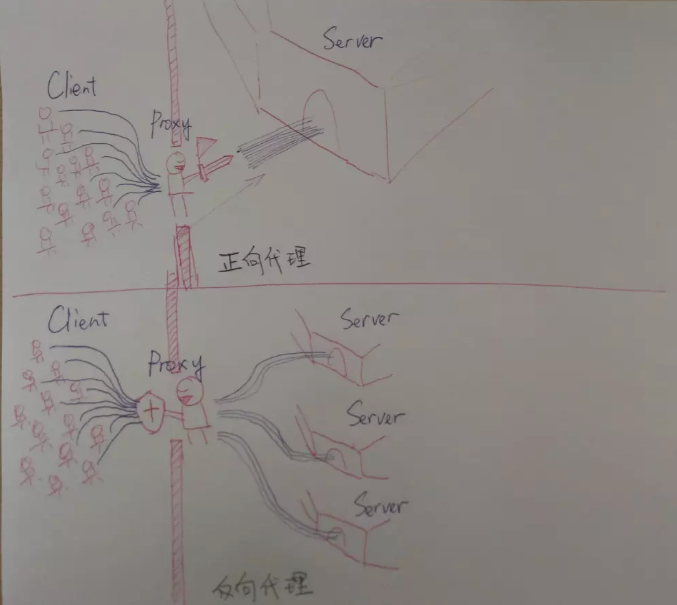
反向代理和正向代理的区别就是:正向代理代理客户端,反向代理代理服务器。
在配置文件加入字段
proxy_pass http://192.168.13.150; 代理服务器为192.168.13.150
配置文件:
user  www;
worker_processes  2;
events {
    worker_connections  1024;
}
http {
    include       mime.types;
    default_type  application/octet-stream;
    sendfile        on;
    keepalive_timeout  5;
    server {
        listen       80;
        server_name  localhost;
        location / {
            proxy_pass http://192.168.13.150;   代理服务器请求地址 如果服务器网页服务端口被修改成8080 只需要在http://192.168.13.150:8080
        }
        error_page   500 502 503 504  /50x.html;
        location = /50x.html {
            root   html;
        }
    }

}
访问代理服务器ip地址即可 请求到13.150页面信息

