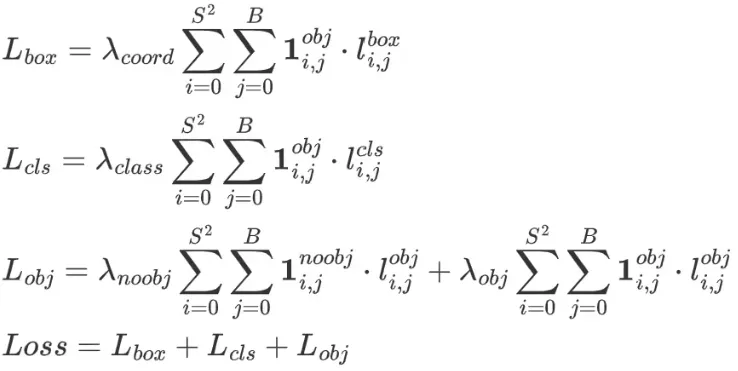
pi 的形状是 6 * 3 * 80 * 80 * 7,pi是模型推理的输出结果,代表着 6张图片,一张图片中有3种anchor的结果,每一个anchor下是 80 * 80 的网格,每一个网格下的结果有7个输出,分别是nc=5,类别数2。5是xywh+confidence。
Pdb ) pp b
tensor ([ 0 , 0 , 0 , 2 , 2 , 2 , 2 , 2 , 2 , 2 , 2 , 2 , 2 , 2 , 2 , 3 , 4 , 4 , 4 , 4 , 4 , 4 , 4 , 4 , 4 , 4 , 4 , 4 , 4 , 4 , 4 , 4 , 4 , 4 , 5 , 0 , 0 , 0 , 0 , 0 , 0 , 1 , 1 , 2 , 2 , 2 , 2 , 2 , 2 , 2 , 2 , 2 , 2 , 2 , 2 , 2 , 2 , 3 , 3 , 3 , 3 , 3 , 3 , 3 , 3 , 3 , 3 , 3 , 4 , 4 , 4 , 4 , 4 , 4 , 4 , 4 , 4 , 4 , 4 , 4 , 4 , 4 , 4 , 4 , 4 , 4 , 4 , 4 , 5 , 5 , 5 , 0 , 0 , 0 , 0 , 0 , 0 , 0 , 1 , 1 , 2 , 2 , 2 , 2 ,
2 , 2 , 2 , 2 , 2 , 2 , 2 , 2 , 2 , 2 , 2 , 3 , 3 , 3 , 3 , 3 , 3 , 3 , 3 , 3 , 3 , 3 , 3 , 3 , 3 , 4 , 4 , 4 , 4 , 4 , 4 , 4 , 4 , 4 , 4 , 4 , 4 , 4 , 4 , 4 , 4 , 4 , 4 , 4 , 4 , 4 , 5 , 5 , 5 , 5 , 5 , 0 , 2 , 2 , 2 , 2 , 2 , 2 , 2 , 3 , 4 , 4 , 4 , 4 , 4 , 4 , 4 , 4 , 4 , 4 , 4 , 5 , 0 , 1 , 2 , 2 , 2 , 2 , 2 , 2 , 2 , 2 , 3 , 3 , 3 , 3 , 4 , 4 , 4 , 4 , 4 , 4 , 4 , 4 , 4 , 4 , 4 , 4 , 5 , 0 , 0 , 1 , 2 , 2 ,
2 , 2 , 2 , 2 , 2 , 2 , 3 , 3 , 3 , 3 , 4 , 4 , 4 , 4 , 4 , 4 , 4 , 4 , 4 , 4 , 4 , 4 , 4 , 5 , 0 , 2 , 2 , 2 , 2 , 2 , 2 , 2 , 2 , 3 , 4 , 4 , 4 , 4 , 4 , 4 , 4 , 4 , 4 , 4 , 4 , 5 , 0 , 0 , 0 , 1 , 2 , 2 , 2 , 2 , 2 , 2 , 2 , 2 , 2 , 2 , 3 , 3 , 3 , 3 , 4 , 4 , 4 , 4 , 4 , 4 , 4 , 4 , 4 , 4 , 4 , 5 , 5 , 0 , 0 , 1 , 2 , 2 , 2 , 2 , 2 , 2 , 2 , 2 , 2 , 2 , 3 , 3 , 3 , 3 , 4 , 4 , 4 , 4 , 4 , 4 , 4 , 4 , 4 , 4 ,
4 , 4 , 5 , 5 , 5 , 0 , 2 , 2 , 2 , 2 , 2 , 4 , 4 , 4 , 4 , 4 , 4 , 4 , 0 , 0 , 0 , 0 , 1 , 2 , 2 , 2 , 2 , 2 , 2 , 3 , 3 , 3 , 3 , 3 , 3 , 3 , 4 , 4 , 4 , 4 , 4 , 4 , 4 , 4 , 5 , 5 , 0 , 0 , 0 , 0 , 0 , 1 , 2 , 2 , 2 , 2 , 2 , 2 , 2 , 3 , 3 , 3 , 3 , 3 , 3 , 3 , 3 , 3 , 3 , 4 , 4 , 4 , 4 , 4 , 4 , 4 , 4 , 5 , 5 , 5 , 5 , 0 , 0 , 2 , 2 , 2 , 2 , 4 , 4 , 4 , 4 , 4 , 4 , 4 , 0 , 0 , 0 , 1 , 2 , 2 , 2 , 2 , 3 , 3 ,
3 , 3 , 3 , 3 , 3 , 4 , 4 , 4 , 4 , 4 , 4 , 4 , 4 , 4 , 5 , 0 , 0 , 0 , 0 , 0 , 1 , 2 , 2 , 2 , 2 , 2 , 3 , 3 , 3 , 3 , 3 , 3 , 3 , 3 , 3 , 3 , 4 , 4 , 4 , 4 , 4 , 4 , 4 , 4 , 4 , 5 , 5 ], device = 'cuda:0' )
( Pdb ) pp a
tensor ([ 0 , 0 , 0 , 0 , 0 , 0 , 0 , 0 , 0 , 0 , 0 , 0 , 0 , 0 , 0 , 0 , 0 , 0 , 0 , 0 , 0 , 0 , 0 , 0 , 0 , 0 , 0 , 0 , 0 , 0 , 0 , 0 , 0 , 0 , 0 , 1 , 1 , 1 , 1 , 1 , 1 , 1 , 1 , 1 , 1 , 1 , 1 , 1 , 1 , 1 , 1 , 1 , 1 , 1 , 1 , 1 , 1 , 1 , 1 , 1 , 1 , 1 , 1 , 1 , 1 , 1 , 1 , 1 , 1 , 1 , 1 , 1 , 1 , 1 , 1 , 1 , 1 , 1 , 1 , 1 , 1 , 1 , 1 , 1 , 1 , 1 , 1 , 1 , 1 , 1 , 1 , 2 , 2 , 2 , 2 , 2 , 2 , 2 , 2 , 2 , 2 , 2 , 2 , 2 ,
2 , 2 , 2 , 2 , 2 , 2 , 2 , 2 , 2 , 2 , 2 , 2 , 2 , 2 , 2 , 2 , 2 , 2 , 2 , 2 , 2 , 2 , 2 , 2 , 2 , 2 , 2 , 2 , 2 , 2 , 2 , 2 , 2 , 2 , 2 , 2 , 2 , 2 , 2 , 2 , 2 , 2 , 2 , 2 , 2 , 2 , 2 , 2 , 2 , 2 , 2 , 0 , 0 , 0 , 0 , 0 , 0 , 0 , 0 , 0 , 0 , 0 , 0 , 0 , 0 , 0 , 0 , 0 , 0 , 0 , 0 , 0 , 1 , 1 , 1 , 1 , 1 , 1 , 1 , 1 , 1 , 1 , 1 , 1 , 1 , 1 , 1 , 1 , 1 , 1 , 1 , 1 , 1 , 1 , 1 , 1 , 1 , 1 , 1 , 2 , 2 , 2 , 2 , 2 ,
2 , 2 , 2 , 2 , 2 , 2 , 2 , 2 , 2 , 2 , 2 , 2 , 2 , 2 , 2 , 2 , 2 , 2 , 2 , 2 , 2 , 2 , 2 , 2 , 0 , 0 , 0 , 0 , 0 , 0 , 0 , 0 , 0 , 0 , 0 , 0 , 0 , 0 , 0 , 0 , 0 , 0 , 0 , 0 , 0 , 0 , 1 , 1 , 1 , 1 , 1 , 1 , 1 , 1 , 1 , 1 , 1 , 1 , 1 , 1 , 1 , 1 , 1 , 1 , 1 , 1 , 1 , 1 , 1 , 1 , 1 , 1 , 1 , 1 , 1 , 1 , 1 , 2 , 2 , 2 , 2 , 2 , 2 , 2 , 2 , 2 , 2 , 2 , 2 , 2 , 2 , 2 , 2 , 2 , 2 , 2 , 2 , 2 , 2 , 2 , 2 , 2 , 2 , 2 ,
2 , 2 , 2 , 2 , 2 , 0 , 0 , 0 , 0 , 0 , 0 , 0 , 0 , 0 , 0 , 0 , 0 , 0 , 1 , 1 , 1 , 1 , 1 , 1 , 1 , 1 , 1 , 1 , 1 , 1 , 1 , 1 , 1 , 1 , 1 , 1 , 1 , 1 , 1 , 1 , 1 , 1 , 1 , 1 , 1 , 1 , 2 , 2 , 2 , 2 , 2 , 2 , 2 , 2 , 2 , 2 , 2 , 2 , 2 , 2 , 2 , 2 , 2 , 2 , 2 , 2 , 2 , 2 , 2 , 2 , 2 , 2 , 2 , 2 , 2 , 2 , 2 , 2 , 2 , 2 , 2 , 0 , 0 , 0 , 0 , 0 , 0 , 0 , 0 , 0 , 0 , 0 , 0 , 0 , 1 , 1 , 1 , 1 , 1 , 1 , 1 , 1 , 1 , 1 ,
1 , 1 , 1 , 1 , 1 , 1 , 1 , 1 , 1 , 1 , 1 , 1 , 1 , 1 , 1 , 2 , 2 , 2 , 2 , 2 , 2 , 2 , 2 , 2 , 2 , 2 , 2 , 2 , 2 , 2 , 2 , 2 , 2 , 2 , 2 , 2 , 2 , 2 , 2 , 2 , 2 , 2 , 2 , 2 , 2 , 2 , 2 ], device = 'cuda:0' )
( Pdb ) pp gj
tensor ([ 78 , 74 , 76 , 13 , 53 , 54 , 53 , 53 , 52 , 52 , 51 , 50 , 52 , 52 , 52 , 76 , 18 , 18 , 19 , 17 , 17 , 18 , 19 , 17 , 17 , 17 , 20 , 19 , 18 , 18 , 19 , 23 , 18 , 41 , 19 , 39 , 66 , 67 , 78 , 74 , 76 , 15 , 20 , 13 , 19 , 57 , 53 , 54 , 53 , 53 , 52 , 52 , 51 , 50 , 52 , 52 , 52 , 31 , 34 , 34 , 29 , 34 , 35 , 29 , 34 , 76 , 74 , 74 , 15 , 14 , 18 , 18 , 19 , 17 , 17 , 18 , 19 , 17 ,
17 , 17 , 20 , 19 , 18 , 18 , 19 , 23 , 18 , 41 , 26 , 32 , 19 , 42 , 39 , 42 , 66 , 67 , 78 , 74 , 15 , 20 , 13 , 19 , 19 , 57 , 53 , 54 , 53 , 53 , 52 , 52 , 51 , 50 , 52 , 52 , 52 , 31 , 37 , 34 , 34 , 29 , 34 , 35 , 29 , 34 , 76 , 74 , 74 , 75 , 75 , 15 , 14 , 18 , 18 , 19 , 17 , 17 , 18 , 19 , 17 , 17 , 17 , 20 , 19 , 18 , 18 , 19 , 23 , 18 , 41 , 46 , 4 , 31 , 26 , 32 , 19 , 74 ,
53 , 53 , 52 , 51 , 52 , 52 , 52 , 76 , 18 , 19 , 17 , 17 , 19 , 17 , 17 , 20 , 19 , 19 , 23 , 19 , 74 , 15 , 19 , 53 , 53 , 52 , 51 , 52 , 52 , 52 , 34 , 29 , 34 , 76 , 15 , 18 , 19 , 17 , 17 , 19 , 17 , 17 , 20 , 19 , 19 , 23 , 19 , 42 , 74 , 15 , 19 , 53 , 53 , 52 , 51 , 52 , 52 , 52 , 34 , 29 , 34 , 76 , 15 , 18 , 19 , 17 , 17 , 19 , 17 , 17 , 20 , 19 , 19 , 23 , 46 , 19 , 75 , 52 ,
53 , 52 , 52 , 51 , 51 , 49 , 51 , 75 , 17 , 17 , 18 , 16 , 16 , 18 , 16 , 19 , 17 , 18 , 17 , 18 , 38 , 65 , 75 , 14 , 18 , 56 , 52 , 53 , 52 , 52 , 51 , 51 , 49 , 51 , 30 , 28 , 28 , 75 , 17 , 17 , 18 , 16 , 16 , 18 , 16 , 19 , 17 , 18 , 17 , 31 , 18 , 38 , 65 , 14 , 18 , 56 , 52 , 53 , 52 , 52 , 51 , 51 , 49 , 51 , 30 , 28 , 28 , 75 , 17 , 17 , 18 , 16 , 16 , 18 , 16 , 19 , 17 , 18 ,
17 , 45 , 3 , 31 , 18 , 78 , 13 , 54 , 53 , 52 , 50 , 18 , 18 , 17 , 18 , 18 , 18 , 41 , 39 , 66 , 67 , 78 , 20 , 13 , 57 , 54 , 53 , 52 , 50 , 31 , 34 , 34 , 35 , 29 , 74 , 74 , 14 , 18 , 18 , 17 , 18 , 18 , 18 , 41 , 26 , 32 , 39 , 42 , 66 , 67 , 78 , 20 , 13 , 19 , 57 , 54 , 53 , 52 , 50 , 31 , 37 , 34 , 34 , 35 , 29 , 74 , 74 , 75 , 75 , 14 , 18 , 18 , 17 , 18 , 18 , 18 , 41 , 4 ,
31 , 26 , 32 , 79 , 75 , 14 , 52 , 53 , 53 , 19 , 18 , 18 , 20 , 19 , 24 , 42 , 68 , 79 , 75 , 21 , 14 , 52 , 53 , 53 , 35 , 35 , 35 , 36 , 35 , 75 , 75 , 16 , 15 , 19 , 18 , 18 , 20 , 19 , 24 , 42 , 27 , 43 , 43 , 68 , 79 , 75 , 21 , 14 , 20 , 52 , 53 , 53 , 38 , 35 , 35 , 35 , 36 , 35 , 75 , 75 , 76 , 76 , 16 , 15 , 19 , 18 , 18 , 20 , 19 , 24 , 42 , 32 , 27 ], device = 'cuda:0' )
( Pdb ) pp gi
tensor ([ 26 , 73 , 79 , 51 , 10 , 16 , 21 , 25 , 30 , 36 , 42 , 44 , 47 , 52 , 57 , 56 , 54 , 24 , 28 , 33 , 36 , 40 , 46 , 60 , 57 , 52 , 50 , 48 , 44 , 37 , 35 , 39 , 42 , 6 , 71 , 50 , 56 , 11 , 26 , 73 , 79 , 10 , 15 , 51 , 45 , 62 , 10 , 16 , 21 , 25 , 30 , 36 , 42 , 44 , 47 , 52 , 57 , 62 , 73 , 79 , 22 , 1 , 35 , 13 , 8 , 56 , 71 , 2 , 18 , 3 , 54 , 24 , 28 , 33 , 36 , 40 , 46 , 60 ,
57 , 52 , 50 , 48 , 44 , 37 , 35 , 39 , 42 , 6 , 26 , 10 , 71 , 9 , 50 , 39 , 56 , 11 , 26 , 73 , 10 , 15 , 51 , 45 , 35 , 62 , 10 , 16 , 21 , 25 , 30 , 36 , 42 , 44 , 47 , 52 , 57 , 62 , 52 , 73 , 79 , 22 , 1 , 35 , 13 , 8 , 56 , 71 , 2 , 20 , 33 , 18 , 3 , 54 , 24 , 28 , 33 , 36 , 40 , 46 , 60 , 57 , 52 , 50 , 48 , 44 , 37 , 35 , 39 , 42 , 6 , 41 , 71 , 45 , 26 , 10 , 71 , 72 ,
9 , 20 , 29 , 41 , 46 , 51 , 56 , 55 , 23 , 27 , 32 , 35 , 45 , 59 , 51 , 49 , 47 , 34 , 38 , 70 , 72 , 9 , 44 , 9 , 20 , 29 , 41 , 46 , 51 , 56 , 78 , 21 , 7 , 55 , 17 , 23 , 27 , 32 , 35 , 45 , 59 , 51 , 49 , 47 , 34 , 38 , 70 , 8 , 72 , 9 , 44 , 9 , 20 , 29 , 41 , 46 , 51 , 56 , 78 , 21 , 7 , 55 , 17 , 23 , 27 , 32 , 35 , 45 , 59 , 51 , 49 , 47 , 34 , 38 , 40 , 70 , 79 , 10 ,
16 , 21 , 25 , 30 , 36 , 44 , 57 , 56 , 54 , 24 , 28 , 33 , 36 , 46 , 57 , 50 , 44 , 35 , 42 , 71 , 50 , 56 , 79 , 10 , 45 , 62 , 10 , 16 , 21 , 25 , 30 , 36 , 44 , 57 , 62 , 22 , 13 , 56 , 54 , 24 , 28 , 33 , 36 , 46 , 57 , 50 , 44 , 35 , 42 , 10 , 71 , 50 , 56 , 10 , 45 , 62 , 10 , 16 , 21 , 25 , 30 , 36 , 44 , 57 , 62 , 22 , 13 , 56 , 54 , 24 , 28 , 33 , 36 , 46 , 57 , 50 , 44 , 35 ,
42 , 41 , 71 , 10 , 71 , 27 , 52 , 17 , 26 , 37 , 45 , 55 , 41 , 58 , 45 , 38 , 43 , 7 , 51 , 57 , 12 , 27 , 16 , 52 , 63 , 17 , 26 , 37 , 45 , 63 , 74 , 2 , 36 , 14 , 72 , 3 , 4 , 55 , 41 , 58 , 45 , 38 , 43 , 7 , 27 , 11 , 51 , 40 , 57 , 12 , 27 , 16 , 52 , 36 , 63 , 17 , 26 , 37 , 45 , 63 , 53 , 74 , 2 , 36 , 14 , 72 , 3 , 21 , 34 , 4 , 55 , 41 , 58 , 45 , 38 , 43 , 7 , 72 ,
46 , 27 , 11 , 26 , 73 , 51 , 42 , 47 , 52 , 40 , 60 , 52 , 48 , 37 , 39 , 6 , 11 , 26 , 73 , 15 , 51 , 42 , 47 , 52 , 73 , 79 , 1 , 35 , 8 , 71 , 2 , 18 , 3 , 40 , 60 , 52 , 48 , 37 , 39 , 6 , 26 , 9 , 39 , 11 , 26 , 73 , 15 , 51 , 35 , 42 , 47 , 52 , 52 , 73 , 79 , 1 , 35 , 8 , 71 , 2 , 20 , 33 , 18 , 3 , 40 , 60 , 52 , 48 , 37 , 39 , 6 , 45 , 26 ], device = 'cuda:0' )
对iou排序,排序之后 如果同一个grid出现两个gt 那么我们经过排序之后每个grid中的score_iou都能保证是最大的。(小的会被覆盖 因为同一个grid坐标肯定相同)。那么从时间顺序的话, 最后1个总是和最大的IOU去计算LOSS
通过gr用来设置IoU的值在objectness loss中做标签的比重。gr = 1 表示IOU是objectness的全部,gr < 1 表示iou的部分作为ogjectness





【推荐】国内首个AI IDE,深度理解中文开发场景,立即下载体验Trae
【推荐】编程新体验,更懂你的AI,立即体验豆包MarsCode编程助手
【推荐】抖音旗下AI助手豆包,你的智能百科全书,全免费不限次数
【推荐】轻量又高性能的 SSH 工具 IShell:AI 加持,快人一步
· winform 绘制太阳,地球,月球 运作规律
· 震惊!C++程序真的从main开始吗?99%的程序员都答错了
· AI与.NET技术实操系列(五):向量存储与相似性搜索在 .NET 中的实现
· 超详细:普通电脑也行Windows部署deepseek R1训练数据并当服务器共享给他人
· 【硬核科普】Trae如何「偷看」你的代码?零基础破解AI编程运行原理
2022-07-16 记一次线上数据库删除百万级数据