Ngnix搭建静态网页和安装wordpress

使用nginx搭建wordpress和静态网站。以下操作均实在ubuntu1604完成。
1|0安装nginx

验证安装是否完成。在浏览器打开127.0.0.1,能够看到nginx启动则代表完成。

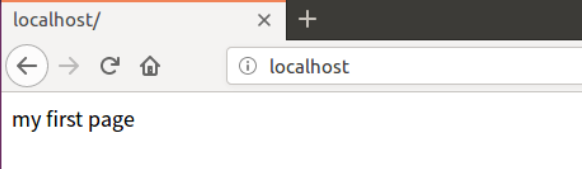
1|1新建自己的静态文件index.html
index.html
1|2创建index.html的配置文件demo.conf
demo.conf
1|3移动配置文件到/etc/nginx/conf.d目录下
能够配置nginx的文件有三个地方,分别是:
- /etc/nginx/nginx.conf
- /etc/nginx/conf.d
- /etc/nginx/sites-enabled
其中/etc/nginx/nginx.conf 为主配置文件,在nginx读取配置文件时,首先读取nginx.conf,然后再读取/etc/nginx/conf.d中以conf结尾的文件,最后读取/etc/nginx/sites-enabled 链接的文件。所以这里选择第二种方式,新建demo.conf文件放在/etc/nginx/conf.d目录下。
1|4重新加载nginx配置文件
2|0安装wordperss
WordPress是使用PHP语言开发的博客平台,用户可以在支持PHP和MySQL数据库的服务器上架设属于自己的网站
2|1安装mysql数据

2|2安装php
2|3下载wordpress
2|4解压wordpress
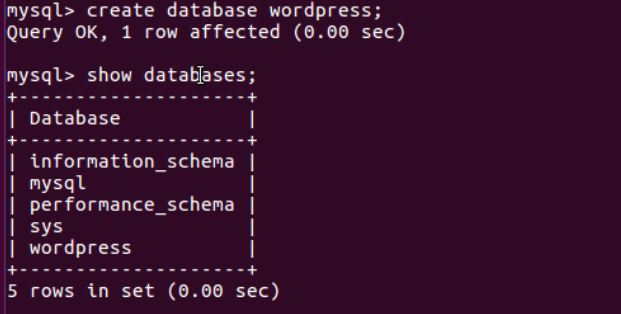
2|5创建数据库wordpress
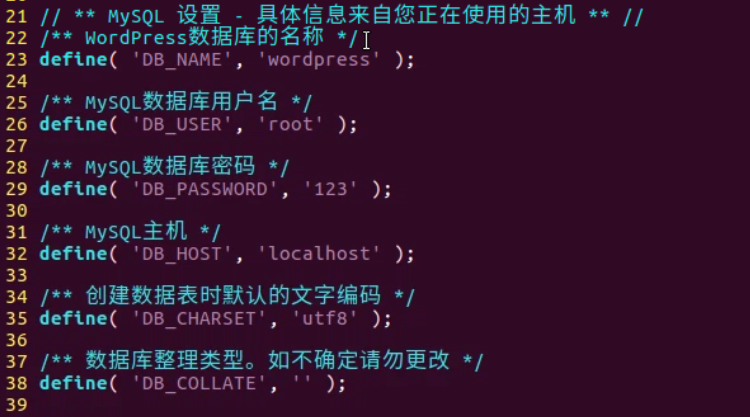
2|6创建wordpress的配置文件
2|7修改wordpress的配置文件
2|8复制wordpress到/var/www文件夹
2|9新增nginx配置
在/etc/nginx/conf.d/目录下新增wordpress.conf配置文件,同时删除上面的demo.conf配置文件
wordpress.conf
2|10重新加载配置文件
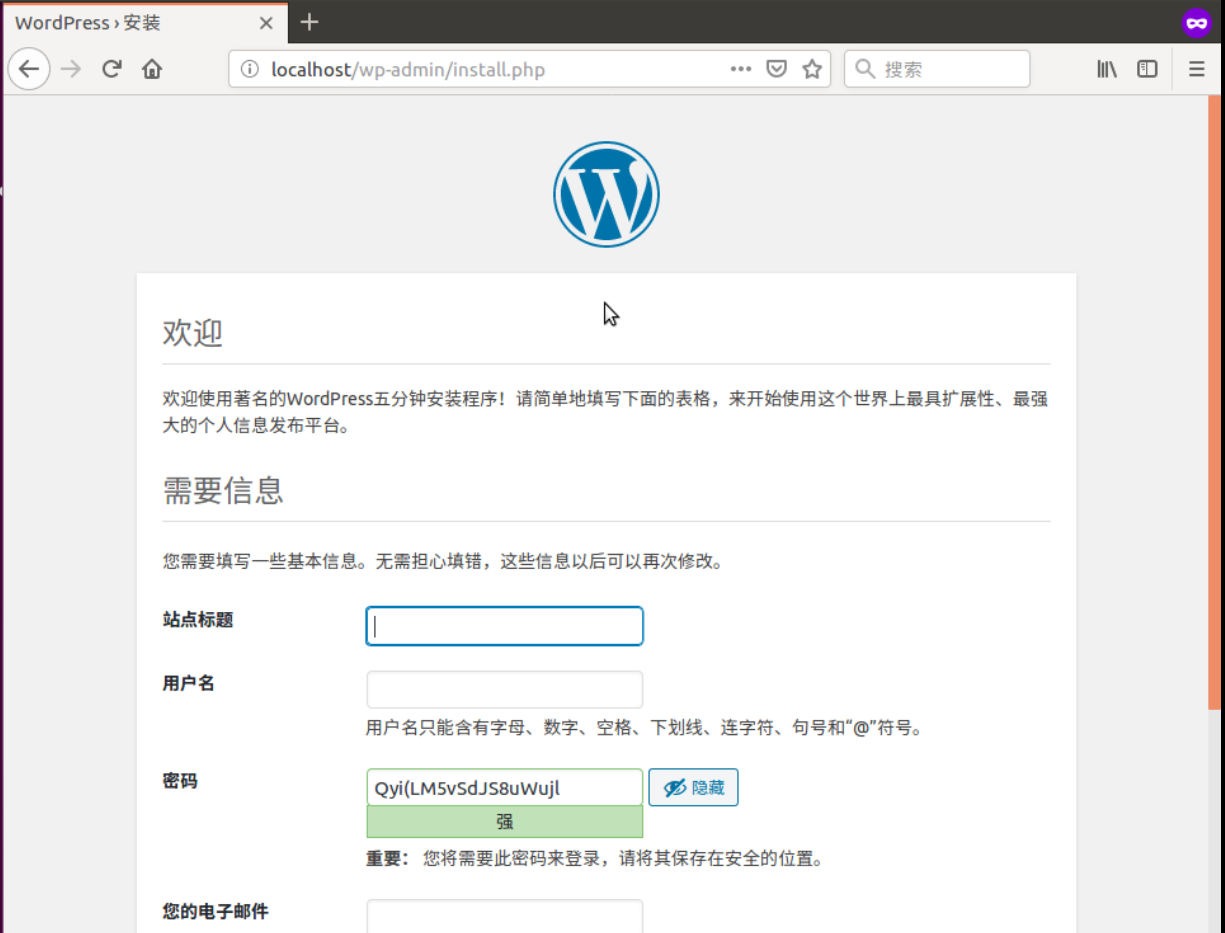
2|11访问localhost安装wordpress
__EOF__

本文作者:goldsunshine
本文链接:https://www.cnblogs.com/goldsunshine/p/13091536.html
关于博主:评论和私信会在第一时间回复。或者直接私信我。
版权声明:本博客所有文章除特别声明外,均采用 BY-NC-SA 许可协议。转载请注明出处!
声援博主:如果您觉得文章对您有帮助,可以点击文章右下角【推荐】一下。您的鼓励是博主的最大动力!
本文链接:https://www.cnblogs.com/goldsunshine/p/13091536.html
关于博主:评论和私信会在第一时间回复。或者直接私信我。
版权声明:本博客所有文章除特别声明外,均采用 BY-NC-SA 许可协议。转载请注明出处!
声援博主:如果您觉得文章对您有帮助,可以点击文章右下角【推荐】一下。您的鼓励是博主的最大动力!


【推荐】国内首个AI IDE,深度理解中文开发场景,立即下载体验Trae
【推荐】编程新体验,更懂你的AI,立即体验豆包MarsCode编程助手
【推荐】抖音旗下AI助手豆包,你的智能百科全书,全免费不限次数
【推荐】轻量又高性能的 SSH 工具 IShell:AI 加持,快人一步
· AI与.NET技术实操系列:向量存储与相似性搜索在 .NET 中的实现
· 基于Microsoft.Extensions.AI核心库实现RAG应用
· Linux系列:如何用heaptrack跟踪.NET程序的非托管内存泄露
· 开发者必知的日志记录最佳实践
· SQL Server 2025 AI相关能力初探
· winform 绘制太阳,地球,月球 运作规律
· 震惊!C++程序真的从main开始吗?99%的程序员都答错了
· AI与.NET技术实操系列(五):向量存储与相似性搜索在 .NET 中的实现
· 超详细:普通电脑也行Windows部署deepseek R1训练数据并当服务器共享给他人
· 【硬核科普】Trae如何「偷看」你的代码?零基础破解AI编程运行原理