SpringMVC—特点及Hello,SpringMVC
Spring MVC是Spring Framework的一部分,是基于Java实现MVC的轻量级Web框架。
查看官方文档:https://docs.spring.io/spring/docs/5.2.0.RELEASE/spring-framework-reference/web.html#spring-web
1、SpringMVC的特点:
- 轻量级,简单易学
- 高效,基于请求响应的MVC框架
- 与Spring兼容性好,无缝结合-
- 约定大于配置
- 功能强大,简介灵活
Spring的web框架围绕DispatcherServlet [ 调度Servlet ] 设计。
DispatcherServlet的作用是将请求分发到不同的处理器。从Spring 2.5开始,使用Java 5或者以上版本的用户可以采用基于注解形式进行开发,十分简洁;
正因为SpringMVC好 , 简单 , 便捷 , 易学 , 天生和Spring无缝集成(使用SpringIoC和Aop) , 使用约定优于配置 . 能够进行简单的junit测试 . 支持Restful风格 .异常处理 , 本地化 , 国际化 , 数据验证 , 类型转换 , 拦截器 等等......所以我们要学习 .
2、Hello,SpringMVC
-
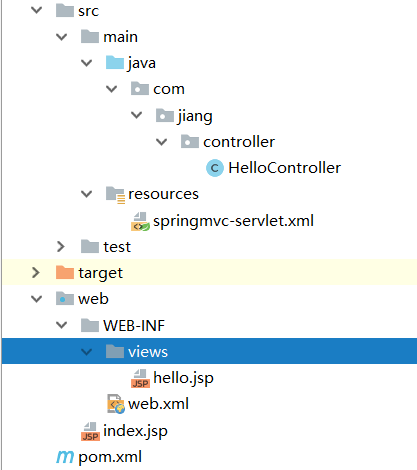
首先看一下完整的目录结构

-
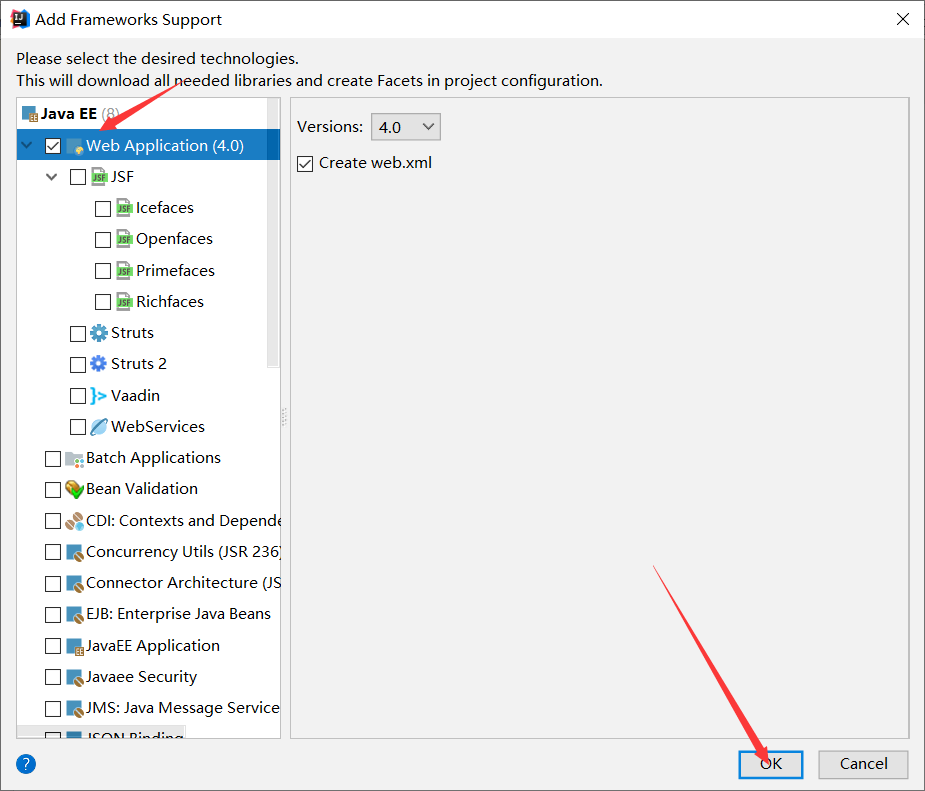
新建一个简单Maven项目,添加web支持!

-
在
pom.xml文件中导入SpringMVC的依赖<dependency> <groupId>org.springframework</groupId> <artifactId>spring-webmvc</artifactId> <version>5.1.9.RELEASE</version> </dependency> <!--由于Maven可能存在资源过滤的问题,我们将配置完善--> <build> <resources> <resource> <directory>src/main/java</directory> <includes> <include>**/*.properties</include> <include>**/*.xml</include> </includes> <filtering>false</filtering> </resource> <resource> <directory>src/main/resources</directory> <includes> <include>**/*.properties</include> <include>**/*.xml</include> </includes> <filtering>false</filtering> </resource> </resources> </build> -
配置web.xml,注册DispatcherServlet
- 注意点:
- 注意web.xml版本问题,要最新版!
- 注册DispatcherServlet
- 关联SpringMVC的配置文件
- 启动级别为1(让它在服务器启动的时候启动)
- 映射路径为 / 【不要用/*,会404】
<?xml version="1.0" encoding="UTF-8"?> <web-app xmlns="http://xmlns.jcp.org/xml/ns/javaee" xmlns:xsi="http://www.w3.org/2001/XMLSchema-instance" xsi:schemaLocation="http://xmlns.jcp.org/xml/ns/javaee http://xmlns.jcp.org/xml/ns/javaee/web-app_4_0.xsd" version="4.0"> <!--1.注册DispatcherServlet Spring提供--> <servlet> <servlet-name>DispatcherServlet</servlet-name> <servlet-class>org.springframework.web.servlet.DispatcherServlet</servlet-class> <!--3.关联一个 SpringMVC配置文件--> <init-param> <param-name>contextConfigLocation</param-name> <param-value>classpath:springmvc-servlet.xml</param-value> </init-param> <!--4.服务器启动的时候就启动--> <load-on-startup>1</load-on-startup> </servlet> <!-- 2.注册servlet的映射 / 匹配所有请求 不包括.jsp /* 匹配所有的请求,包括.jsp --> <servlet-mapping> <servlet-name>DispatcherServlet</servlet-name> <url-pattern>/</url-pattern> </servlet-mapping> </web-app> - 注意点:
-
编写SpringMVC 的 配置文件!名称:springmvc-servlet.xml : [servletname]-servlet.xml说明,这里的名称要求是按照官方来的
<?xml version="1.0" encoding="UTF-8"?> <beans xmlns="http://www.springframework.org/schema/beans" xmlns:context="http://www.springframework.org/schema/context" xmlns:mvc="http://www.springframework.org/schema/mvc" xmlns:xsi="http://www.w3.org/2001/XMLSchema-instance" xsi:schemaLocation="http://www.springframework.org/schema/beans https://www.springframework.org/schema/beans/spring-beans.xsd http://www.springframework.org/schema/context https://www.springframework.org/schema/context/spring-context.xsd http://www.springframework.org/schema/mvc https://www.springframework.org/schema/mvc/spring-mvc.xsd"> <!--固定配置--> <!--1.扫描包配置让下面的所有类被spring识别 控制层 和前端交互的 controller--> <context:component-scan base-package="com.jiang.controller"/> <!--2.注解驱动开驱动--> <mvc:annotation-driven/> <!--3.在web开发中,我们一般存在静态资源,css,js,img.. 我们不希望处理它--> <mvc:default-servlet-handler/> <!--重点:视图解析器 默认id:internalResourceViewResolver(不要改)--> <bean id="internalResourceViewResolver" class="org.springframework.web.servlet.view.InternalResourceViewResolver"> <!--前缀--> <property name="prefix" value="WEB-INF/views/"/> <!--后缀--> <property name="suffix" value=".jsp"/> </bean> </beans> -
编写我们要操作业务
HelloController,用注解!- @Controller是为了让Spring IOC容器初始化时自动扫描到;
- @RequestMapping是为了映射请求路径,这里因为类与方法上都有映射所以访问时应该是/HelloController/hello;
- 方法中声明Model类型的参数是为了把Action中的数据带到视图中;
- 方法返回的结果是视图的名称hello,加上配置文件中的前后缀变成WEB-INF/jsp/hello.jsp。
package com.jiang.controller; import org.springframework.ui.Model; import org.springframework.stereotype.Controller; import org.springframework.web.bind.annotation.RequestMapping; @Controller public class HelloController { @RequestMapping("/hello") public String hello(Model model){ //我们要传的参数 model.addAttribute("msg","Hello,SpringMVC"); //后台的输出 System.out.println("aaa"); return "hello"; } } -
编写我们要跳转的页面
hello.jsp<%@ page contentType="text/html;charset=UTF-8" language="java" %> <html> <head> <title>Hello</title> </head> <body> <h1>${msg}</h1> </body> </html> -
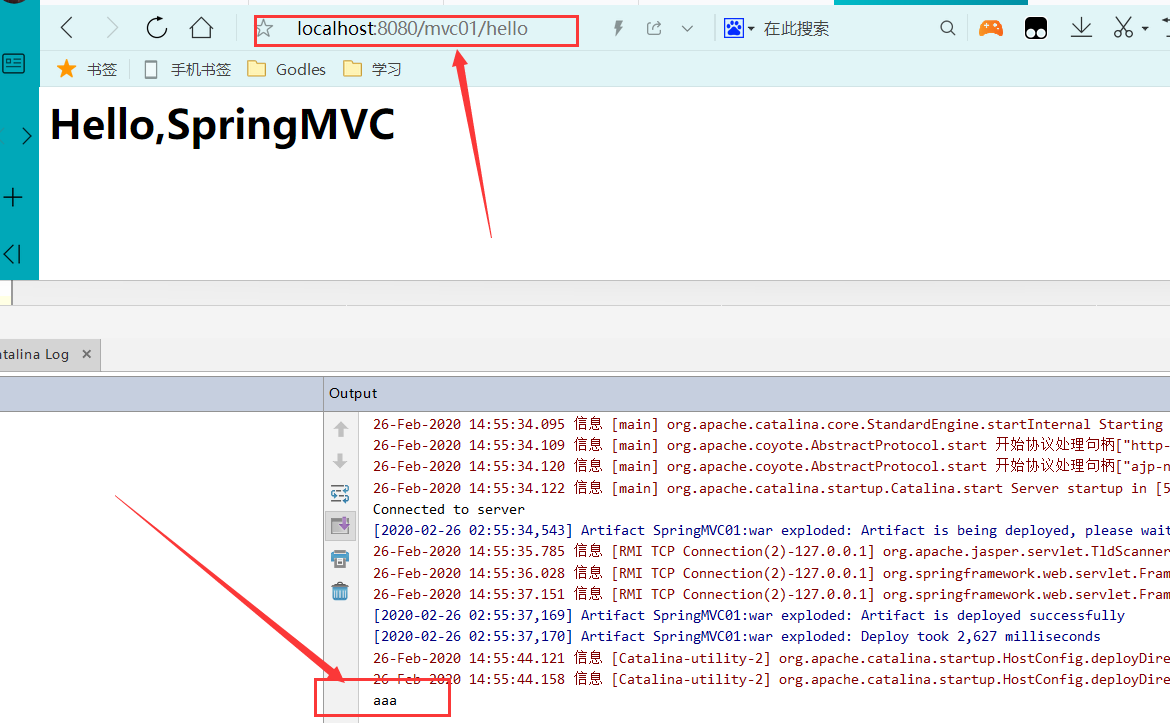
配置Tomcat运行测试!

测试成功!


 浙公网安备 33010602011771号