Flutter ncnn 使用
Flutter 实现手机端 App,如果想利用 AI 模型添加新颖的功能,那么 ncnn 就是一种可考虑的手机端推理模型的框架。
本文即是 Flutter 上使用 ncnn 做模型推理的实践分享。有如下内容:
- ncnn 体验:环境准备、模型转换及测试
- Flutter 项目体验: 本文 demo_ncnn 体验
- Flutter 项目实现
- 创建 FFI plugin,实现 dart 绑定 C 接口
- 创建 App,于 Linux 应用 plugin 做推理
- 适配 App,于 Android 能编译运行
demo_ncnn 代码: https://github.com/ikuokuo/start-flutter/tree/main/demo_ncnn
ncnn 体验
ncnn 环境准备
获取 ncnn 源码,并编译。以下是 Ubuntu 上的步骤:
# demo 用的预编译库,建议与其版本一致
export YYYYMMDD=20230517
git clone -b $YYYYMMDD --depth 1 https://github.com/Tencent/ncnn.git

# Build for Linux
#  https://github.com/Tencent/ncnn/wiki/how-to-build#build-for-linux
sudo apt install build-essential git cmake libprotobuf-dev protobuf-compiler libvulkan-dev vulkan-tools libopencv-dev

cd ncnn/
git submodule update --init

mkdir -p build; cd build

# cmake -LAH ..
cmake -DCMAKE_BUILD_TYPE=Release \
-DCMAKE_INSTALL_PREFIX=$HOME/ncnn-$YYYYMMDD \
-DNCNN_VULKAN=ON \
-DNCNN_BUILD_EXAMPLES=ON \
-DNCNN_BUILD_TOOLS=ON \
..

make -j$(nproc); make install
配置 ncnn 环境,
# 软链,以便替换
sudo ln -sfT $HOME/ncnn-$YYYYMMDD /usr/local/ncnn

cat <<-EOF >> ~/.bashrc
# ncnn
export NCNN_HOME=/usr/local/ncnn
export PATH=\$NCNN_HOME/bin:\$PATH
EOF

# 测试 tools
ncnnoptimize
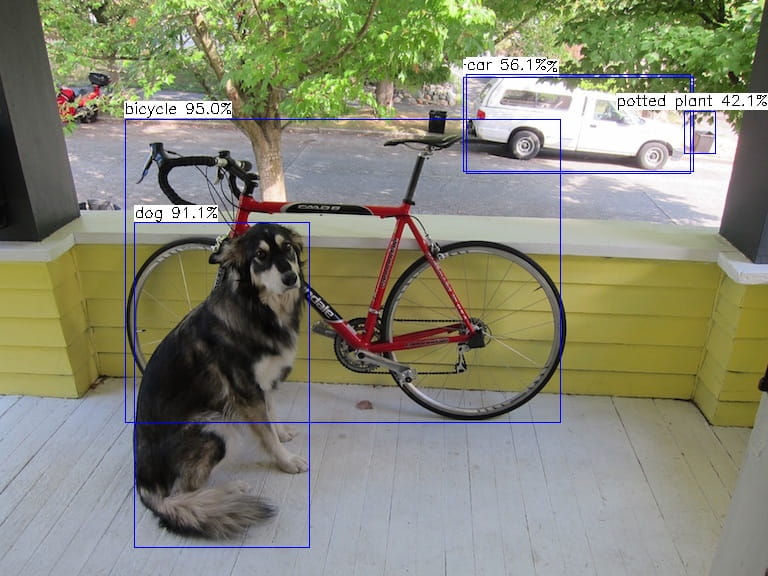
测试 YOLOX 推理样例,
# 下载 YOLOX ncnn 模型,解压进工作目录 ncnn/build/examples
#  说明可见 ncnn/examples/yolox.cpp 的注释
#  https://github.com/Megvii-BaseDetection/YOLOX/releases/download/0.1.1rc0/yolox_s_ncnn.tar.gz
tar -xzvf yolox_s_ncnn.tar.gz

# 下载 YOLOX 测试图片,拷贝进工作目录 ncnn/build/examples
#  https://github.com/Megvii-BaseDetection/YOLOX/blob/main/assets/dog.jpg

# 进入工作目录
cd ncnn/build/examples

# 运行 YOLOX ncnn 样例
./yolox dog.jpg

ncnn 模型转换
上述 YOLOX 推理,用的是已转换好的模型。实际推理某一个模型,得了解如何做转换。
这里还以 YOLOX 模型为例,体验 ncnn 转换、修改、量化模型的过程。步骤依照的 YOLOX/demo/ncnn 的说明。此外,ncnn/tools 下有各类模型转换工具的说明。
Step 1) 下载 YOLOX 模型
- yolox_nano.onnx: YOLOX-Nano ONNX 模型
Step 2) onnx2ncnn 转换模型
# onnx 简化
#  https://github.com/daquexian/onnx-simplifier
# pip3 install onnxsim
python3 -m onnxsim yolox_nano.onnx yolox_nano_sim.onnx

# onnx 转换为 ncnn
onnx2ncnn yolox_nano_sim.onnx yolox_nano.param yolox_nano.bin
报错 Unsupported slice step ! 可忽略。Focus layer 已经于 demo 的 yolox.cpp 里实现了。
Step 3) 修改 yolox_nano.param
修改 yolox_nano.param 把第一个 Convolution 前的层都删掉,另加个 YoloV5Focus 层,并修改层数值。
修改前:
291 324
Input            images                   0 1 images
Split            splitncnn_input0         1 4 images images_splitncnn_0 images_splitncnn_1 images_splitncnn_2 images_splitncnn_3
Crop             630                      1 1 images_splitncnn_3 630 -23309=2,0,0 -23310=2,2147483647,2147483647 -23311=2,1,2
Crop             635                      1 1 images_splitncnn_2 635 -23309=2,0,1 -23310=2,2147483647,2147483647 -23311=2,1,2
Crop             640                      1 1 images_splitncnn_1 640 -23309=2,1,0 -23310=2,2147483647,2147483647 -23311=2,1,2
Crop             650                      1 1 images_splitncnn_0 650 -23309=2,1,1 -23310=2,2147483647,2147483647 -23311=2,1,2
Concat           Concat_40                4 1 630 640 635 650 683 0=0
Convolution      Conv_41                  1 1 683 1177 0=16 1=3 11=3 2=1 12=1 3=1 13=1 4=1 14=1 15=1 16=1 5=1 6=1728
修改后:
286 324
Input            images                   0 1 images
YoloV5Focus      focus                    1 1 images 683
注:onnx 简化这里用处不大,合了本来要删除的几个
Crop层。
Step 4) ncnnoptimize 量化模型
ncnnoptimize 转为 fp16,减少一半权重:
ncnnoptimize yolox_nano.param yolox_nano.bin yolox_nano_fp16.param yolox_nano_fp16.bin 65536
如果量化为 int8,可见 Post Training Quantization Tools。
ncnn 推理实践
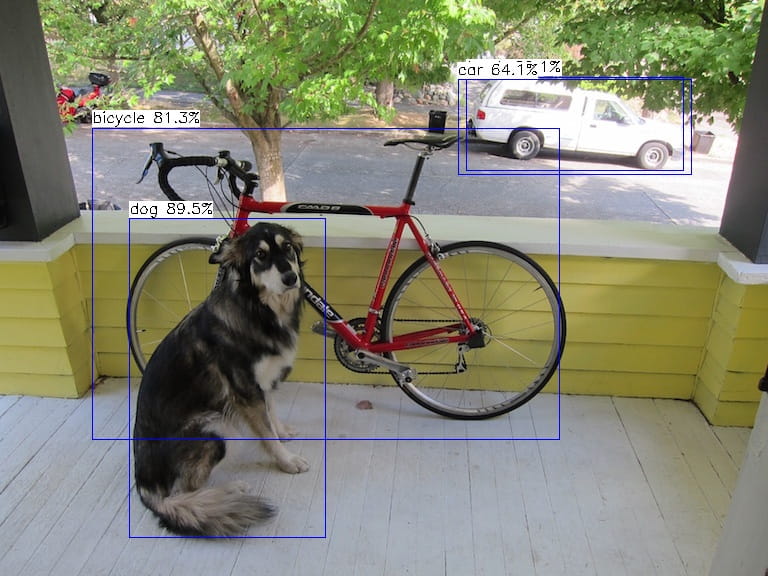
修改 ncnn/examples/yolox.cpp detect_yolox() 里模型路径,重编译后测试:
cd ncnn/build/examples
./yolox dog.jpg

demo_ncnn 体验
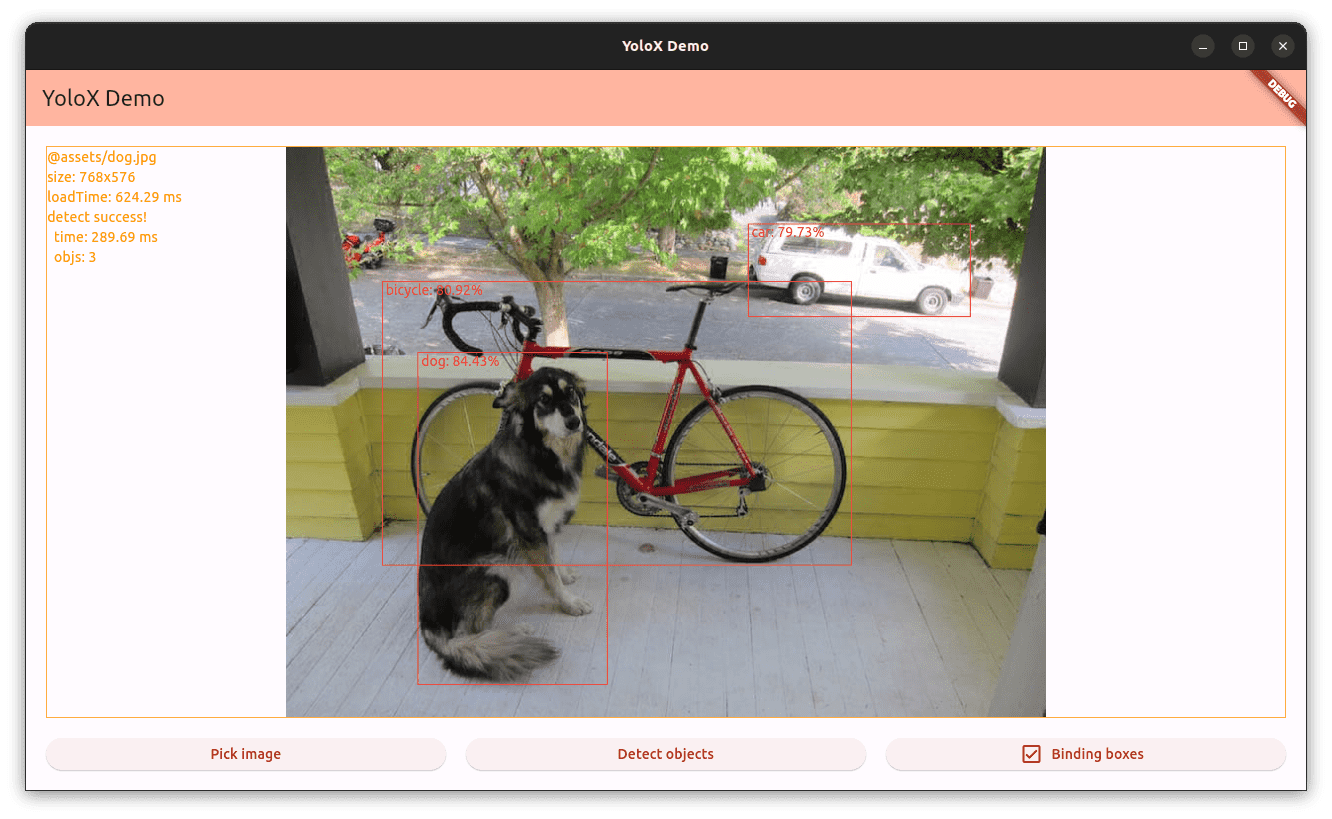
demo_ncnn 是本文实践的演示项目,可以运行体验。效果如下:

准备 Flutter 环境
Flutter 请依照官方文档 Get started 进行准备。
准备 demo_ncnn 项目
获取 demo_ncnn 源码,
git clone --depth 1 https://github.com/ikuokuo/start-flutter.git
其中,
demo_ncnn/: 选择图片进行 ncnn 推理的 Flutter 应用plugins/ncnn_yolox/: ncnn 推理 yolox 模型的 Flutter FFI 插件
安装依赖,
cd demo_ncnn/

flutter pub get

sudo apt-get install libclang-dev libomp-dev
准备 Linux 预编译库,
解压进 plugins/ncnn_yolox/linux/。
准备 Android 预编译库,
解压进 plugins/ncnn_yolox/android/。
确认 ncnn_yolox/src/CMakeLists.txt 里 ncnn_DIR OpenCV_DIR 的路径正确。
体验 demo_ncnn 项目
运行体验,
cd demo_ncnn/
flutter run

# 或查看设备,-d 指定运行
flutter devices
flutter run -d linux
demo_ncnn 实现
demo_ncnn 实现,分为两部分:
- Flutter FFI 插件:实现 dart 绑定 C 接口
- Flutter App 应用:实现 UI 并应用插件做推理
创建 FFI 插件
# 创建 FFI 插件
flutter create --org dev.flutter -t plugin_ffi --platforms=android,ios,linux ncnn_yolox

cd ncnn_yolox

# 更新 ffigen 版本
#  不然,可能报错 Error: The type 'YoloX' must be 'base', 'final' or 'sealed'
flutter pub outdated
flutter pub upgrade --major-versions
之后,只需在 src/ncnn_yolox.h 里定义 C 接口并实现,然后用 package:ffigen 自动生成 Dart 绑定就可以了。
Step 1) 定义 C 接口
#ifdef __cplusplus
extern "C" {
#endif

FFI_PLUGIN_EXPORT typedef int yolox_err_t;

#define YOLOX_OK        0
#define YOLOX_ERROR    -1

FFI_PLUGIN_EXPORT struct YoloX {
  const char *model_path;   // path to model file
  const char *param_path;   // path to param file

  float nms_thresh;   // nms threshold
  float conf_thresh;  // threshold of bounding box prob
  float target_size;  // target image size after resize, might use 416 for small model
};

// ncnn::Mat::PixelType
FFI_PLUGIN_EXPORT enum PixelType {
  PIXEL_RGB = 1,
  PIXEL_BGR = 2,
  PIXEL_GRAY = 3,
  PIXEL_RGBA = 4,
  PIXEL_BGRA = 5,
};

FFI_PLUGIN_EXPORT struct Rect {
  float x;
  float y;
  float w;
  float h;
};

FFI_PLUGIN_EXPORT struct Object {
  int label;
  float prob;
  struct Rect rect;
};

FFI_PLUGIN_EXPORT struct DetectResult {
  int object_num;
  struct Object *object;
};

FFI_PLUGIN_EXPORT struct YoloX *yoloxCreate();
FFI_PLUGIN_EXPORT void yoloxDestroy(struct YoloX *yolox);

FFI_PLUGIN_EXPORT struct DetectResult *detectResultCreate();
FFI_PLUGIN_EXPORT void detectResultDestroy(struct DetectResult *result);

FFI_PLUGIN_EXPORT yolox_err_t detectWithImagePath(
    struct YoloX *yolox, const char *image_path, struct DetectResult *result);
FFI_PLUGIN_EXPORT yolox_err_t detectWithPixels(
    struct YoloX *yolox, const uint8_t *pixels, enum PixelType pixelType,
    int img_w, int img_h, struct DetectResult *result);

#ifdef __cplusplus
}
#endif
Step 2) 实现 C 接口
src/ncnn_yolox.cc 实现参考 ncnn/examples/yolox.cpp 来做的。
Step 3) 更新 Dart 绑定接口
lib/ncnn_yolox_bindings_generated.dart,
flutter pub run ffigen --config ffigen.yaml
如果要了解 dart 怎么与 C 交互,可见:C interop using dart:ffi。
Step 4) 准备依赖库
- Linux,解压进
linux/- ncnn-YYYYMMDD-ubuntu-2204-shared.zip
- opencv-mobile-4.6.0-ubuntu-2204.zip
- Android,解压进
android/- ncnn-YYYYMMDD-android-vulkan-shared.zip
- opencv-mobile-4.6.0-android.zip
Step 5) 写构建脚本
# packages

if(CMAKE_SYSTEM_NAME STREQUAL "Linux")
  set(ncnn_DIR "${MY_PROJ}/linux/ncnn-20230517-ubuntu-2204-shared/lib/cmake")
  set(OpenCV_DIR "${MY_PROJ}/linux/opencv-mobile-4.6.0-ubuntu-2204/lib/cmake")
elseif(CMAKE_SYSTEM_NAME STREQUAL "Android")
  set(ncnn_DIR "${MY_PROJ}/android/ncnn-20230517-android-vulkan-shared/${ANDROID_ABI}/lib/cmake/ncnn")
  set(OpenCV_DIR "${MY_PROJ}/android/opencv-mobile-4.6.0-android/sdk/native/jni")
else()
  message(FATAL_ERROR "system not support: ${CMAKE_SYSTEM_NAME}")
endif()

if(NOT EXISTS ${ncnn_DIR})
  message(FATAL_ERROR "ncnn_DIR not exists: ${ncnn_DIR}")
endif()
if(NOT EXISTS ${OpenCV_DIR})
  message(FATAL_ERROR "OpenCV_DIR not exists: ${OpenCV_DIR}")
endif()

## ncnn

find_package(ncnn REQUIRED)
message(STATUS "ncnn_FOUND: ${ncnn_FOUND}")

## opencv

find_package(OpenCV 4 REQUIRED)
message(STATUS "OpenCV_VERSION: ${OpenCV_VERSION}")
message(STATUS "OpenCV_INCLUDE_DIRS: ${OpenCV_INCLUDE_DIRS}")
message(STATUS "OpenCV_LIBS: ${OpenCV_LIBS}")

# targets

include_directories(
  ${MY_PROJ}/src
  ${OpenCV_INCLUDE_DIRS}
)

## ncnn_yolox

add_library(ncnn_yolox SHARED
  "ncnn_yolox.cc"
)
target_link_libraries(ncnn_yolox ncnn ${OpenCV_LIBS})

set_target_properties(ncnn_yolox PROPERTIES
  PUBLIC_HEADER ncnn_yolox.h
  OUTPUT_NAME "ncnn_yolox"
)

target_compile_definitions(ncnn_yolox PUBLIC DART_SHARED_LIB)
测试 ncnn 推理
首先,把准备好的模型放进 assets 目录。如:
assets/
├── dog.jpg
├── yolox_nano_fp16.bin
└── yolox_nano_fp16.param
之后,于 Linux 可以自测 C & Dart 接口实现。
Step 1) C 接口测试
std::string assets_dir("../assets/");
std::string image_path = assets_dir + "dog.jpg";
std::string model_path = assets_dir + "yolox_nano_fp16.bin";
std::string param_path = assets_dir + "yolox_nano_fp16.param";

auto yolox = yoloxCreate();
yolox->model_path = model_path.c_str();
yolox->param_path = param_path.c_str();
yolox->nms_thresh  = 0.45;
yolox->conf_thresh = 0.25;
yolox->target_size = 416;
// yolox->target_size = 640;

auto detect_result = detectResultCreate();

auto err = detectWithImagePath(yolox, image_path.c_str(), detect_result);
if (err == YOLOX_OK) {
  auto num = detect_result->object_num;
  printf("yolox detect ok, num=%d\n", num);
  for (int i = 0; i < num; i++) {
    Object *obj = detect_result->object + i;
    printf("  object[%d] label=%d prob=%.2f rect={x=%.2f y=%.2f w=%.2f h=%.2f}\n",
      i, obj->label, obj->prob, obj->rect.x, obj->rect.y, obj->rect.w, obj->rect.h);
  }
} else {
  printf("yolox detect fail, err=%d\n", err);
}

draw_objects(image_path.c_str(), detect_result);

detectResultDestroy(detect_result);
yoloxDestroy(yolox);
Step 2) Dart 接口测试
final yoloxLib = NcnnYoloxBindings(dlopen('ncnn_yolox', 'build/shared'));

const assetsDir = '../assets';
final imagePath = '$assetsDir/dog.jpg'.toNativeUtf8();
final modelPath = '$assetsDir/yolox_nano_fp16.bin'.toNativeUtf8();
final paramPath = '$assetsDir/yolox_nano_fp16.param'.toNativeUtf8();

final yolox = yoloxLib.yoloxCreate();
yolox.ref.model_path = modelPath.cast();
yolox.ref.param_path = paramPath.cast();
yolox.ref.nms_thresh = 0.45;
yolox.ref.conf_thresh = 0.25;
yolox.ref.target_size = 416;
// yolox.ref.target_size = 640;

final detectResult = yoloxLib.detectResultCreate();

final err =
    yoloxLib.detectWithImagePath(yolox, imagePath.cast(), detectResult);

if (err == YOLOX_OK) {
  final num = detectResult.ref.object_num;
  print('yolox detect ok, num=$num');
  for (int i = 0; i < num; i++) {
    var obj = detectResult.ref.object.elementAt(i).ref;
    print('  object[$i] label=${obj.label}'
        ' prob=${obj.prob.toStringAsFixed(2)} rect=${obj.rect.str()}');
  }
} else {
  print('yolox detect fail, err=$err');
}

calloc.free(imagePath);
calloc.free(modelPath);
calloc.free(paramPath);

yoloxLib.detectResultDestroy(detectResult);
yoloxLib.yoloxDestroy(yolox);
Step 3) 运行测试
cd ncnn_yolox/linux
make

# cpp test
./build/ncnn_yolox_test

# dart test
dart ncnn_yolox_test.dart
创建 App 写 UI
创建 App 项目,
flutter create --project-name demo_ncnn --org dev.flutter --android-language java --ios-language objc --platforms=android,ios,linux demo_ncnn
本文项目添加了如下些依赖:
cd demo_ncnn

dart pub add path logging image easy_debounce

flutter pub add mobx flutter_mobx provider path_provider
flutter pub add -d build_runner mobx_codegen
App 状态管理用的 MobX。若要了解使用,可见:
App 主要就两个功能:选图片、做推理。对应实现了两个 Store 类:
- image_store.dart: 给图片路径,异步加载图片数据
- yolox_store.dart: 给图片数据,异步预测图片对象
因为加载、预测都比较耗时,故用的 MobX ObservableFuture 异步方式。若要了解使用,可见:
以上就是 App 实现的关键内容,也可采取不同方案。
应用插件做推理
App 里应用插件,首先要于 pubspec.yaml 里加上插件的依赖:
dependencies:
  ncnn_yolox:
    path: ../plugins/ncnn_yolox
然后,yolox_store.dart 应用了插件做推理,过程与之前 Dart 接口测试基本一致。差异主要在:
- 多了将
assets里的模型拷贝进临时路径的操作,因为 App 里无法获取资源的绝对路径。要么改 C 接口,模型以字节给到。 - 多了将图片数据从
Uint8List到Pointer<Uint8>的拷贝,因为要从 Dart 堆内存进 C 堆内存。可见注释的 Issue 了解。
import 'dart:ffi';
import 'dart:io';

import 'package:ffi/ffi.dart';
import 'package:flutter/services.dart';
import 'package:image/image.dart' as img;
import 'package:mobx/mobx.dart';

import 'package:ncnn_yolox/ncnn_yolox_bindings_generated.dart' as yo;
import 'package:path/path.dart' show join;
import 'package:path_provider/path_provider.dart';

import '../util/image.dart';
import '../util/log.dart';
import 'future_store.dart';

part 'yolox_store.g.dart';

class YoloxStore = YoloxBase with _$YoloxStore;

class YoloxObject {
  int label = 0;
  double prob = 0;
  Rect rect = Rect.zero;
}

class YoloxResult {
  List<YoloxObject> objects = [];
  Duration detectTime = Duration.zero;
}

abstract class YoloxBase with Store {
  late yo.NcnnYoloxBindings _yolox;

  YoloxBase() {
    final dylib = Platform.isAndroid || Platform.isLinux
        ? DynamicLibrary.open('libncnn_yolox.so')
        : DynamicLibrary.process();

    _yolox = yo.NcnnYoloxBindings(dylib);
  }

  @observable
  FutureStore<YoloxResult> detectFuture = FutureStore<YoloxResult>();

  @action
  Future detect(ImageData data) async {
    try {
      detectFuture.errorMessage = null;

      detectFuture.future = ObservableFuture(_detect(data));

      detectFuture.data = await detectFuture.future;
    } catch (e) {
      detectFuture.errorMessage = e.toString();
    }
  }

  Future<YoloxResult> _detect(ImageData data) async {
    final timebeg = DateTime.now();
    // await Future.delayed(const Duration(seconds: 5));

    final modelPath = await _copyAssetToLocal('assets/yolox_nano_fp16.bin',
        package: 'ncnn_yolox', notCopyIfExist: false);
    final paramPath = await _copyAssetToLocal('assets/yolox_nano_fp16.param',
        package: 'ncnn_yolox', notCopyIfExist: false);
    log.info('yolox modelPath=$modelPath');
    log.info('yolox paramPath=$paramPath');

    final modelPathUtf8 = modelPath.toNativeUtf8();
    final paramPathUtf8 = paramPath.toNativeUtf8();

    final yolox = _yolox.yoloxCreate();
    yolox.ref.model_path = modelPathUtf8.cast();
    yolox.ref.param_path = paramPathUtf8.cast();
    yolox.ref.nms_thresh = 0.45;
    yolox.ref.conf_thresh = 0.45;
    yolox.ref.target_size = 416;
    // yolox.ref.target_size = 640;

    final detectResult = _yolox.detectResultCreate();

    final pixels = data.image.getBytes(order: img.ChannelOrder.bgr);
    // Pass Uint8List to Pointer<Void>
    //  https://github.com/dart-lang/ffi/issues/27
    //  https://github.com/martin-labanic/camera_preview_ffi_image_processing/blob/master/lib/image_worker.dart
    final pixelsPtr = calloc.allocate<Uint8>(pixels.length);
    for (int i = 0; i < pixels.length; i++) {
      pixelsPtr[i] = pixels[i];
    }

    final err = _yolox.detectWithPixels(
        yolox,
        pixelsPtr,
        yo.PixelType.PIXEL_BGR,
        data.image.width,
        data.image.height,
        detectResult);

    final objects = <YoloxObject>[];
    if (err == yo.YOLOX_OK) {
      final num = detectResult.ref.object_num;
      for (int i = 0; i < num; i++) {
        final o = detectResult.ref.object.elementAt(i).ref;
        final obj = YoloxObject();
        obj.label = o.label;
        obj.prob = o.prob;
        obj.rect = Rect.fromLTWH(o.rect.x, o.rect.y, o.rect.w, o.rect.h);
        objects.add(obj);
      }
    }

    calloc
      ..free(pixelsPtr)
      ..free(modelPathUtf8)
      ..free(paramPathUtf8);

    _yolox.detectResultDestroy(detectResult);
    _yolox.yoloxDestroy(yolox);

    final result = YoloxResult();
    result.objects = objects;
    result.detectTime = DateTime.now().difference(timebeg);
    return result;
  }

  // ...
}
最后,于 UI home_page.dart 里使用,
class HomePage extends StatefulWidget {
  const HomePage({super.key, required this.title});

  final String title;

  @override
  State<HomePage> createState() => _HomePageState();
}

class _HomePageState extends State<HomePage> {
  late ImageStore _imageStore;
  late YoloxStore _yoloxStore;
  late OptionStore _optionStore;

  @override
  void didChangeDependencies() {
    _imageStore = Provider.of<ImageStore>(context);
    _yoloxStore = Provider.of<YoloxStore>(context);
    _optionStore = Provider.of<OptionStore>(context);

    _imageStore.load();

    super.didChangeDependencies();
  }

  void _pickImage() async {
    final result = await FilePicker.platform.pickFiles(type: FileType.image);
    if (result == null) return;

    final image = result.files.first;
    _imageStore.load(imagePath: file.path);
  }

  void _detectImage() {
    if (_imageStore.loadFuture.futureState != FutureState.loaded) return;
    _yoloxStore.detect(_imageStore.loadFuture.data!);
  }

  @override
  Widget build(BuildContext context) {
    const pad = 20.0;
    return Scaffold(
      appBar: AppBar(
        backgroundColor: Theme.of(context).colorScheme.inversePrimary,
        title: Text(widget.title),
      ),
      body: Padding(
        padding: const EdgeInsets.all(pad),
        child: Column(
          mainAxisAlignment: MainAxisAlignment.spaceBetween,
          crossAxisAlignment: CrossAxisAlignment.stretch,
          children: [
            // 图片与结果
            Expanded(
                flex: 1,
                child: Observer(builder: (context) {
                  if (_imageStore.loadFuture.futureState ==
                      FutureState.loading) {
                    return const Center(child: CircularProgressIndicator());
                  }

                  if (_imageStore.loadFuture.errorMessage != null) {
                    return Center(
                        child: Text(_imageStore.loadFuture.errorMessage!));
                  }

                  final data = _imageStore.loadFuture.data;
                  if (data == null) {
                    return const Center(child: Text('Image load null :('));
                  }

                  _yoloxStore.detectFuture.reset();

                  return Container(
                    decoration: BoxDecoration(
                        border: Border.all(color: Colors.orangeAccent)),
                    child: DetectResultPage(imageData: data),
                  );
                })),
            const SizedBox(height: pad),
            // 三个按钮:选图、推理、是否显示框
            Row(
              mainAxisAlignment: MainAxisAlignment.center,
              children: [
                Expanded(
                  child: ElevatedButton(
                    child: const Text('Pick image'),
                    onPressed: () => _debounce('_pickImage', _pickImage),
                  ),
                ),
                const SizedBox(width: pad),
                Expanded(
                  child: ElevatedButton(
                    child: const Text('Detect objects'),
                    onPressed: () => _debounce('_detectImage', _detectImage),
                  ),
                ),
                const SizedBox(width: pad),
                Expanded(
                  child: Observer(builder: (context) {
                    return ElevatedButton.icon(
                      icon: Icon(_optionStore.bboxesVisible
                          ? Icons.check_box_outlined
                          : Icons.check_box_outline_blank),
                      label: const Text('Binding boxes'),
                      onPressed: () => _optionStore
                          .setBboxesVisible(!_optionStore.bboxesVisible),
                    );
                  }),
                ),
              ],
            ),
          ],
        ),
      ),
    );
  }
}
适配 Android 工程
Android 构建脚本在 android/build.gradle,也用的 CMake,与 Linux 共享了 src/CMakeLists.txt。不过要把 minSdkVersion 改成 24,以使用 Vulkan。
Vulkan 于 Android 7.0 (Nougat), API level 24 or higher 开始支持,可见 NDK / Get started with Vulkan。
plugins/ncnn_yolox/android/build.gradle 配置:
android {
    defaultConfig {
        minSdkVersion 24
        ndk {
            moduleName "ncnn_yolox"
            abiFilters "armeabi-v7a", "arm64-v8a", "x86", "x86_64"
        }
    }
}
demo_ncnn/android/app/build.gradle 也一样修改 minSdkVersion 为 24。
最后,即可 flutter run 运行。更多可见 Build and release an Android app。
适配 iOS 工程
本文项目未适配 iOS。如何适配 iOS,请见:
Xcode 14 不再支持提交含有 bitcode 的应用,Flutter 3.3.x 之后也移除了 bitcode 的支持,可见 Creating an iOS Bitcode enabled app。


 浙公网安备 33010602011771号