

redission-delay-queue使用及原理
1.引入jar包
<dependency>
    <groupId>xxxx.delay</groupId>
    <artifactId>redisson-delayed-queue</artifactId>
    <version>1.0.0-SNAPSHOT</version>
</dependency>
2.客户端代码开发
2.1:新增实现BaseTask的bean 参数由业务自行决定
public class TestDto extends BaseTask {

    private String aa1 = "aa1";
    private String aa2 = "aa2";;
    private String aa3 = "aa3";;
    private String aa4 = "aa4";;
    private String aa5 = "aa5";;
    private String aa6 = "aa6";;
    private String aa7 = "aa7";;
}
2.2客户端发送延时任务
TestDto testDto = new TestDto();
//todo构建参数
redisDelayQueue.addQueue("test1", testDto, 5, TimeUnit.SECONDS);
3.服务端代码开发 加上@RedisDelayListener注解接收即可(租户已自动传递,无需关心)
@Component
public class TestDelayListener {

    @RedisDelayListener(topic = "test1")
    public void test(TestDto testDto) {
        System.out.println("收到test1的消息"+ JSON.toJSONString(testDto));

    }
}
上面我们知道如何使用,很简单,只需要调用addQueue然后定义接收方法并加上注解就可以进行业务开发了,这里再看下如何实现的。
流程图:https://www.processon.com/v/65af2dfd7fce4a25f8dd239f
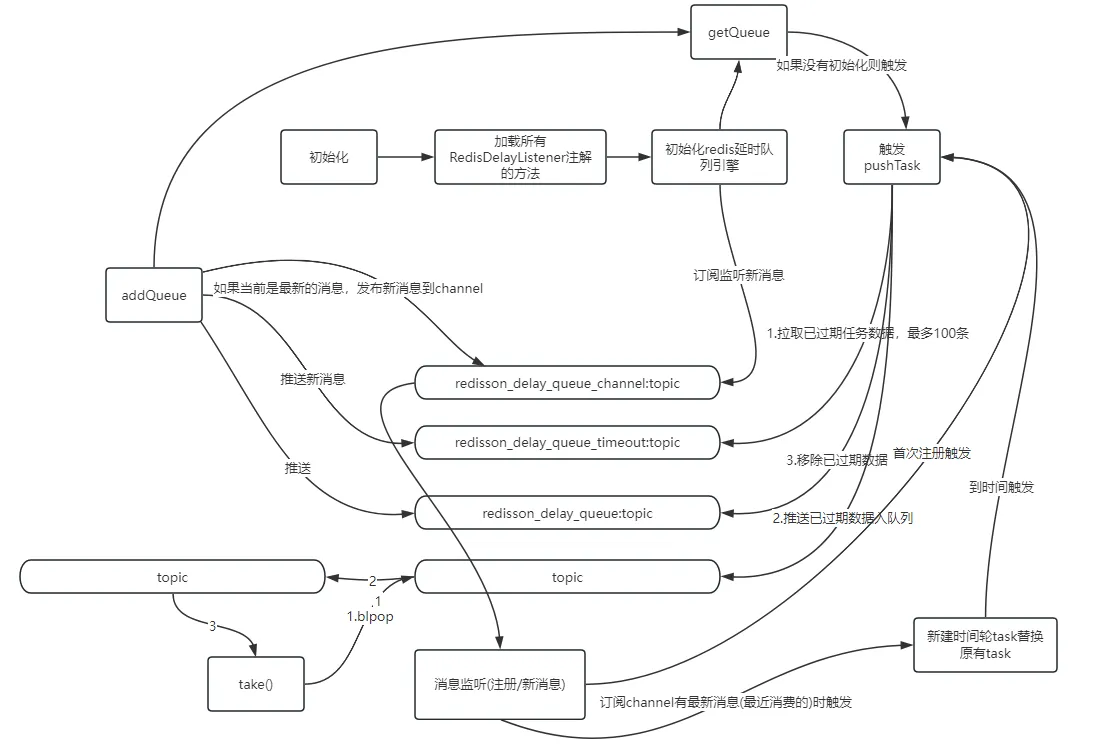
核心实现是对一个channel一个zset两个list的操作。
首先在初始化的时候,我们会加载所有被RedisDelayListener的方法并初始化redis延时队列引擎。代码如下:
public Object postProcessAfterInitialization(Object bean, String beanName) throws BeansException {
    if (!this.nonAnnotatedClasses.contains(bean.getClass())) {
        Class<?> targetClass = AopUtils.getTargetClass(bean);
        Map<Method, Set<RedisDelayListener>> annotatedMethods = MethodIntrospector.selectMethods(targetClass,
                                  (MethodIntrospector.MetadataLookup<Set<RedisDelayListener>>) method -> {
                               Set<RedisDelayListener> listenerMethods = findListenerAnnotations(method);
                                return (!listenerMethods.isEmpty() ? listenerMethods : null);
                             });

        if (annotatedMethods.isEmpty()) {
            this.nonAnnotatedClasses.add(bean.getClass());
            //            log.info("当前class类型:{}无redisDelayListener注解 " + bean.getClass());
        } else {
            for (Method method : annotatedMethods.keySet()) {
                RedisDelayListener customAnnotation = method.getAnnotation(RedisDelayListener.class);
                if (customAnnotation != null) {
                    String topic = customAnnotation.topic();
                    //不允许有重复topic配置
                    int retryTimes = customAnnotation.retryTime();
                    long reTryDelay = customAnnotation.reTryDelay();
                    Class<?> parameterType = method.getParameterTypes()[0];
                    if(!BaseTask.class.isAssignableFrom(parameterType)) {
                        throw new ClassCastException("redis延时任务对象:"+parameterType.getName()+"必须实现BaseTask");
                    }
                    RedisDelayEngine redisDelayEngine = new RedisDelayEngine(redisDelayQueue,
                                                                             topic, method, parameterType);
                    redisDelayEngine.setTryTimes(retryTimes);
                    redisDelayEngine.setReTryDelay(reTryDelay);
                }
            }
        }
    }

    return bean;
}
这里在bean初始化后触发,会校验当前bean是否有redisDelayListener注解,有则初始化RedisDelayEngine:
public RedisDelayEngine(RedisDelayBlockingQueue redisDelayQueue, String topic, Method method, Class<T> classType) {
    this.redisDelayQueue = redisDelayQueue;
    this.topic = topic;
    this.classType = classType;
    this.method = method;
    // 阻塞队列和延时队列初始化
    redisDelayQueue.getDelayQueue(topic);
    //启动延时线程
    ThreadPools.getInstance().execute(new DelayThread());
}
这里会触发阻塞队列和延时队列初始化,然后启动消费消息的任务,先看队列初始化:
RDelayedQueue<String> getDelayQueue(String queueName) {
    return delayedQueueMap.computeIfAbsent(queueName, k -> {
        RBlockingQueue<String> blockingQueue = blockingQueueMap.computeIfAbsent(queueName,
                t -> redissonClient.getBlockingQueue(queueName));
        return redissonClient.getDelayedQueue(blockingQueue);
    });
}
public <V> RDelayedQueue<V> getDelayedQueue(RQueue<V> destinationQueue) {
    if (destinationQueue == null) {
        throw new NullPointerException();
    } else {
        return new RedissonDelayedQueue(this.queueTransferService, destinationQueue.getCodec(), this.commandExecutor, destinationQueue.getName());
    }
}
protected RedissonDelayedQueue(QueueTransferService queueTransferService, Codec codec, final CommandAsyncExecutor commandExecutor, String name) {
    super(codec, commandExecutor, name);
    //延时队列核心代码
    QueueTransferTask task = new QueueTransferTask(commandExecutor.getConnectionManager()) {
        protected RFuture<Long> pushTaskAsync() {
                return commandExecutor.evalWriteAsync(getRawName(), LongCodec.INSTANCE, RedisCommands.EVAL_LONG,
                        "local expiredValues = redis.call('zrangebyscore', KEYS[2], 0, ARGV[1], 'limit', 0, ARGV[2]); "//拿到zset中过期的值列表
                      + "if #expiredValues > 0 then " //如果有
                          + "for i, v in ipairs(expiredValues) do "
                              + "local randomId, value = struct.unpack('dLc0', v);"//解构消息,在提交任务时打包的消息
                              + "redis.call('rpush', KEYS[1], value);" //放入无前缀的list 队头
                              + "redis.call('lrem', KEYS[3], 1, v);"//移除带前缀list 队尾元素
                          + "end; "
                          + "redis.call('zrem', KEYS[2], unpack(expiredValues));" //移除zset中本次读取的过期元素
                      + "end; "
                        // get startTime from scheduler queue head task
                      + "local v = redis.call('zrange', KEYS[2], 0, 0, 'WITHSCORES'); "//取zset最小分值的元素
                      + "if v[1] ~= nil then "
                         + "return v[2]; " //返回分值,即过期时间
                      + "end "
                      + "return nil;",
                      Arrays.asList(getRawName(), timeoutSetName, queueName),
                      System.currentTimeMillis(), 100);
            }


        protected RTopic getTopic() {
            return new RedissonTopic(LongCodec.INSTANCE, commandExecutor, RedissonDelayedQueue.this.channelName);
        }
    };
    queueTransferService.schedule(this.queueName, task);
    this.queueTransferService = queueTransferService;
}
这里主要看下RedissonDelayedQueue初始化部分,主要新建了一个task,这个task即上图中的pushTask,是redission实现延时队列的核心部分,task提供了两个方法pushTaskAsync和getTopic,getTopic方法很简单,只是新建了一个topic名称为redisson_delay_queue_channel的对象,这个下面会用到,主要先看下pushTaskAsync的lua脚本做了什么:
1.拿到zset(redisson_delay_queue_timeout)中的已过期的值(通过score大小筛选,最多前100条)
2.如果本次有已过期的任务则遍历放入无前缀的list中(无前缀的list即是我们后面获取任务的来源),并从有前缀的list中删除
3.从zset中删除查询出的任务
4.如果zset中还有任务,则返回该任务的过期时间(本地需要这个新建定时任务,到期继续触发这个流程)
再看schedule方法:
public synchronized void schedule(String name, QueueTransferTask task) {
    QueueTransferTask oldTask = tasks.putIfAbsent(name, task);
    if (oldTask == null) {
        task.start();
    } else {
        oldTask.incUsage();
    }
}
public void start() {
    RTopic schedulerTopic = getTopic();
    statusListenerId = schedulerTopic.addListener(new BaseStatusListener() {
        @Override
        public void onSubscribe(String channel) {
            pushTask();
        }
    });

    messageListenerId = schedulerTopic.addListener(Long.class, new MessageListener<Long>() {
        @Override
        public void onMessage(CharSequence channel, Long startTime) {
            scheduleTask(startTime);
        }
    });
}
上面的getTopic方法即调用之前任务定义的getTopic(就是上面那个channel)
这里注册监听onSubScribe(订阅时触发)onMessage(新消息时触发)
看pushTask:
private void pushTask() {
    RFuture<Long> startTimeFuture = pushTaskAsync();
    startTimeFuture.whenComplete((res, e) -> {
        if (e != null) {
            if (e instanceof RedissonShutdownException) {
                return;
            }
            log.error(e.getMessage(), e);
            scheduleTask(System.currentTimeMillis() + 5 * 1000L);
            return;
        }

        if (res != null) {
            scheduleTask(res);
        }
    });
}
这里首先会调用pushTaskAsync方法,其实就是上面说的lua脚本触发的地方
前面说到,如果还有新的延时任务,会返回最新的一条的到期时间,
然后调用scheduleTask方法:
private void scheduleTask(final Long startTime) {
    TimeoutTask oldTimeout = lastTimeout.get();
    if (startTime == null) {
        return;
    }

    if (oldTimeout != null) {
        oldTimeout.getTask().cancel();
    }

    long delay = startTime - System.currentTimeMillis();
    if (delay > 10) {
        Timeout timeout = connectionManager.newTimeout(new TimerTask() {
            @Override
            public void run(Timeout timeout) throws Exception {
                pushTask();

                TimeoutTask currentTimeout = lastTimeout.get();
                if (currentTimeout.getTask() == timeout) {
                    lastTimeout.compareAndSet(currentTimeout, null);
                }
            }
        }, delay, TimeUnit.MILLISECONDS);
        if (!lastTimeout.compareAndSet(oldTimeout, new TimeoutTask(startTime, timeout))) {
            timeout.cancel();
        }
    } else {
        pushTask();
    }
}
如果没到期的任务都会走到这里,如果有老任务会先取消掉(新的一定是比老的先到期),然后新建一个定时任务,放到时间轮里面,到期会触发pushTask,然后继续触发执行上面的lua脚本。
上面这些就是队列的初始化部分,接下来再看启动消费消息的任务:
public class DelayThread implements Runnable {

    @Override
    public void run() {
        try {
            RBlockingQueue<String> blockingFairQueue = redisDelayQueue.getBlockingQueue(topic);
            String data = null;
            while (true) {
                try {
                    log.info("延时处理获取队列queueName:{}", topic);
                    data = blockingFairQueue.take();
                } catch (InterruptedException e) {
                    log.error("延时处理获取队列元素异常,队列:{}", topic, e);
                    Thread.currentThread().interrupt();
                }

                if(StringUtils.isNotEmpty(data))  {
                    T t = JSON.parseObject(data, classType);
                    if(t == null) {
                        log.error("延时队列元素json解析异常:{}", data);
                        continue;
                    }
                    try {
                        log.info("触发队列:{},任务:{}", topic, t.taskIdentity());
                        Object beanInstance = SpringContextUtil.getBean(method.getDeclaringClass());
                        TenantContext.set(t.getTenantId());
                        method.invoke(beanInstance, t);
                    } catch (Exception exception) {
                        log.error("延时处理元素{}:{}异常", topic, t, exception);
                        errorHandler(t);
                    } finally {
                        TenantContext.clear();
                    }
                }
            }
        } catch (Throwable throwable) {
            log.error("延时处理线程错误", throwable);
        }
    }
}这里主要是消费消息,流程很简单,每个topic都会在服务端新建一个阻塞队列副本,调用blockingFairQueue.take()阻塞获取任务,当上面的task查到已过期的数据时,则会存入阻塞队列副本,队列有数据则take方法会被唤醒,然后反射调用topic对应的方法(注意:topic对应的方法参数格式必须要可以反序列化成功,否则延时任务会退出)
上面是初始化时的主要流程,接下来看addQueue时的代码:
public <T> void addQueue(String queueName, T t, long delay, TimeUnit timeUnit) {
    if (t != null) {
        RDelayedQueue<String> delayedQueue = this.getDelayQueue(queueName);
        log.info("任务入队列,延时时间:{}({}), queueName:{}, task:{}", new Object[]{delay, timeUnit.name(), queueName, JSON.toJSONString(t)});
        delayedQueue.offer(JSON.toJSONString(t), delay, timeUnit);
    }
}
这里也会触发队列的初始化流程getDelayQueue,主要看下offer方法:
public void offer(V e, long delay, TimeUnit timeUnit) {
    get(offerAsync(e, delay, timeUnit));
}
public RFuture<Void> offerAsync(V e, long delay, TimeUnit timeUnit) {
if (delay < 0) {
throw new IllegalArgumentException("Delay can't be negative");
}
long delayInMs = timeUnit.toMillis(delay);
long timeout = System.currentTimeMillis() + delayInMs;
long randomId = ThreadLocalRandom.current().nextLong();
return commandExecutor.evalWriteNoRetryAsync(getRawName(), codec, RedisCommands.EVAL_VOID,
"local value = struct.pack('dLc0', tonumber(ARGV[2]), string.len(ARGV[3]), ARGV[3]);" //打包消息体:消息id,消息长度,消息值
+ "redis.call('zadd', KEYS[2], ARGV[1], value);"//zset中加入消息及其超时分值
+ "redis.call('rpush', KEYS[3], value);" //向带前缀的list中添加消息
// if new object added to queue head when publish its startTime
// to all scheduler workers
+ "local v = redis.call('zrange', KEYS[2], 0, 0); "//取出zset中第一个元素
+ "if v[1] == value then " //如果最快过期的元素就是这次发送的消息
+ "redis.call('publish', KEYS[4], ARGV[1]); " //channel中发布一下超时时间
+ "end;",
Arrays.asList(getRawName(), timeoutSetName, queueName, channelName),
timeout, randomId, encode(e));
}看下lua脚本做了什么:
1.zset和带前缀的list重添加消息
2.取出zset最新一条的任务数据
3.校验如果最新一条就是当前自己新增的这一条,channel重发布消息(发布后上面的listener就会接收到新消息通知,最后都会执行pushTask流程)
再看下服务端怎么消费的,即上面的blockingFairQueue.take()
take方法会调用org.redisson.RedissonBlockingQueue#take:
public V take() throws InterruptedException {
	return commandExecutor.getInterrupted(takeAsync());
}
public RFuture<V> takeAsync() {
return commandExecutor.writeAsync(getRawName(), codec, RedisCommands.BLPOP_VALUE, getRawName(), 0);
}往下跟会走到org.redisson.command.RedisExecutor#sendCommand
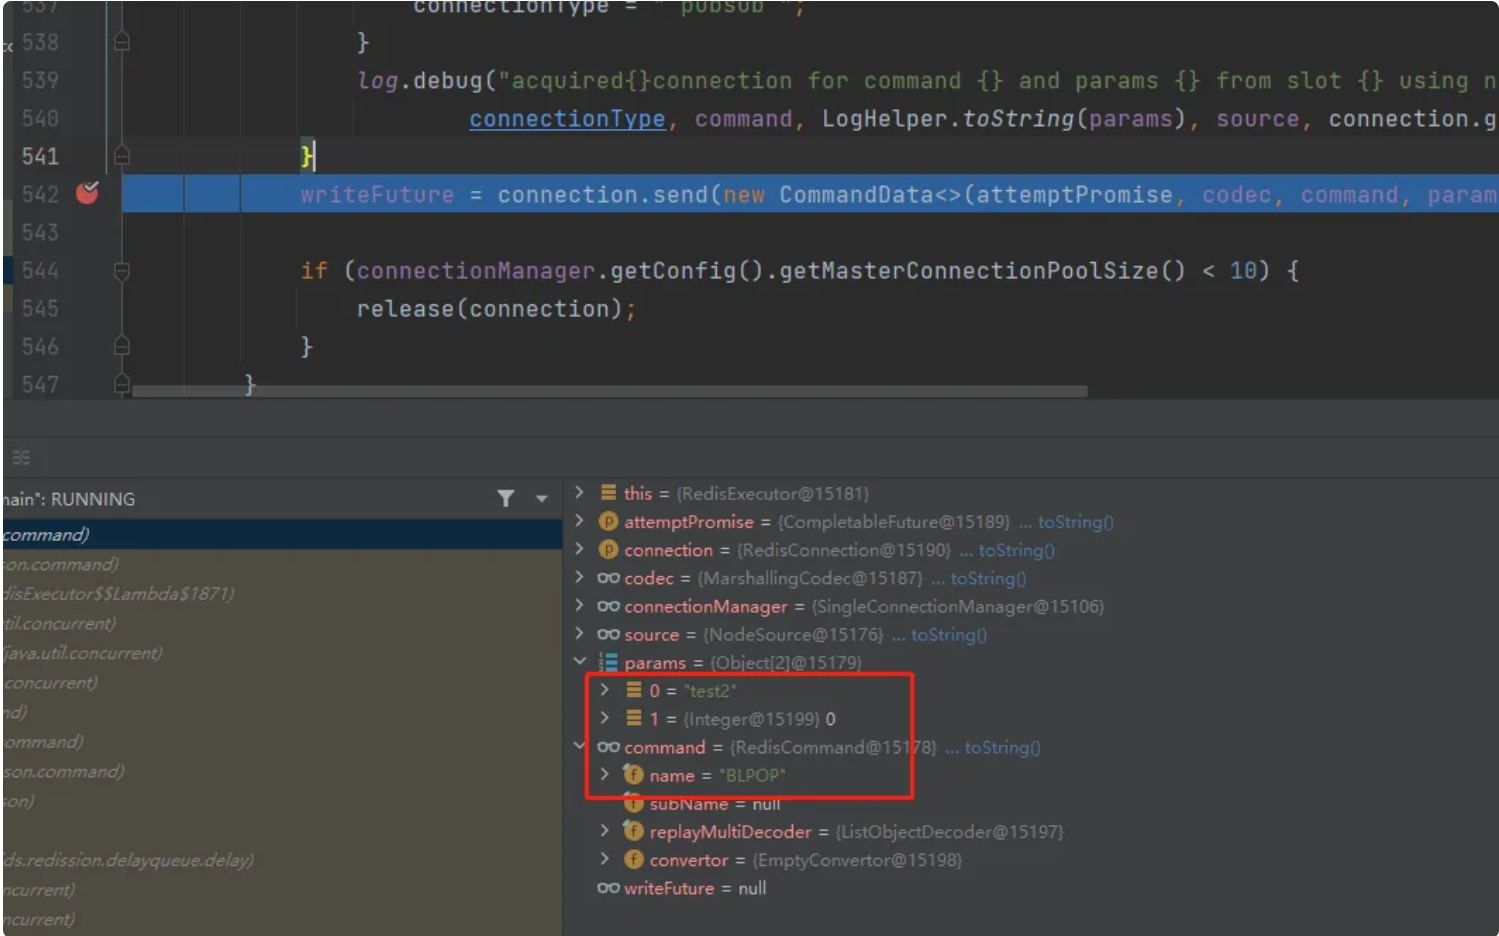
最终会发现其实调用的就是blpop key 0命令 无限阻塞式获取无前缀列表的任务数据,我们每次任务到期后都会推送到无前缀列表中,本地服务端就在这里pop出来,消费数据。
关于选型:
做之前我调研了一下市面上java常用的延时队列,单机实现直接pass, rocketMq等大部分第三方消息中间件公司不想部署机器且kafka实现起来较为复杂,剩下的实现要么基于redis,要么基于数据库,基于数据库实现的比较好的则是quartz,优点在于功能齐全,由于数据库的限制且所有逻辑都基于代码实现,在数据量较大时性能较差,而其很多强大的功能对于当前业务场景没必要,因此选择了较为轻量的redission实现。
redission实现的延时队列优点在于轻量化,其功能多基于redis的zset的数据结构特性以及其支持的发布订阅模式支持,而且能够将更多的压力转移到redis上,但其也有局限性,比如发布订阅没有ack无法保证消息不丢失等,但也可以通过在业务中尽量规避,减少业务处理的时间,比如消费完后推kafka, 虽然延时时间的精确度会降低,但对于当前业务来说相对更为合适,而且考虑到当前需求在较长一段时间内也不会做质的变更,即便有些变动稍加改造也能够满足一些稍复杂的场景,基本可以满足当前需求。
