火焰图是怎么画出来的?Pyroscope源码解析之火焰图
火焰图简述
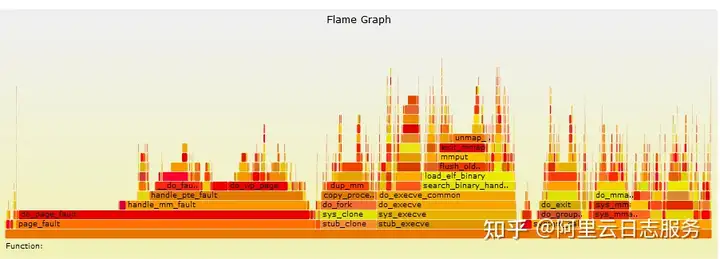
火焰图(Flame Graph) 由Brendan Gregg在2011年创造,是一种可视化程序性能分析工具,它可以帮助开发人员追踪程序的函数调用以及调用所占用的时间,并且展示出这些信息。

一般性解释
火焰图的基本思想是将程序的函数调用栈转化为一个矩形的 “火焰” 形图像,每个矩形的宽度表示该函数所占用的比例,高度表示函数的调用深度(也就是递归调用的层数)。通过比较不同时间点的火焰图,可以快速诊断程序的性能瓶颈所在,从而针对性地进行优化。通常情况下,如果遇到栈顶上存在很宽的矩形,那么这个函数就是性能瓶颈,需要重点分析优化。
火焰图(广义)分为两种画法,包括火焰图(狭义)、冰柱图。火焰图(狭义)的根位于底部,子节点显示在其父节点上方,而冰柱图的根位于顶部,子节点显示在其父节点下方。两种画法仅仅是展现方式和叫法不同,通常也统称为火焰图(广义)。
火焰图类型
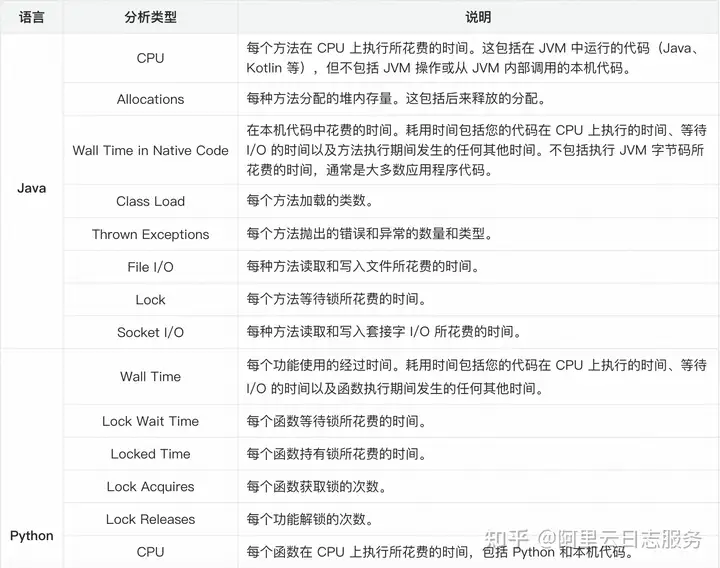
根据创始人Gregg给出的类型,常见的火焰图类型有5种,CPU、Off-CPU、Memory、Hot/Cold、Differential。
| 类型 | 横轴 | 纵轴 | 解决的问题 | 采样方式 |
| CPU | CPU 占用时间 | 调用栈 | 找出CPU占用高的问题函数,分析代码热路径 | 固定频率采样CPU调用栈 |
| Off-CPU | 阻塞时间 | 调用栈 | i/o、网络等阻塞场景导致的性能下降;锁竞争、死锁导致的性能下降问题 | 固定频率采样阻塞事件调用栈 |
| Memory | 内存申请/释放函数调用次数,或分配的总字节数 | 调用栈 | 内存泄漏问题、内存占用高的对象/申请内存多的函数、虚拟内存或物理内存泄漏问题 | 跟踪malloc/free、跟踪brk、跟踪mmap、跟踪页错误 |
| Hot/Cold | CPU和Off-CPU结合 | 调用栈 | 需要结合CPU占用以及阻塞分析的场景、Off-CPU无法直观判断问题的场景 | CPU和Off-CPU结合 |
| Differential | 前后火焰图之间的差异 | 调用栈 | 性能回归问题、调优效果分析 | 与前后火焰图一致 |
关于On-CPU与Off-CPU


CPU火焰图展现的是在CPU上发生的事情,为下图中的红色部分。Off-CPU火焰图展现的是在CPU之外发生的事情,也就是在 I/O、锁、定时器、分页/交换等阻塞时等待的时间,在下图中用蓝色展示。
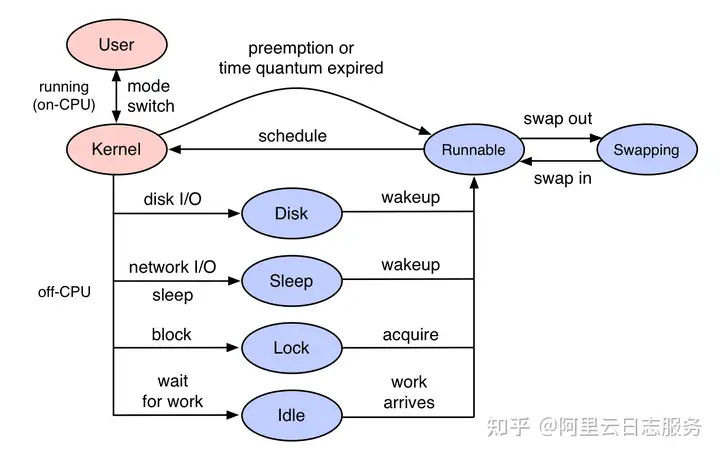
I/O期间有File I/O、Block Device I/O,通过采集进程让出CPU时调用栈,可以知道哪些函数正在频繁地等待其它事件,以至于需要让出CPU,通过采集进程被唤醒时的调用栈,可以知道哪些函数让进程等待的时间比较长。

关于冷热火焰图(Hot/Cold)与差异火焰图(Differential)
二者都有“对比”的意味,但是维度不一样。
冷热火焰图主要比较的是一次性能分析的On-CPU与Off-CPU。如果使用原生火焰图套件,只能缩放到相同的 x 轴,通常相对较大的 Off-CPU 时间会挤压 On-CPU 时间。Vladimir Kirillov 将阻塞数据与 CPU 配置文件集成,将阻塞调用包含在eflame中,实现了合并祖先,使得阻塞函数在暖色堆栈顶部显示为蓝色。

差异火焰图主要比较的是两次性能分析的差异。通过第一次性能分析的火焰度了解了程序运行期间的情况以后,接下来是有针对性地修改调优。 调整之后,进行第二次性能分析生成火焰图,通过对比调优前和调优后的火焰图,评估调整是否有效。
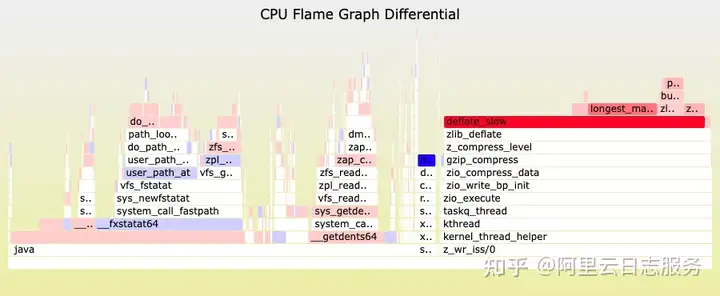
有时候可能发现系统升级之后,某些指标突然升高,这时候也可以对比升级前和升级后的火焰图,找到那些耗时增加的函数。
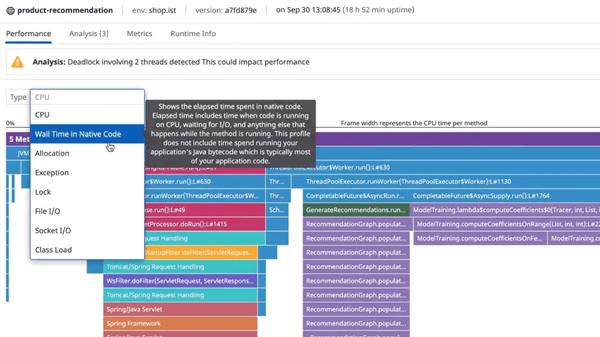
火焰图在Continuous Profiling中的应用
Continuous Profiling是一种持续性能分析技术,它从任何环境(包括生产环境)连续收集代码行级别性能数据。之后提供数据的可视化,使开发人员可以分析、排除故障和优化他们的代码。
与传统的静态分析技术不同,Continuous Profiling可以在实际运行环境下获取性能数据,并且不会对应用程序的性能产生显著的影响。这使得它可以更加准确地分析应用程序的性能问题,并且可以在实际部署环境中进行性能优化和调试。开发人员可以为生产环境实施持续集成和部署。然后,生产反馈到Continuous Profiler,这是一个反馈回路,为开发人员提供剖析数据的回馈。
更多类型可能
从实现角度而言,火焰图是一种“栈-值”数据结构的图,只要满足该数据结构的数据,都可以转化为火焰图的展示方式。创始人Gregg给出的CPU、Off-CPU、Memory类型,被赋予了更多的想象空间,以Pyroscope为例,由Pyroscope Server 和 Pyroscope Agent 两部分组成,Agent记录并聚合应用程序执行动作,发送到Server,Server 处理、聚合和存储来自 Agent 的数据,以便在按照时间范围进行快速查询。因此可以针对于不同语言设计不同的Agent,进行更细致的性能监控。
以针对于不同语言设计不同的Agent,进行更细致的性能监控。

火焰图相关开源仓库
火焰图相关开源仓库
- 火焰图创始人 Brendan Gregg 提供了关于火焰图的本人git仓库:https://github.com/brendangregg/FlameGraph
- 创始人的同事,在Netflix performance engineering 团队工作的Martin Spier,根据d3.js框架创建了 d3-flame-graph:https://github.com/spiermar/d3-flame-graph
- flamebearer,一个用于 Node 和 V8 的快速火焰图工具。旨在生成快速、轻量级的火焰图,即使在非常大的输入下也能保持响应,Pyroscope也是基于flamebearer继续开发的:https://github.com/mapbox/flamebearer
- react版本火焰图实现 react-flame-graph:https://github.com/bvaughn/react-flame-graph
- Clinic.js 关于火焰图的实现:https://github.com/clinicjs/node-clinic-flame
- Pyroscope 项目中关于火焰图部分的代码:https://github.com/pyroscope-io/pyroscope/tree/main/packages/pyroscope-flamegraph
Pyroscope源码解析之火焰图
本文所述Pyroscope相关源码的版本为v0.35.1。源码分析主要聚焦火焰图部分(/packages/pyroscope-flamegraph),以及模型定义部分(/packages/pyroscope-models),采集侧暂不涉及。
代码结构
pyroscope-flamegraph
--- src
 |--- convert                            ->  一些工具、转换方法,包含diff两个Profile,flamebearer转换为树的方法等
 |--- fitMode                            ->  火焰图搭配的Table每一行的行内排序模式,分为Head First和Tail First两种
 |--- FlameGraph                         ->  火焰图主要文件夹
 | |--- FlameGraphComponent              ->  火焰图组件主要文件夹
 | | |--- ...
 | | |--- color.ts                       ->  火焰图配色哈希策略以及Diff线性渐变配色逻辑
 | | |--- colorPalette.ts                ->  火焰图配色调色盘
 | | |--- constants.ts                   ->  火焰图canvas显示全局配置,比如每一个bar的宽度、之间的间距等
 | | |--- ContextMenu.tsx                ->  右键火焰图弹出的Menu组件
 | | |--- ContextMenuHighlight.tsx       ->  为火焰图中被右键点中(呼出ContextMenu)的bar提供高亮效果
 | | |--- DiffLegend.tsx                 ->  火焰图Diff的调色盘配置(默认和色盲模式)中间的色条组件
 | | |--- DiffLegendPaletteDropdown.tsx  ->  火焰图Diff的调色盘配置的下拉框组件
 | | |--- Flamegraph_render.ts           ->  火焰图核心绘图渲染代码,基于flamebarear,包含canvas的绘图逻辑、聚焦逻辑(zoom)、折叠逻辑(collapse)、高亮联动逻辑
 | | |--- Flamegraph.ts                  ->  火焰图核心类,驱动Flamegraph_render,并且包含所有的组件操作逻辑实现,适配flamebarear数据结构在调用Stack中的二分搜索(xyToBarIndex),实现了与canvas配合紧密的数据可控组件
 | | |--- Header.tsx                     ->  火焰图标题组件,主要是根据unit换title,如果是Diff则展示DiffLegendPaletteDropdown
 | | |--- Highlight.tsx                  ->  火焰图高亮润色,为canvas设置EventListener监听鼠标事件并添加/移除火焰图bar高亮
 | | |--- index.tsx                      ->  火焰图入口组件,将其他相关组件接入(ContextMenu、Tooltip、Header等),封装调用Flamegraph的xyToData逻辑,传给其他子组件
 | | |--- LogoLink.tsx                   ->  Pyroscope的svg logo组件
 | | |--- murmur3.ts                     ->  MurmurHash3 哈希算法,可以将任意长度的数据映射为固定长度的哈希值,用于火焰图中相似调用栈层的相近颜色显示
 | | |--- testData.ts                    ->  火焰图样例数据格式,包含SimpleTree、ComplexTree、DiffTree
 | | |--- utils.ts                       ->  计算Diff时的两部分占比比率的辅助方法
 | | |--- viewTypes.ts                   ->  火焰图的显示模式,包含'flamegraph' | 'both' | 'table' | 'sandwich'
 | |--- decode.ts                        ->  在火焰图挂载/改变/covert的时候执行其中的decode方法,将原始数据结构的level进行二次运算
 | |--- FlameGraphRenderer.tsx           ->  火焰图全功能的入口,包含Toolbar、3种形态(表格、火焰图、三明治)
 |--- format                             ->  单位格式化工具文件夹
 | |--- format.ts                        ->  不同unit的Formatter也不一样,大致分为Duration、Objects、Bytes、Nanoseconds这几种Formatter,在Tooltip和表格中会用到
 |--- Tooltip                            ->  hover时出现的框
 | |--- ...
 | |--- FlamegraphTooltip.tsx            ->  用于火焰图的Tooltip组件,通过xyToData获取bar数据,并通过Formatter展示
 | |--- TableTooltip.tsx                 ->  用于表格的Tooltip组件,通过表格的数据回调方法获取数据,并通过Formatter展示
 | |--- Tooltip.tsx                      ->  Tooltip组件具体实现,通过baselineDataExpression判断hover类型是火焰图还是表格
 |--- FlamegraphRenderer.tsx             ->  FlameGraph/FlameGraphRenderer.tsx的包装
 |--- index.tsx                          ->  暴露Flamegraph等组件
 |--- ProfilerTable.tsx                  ->  火焰图表格的实现,包括singleRow和DoubleRow(Diff视图)的两种展现
 |--- search.ts                          ->  搜索工具类,判断bar名称是否和搜索内容一致
 |--- SharedQueryInput.tsx               ->  搜索框功能实现
 |--- Toolbar.tsx                        ->  火焰图控制bar的实现,可以切换视图和排序等
pyroscope-models
--- src
 |--- decode.ts        ->  TODO:理想情况下,这应该被移动到 FlamegraphRenderer 组件中,但是因为现在它需要太多的改变
 |--- flamebearer.ts   ->  老版本的火焰图数据结构
 |--- groups.ts        ->  火焰图主要文件夹
 |--- index.ts         ->  暴露索引文件
 |--- profile.ts       ->  新版本的火焰图数据结构(实际上本质是一样的,新版本用zod驱动)
 |--- spyName.ts       ->  不同语言的spy的相关常量与数据结构定义
 |--- trace.ts         ->  Trace相关的Schema定义
 |--- units.ts         ->  unit相关常量与数据结构定义
火焰图数据结构
Single Format
const SimpleTree = {
  version: 1,
  flamebearer: {
    names: [
      'total',
      'runtime.mcall',
      'runtime.park_m',
      'runtime.schedule',
      'runtime.resetspinning',
      'runtime.wakep',
      'runtime.startm',
      'runtime.notewakeup',
      'runtime.semawakeup',
      'runtime.pthread_cond_signal',
      'runtime.findrunnable',
      'runtime.netpoll',
      'runtime.kevent',
      'runtime.main',
      'main.main',
      'github.com/pyroscope-io/client/pyroscope.TagWrapper',
      'runtime/pprof.Do',
      'github.com/pyroscope-io/client/pyroscope.TagWrapper.func1',
      'main.main.func1',
      'main.slowFunction',
      'main.slowFunction.func1',
      'main.work',
      'runtime.asyncPreempt',
      'main.fastFunction',
      'main.fastFunction.func1',
    ],
    levels: [
      [0, 609, 0, 0],
      [0, 606, 0, 13, 0, 3, 0, 1],
      [0, 606, 0, 14, 0, 3, 0, 2],
      [0, 606, 0, 15, 0, 3, 0, 3],
      [0, 606, 0, 16, 0, 1, 0, 10, 0, 2, 0, 4],
      [0, 606, 0, 17, 0, 1, 0, 11, 0, 2, 0, 5],
      [0, 606, 0, 18, 0, 1, 1, 12, 0, 2, 0, 6],
      [0, 100, 0, 23, 0, 506, 0, 19, 1, 2, 0, 7],
      [0, 100, 0, 15, 0, 506, 0, 16, 1, 2, 0, 8],
      [0, 100, 0, 16, 0, 506, 0, 20, 1, 2, 2, 9],
      [0, 100, 0, 17, 0, 506, 493, 21],
      [0, 100, 0, 24, 493, 13, 13, 22],
      [0, 100, 97, 21],
      [97, 3, 3, 22],
    ],
    numTicks: 609,
    maxSelf: 493,
  },
  metadata: {
    appName: 'simple.golang.app.cpu',
    name: 'simple.golang.app.cpu 2022-09-06T12:16:31Z',
    startTime: 1662466591,
    endTime: 1662470191,
    query: 'simple.golang.app.cpu{}',
    maxNodes: 1024,
    format: 'single' as const,
    sampleRate: 100,
    spyName: 'gospy' as const,
    units: 'samples' as const,
  }
};
该数据结构是在pyroscope github上面的示例数据,也就是传入火焰图组件的数据结构,示例渲染出来的效果如下:
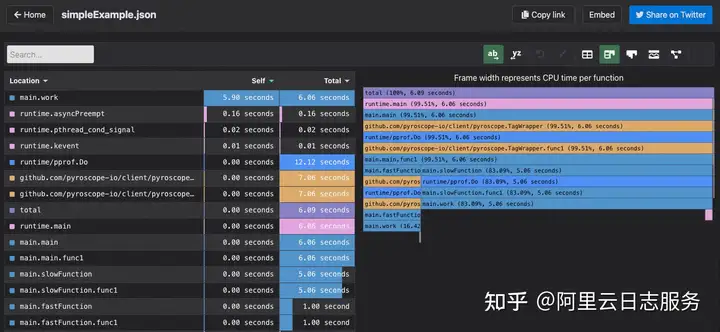
数据中大部分内容比较好理解,根据命名就可以判断,比较关键的是names和levels代表什么意思。这一部分可以在源码中models/flamebearer.ts里推断出来。

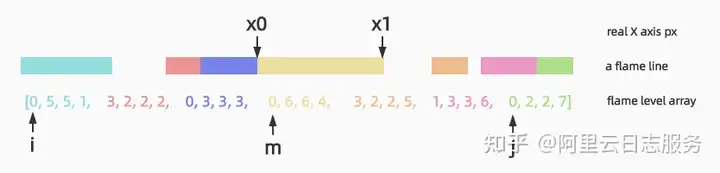
levels是火焰图形状的数据结构,是一个二维数组,每一行对应火焰图中的每一行,在每一行中,Single类型火焰图4个数描述了一条bar,例如第一行是1个bar,第二行有2个bar。在描述bar的4个数字中,第一列代表offset,这个数代表了在当前行中,距离上一个bar需要空出来的距离;第二列代表这个bar的总长度;第三列代表这个bar的自身独占(self)长度,意思是除去该bar所有子调用栈之后,自身所占用的部分(可能多段)长度总和。第四列代表该bar上面的名称对应上方name数组的index是哪个。

Diff Format
Diff格式的火焰图和Single格式的类似,但是由一组4个,变成了一组7个数值。一组示例levels如下:
"levels": [
  [0, 20464695, 0, 0, 22639351, 0, 0],
  [
    0, 1573488, 0, 0, 0, 0, 1, 0, 524336, 0, 0, 524336, 0, 2, 0, 1049728, 0,
    0, 524864, 0, 3, 0, 3149185, 0, 0, 3674049, 0, 4, 0, 13643094, 0, 0,
    17391238, 0, 5, 0, 524864, 0, 0, 524864, 0, 6
  ],
  [
    0, 1573488, 0, 0, 0, 0, 7, 0, 524336, 524336, 0, 524336, 524336, 8, 0,
    1049728, 0, 0, 524864, 0, 9, 0, 3149185, 0, 0, 3674049, 0, 10, 0,
    13643094, 0, 0, 17391238, 0, 11, 0, 524864, 0, 0, 524864, 0, 12
  ],
  [
    0, 1573488, 0, 0, 0, 0, 13, 524336, 1049728, 0, 524336, 524864, 0, 14,
    0, 3149185, 0, 0, 3674049, 0, 15, 0, 524361, 524361, 0, 524360, 524360,
    16, 0, 2146687, 0, 0, 5366719, 0, 17, 0, 528394, 528394, 0, 528394,
    528394, 18, 0, 0, 0, 0, 524292, 0, 19, 0, 9387757, 0, 0, 9397105, 0, 20,
    0, 525440, 0, 0, 525440, 0, 21, 0, 0, 0, 0, 524928, 0, 22, 0, 530455, 0,
    0, 0, 0, 23, 0, 524864, 0, 0, 524864, 0, 24
  ],
  [
    0, 1573488, 1573488, 0, 0, 0, 25, 524336, 1049728, 0, 524336, 524864, 0,
    26, 0, 3149185, 0, 0, 3674049, 0, 14, 524361, 2146687, 0, 524360,
    5366719, 0, 27, 528394, 0, 0, 528394, 524292, 0, 28, 0, 9387757, 695248,
    0, 9397105, 695248, 29, 0, 525440, 0, 0, 525440, 0, 30, 0, 0, 0, 0,
    524928, 0, 31, 0, 530455, 0, 0, 0, 0, 32, 0, 524864, 0, 0, 524864, 0, 33
  ],
  [
    2097824, 1049728, 0, 524336, 524864, 0, 34, 0, 3149185, 0, 0, 3674049,
    0, 26, 524361, 2146687, 0, 524360, 5366719, 0, 35, 528394, 0, 0, 528394,
    524292, 0, 36, 695248, 8692509, 789507, 695248, 8701857, 526338, 37, 0,
    525440, 0, 0, 525440, 0, 38, 0, 0, 0, 0, 524928, 0, 39, 0, 530455, 0, 0,
    0, 0, 40, 0, 524864, 0, 0, 524864, 0, 14
  ],
  [
    2097824, 1049728, 0, 524336, 524864, 0, 41, 0, 3149185, 0, 0, 3674049,
    0, 34, 524361, 2146687, 0, 524360, 5366719, 0, 42, 528394, 0, 0, 528394,
    524292, 0, 43, 1484755, 7903001, 7903001, 1221586, 8175519, 8175519, 44,
    0, 525440, 525440, 0, 525440, 525440, 45, 0, 0, 0, 0, 524928, 0, 46, 0,
    530455, 0, 0, 0, 0, 47, 0, 524864, 0, 0, 524864, 0, 48
  ],
  [
    2097824, 1049728, 0, 524336, 524864, 0, 49, 0, 3149185, 0, 0, 3674049,
    0, 41, 524361, 2146687, 0, 524360, 5366719, 0, 50, 528394, 0, 0, 528394,
    524292, 0, 51, 9913197, 0, 0, 9922545, 524928, 0, 52, 0, 530455, 0, 0,
    0, 0, 53, 0, 524864, 0, 0, 524864, 0, 54
  ],
  [
    2097824, 1049728, 1049728, 524336, 524864, 524864, 55, 0, 3149185, 0, 0,
    3674049, 0, 49, 524361, 2146687, 2146687, 524360, 5366719, 5366719, 56,
    528394, 0, 0, 528394, 524292, 524292, 57, 9913197, 0, 0, 9922545,
    524928, 0, 58, 0, 530455, 530455, 0, 0, 0, 59, 0, 524864, 0, 0, 524864,
    0, 41
  ],
  [
    3147552, 3149185, 3149185, 1049200, 3674049, 3674049, 55, 13112639, 0,
    0, 16866310, 524928, 0, 60, 530455, 524864, 0, 0, 524864, 0, 49
  ],
  [
    19409376, 0, 0, 21589559, 524928, 524928, 61, 530455, 524864, 524864, 0,
    524864, 524864, 55
  ]
]
一组内7个数值具体含义为:
| 第几位数 | 含义 | 组合计算 |
| 0 | leftOffset | barOffset = level[0] + level[3]barTotal = level[1] + level[4]barTotalDiff = level[4] - level[1]barSelf = level[2] + level[5]barSelfDiff = level[5] - level[2] |
| 1 | barLeftTotal | |
| 2 | leftSelf | |
| 3 | rightOffset | |
| 4 | barRightTotal | |
| 5 | rightSelf | |
| 6 | name_index |
相关源码
export type Flamebearer = {
  /**
   * List of names
   */
  names: string[];
  /**
   * List of level
   *
   * This is NOT the same as in the flamebearer
   * that we receive from the server.
   * As in there are some transformations required
   * (see deltaDiffWrapper)
   */
  levels: number[][];
  numTicks: number;
  maxSelf: number;

  /**
   * Sample Rate, used in text information
   */
  sampleRate: number;
  units: Units;

  spyName: SpyName;
  // format: 'double' | 'single';
  //  leftTicks?: number;
  //  rightTicks?: number;
} & addTicks;

export type addTicks =
  | { format: 'double'; leftTicks: number; rightTicks: number }
  | { format: 'single' };

export const singleFF = {
  format: 'single' as const,
  jStep: 4,
  jName: 3,
  getBarOffset: (level: number[], j: number) => level[j],
  getBarTotal: (level: number[], j: number) => level[j + 1],
  getBarTotalDiff: (level: number[], j: number) => 0,
  getBarSelf: (level: number[], j: number) => level[j + 2],
  getBarSelfDiff: (level: number[], j: number) => 0,
  getBarName: (level: number[], j: number) => level[j + 3],
};

export const doubleFF = {
  format: 'double' as const,
  jStep: 7,
  jName: 6,
  getBarOffset: (level: number[], j: number) => level[j] + level[j + 3],
  getBarTotal: (level: number[], j: number) => level[j + 4] + level[j + 1],
  getBarTotalLeft: (level: number[], j: number) => level[j + 1],
  getBarTotalRght: (level: number[], j: number) => level[j + 4],
  getBarTotalDiff: (level: number[], j: number) => {
    return level[j + 4] - level[j + 1];
  },
  getBarSelf: (level: number[], j: number) => level[j + 5] + level[j + 2],
  getBarSelfLeft: (level: number[], j: number) => level[j + 2],
  getBarSelfRght: (level: number[], j: number) => level[j + 5],
  getBarSelfDiff: (level: number[], j: number) => level[j + 5] - level[j + 2],
  getBarName: (level: number[], j: number) => level[j + 6],
};
火焰图取数据算法解析(xyToData)
Maybe模型简述
在pyroscope的数据模型中大量用到了Maybe(来自true-myth库,https://github.com/true-myth/true-myth),关于该模型解决的问题和常用的写法,在此简单阐述,并熟悉pyroscope用Maybe模型驱动火焰图状态判断的逻辑,但不过多展开,更多使用方法与细节见https://true-myth.js.org/
Maybe解决了什么痛点
Maybe主要解决了null/undefined问题。以一种规则性定义的方式,而不是在整个代码库中以一种临时性的方式解决的null/undefined问题。将值放入一个容器中,无论里面是否有东西,都可以保证安全地进行操作。这些容器让我们在编写函数时对参数值有了实际的安全假设,通过提取 "这个变量包含一个有效的值吗?"到API边界,而不是需要在每个函数的头部去额外处理这个问题。
个人认为Pyroscope采用Maybe驱动xyToData等一系列方法属于代码上的整洁与可维护性考虑,否则在边界条件非常复杂的火焰图交互中,应用6~7中取数据的方法,每种方法中还要写大量的if(undefined)-else,是令人绝望的。
Maybe怎么用
设A表示可能存在或可能不存在Maybe<T>的类型值。如果该值存在,则为Just(value)。如果不存在,则为Nothing,这提供了一个类型安全的容器来处理空值的可能性,就可以避免在你的代码库中进行检查null/undefined,像使用一个没有后顾之忧的数组一样去用了。这种类型的行为在编译时由 TypeScript 检查,除了容器对象和一些轻量级包装/解包功能的非常小的成本外,不承担任何运行时开销。
Maybe在用法上,是一种方法式调用规则。
import Maybe from 'true-myth/maybe';

// Construct a `Just` where you have a value to use, and the function accepts
// a `Maybe`.
const aKnownNumber = Maybe.just(12);

// Construct a `Nothing` where you don't have a value to use, but the
// function requires a value (and accepts a `Maybe`).
const aKnownNothing = Maybe.nothing<string>();

// Construct a `Maybe` where you don't know whether the value will exist or
// not, using `of`.
type WhoKnows = { mightBeAThing?: boolean[] };

const whoKnows: WhoKnows = {};
const wrappedWhoKnows = Maybe.of(whoKnows.mightBeAThing);
console.log(toString(wrappedWhoKnows)); // Nothing

const whoElseKnows: WhoKnows = { mightBeAThing: [true, false] };
const wrappedWhoElseKnows = Maybe.of(whoElseKnows.mightBeAThing);
console.log(toString(wrappedWhoElseKnows)); // "Just(true,false)"
import { isVoid } from 'true-myth/utils';
import Maybe, { Just, Nothing } from 'true-myth/maybe';

// Construct a `Just` where you have a value to use, and the function accepts
// a `Maybe`.
const aKnownNumber = new Just(12);

// Once the item is constructed, you can apply methods directly on it.
const fromMappedJust = aKnownNumber.map((x) => x * 2).unwrapOr(0);
console.log(fromMappedJust); // 24

// Construct a `Nothing` where you don't have a value to use, but the
// function requires a value (and accepts a `Maybe<string>`).
const aKnownNothing = new Nothing();

// The same operations will behave safely on a `Nothing` as on a `Just`:
const fromMappedNothing = aKnownNothing.map((x) => x * 2).unwrapOr(0);
console.log(fromMappedNothing); // 0

// Construct a `Maybe` where you don't know whether the value will exist or
// not, using `isVoid` to decide which to construct.
type WhoKnows = { mightBeAThing?: boolean[] };

const whoKnows: WhoKnows = {};
const wrappedWhoKnows = !isVoid(whoKnows.mightBeAThing)
  ? new Just(whoKnows.mightBeAThing)
  : new Nothing();

console.log(wrappedWhoKnows.toString()); // Nothing

const whoElseKnows: WhoKnows = { mightBeAThing: [true, false] };
const wrappedWhoElseKnows = !isVoid(whoElseKnows.mightBeAThing)
  ? new Just(whoElseKnows.mightBeAThing)
  : new Nothing();

console.log(wrappedWhoElseKnows.toString()); // "Just(true,false)"
组件内部数据结构与描述说明
- bar:描述火焰图中一个"条",同一行中有可能包含多个"条"。
- Node:指代了火焰图中一个bar的引用,数据结构是
{i, j},也就是上述火焰图的index。 - XYWithinBounds:说的是在canvas范围内的XY坐标,数据结构是
{x, y},是MouseEvent的XY。 - this.zoom:当前状态下,放大的那个节点。放大的意思是左键点击火焰图的那个操作带来的效果。
- this.focusedNode:当前状态下,聚焦的那个节点。右键Collapsed Nodes Above。
火焰图点击的全流程
从点击开始说起
绑定在canvas上的OnClick事件如下:
const onClick = (e: React.MouseEvent<HTMLCanvasElement>) => {
  const opt = getFlamegraph().xyToBar(
    e.nativeEvent.offsetX,
    e.nativeEvent.offsetY
  );
  // opt 是根据xy位置取出的 Maybe<XYWithinBounds> 对象后,再根据一系列xyToData方法(后文详细介绍)构造了包含index、position、data的bar
  opt.match({
    // 点击在canvas中不合理的位置,就什么都不做
    Nothing: () => {},
    //  如果是合理的位置,则取出bar数据(信息包含index、position、data)
    Just: (bar) => {
      // zoom是当前已经被放大的 Maybe<Node> 对象(不一定是opt),放大的意思是左键点击火焰图的那个操作带来的效果
      zoom.match({
        // 如果当前不存在zoom,则在当前位置(opt处)执行zoom
        Nothing: () => {
          onZoom(opt);
        },
        // 如果当前存在已经被放大的节点z,则取出bar数据
        Just: (z) => {
          // 判断opt和zoom是否是相同的index
          if (bar.i === z.i && bar.j === z.j) {
            // 如果是,则取消被放大,复原
            onZoom(Maybe.nothing());
          } else {
            // 如果不是,则对这个当前被点击的opt进行zoom操作
            onZoom(opt);
          }
        },
      });
    },
  });
};
xyToIndex
xyToIndex方法是鼠标屏幕x、y到数据结构中的i、j的核心方法。
private xyToBarIndex(x: number, y: number) {
  if (x < 0 || y < 0) {
    throw new Error(`x and y must be bigger than 0. x = ${x}, y = ${y}`);
  }

  // 意思是点击了聚焦模式下的顶上的bar,或者是非聚焦模式下的Total,则返回{ i: 0, j: 0 }
  if (this.isFocused() && y <= BAR_HEIGHT) {
    return { i: 0, j: 0 };
  }

  // 当进行collapse的时候(聚焦操作),最顶上会有一个虚拟collapsed节点,因此这里需要减一下
  const computedY = this.isFocused() ? y - BAR_HEIGHT : y;

  const compensatedFocusedY = this.focusedNode.mapOrElse(
    () => 0,
    (node) => {
      return node.i <= 0 ? 0 : node.i;
    }
  );

  // 把它当做一组if-else即可
  const compensation = this.zoom.match({
    Just: () => {
      return this.focusedNode.match({
        Just: () => {
          // 有focus、也有zoom,以focus为主
          return compensatedFocusedY;
        },
        Nothing: () => {
          // 只有zoom
          return 0;
        },
      });
    },

    Nothing: () => {
      return this.focusedNode.match({
        Just: () => {
          // 只有focus
          return compensatedFocusedY;
        },
        Nothing: () => {
          // 既没有focus,也没有zoom
          return 0;
        },
      });
    },
  });

  // 可以根据以上信息,定位i的位置
  const i = Math.floor(computedY / PX_PER_LEVEL) + compensation;
  if (i >= 0 && i < this.flamebearer.levels.length) {
    const level = this.flamebearer.levels[i];
    if (!level) {
      throw new Error(`Could not find level: '${i}'`);
    }
    // j的位置,用到了一个二分查找的算法去找
    const j = this.binarySearchLevel(x, level);
    return { i, j };
  }
  return { i: 0, j: 0 };
}xyToIndex方法中,通过对火焰图的状态分类讨论,计算出了i的位置,接下来需要在i所在的level中进行二分查找,把j找到。
// binary search of a block in a stack level
private binarySearchLevel(x: number, level: number[]) {
  const { ff } = this;
  let i = 0;
  let j = level.length - ff.jStep;

  while (i <= j) {
    /* eslint-disable-next-line no-bitwise */
    const m = ff.jStep * ((i / ff.jStep + j / ff.jStep) >> 1);
    const x0 = this.tickToX(ff.getBarOffset(level, m));
    const x1 = this.tickToX(
      ff.getBarOffset(level, m) + ff.getBarTotal(level, m)
    );

    if (x0 <= x && x1 >= x) {
      return x1 - x0 > COLLAPSE_THRESHOLD ? m : -1;
    }
    if (x0 > x) {
      j = m - ff.jStep;
    } else {
      i = m + ff.jStep;
    }
  }
  return -1;
}该算法非常巧妙地将二分查找和火焰图的特性相结合,请注意,将二分查找的i、j与火焰图的i、j概念区分开,此处二分查找的i、j仅表示火焰图中一行所代表的Array的索引。在该Array上进行二分查找,但是通过jStep进行bar维度的跳转(Single jStep = 4;Diff jStep = 7),这样m的落点一定是i、j中间bar的起始点,确定m后,就可以通过数据结构中阐述的getBarTotal、getBarOffset获取相关bar信息,然后传入tickToX中。最后得到的是中间bar的真实X范围,和传入的x做范围比较,如果落在了范围中,则确定了bar的j-index,否则继续按照二分查找的方式继续。
tickToX方法在此不做过多展开,其中的判断逻辑比较复杂,但判断原理与xyToIndex类似,都是将zoom与focusedNode进行分类讨论,确定当下的Range(可能由于zoom和focus操作改变Range),进而确定每一个Tick所占Px,就可以计算出来了。
xyToAnything
有了xyToIndex的能力,配合Maybe与数据结构,可以让获取数据的能力轻松暴露。
private xyToBarPosition = (xy: XYWithinBounds) => {
    const { ff } = this;
    const { i, j } = this.xyToBarIndex(xy.x, xy.y);

    const topLevel = this.focusedNode.mapOrElse(
      () => 0,
      (node) => (node.i < 0 ? 0 : node.i - 1)
    );

    const level = this.flamebearer.levels[i];
    if (!level) {
      throw new Error(`Could not find level: '${i}'`);
    }
    const posX = Math.max(this.tickToX(ff.getBarOffset(level, j)), 0);

    // lower bound is 0
    const posY = Math.max((i - topLevel) * PX_PER_LEVEL, 0);

    const sw = Math.min(
      this.tickToX(ff.getBarOffset(level, j) + ff.getBarTotal(level, j)) - posX,
      this.getCanvasWidth()
    );

    return {
      x: posX,
      y: posY,
      width: sw,
    };
  };

  private xyToBarData = (xy: XYWithinBounds) => {
    const { i, j } = this.xyToBarIndex(xy.x, xy.y);
    const level = this.flamebearer.levels[i];
    if (!level) {
      throw new Error(`Could not find level: '${i}'`);
    }

    switch (this.flamebearer.format) {
      case 'single': {
        const ff = singleFF;

        return {
          format: 'single' as const,
          name: this.flamebearer.names[ff.getBarName(level, j)],
          self: ff.getBarSelf(level, j),
          offset: ff.getBarOffset(level, j),
          total: ff.getBarTotal(level, j),
        };
      }
      case 'double': {
        const ff = doubleFF;

        return {
          format: 'double' as const,
          barTotal: ff.getBarTotal(level, j),
          totalLeft: ff.getBarTotalLeft(level, j),
          totalRight: ff.getBarTotalRght(level, j),
          totalDiff: ff.getBarTotalDiff(level, j),
          name: this.flamebearer.names[ff.getBarName(level, j)],
        };
      }

      default: {
        throw new Error(`Unsupported type`);
      }
    }
  };
其中的逻辑较为简单,不再过多赘述。
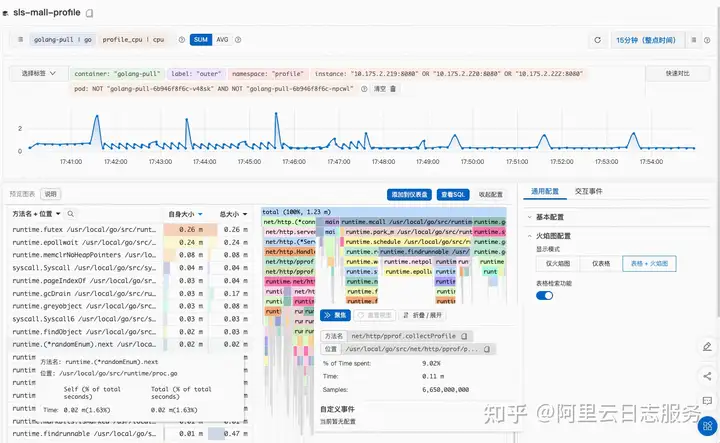
日志服务-性能监控对火焰图的优化
日志服务(SLS)的性能监控功能基于Pyroscope v0.35.1版本(该版本开源协议为Apache 2.0)开发,并在其基础上进行了融合日志服务特色能力的优化。
对比概览
| Pyroscope v0.35.1 | SLS |
| ❌ ProfileTable 大量reRender问题 | ✅ 性能优化:火焰图表格相比开源版本渲染性能总体提升约50% |
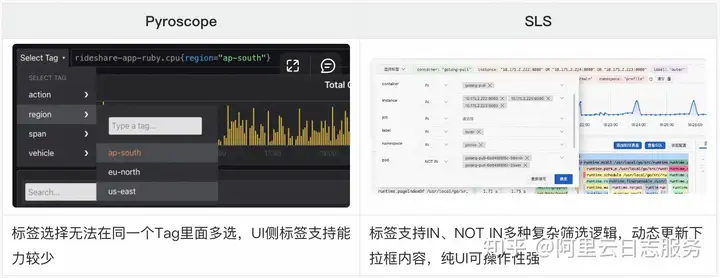
| ❌ 标签选择无法在同一个Tag里面多选,UI侧标签支持能力较少 | ✅ 逻辑优化:发挥SLS查询特色优势,支持更灵活的标签选择逻辑,并且不止支持SUM的聚合逻辑,还支持AVG的Profile聚合逻辑 |
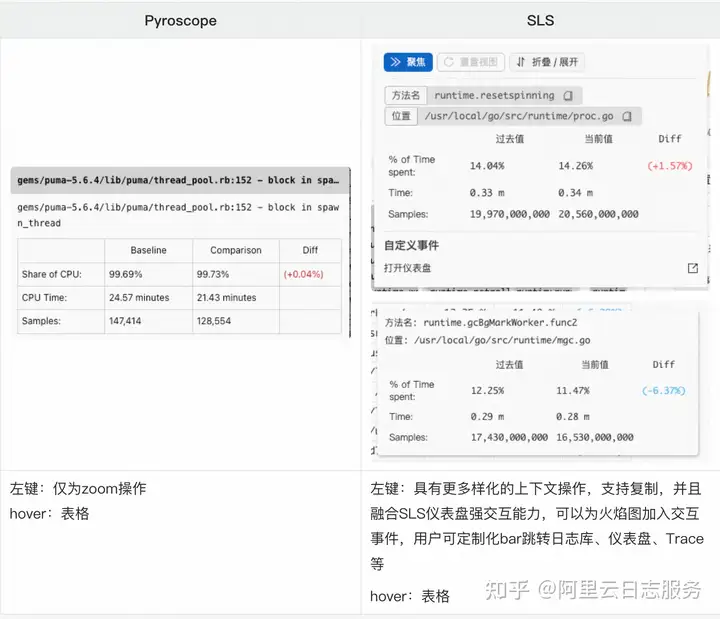
| ☑️ 调用栈深时表格显示冗长,火焰图交互能力较单调 | ✅ 交互优化:深栈优化、检索集成、一键diff、火焰图交互菜单 |
| ❌ 不涉及关联资源统一整合 | ✅ 体验优化:融入强交互式开放性强的SLS仪表盘生态,提供更多想象空间。 |
具体特色
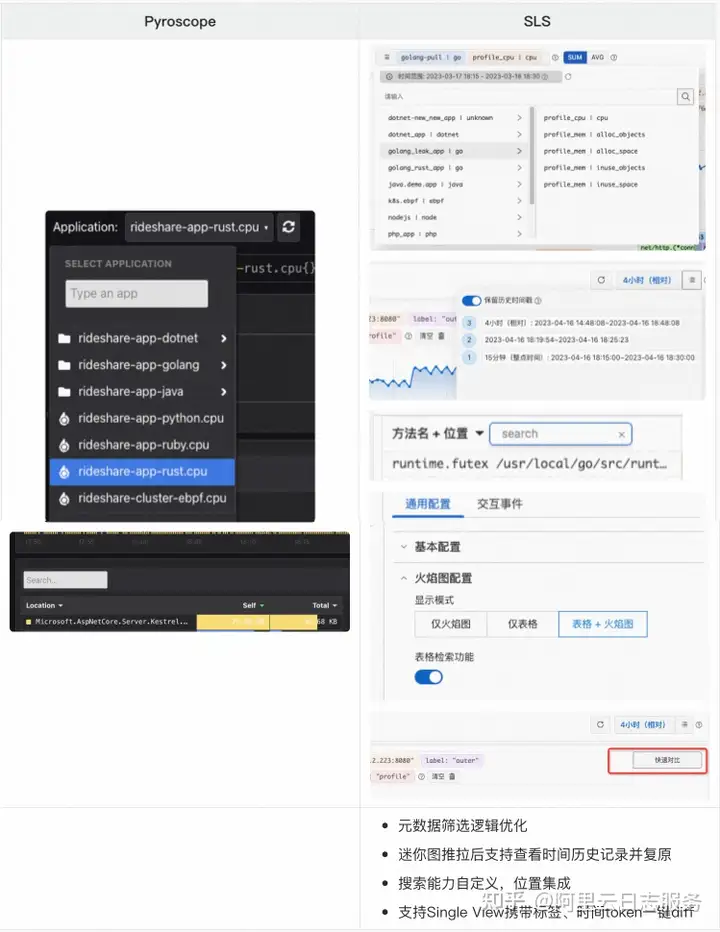
- 主界面

- ToolTip & contextPanel
- 标签
- 其他细节
-
Pyroscope SLS 元数据筛选逻辑优化迷你图推拉后支持查看时间历史记录并复原搜索能力自定义,位置集成支持Single View携带标签、时间token一键diff -
Pyroscope SLS 元数据筛选逻辑优化迷你图推拉后支持查看时间历史记录并复原搜索能力自定义,位置集成支持Single View携带标签、时间token一键diff -
Pyroscope SLS 元数据筛选逻辑优化迷你图推拉后支持查看时间历史记录并复原搜索能力自定义,位置集成支持Single View携带标签、时间token一键diff -
Pyroscope SLS 元数据筛选逻辑优化迷你图推拉后支持查看时间历史记录并复原搜索能力自定义,位置集成支持Single View携带标签、时间token一键diff
参考
[1] Brendan Gregg博客上关于火焰图的介绍 https://www.brendangregg.com/flamegraphs.html
[2] 程序员精进之路:性能调优利器--火焰图 https://zhuanlan.zhihu.com/p/147875569
[3] 小鸟笔记-火焰图 https://www.lijiaocn.com/soft/linux/04-flame-graphs.html
[4] true-myth github 说明文档 https://true-myth.js.org/#maybe-with-the-method-style
[5] Pyroscope 官方文档 https://pyroscope.io/docs/
[6] 新功能:SLS支持持续性能数据采集与监控 https://mp.weixin.qq.com/s/GYJTdldPFVpOwURGnOrpQQ
[7] 深入解读基于Pyroscope构建Continuous Profiling https://ata.alibaba-inc.com/articles/253057
[8] 日志服务SLS性能监控-火焰图文档 https://help.aliyun.com/document_detail/609710.html
[9] 日志服务SLS性能监控-数据查询文档 https://help.aliyun.com/document_detail/609709.html
[10] 日志服务SLS性能监控-数据对比文档 https://help.aliyun.com/documen

 浙公网安备 33010602011771号